


chrome扩展crx构建
When I began as a JavaScript editor at SitePoint, our submission process was something of a mess — articles coming from every direction in a variety of formats. So we decided to standardize things and settled on submission via GitHub in Markdown.
当我开始在SitePoint上担任JavaScript编辑器时,我们的提交过程有些混乱—来自各个方向的文章以多种格式出现。 因此,我们决定将事情标准化,并决定通过Markdown中的GitHub提交。
This was a step forward, but we still needed to convert the Markdown into HTML for our WordPress back end. The powers that be at SitePoint HQ at the time had vetoed the installation of any WordPress plugins, which made us consider if we could accomplish this task with a browser extension. Luckily we could!
这是向前迈出的一步,但是我们仍然需要将Markdown转换为WordPress后端HTML。 当时SitePoint总部的权力已否决了任何WordPress插件的安装,这使我们考虑是否可以通过浏览器扩展来完成此任务。 幸运的是我们可以!
In the following post, I’m going to demonstrate how you can build your own Chrome extension to add additional functionality to WordPress. I’ll also introduce you to SP-Tools, the extension we use at SitePoint to make life as an editor that little bit easier.
在下面的文章中,我将演示如何构建自己的Chrome扩展程序以向WordPress添加其他功能。 我还将向您介绍SP-Tools ,这是我们在SitePoint上使用的扩展名,它使编辑生活变得更加轻松。
Chrome扩展程序的剖析 (The Anatomy of a Chrome Extension)
Despite what you might think, building a Chrome extension isn’t difficult. Let’s start by looking at the various components.
尽管您可能会想,但构建Chrome扩展程序并不困难。 让我们从查看各种组件开始。
Parts of the following section are borrowed from another tutorial I wrote about building a Chrome extension using Vue.js.
下一节的内容是从我写的另一篇有关使用Vue.js构建Chrome扩展程序的教程中获得的 。
The core piece of any Chrome extension is a manifest file. This is in a JSON format and provides important information about an extension, such as its version, resources, or the permissions it requires.
任何Chrome扩展程序的核心都是清单文件 。 这是JSON格式,并提供有关扩展的重要信息,例如扩展的版本,资源或所需的权限。
A manifest file won’t do much on its own, so we can use a content script to add some functionality. Content scripts are files that “run in the context of web pages”. That is to say, you specify the URL in your manifest file, then when your browser visits a page whose address matches the URL you specified, the content script is injected into the page and run.
清单文件本身并不会做很多事情,因此我们可以使用内容脚本添加一些功能。 内容脚本是“在网页上下文中运行”的文件。 也就是说,您在清单文件中指定URL,然后,当浏览器访问地址与您指定的URL匹配的页面时,内容脚本将被注入该页面并运行。
To demonstrate these concepts, let’s start by writing a Chrome extension to do something on the SitePoint main site.
为了演示这些概念,让我们首先编写一个Chrome扩展程序以在SitePoint主站点上执行一些操作。
Make a new folder called my-extension and two files, manifest.json and main.js:
创建一个名为my-extension的新文件夹,并main.js两个文件manifest.json和main.js :
mkdir my-extension
cd my-extension
touch manifest.json main.js
Open up manifest.json and add the following code:
打开manifest.json并添加以下代码:
{
  "name": "My Extension",
  "version": "0.0.1",
  "manifest_version": 2,
  "content_scripts": [
    {
      "matches": [ "*://*.sitepoint.com/*" ],
      "js": [ "main.js" ]
    }
  ]
}
The name, version and manifest_version are all required fields. The name and version fields can be whatever you want; the manifest version should be set to 2 (as of Chrome 18).
name , version和manifest_version都是必填字段。 name和version字段可以是您想要的任何内容。 清单版本应设置为2(从Chrome 18开始)。
The content_scripts key allows us to register a content script (main.js), which will be run whenever we visit SitePoint. Notice how we can use match patterns to specify parts of the URL, such as the protocol.
content_scripts键允许我们注册一个内容脚本( main.js ),该脚本将在我们访问SitePoint时运行。 请注意,我们如何使用匹配模式来指定URL的一部分,例如协议。
Now let’s add the following code to main.js to make the browser say hello whenever we visit SitePoint:
现在,将以下代码添加到main.js以使浏览器在每次访问SitePoint时打个招呼:
alert('Hello there!');Finally, let’s install the extension. Open Chrome and enter chrome://extensions/ in the address bar. You should see a page displaying the extensions you’ve installed.
最后,让我们安装扩展程序。 打开Chrome,然后在地址栏中输入chrome://extensions/ 。 您应该看到显示已安装扩展的页面。
As we want to install our extension from a file (and not the Chrome Web Store) we need to activate Developer mode using the toggle in the top right-hand corner of the page. This should add an extra menu bar with the option Load unpacked. Click this button and select the my-extension folder you created previously. Click Open and the extension will be installed.
当我们要从文件(而不是Chrome网上应用店)安装扩展程序时,我们需要使用页面右上角的切换开关激活开发人员模式 。 这应该添加一个带有选项Load unpacked的额外菜单栏。 单击此按钮,然后选择您先前创建的my-extension文件夹。 单击打开 ,将安装扩展名。
Now when you visit SitePoint, this will happen:
现在,当您访问SitePoint时,将发生以下情况:
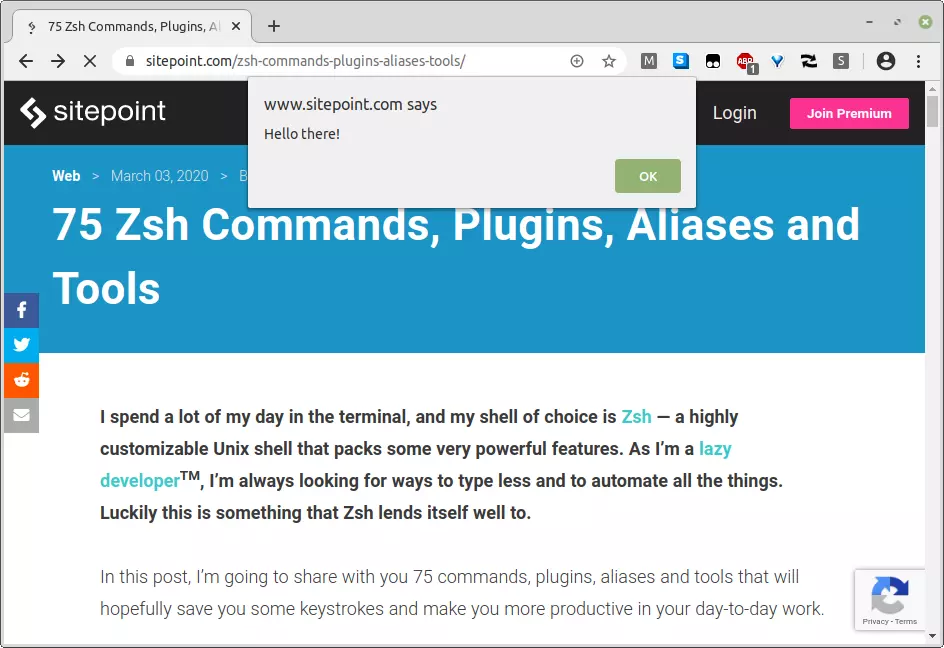
Congratulations! You just made a Chrome extension.
恭喜你! 您刚刚做了一个Chrome扩展程序。
后台脚本和消息传递 (Background Scripts and Message Passing)
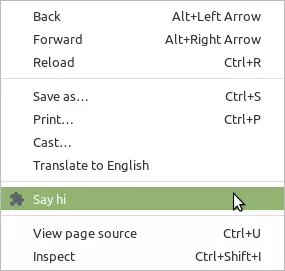
So, that dialogue box is pretty annoying right? To finish off this section, let’s add a context menu entry to fire it off manually, instead of having it appear on every page load.
因此,该对话框非常烦人吧? 为了完成本节,让我们添加一个上下文菜单项以手动将其触发,而不是让它出现在每个页面加载中。
This introduces us to another important component of Chrome extensions — background scripts. These scripts can react to browser events (such as a user clicking a context menu entry) and they have full access to Chrome’s APIs. However, they don’t have access to the current page, and rely on message passing to communicate with content scripts.
这向我们介绍了Chrome扩展程序的另一个重要组件- 后台脚本 。 这些脚本可以响应浏览器事件(例如,用户单击上下文菜单项),并且可以完全访问Chrome的API。 但是,他们无权访问当前页面,并且依赖消息传递来与内容脚本进行通信。
Update the manifest like so:
像这样更新清单:
{
  "name": "My Extension",
  "version": "0.0.1",
  "manifest_version": 2,
  "permissions": [ "contextMenus" ],
  "content_scripts": [
    {
      "matches": [ "*://*.sitepoint.com/*" ],
      "js": [ "main.js" ]
    }
  ],
  "background": {
    "scripts": ["background.js"],
    "persistent": false
  }
}
Notice that we’re requesting the contextMenus permission, as we want to add something to the context menu, and that we’ve registered a non-persistent background script. Making the background script non persistent allows it to be unloaded when it’s not needed.
请注意,由于我们要向上下文菜单添加内容,因此我们正在请求contextMenus权限,并且我们已注册了非持久性背景脚本。 使后台脚本具有非持久性,可以在不需要时将其卸载。
Next, create a background.js file and add:
接下来,创建一个background.js文件并添加:
chrome.runtime.onInstalled.addListener(() => {
  chrome.contextMenus.create({
    id: 'greet',
    title: 'Say hi',
    contexts: ['page'],
    documentUrlPatterns: ['*://*.sitepoint.com/*'],
  });
});

chrome.contextMenus.onClicked.addListener((info, tab) => {
  if (info.menuItemId === 'greet') {
    chrome.tabs.sendMessage(tab.id, { text: 'greet' }, (res) => {
      console.log(res);
    });
  }
});
We register the context menu entry when the extension is installed, then add an event listener to send a message to our content script whenever the entry is clicked.
我们在安装扩展程序时注册上下文菜单项,然后添加事件侦听器,以在每单击该条目时将一条消息发送到我们的内容脚本。
Change main.js like so:
像这样更改main.js :
chrome.runtime.onMessage.addListener((msg, sender, sendResponse) => {
  if (msg.text === 'greet') {
    alert('hi');
    sendResponse('I greeted the user');
  }
});
Here, we listen for a message from our background script. If it has a text of “greet”, we then fire off the alert and send back a message informing the background script that we did what was requested.
在这里,我们收听来自后台脚本的消息。 如果它的文本为“ greet”,则我们将关闭警报并发送回一条消息,通知后台脚本我们已执行了请求的操作。
To try this out, head back to the extensions page (at chrome://extensions/), then click the reload icon and reload any SitePoint page. When you right click, you should now see a context menu entry.
要尝试此操作,请返回扩展页面(位于chrome://extensions/ ),然后单击重新加载图标并重新加载任何SitePoint页面。 右键单击时,现在应该看到一个上下文菜单项。
通过Chrome扩展程序增强WordPress的功能 (Enhancing WordPress’ Functionality with a Chrome Extension)
Now that we’ve familiarized ourselves with the basic components of a Chrome extension, let’s look at how we can make some additions to WordPress’ functionality.
现在,我们已经熟悉了Chrome扩展程序的基本组件,下面让我们看一下如何对WordPress功能进行一些补充。
To follow along with this section, you’ll need a working installation of WordPress. I installed mine locally. It’s running on an Apache server at http://localhost/wp.
要继续执行本节,您将需要可正常运行的WordPress安装 。 我在本地安装了我的。 它运行在http://localhost/wp的Apache服务器上。
The code for this extension can be found on GitHub.
可以在GitHub上找到此扩展的代码。
添加降价转换器 (Adding a Markdown Converter)
Let’s start by adding a Markdown converter to the WordPress editor. True to the experience on SitePoint, I’ll be using the “classic” editor (achieved by installing the Disable Gutenberg plugin) and the Text view.
让我们从将Markdown转换器添加到WordPress编辑器开始。 按照SitePoint的经验,我将使用“经典”编辑器(通过安装Disable Gutenberg插件实现 )和“ 文本”视图。
To begin, create the following folder structure for our new extension:
首先,为我们的新扩展名创建以下文件夹结构:
wp-enhance
├── lib
│   ├── jquery.min.js
│   └── showdown.min.js
├── manifest.json
└── scripts
    └── main.js
On the command line:
在命令行上:
mkdir wp-enhance
cd wp-enhance
mkdir lib scripts
touch lib/showdown.min.js lib/jquery.min.js
touch scripts/main.js
touch manifest.json
As you can see, we’ll be using the Showdown markdown converter and jQuery (because I’m lazy).
如您所见,我们将使用Showdown markdown转换器和jQuery(因为我很懒)。
The first order of business is to grab the latest minified version of these libraries (Showdown and jQuery) and add the contents to the appropriate files.
首先要做的是获取这些库的最新缩小版本( Showdown和jQuery ),然后将内容添加到适当的文件中。
Next, add the following code to manifest.json:
接下来,将以下代码添加到manifest.json :
{
  "manifest_version": 2,
  "name": "WP Enhance",
  "description": "A Chrome extension to enhance WordPress' functionality",
  "version": "0.0.1",
  "content_scripts": [
    {
      "matches": [ "http://localhost/wp/wp-admin/post-new.php" ],
      "js": [
        "lib/jquery.min.js",
        "lib/showdown.min.js",
        "scripts/main.js"
      ]
    }
  ]
}
There’s nothing spectacular going on here. The extension is set to run when we visit http://localhost/wp/wp-admin/post-new.php, and we’re including the two libraries we just downloaded.
这里没有什么壮观的事。 该扩展程序设置为在我们访问http://localhost/wp/wp-admin/post-new.php时运行,其中包括我们刚刚下载的两个库。
Finally, in scripts/main add the following:
最后,在scripts/main添加以下内容:
'use strict';

const $editorToolbar = $('#ed_toolbar');
const $mainTextArea = $('#content');

function getShowdownConverter() {
  const converter = new showdown.Converter();

  // Set any options here, for example to add table support
  converter.setOption('tables', true);

  return converter;
}

function addMDButton() {
  const mdConverter = getShowdownConverter();
  const $convertButton = $('<input />', {
    type: 'button',
    value: 'MD',
    class: 'ed_button button button-small',
    title: 'Convert MD to HTML',
    click() {
      const md = $mainTextArea.val();
      const html = mdConverter.makeHtml(md);
      $mainTextArea.val(html);
    },
  });
  $editorToolbar.append($convertButton);
}

addMDButton();
Here, we’re creating a new button and appending it to the WordPress editor’s toolbar. When it’s clicked, we’re calling Showdown’s makeHtml method, which we pass the contents of the content area. This returns us some HTML, which we then insert back into the editor.
在这里,我们正在创建一个新按钮,并将其附加到WordPress编辑器的工具栏上。 单击它时,我们将调用Showdown的makeHtml方法,该方法将传递内容区域的内容。 这将为我们返回一些HTML,然后将其插入到编辑器中。
Load the extension and visit the new post page. You should see something like this:
加载扩展并访问新的帖子页面。 您应该会看到以下内容:
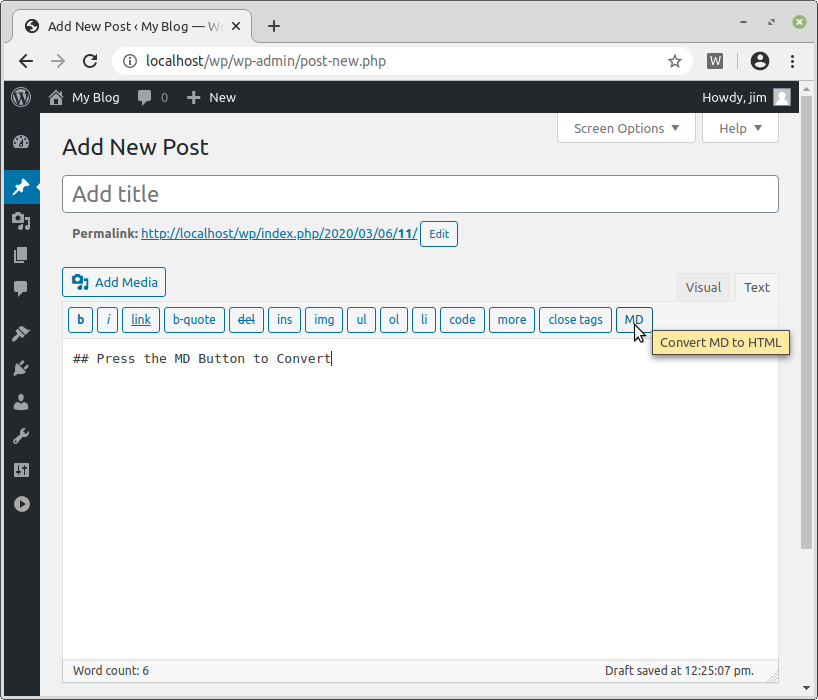
I’m sure you’ll agree, that’s a reasonably impressive result in just a few lines of code.
我相信您会同意的,这仅用几行代码就可以得出令人印象深刻的结果。
将日期选择器添加到“发布”小部件 (Adding a Date Picker to the Publish Widget)
Next, we’re going to enhance the publish widget with a datepicker. This will replace the series of drop-downs and input boxes that you normally see when you click the Edit link next to the “Publish immediately” message in WordPress’ Publish widget.
接下来,我们将使用datepicker增强发布小部件。 这将替换当您单击WordPress的“ 发布”小部件中“立即发布”消息旁边的“ 编辑”链接时通常看到的一系列下拉列表和输入框。
The first thing we’ll need to do is to download a datepicker. For this demo I’ll be using this one. You can download the necessary files from here. Unzip that file and place build/jquery.datetimepicker.full.min.js into our lib folder. Then create a new css folder in the extension and place build/jquery.datetimepicker.min.css into it.
我们需要做的第一件事是下载日期选择器。 对于此演示,我将使用此演示。 您可以从此处下载必要的文件。 解压缩该文件并将build/jquery.datetimepicker.full.min.js放入我们的lib文件夹中。 然后在扩展名中创建一个新的css文件夹,并将build/jquery.datetimepicker.min.css放入其中。
Our extension should now look like this:
现在,我们的扩展名应如下所示:
wp-enhance
├── css
│   └── jquery.datetimepicker.min.css
├── lib
│   ├── jquery.datetimepicker.full.min.js
│   ├── jquery.min.js
│   └── showdown.min.js
├── manifest.json
└── scripts
    └── main.js
Now include these files in the manifest:
现在将这些文件包括在清单中:
{
  "manifest_version": 2,
  "name": "WP Enhance",
  "description": "A Chrome extension to enhance WordPress' functionality",
  "version": "0.0.1",
  "content_scripts": [
    {
      "matches": [ "http://localhost/wp/wp-admin/post-new.php" ],
      "js": [
        "lib/jquery.min.js",
        "lib/showdown.min.js",
        "lib/jquery.datetimepicker.full.min.js",
        "scripts/main.js"
      ],
      "css": [ "css/jquery.datetimepicker.min.css" ]
    }
  ]
}
Finally, we need to alter our content script (main.js) to look like this:
最后,我们需要更改内容脚本( main.js )如下所示:
const $editorToolbar = $('#ed_toolbar');
const $mainTextArea = $('#content');
const $timeStampDiv = $('#timestampdiv');
const $wpSchedulePostDropdown = $('.timestamp-wrap');
let $datepicker;

const $dd = $('#jj');
const $mm = $('#mm');
const $yyyy = $('#aa');
const $hh = $('#hh');
const $mn = $('#mn');

function getShowdownConverter() { ... }

function addMDButton() { ... }

function addDatePicker() {
  $datepicker = $('<input />', {
    id: 'bandaid-datepicker',
    type: 'text',
    placeholder: 'Date and time',
  });

  $datepicker.datetimepicker();
  $timeStampDiv.prepend($datepicker);
}

addMDButton();

$wpSchedulePostDropdown.hide();
addDatePicker();

$datepicker.on('change', function updateDateFields() {
  // String in format yyyy/mm/dd hh:mm
  const dateString = this.value;

  $yyyy.val(dateString.substr(0, 4));
  $mm.val(dateString.substr(5, 2));
  $dd.val(dateString.substr(8, 2));
  $hh.val(dateString.substr(11, 2));
  $mn.val(dateString.substr(14, 2));
});
What we’re doing is getting a reference to the input elements that WP uses to manage the time and date of the scheduled post. We’re then hiding these elements and initializing the datepicker. Whenever a user selects a date, the hidden field is updated and the post can be scheduled.
我们正在做的事情是引用WP用于管理预定帖子的时间和日期的输入元素。 然后,我们隐藏这些元素并初始化datepicker。 每当用户选择日期时,隐藏字段都会更新,并且可以安排发布。
Reload the extension, then refresh the WordPress new post page. What you have now should look like this:
重新加载扩展,然后刷新WordPress新帖子页面。 您现在所拥有的应该如下所示:
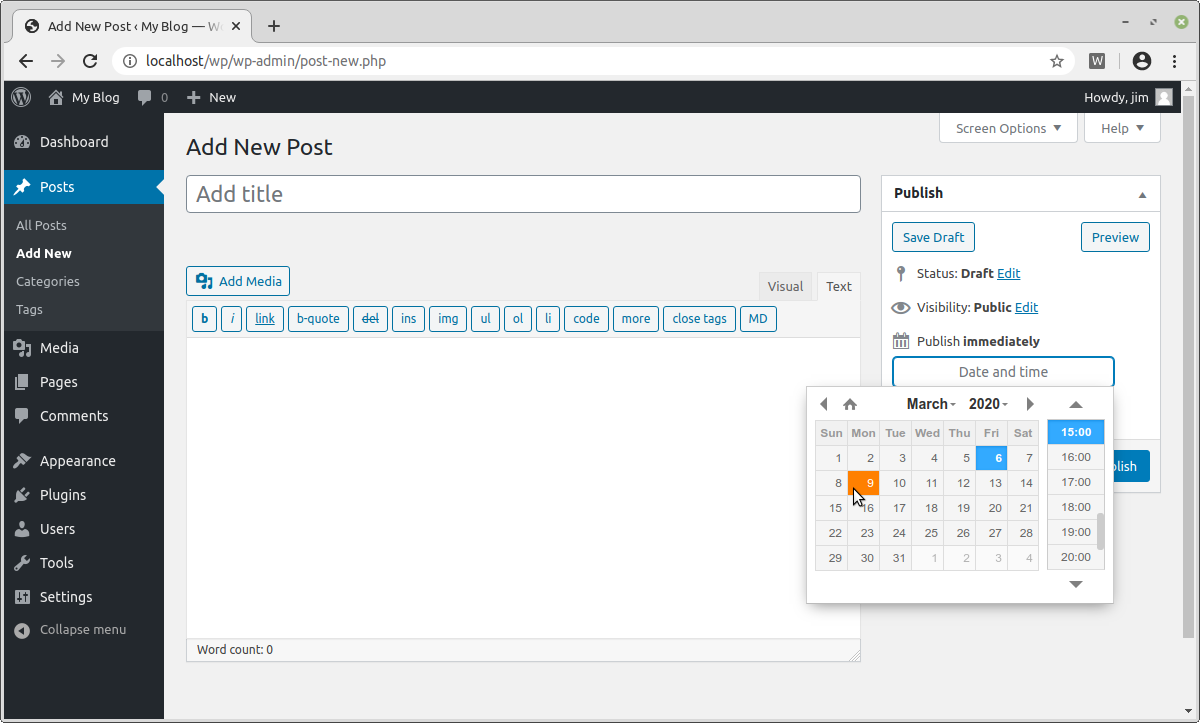
Again, an impressive result for not much code.
同样,无需太多代码即可获得令人印象深刻的结果。
测试扩展 (Testing the Extension)
One of the things I noticed early on with our SP-Tools extension was that, when WordPress got updated, things would break. So, I got to thinking how I could test the extension and decided that some end-to-end tests with Nightwatch would make sense.
我早期注意到我们的SP-Tools扩展的一件事是,当WordPress更新时,事情会中断。 因此,我开始考虑如何测试扩展,并决定使用Nightwatch进行一些端到端测试是有意义的。
In the following section, I’ll demonstrate how we can test our extension in the same way.
在下一节中,我将演示如何以相同的方式测试扩展。
First, we’ll need to generate a package.json file. In the extension root, run npm init -y. Next, let’s install Nightwatch and the ChromeDriver as dev dependencies:
首先,我们需要生成一个package.json文件。 在扩展根目录中,运行npm init -y 。 接下来,让我们将Nightwatch和ChromeDriver安装为dev依赖项:
npm install --save-dev nightwatch chromedriverNow make a testdirectory and add a nightwatch.config.js file, as well as a wp.js file for our test code:
现在做一个test目录,并添加nightwatch.config.js文件,以及一个wp.js我们的测试代码文件中:
mkdir test
touch test/nightwatch.config.js test/wp.js
Add the following to the config file:
将以下内容添加到配置文件中:
module.exports = {
  src_folders: 'test',
  output_folder: 'test',
  page_objects_path: '',
  custom_commands_path: '',
  custom_assertions_path: '',

  webdriver: {
    start_process: true,
    port: 9515,
    server_path: 'node_modules/.bin/chromedriver',
    log_path: false,
    cli_args: [],
  },

  test_settings: {
    default: {
      desiredCapabilities: {
        browserName: 'chrome',
        chromeOptions: {
          args: [
            'load-extension=./',
            '--test-type',
          ],
        },
      },
    },
  },
};
The important part is 'load-extension=./',, which tells Nightwatch to load our extension into the test browser.
重要部分是'load-extension=./', ,它告诉Nightwatch将我们的扩展程序加载到测试浏览器中。
And add the following to wp.js (replacing my login credentials with your own):
并将以下内容添加到wp.js (将您的登录凭据替换为您自己的登录凭据):
module.exports = {
  'Test WordPress Mods': (browser) => {
    browser
      // Login to WP Dashboard
      .url('http://localhost/wp/wp-login.php')
      .setValue('#user_login', 'jim')
      .setValue('#user_pass', 'secret')
      .click('#wp-submit')

      // Go to New Post Page
      .url('http://localhost/wp/wp-admin/post-new.php')

      // Test MD > HTML conversion
      .setValue('#content', '## level 2 heading\n### level 3 heading')
      .click('input[value="MD"]')
      .assert.valueContains('#content', '<h2 id="level2heading">level 2 heading</h2>')
      .assert.valueContains('#content', '<h3 id="level3heading">level 3 heading</h3>')

      // This is here so that you can take a look at the browser
      .pause(5000)
      .end();
  },
};
Now run the tests using:
现在使用以下命令运行测试:
node_modules/.bin/nightwatch --config test/nightwatch.config.jsYou should see an instance of the Chrome browser open and Nightwatch perform the tests we’ve specified. The result of the tests is output to the terminal.
您应该会看到Chrome浏览器的实例已打开,并且Nightwatch会执行我们指定的测试。 测试结果输出到终端。
Hopefully Nightwatch’s DSL is pretty self explanatory. You can read more about it in their documentation. If you fancy a challenge, try adding tests for the datepicker.
希望Nightwatch的DSL可以很好地说明自己。 您可以在他们的文档中阅读有关它的更多信息。 如果您想挑战,请尝试为日期选择器添加测试。
Note that I’ve hardcoded my credentials here. If you use this for anything other than demonstration purposes, it’ll be a good idea to move these to a config file that’s not committed to GitHub.
请注意,我已经在此处对凭据进行了硬编码。 如果您将其用于演示目的以外的其他用途,则最好将其移动到未提交给GitHub的配置文件中。
And don’t forget you can find the code for everything I’ve demonstrated so far on GitHub.
并且不要忘记,您可以找到到目前为止我在GitHub上演示的所有内容的代码。
SitePoint的Chrome扩展程序的显着功能 (Notable Features of SitePoint’s Chrome Extension)
As I’m sure you’ve realized, your mileage will vary regarding how useful you find such a browser extension. Most people will have (slightly) different needs and will be able to install WordPress plugins to solve most of the problems they encounter.
如您所知,您发现这样的浏览器扩展的实用程度会有所不同。 大多数人(略有不同)需求,并且能够安装WordPress插件来解决他们遇到的大多数问题。
Nonetheless, in this final section, I’d like to outline some of the features we have added to our SP-Tools extension in the hope that they might inspire or even be useful for others.
尽管如此,在最后一节中,我还是要概述我们添加到SP-Tools扩展中的一些功能,以希望它们对其他人有启发甚至有用。
A Capitalize and Check button. This converts the post title to title case.
大写和检查按钮。 这会将帖子标题转换为标题大小写 。
- A headline analysis tool, which gives you a score out of 100 for your title and offers suggestions for improvements. 标题分析工具,可为您的标题打出100分并提供改进建议。
A Capitalize Subheadings button, which checks the remaining headings in the article for title capitalization.
“ 大写子标题”按钮,用于检查文章中其余标题的大小写。
A Copy Link button, which copies the post’s current permalink to the clipboard.
复制链接按钮,用于将帖子的当前永久链接复制到剪贴板。
A Rebuild Link button, which rebuilds the post’s permalink. This is useful, for example, when WordPress creates a permalink based on a draft heading which subsequently changes.
“ 重建链接”按钮,用于重建帖子的永久链接。 例如,当WordPress根据随后更改的草稿标题创建永久链接时,这很有用。
An extensible molly-guard, which performs a number of checks and disables/enables the publish button accordingly. Among other things, it checks for:
可扩展的molly-guard ,它执行许多检查并相应地禁用/启用publish按钮。 除其他外,它检查:
- a sensible post permalink 合理的帖子永久链接
- the presence of relative URLs in the editor pane 编辑器窗格中是否存在相对URL
- the presence of empty links in the editor pane 编辑器窗格中是否存在空链接
the presence of
<h1>tags in the editor pane编辑器窗格中是否存在
<h1>标记the presence of
[special]shortcode tags in the excerpt摘录中是否存在
[special]短代码标签
An extensible molly-guard, which performs a number of checks and disables/enables the publish button accordingly. Among other things, it checks for:
可扩展的molly-guard ,它执行许多检查并相应地禁用/启用publish按钮。 除其他外,它检查:
A Copy Tags button, which gives you a comma-separated list of tags copied to the clipboard.
复制标签按钮,为您提供一个逗号分隔的复制到剪贴板的标签列表。
A rel=”sponsored” button, which toggles the
relattribute of all links in a post as beingsponsored.一个rel =”主办的”按钮,它的
rel所有链接的属性在后为被sponsored。
If you’d like to check it out, you can find our extension on GitHub. There are a few other goodies in there, such as context menu entries, some code to turn off the infinite scroll on our main site and, of course, tests with Nightwatch.
如果您想检查一下,可以在GitHub上找到我们的扩展 。 那里还有其他一些好处,例如上下文菜单项,一些用于关闭我们主站点上无限滚动的代码,以及使用Nightwatch进行的测试。
结论 (Conclusion)
In this tutorial, we’ve looked at the various components that make up a Chrome extension. I’ve demonstrated how we can build and test our own Chrome extension to enhance the basic functionality of a WordPress install. I’ve also introduced you to SP-Tools, SitePoint’s own Chrome extension, which we use to make various editing tasks somewhat easier.
在本教程中,我们研究了构成Chrome扩展程序的各种组件。 我已经演示了如何构建和测试自己的Chrome扩展程序,以增强WordPress安装的基本功能。 我还向您介绍了SitePoint自己的Chrome扩展程序SP-Tools,我们使用它来简化各种编辑任务。
If you find our extension useful, or adapt it to do anything else, I’d love to hear from you on Twitter.
如果您发现我们的扩展程序有用,或将其改编成其他功能,希望在Twitter上收到您的来信 。
chrome扩展crx构建


 578
578

 被折叠的 条评论
为什么被折叠?
被折叠的 条评论
为什么被折叠?
 到【灌水乐园】发言


