


目标检测 rcnn
Object Detection is always a hot topic in computer vision and is applied in many areas such as security, surveillance, autonomous vehicle systems, and machine inspection. Widely used object detector algorithms are either region-based detection algorithms (Faster R-CNN, R-FCN, FPN) or single-shot detection algorithms(SSD and YOLO).
对象检测一直是计算机视觉中的热门话题,并应用于许多领域,例如安全性,监视,自动驾驶汽车系统和机器检查。 广泛使用的对象检测器算法是基于区域的检测算法(更快的R-CNN,R-FCN,FPN)或单次检测算法(SSD和YOLO)。
The region-based detection or two-shot detection model has two stages:
基于区域的检测或两次检测模型具有两个阶段:
- Region proposal 区域提案
- Classification of those regions and refinement of the location prediction. 这些区域的分类和位置预测的细化。
Single-shot detection skips the region proposal stage and yields final localisations and content prediction at once. Faster RCNN is more popular in region-based detectors. We will now see how to implement a custom object detector using Faster RCNN with PyTorch.
单次检测跳过了区域提议阶段,并立即产生了最终的定位和内容预测。 更快的RCNN在基于区域的检测器中更受欢迎。 现在,我们将看到如何使用带有PyTorch的Faster RCNN实现自定义对象检测器。
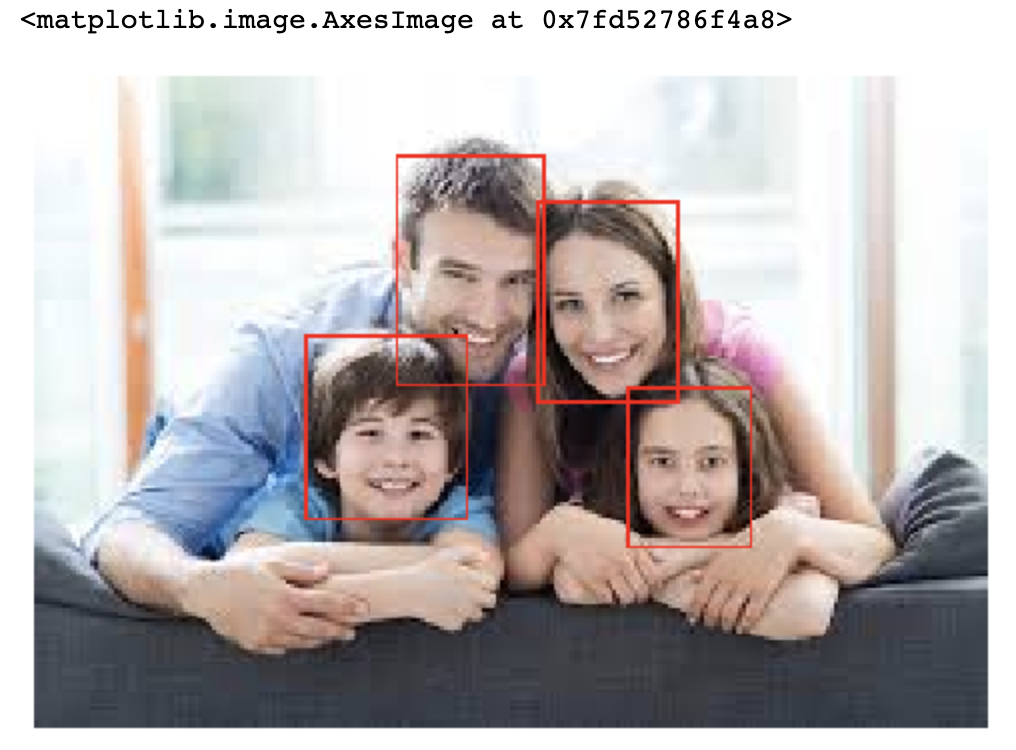
For the scope of this article, we will detect faces in an image. There can be multiple faces in a single image. I have got the images from Google and resized everything to 512 X 512. And for annotation, I have used the labelImg tool. The annotation file is a single CSV file, holding image_id and bounding box coordinates. Let’s import the required libraries.
对于本文的范围,我们将检测图像中的人脸。 一张图像中可以有多个面Kong。 我从Google那里获得了图片,并将所有内容的大小调整为512 X512 。对于注释,我使用了labelImg工具。 注释文件是单个CSV文件,其中包含image_id和边界框坐标。 让我们导入所需的库。
import pandas as pd
import numpy as np
import cv2
import torch
import torchvision
from torchvision.models.detection.faster_rcnn import FastRCNNPredictor
from torchvision.models.detection import FasterRCNN
from torch.utils.data import DataLoader, Dataset
Next up, we can define the dataset for training. For that, we can inherit PyTorch’s Dataset class and create our own TrainDataset class. As per PyTorch documentation, our class should implement __len__ and __getitem__ methods.
接下来,我们可以定义用于训练的数据集。 为此,我们可以继承PyTorch的Dataset类并创建我们自己的TrainDataset类。 根据PyTorch文档,我们的类应实现__len__和__getitem__方法。

For our Dataset class, we receive the annotation file as input. All our training images are inside the “face” folder. Inside the constructor, we convert the annotation file into the dataframe and get all the unique image_ids for further processing. In the __getitem__ method we can read the image using the image_id we have in the dataframe, and also we can get all the bounding boxes associated with that image.
对于我们的Dataset类,我们将接收注释文件作为输入。 我们所有的训练图像都位于“ face”文件夹中。 在构造函数内部,我们将注释文件转换为数据帧,并获取所有唯一的image_id,以进行进一步处理。 在__getitem__方法中,我们可以使用数据帧中的image_id读取图像,也可以获取与该图像关联的所有边界框。
We will then initialize a dict called target, which will be passed to model for training. This target will have metadata of the annotation like actual bounding box coordinates, it’s corresponding labels, image_id, area of the bounding boxes. The area param is used during evaluation with the COCO metric, to separate the metric scores between small, medium, and large boxes. If we set iscrowd as True, those instances will be ignored during evaluation. The __len__ method will give the size of the Dataset.
然后,我们将初始化一个称为target的字典,该字典将传递给模型进行训练。 该目标将具有注释的元数据,例如实际的边界框坐标,它是相应的标签,image_id,边界框的区域。 在使用COCO度量进行评估时,将使用面积参数来区分小盒子,中盒子和大盒子之间的度量得分。 如果将iscrowd设置为True,则在评估期间将忽略这些实例。 __len__方法将提供数据集的大小。
The next thing would be to set a data loader, which will load the training data in batches into the model for training. For this also we will be using PyTorch’s DataLoader utility.
下一步是设置一个数据加载器,该加载器会将训练数据批量加载到模型中进行训练。 为此,我们还将使用PyTorch的DataLoader实用程序。
# Initialize Dataset
train_dataset = TrainDataset('face/face_annotation.csv')def collate_fn(batch):
    return tuple(zip(*batch))train_data_loader = DataLoader(
    train_dataset,
    batch_size=2,
    shuffle=True,
    num_workers=2,
    collate_fn=collate_fn
)
In the DataLoader we can pass the initialized train_dataset. batch_size and num_workers would be an arbitrary number, based on the memory available we can play around with this.
在DataLoader中,我们可以传递初始化的train_dataset。 根据我们可以使用的可用内存,batch_size和num_workers将是任意数字。
If we have GPU available we can set the device as cuda else as CPU.
如果我们有可用的GPU,则可以将设备设置为cuda,否则设置为CPU。
device = torch.device('cuda') if torch.cuda.is_available() else torch.device('cpu')Now let's load some training data and have a look.
现在,让我们加载一些训练数据并看看。

we can run the above snippet and plot the images with its bounding boxes. Here are the few samples.
我们可以运行上面的代码片段,并用边界框绘制图像。 这是一些样品。

Now let's initialize our model. I’m going to use torchvision’s FasterRCNN with a resnet50 backbone.
现在让我们初始化模型。 我将结合使用torchvision的FasterRCNN和resnet50主干网。

We have set pretrained as true, so the function will return a model pre-trained on ImageNet. Here we set the num_classes as 2, considering background as one class.
我们将pretrained设置为true,因此该函数将返回在ImageNet上进行预训练的模型。 在这里,我们将num_classes设置为2,将背景作为一个类。
Before we start the training we can declare the number of epochs we wanna train and also set the optimizer and learning rate scheduler.
在开始训练之前,我们可以声明要训练的时期数,还可以设置优化程序和学习率调度程序。
params = [p for p in model.parameters() if p.requires_grad]
optimizer = torch.optim.SGD(params, lr=0.005, momentum=0.9, weight_decay=0.0005)
lr_scheduler = torch.optim.lr_scheduler.StepLR(optimizer, step_size=3, gamma=0.1)num_epochs = 40
The optimizer we are using here is SGD (Stochastic Gradient Descent), we have many other optimizers available in torch.optim, we can play around with this. The learning rate scheduler helps to adjust the learning rate during the course of the training to achieve more accuracy and speed up convergence. We are StepLR scheduler which decays the learning rate of each parameter group by gamma every step_size epochs. The gamma and step_size hyperparameters will decide the lr decay, we can play around with those values. Finally, we gonna train this model for 40 epochs.
我们在这里使用的优化器是SGD(随机梯度下降), torch.optim中还有许多其他可用的优化器,我们可以尝试一下。 学习率调度器有助于在训练过程中调整学习率,以实现更高的准确性并加快收敛速度。 我们是StepLR调度程序,它在每个step_size时期减少每个参数组的学习率。 γ和step_size超参数将决定lr衰减,我们可以处理这些值。 最后,我们将训练此模型40个纪元。

The above code snippet will run the training for 40 epochs. optimizer.zero_grad() clears old gradients from the last step otherwise, we would just accumulate the gradients from all loss. backward() calls.
上面的代码段将运行训练40个纪元。 Optimizer.zero_grad()从最后一步清除旧的渐变,否则,我们将从所有损失中累积渐变。 向后()调用。
loss.backward() call will compute the gradient of loss w.r.t all the parameters in loss that have requires_grad = True and store them in parameter.grad attribute for every parameter.
loss.backward()调用将计算损失中所有具有require_grad = True的参数的损失梯度,并将其存储在每个参数的parameter.grad属性中。
optimizer.step() will update all the parameters based on parameter.grad. lr_scheduler.step() will adjust the learning rate. We should make sure that the lr.scheduler.step() was called after optimizer.step(), else the first value of the learning rate schedule will be skipped. We have saved the model for inference and checkpoint if in case we need to resume training for more epochs. Once the training is completed we will have the model.pth file.
Optimizer.step()将基于parameter.grad更新所有参数。 lr_scheduler.step()将调整学习率。 我们应该确保在optimizer.step()之后调用lr.scheduler.step(),否则将跳过学习率计划的第一个值。 如果我们需要恢复训练以获得更多的纪元,我们将模型保存为推理和检查点。 培训完成后,我们将获得model.pth文件。
For inference, we need to create test_dataset and test_data_loader.
为了进行推断,我们需要创建test_dataset和test_data_loader。

TestDataset is similar to TrainDataset, this will also implement __getitem__ and __len__ methods. But this will just return images instead of image and bounding box.
TestDataset与TrainDataset类似,它还将实现__getitem__和__len__方法。 但这只会返回图像,而不是图像和边界框。
test_dataset = TestDataset('test/')test_data_loader = DataLoader(
    test_dataset,
    batch_size=2,
    shuffle=True,
    num_workers=2,
    collate_fn=collate_fn
)
we can reuse the model initialization code we used for training with pretrained as Fase and then we can load our weight file as below.
我们可以将训练时使用的模型初始化代码以Fase的形式重新使用,然后按如下方式加载权重文件。
model.load_state_dict(torch.load('./model.pth'))
model.to(device)
Let’s plot our predictions now.
让我们现在绘制我们的预测。

We had 1500 images for training and it took around 5 hours on NVIDIA Tesla K80 GPU and the accuracy is pretty decent. We can still improve this model with various techniques like image augmentations, ensemble inference, and TTA. This blog will explain these things in detail.
我们进行了1500张图像训练,在NVIDIA Tesla K80 GPU上花费了大约5个小时,而且准确性还不错。 我们仍然可以使用各种技术(例如图像增强,集成推理和TTA)来改进此模型。 该博客将详细解释这些内容。
Thanks for the read!
感谢您的阅读!
Francium Tech is a technology company laser focused on delivering top quality software of scale at extreme speeds. Numbers and Size of the data don’t scare us. If you have any requirements or want a free health check of your systems or architecture, feel free to shoot an email to contact@francium.tech, we will get in touch with you!
Francium Tech 是一家技术公司,致力于以极高的速度提供顶级规模的高质量软件。 数据的数量和大小不会吓我们一跳。 如果您有任何要求或想要对系统或体系结构进行免费的健康检查,请随时发送电子邮件至contact@francium.tech,我们将与您联系!
翻译自: https://blog.francium.tech/object-detection-with-faster-rcnn-bc2e4295bf49
目标检测 rcnn


 1277
1277

 被折叠的 条评论
为什么被折叠?
被折叠的 条评论
为什么被折叠?
 到【灌水乐园】发言


