windows 深度学习
Deep learning and artificial intelligence are one of the hottest topics in the world today. We see an ever-increasing number of applications that employ deep learning: facial recognition, speech recognition (Siri, ‘OK Google’, Alexa), Self-Driving Cars, and the list goes on and on. So as a student, fresh employee, team manager, senior management, we get curious: Will this ever-rising wave of AI technology eventually make my job or future career less relevant?
深度学习和人工智能是当今世界上最热门的主题之一。 我们发现采用深度学习的应用程序数量在不断增加:面部识别,语音识别(Siri,“ OK Google”,Alexa), 无人驾驶汽车 ,并且清单还在不断增加。 因此,作为一名学生,应聘人员,团队经理,高级管理人员,我们会感到好奇:这种不断上升的AI技术浪潮最终会使我的工作或未来的职业失去意义吗?
That was actually how I stumbled upon the world of Deep Learning years ago, and ended up where I am today: pursuing a postgraduate degree in this field of research. We all have been conditioned to learn things in a certain way: search for information online, sign up for courses, watch tutorials on YouTube. However, the massive and ever-increasing amount of information on this subject is scary, and many of us give up on the pursuit of new, relevant skills quickly.
实际上,这就是几年前我迷失在深度学习领域的最终方法,直到今天才成为我的目标:攻读该研究领域的研究生学位。 我们都有条件以某种方式学习事物:在线搜索信息,注册课程,观看YouTube教程。 但是,关于该主题的大量且不断增加的信息令人恐惧,我们许多人很快放弃了对新的相关技能的追求。
Here I will share my experience on what I think is the easiest and quickest ways to get started with Deep Learning, and be able to create your own Visual Recognition Application within a day. This is my personal opinion after doing dozens of online courses on Deep Learning, Data Science, Machine Learning etc. What I recommend is fast.ai, and it is suitable for people of any skill level! (p.s. Minimally, you need to have a google account — who doesn’t)
在这里,我将分享我的经验,我认为这是深度学习入门的最简单,最快的方法,并且能够在一天内创建自己的视觉识别应用程序 。 这是我在完成数十种有关深度学习,数据科学,机器学习等的在线课程之后的个人观点。我推荐的是fast.ai ,它适合任何技能水平的人! (ps至少,您需要拥有一个Google帐户-谁没有)
什么是fast.ai (What is fast.ai)
This is a software package that is coded on top of PyTorch, a Deep Learning Framework coded in the Python Language. Don’t worry if you didn’t understand a single part of that sentence, the materials we are talking about in the online course do not technically require any coding knowledge. The creators of fast.ai have published their online learning course which can be accessed at https://course.fast.ai/. The first three lessons (5 hours) will take you through the steps to deploying your own Deep Learning application!
这是一个在PyTorch之上编码的软件包, PyTorch是用Python语言编码的深度学习框架。 如果你不明白这句话的一个部分别担心,我们在网上谈论的材料当然技术上不要求任何编码知识。 fast.ai的创建者已经发布了他们的在线学习课程,可以从https://course.fast.ai/访问。 前三节课(5小时)将带您完成部署自己的深度学习应用程序的步骤!

For more advanced practitioners, you can continue on with the course to learn the more complex details about Deep Learning. I will probably be publishing another series that goes through the key pointers and notes from each lesson in the course, but let’s save that for another day.
对于更高级的从业者,您可以继续学习本课程,以了解有关深度学习的更复杂的细节。 我可能会发布另一个系列,介绍该课程中每节课的关键指针和注释,但让我们将其保留另一天。
安装和设置…学习任何新技术的最痛苦步骤 (Installation and Setup… the most painful step of learning any new technology)
Thankfully, we can use fast.ai without any installation on your computer, thanks to the wonders of cloud computing! Hence the advantages for Windows users, since most deep learning frameworks are built to run in Linux. Here are the options that are optimised for the fast.ai package, simply skip to the section you prefer or read through to find out the differences! I have only listed the options that are completely free. (No worries, fellow students)
值得庆幸的是,由于云计算的奇迹,我们可以在没有任何安装的情况下使用fast.ai! 因此,由于大多数深度学习框架都是在Linux上运行的,因此Windows用户具有优势。 以下是针对fast.ai软件包进行了优化的选项,只需跳至您喜欢的部分或通读以了解差异! 我只列出了完全免费的选项。 (同学们,不用担心)
Google Colab (Requires Google Account)
Google Colab (需要Google帐户)
Installation on your local machine (Windows Tested, only recommended for advanced users)
在本地计算机上安装 (Windows测试,仅建议高级用户使用)
Paperspace Gradient
图纸空间渐变
Google Colab (Google Colab)
Colab is a service launched by Google that provides free GPU(!!) access through notebooks. To get started with fast.ai on Colab, simply access the notebooks using the following links (For advanced users who wish to continue on with the course, do follow the instructions at https://course.fast.ai/):
Colab是Google推出的一项服务,可通过笔记本电脑提供免费的GPU(!!)访问。 要在Colab上开始使用fast.ai,只需使用以下链接访问笔记本(对于希望继续学习该课程的高级用户,请按照https://course.fast.ai/上的说明进行操作):
It will be as simple as going through the three notebooks while watching the first 3 lesson videos of the course! However, here are the things to take note when using Colab:
这就像观看本课程的前3节视频时浏览三个笔记本一样简单! 但是,以下是使用Colab时要注意的事项:
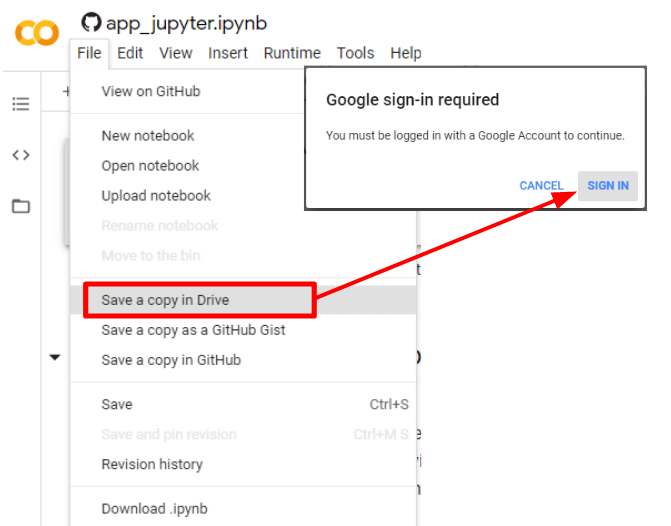
- Start off by clicking on File > Save a Copy in Drive > Sign in (If you haven’t already). This ensures that any changes you make to the notebook can be revisited from your own Google Drive account. 首先,单击文件>在驱动器中保存副本>登录(如果尚未登录)。 这样可以确保您可以通过自己的Google云端硬盘帐户重新访问对笔记本所做的任何更改。

2. Making a copy should redirect you to the copied notebook stored in your own Google Drive storage. To access it again, simply head to My Drive > Colab Notebooks. Copied notebooks will be stored in this folder by default.
2.复制后,应将您重定向到存储在自己的Google云端硬盘存储中的复制笔记本。 要再次访问它,只需转到我的云端硬盘> Colab笔记本。 默认情况下,复制的笔记本将存储在此文件夹中。
3. To open, double click the notebook of interest and click on open with Google Colaboratory. Easy!
3.要打开,请双击所需的笔记本,然后单击“使用Google Colaboratory打开”。 简单!

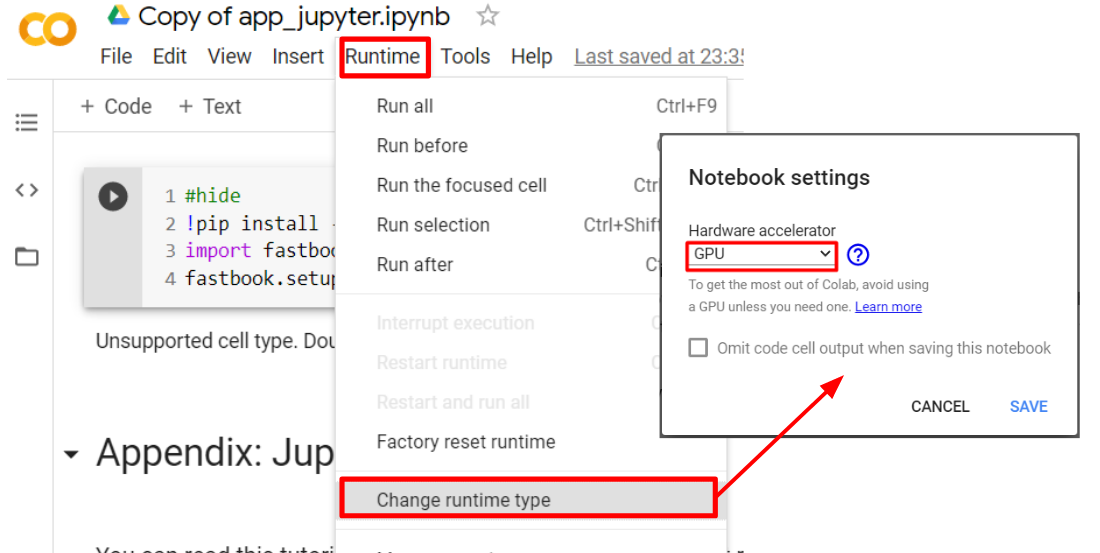
4. For most Deep Learning Frameworks, GPUs can really speed up the computation time. Thankfully, Google Colab provides free GPU usage (up to 3GB of RAM). Make sure the runtime type in Colab is set to GPU.
4.对于大多数深度学习框架,GPU确实可以加快计算时间。 幸运的是,Google Colab提供了免费的GPU使用(高达3GB的RAM)。 确保将Colab中的运行时类型设置为GPU。

5. Now you’re ready! Simply follow the video lectures on https://course.fast.ai/ and you can become a Deep Learning student in no time.
5.现在您准备好了! 只需关注https://course.fast.ai/上的视频讲座,您就可以立即成为深度学习学生。
在Windows上安装 (Installing on Windows)
Installing on your own machine gives you more flexibility. However, this is only recommended for advanced users. fast.ai recommends installations on Linux-based OS, but many of us do not want to go through the hassle of dual-booting or running a Virtual Machine. I am personally running the fast.ai package on a Windows 10, 64-bit machine using the following steps:
在自己的计算机上安装可为您提供更大的灵活性。 但是,仅建议高级用户使用。 fast.ai建议在基于Linux的操作系统上进行安装,但是我们许多人不想经历双重引导或运行虚拟机的麻烦。 我个人使用以下步骤在Windows 10 64位计算机上运行fast.ai软件包:
Install Miniconda (Anaconda works fine too, if you already have that installed). Make sure to select the correct operating system, and choose the option for Python 3.8.
安装Miniconda (Anaconda也可以正常工作,如果您已经安装了它)。 确保选择正确的操作系统,然后为Python 3.8选择选项。
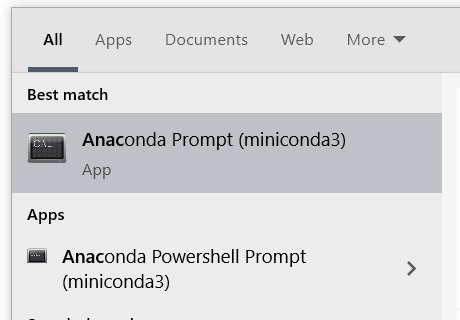
- Fire up the Anaconda Prompt from the Windows Search bar. 从Windows搜索栏中启动Anaconda提示。

3. Run the following command to install fastai, then enter ‘Y’ when prompted to commence downloading:
3.运行以下命令以安装fastai,然后在系统提示您开始下载时输入“ Y”:
conda install -c fastai -c pytorch fastai jupyter notebook4. After installation, run the following command in the Anaconda Prompt to start a local Jupyter Notebook Server.
4.安装后,在Anaconda提示符中运行以下命令以启动本地Jupyter Notebook服务器。
jupyter notebook5. A window should pop-up in your default browser, or you can access it by typing:
5.应该在默认浏览器中弹出一个窗口,或者您可以通过键入以下内容来访问它:
http://localhost:8888/?token='find_under_conda_prompt'6. Download a copy of the fast.ai notebooks from https://github.com/fastai/fastai
6.从https://github.com/fastai/fastai下载fast.ai笔记本的副本。
7. Access the notebooks and you’re done!
7.进入笔记本,您就完成了!
It’s really simple to get started with Deep Learning. Now, almost anyone can do it with the help of comprehensive courses and frameworks. If you have any questions, or if any of the steps do not work for you, feel free to leave a comment below!
深度学习入门非常简单。 现在,几乎任何人都可以在综合课程和框架的帮助下做到这一点。 如果您有任何疑问,或者任何步骤都不适合您,请在下面发表评论!
翻译自: https://towardsdatascience.com/how-anyone-can-get-started-with-deep-learning-on-windows-c08f5987579f
windows 深度学习


 本文介绍了如何在Windows上快速入门深度学习,特别是通过fast.ai这个基于PyTorch的软件包。作者推荐使用Google Colab,它提供免费GPU资源,适合任何技能水平的用户。只需观看视频教程并按照指导操作,即可在一天内创建自己的视觉识别应用程序。对于高级用户,也可以在本地Windows机器上安装fast.ai。文章提供了详细的安装和设置步骤。


 11万+
11万+

 被折叠的 条评论
为什么被折叠?


