


A comprehensive cloud engineering cookbook with step-by-step how to instructions!
全面的云工程食谱,其中包含分步说明!
Microsoft Azure is becoming more and more widespread, powerful and important as our remote-working capabilities become the norm. I really believe these skills are super useful so I want to give back and teach what I spent a few months learning. I feel like this terrain is still a total mess and unnecessarily complicated. Here I do my best to simplify and make an easy to follow guidebook.
随着我们的远程工作能力成为常态,Microsoft Azure正在变得越来越广泛,强大和重要。 我真的相信这些技能非常有用,因此我想回馈并教我花了几个月的时间来学习。 我觉得这个地形仍然是一片混乱,不必要的复杂。 在这里,我会尽力简化并简化指南。
Feel free to leave any comments if something isn’t clear or if it helps you out. I spent time to learn this, the least I can do is try to share the knowledge!
如果有不清楚的地方或有帮助的话,请随时发表评论。 我花时间学习了这一点,我至少可以做的就是分享知识!
At the very least, you should be inspired to go jump in and build something like this yourself! This is super fun 😄, well, when it works…
至少,应该启发您自己去构建类似的东西! is,当它起作用时,这真是太好了……
配料: (Ingredients:)
1 Dose of Azure
1剂天蓝色
2 Sprinkles of PFSENSE MAGIC
2点PFSENSE MAGIC
3 Shakes of Google Seasoning
Google调味料3摇

You get 1 Remote VPN Setup. Now we’re talking some 21st century tech! You’re on your way to being an Azure Pro.
您将获得1 Remote VPN Setup 。 现在我们正在谈论一些21世纪的技术! 您正要成为Azure Pro。
TLDR; 阅读内容: (TLDR; What you get for reading:)
How to setup Win10 virtual machines and servers (Win10 or Linux) running in Microsoft Azure Cloud. Secure RDP + fileshares to these from behind the VPN for safety.
如何设置在Microsoft Azure云中运行的Win10虚拟机和服务器(Win10或Linux)。 从VPN后面将RDP +文件共享安全地保护到这些文件共享,以确保安全。
Netgate PFsense firewall protecting everything via OpenVPN protocol
Netgate PFsense防火墙通过OpenVPN协议保护一切
Humor. Without it, you will not survive. Also, life’s too short not to laugh. 😆
幽默。 没有它,您将无法生存。 另外,生活太短了,不能笑。 😆
I found that building this there was no guide that I could just follow along. I had to cobble every step together from a million sources. So my hope is this fills that gap a little bit!
我发现构建此文档没有我可以遵循的指南。 我不得不从100万个来源中收集所有步骤。 所以我希望这能填补一点空白!
This is a MEGA GUIDE and is quite lengthy. I re-created my entire production setup, including hardening, protection from cyber attacks and every tool I used along the way. I think it can be adapted to your situation pretty easily, as it provides a great foundation point. In theory, anyone who can follow this along should be able to set up a really awesome VPN.
这是一个巨型指南 ,相当长。 我重新创建了整个生产设置,包括加固,防范网络攻击以及在使用过程中使用的所有工具。 我认为它可以很容易地适应您的情况,因为它提供了很好的基础。 从理论上讲,任何可以遵循此原则的人都应该能够建立一个非常出色的VPN。
For example, I used this to deploy a small business into the cloud to allow them to work remotely, ironically right before this whole virus crisis started.
例如,我用它来将一个小型企业部署到云中,从而使他们可以在整个病毒危机开始之前进行远程工作,具有讽刺意味的。
大纲: (The Outline:)
- Setup Azure VMs 设置Azure VM
- Setup PFSense + OpenVPN 设置PFSense + OpenVPN
- Setup your clients to connect 设置您的客户端以进行连接
- Setup fileshares 设置文件共享
- Bonus: Setup Snort intrusion detection 奖励:设置Snort入侵检测
- Summary Recap 总结
When in doubt, just re-watch this scene.
如有疑问,请重新观看此场景。

And mark my words, you WILL get here. Rite of Passage.
而记住我的话,你会来到这里。 通行礼。
1)设置Azure VM (1) Setup Azure VMs)
Reader beware in this stage lest ye fall down the endless pit of reading MSDN / Azure documentation. I found there are AT LEAST 3–4 copies of the exact “thing you want to do” on Microsoft’s official docs. Why Microsoft? Alas, I wish I had the answer… just know there’s about 10 ways to achieve things and I try to choose the simplest ones. Simple = less sh*t to break.
读者在这个阶段要当心,以免跌倒了阅读MSDN / Azure文档的无休止的陷阱。 我发现Microsoft官方文档中至少有3-4份精确的“您想做的事情”。 为什么选择微软? las,我希望我能得到答案……只知道大约有10种方法可以实现目标,所以我会尝试选择最简单的方法。 简单=更少破坏。
Our antidote is learning how to skim-read before you follow instructions that may or may not lead you up the correct “wall”. Microsoft = great at documenting, not so great at giving you outcomes you actually desire. So keep that in mind as you read the endless treasure trove of Azure documentation. You really don’t need 95% of what’s on there to meet your goal.
我们的解毒剂是在您按照说明可能会或可能不会引向正确的“墙”之前,学习如何略读。 Microsoft =擅长记录文档,但不擅长为您提供实际想要的结果。 因此,在阅读无尽的Azure文档宝库时,请记住这一点。 您真的不需要那里的95%来实现您的目标。
Without further ado let’s dive right in.
事不宜迟,让我们潜入。
获取Azure (Get Azure)
You’ll want to have at least a free trial account going here to follow along. Azure has a 30-day trial you can experiment with $200 of credits (as of 2020), should work without a payment method. Grab it!
您需要至少有一个免费试用帐户才能继续使用。 Azure有30天的试用期,您可以试用200美元的信用额度(截至2020年),无需付款即可使用。 抓住它!
让我们做一个虚拟机 (Let’s make a VM)
Remember that endless pit of Azure Docs? There’s a TON of options here so we’re just going to skim past most of them. I’ll stop and explain the ones that matter right now.
还记得无休止的Azure文档坑吗? 这里有很多选择,因此我们将略过大多数选择。 现在,我将停止并解释那些重要的事情。
That said, there’s more in-depth guides on how to deploy these VMs if you struggle to follow along or you’re curious about the options. I’d rather not re-create what’s already out there. Rather my goal is to highlight only the valuable info you must get right, things the documentation tends to forget about making a big point of. The docs talk about everything as if its all equally important (it’s not).
就是说,如果您难以跟进或对这些选项感到好奇,则有更多有关如何部署这些VM的更深入的指南。 我宁愿不重新创建已经存在的内容。 相反,我的目标是仅 突出显示您必须正确获取的有价值的信息 ,而这些文档往往在强调重点时会忘记这些信息。 文档谈论所有事物,就好像它们同样重要( 不是 )。
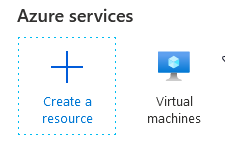
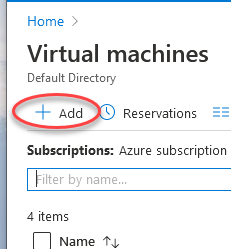
First we’re going to select, config and launch the first Windows VM. You could use a Linux VM here if you wanted, but I don’t cover that.
首先,我们将选择,配置并启动第一个Windows VM。 如果需要,您可以在这里使用Linux VM,但是我不做介绍。
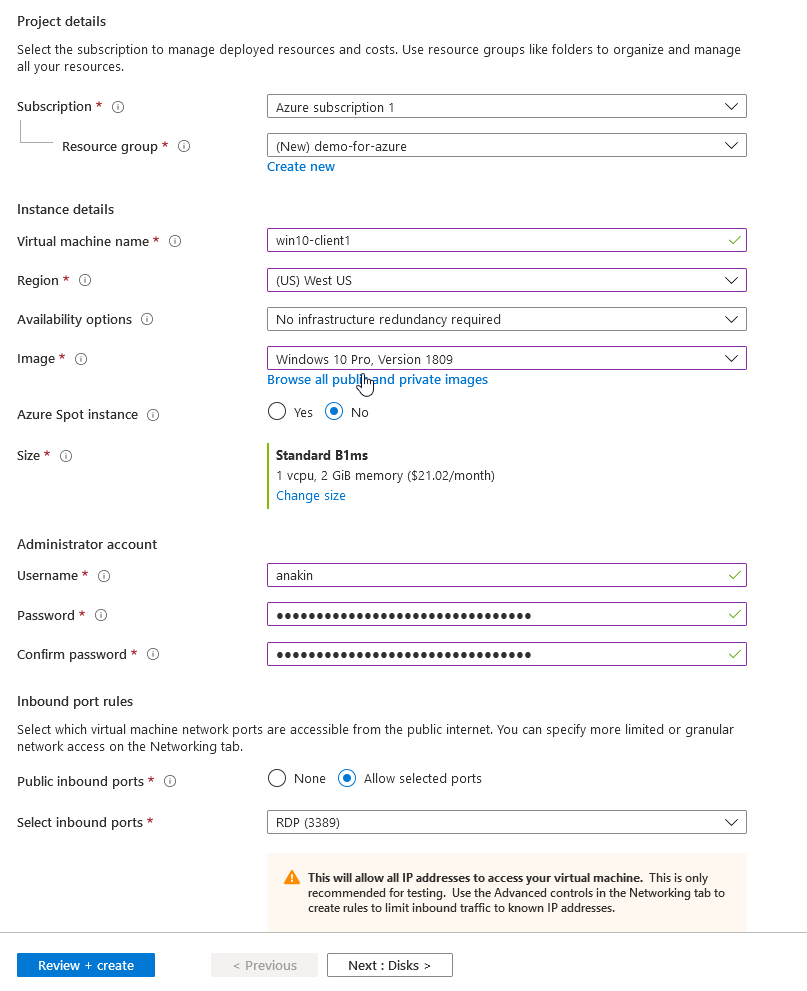
An overview:
概述:
- Resource group — you should gather all of the same “project” into the same group. 资源组-您应该将所有相同的“项目”收集到同一组中。
- VM name — pick something meaningful, it becomes the system name later and the name of the attached resources (disks, network, etc) VM名称-选择有意义的名称,以后将成为系统名称以及附加资源(磁盘,网络等)的名称
- Region — this one is super important, you cannot change this easily later. Pick the closest region to your client and keep all your resources in the same region if possible. 区域-这是非常重要的,以后不能轻易更改。 选择最接近客户的区域,并尽可能将所有资源都放在同一区域。
- Size — see the next image, it’s a complicated mess :) 大小-请看下一张图片,它很复杂:)
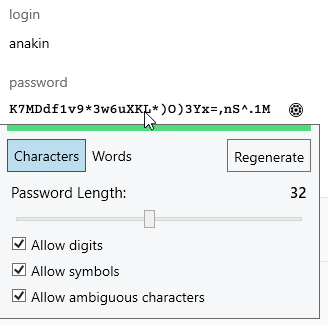
Admin Account — I highly recommend using a password manager service here since you’ll be using this PW ALOT, and you will likely need it across systems. I went with https://1password.com/ but anything like them will work. Your admin pw better not be “password” or you must take a walk of shame!
管理员帐户-我强烈建议您在此处使用密码管理器服务,因为您将使用此PW ALOT,并且您可能需要在整个系统中使用它。 我使用https://1password.com/,但是类似它们的东西都可以使用。 您的管理员密码最好不要成为“密码”,否则您必须丢脸!
Public inbound ports / RDP — you *must* leave this open until we setup a VPN or else you cannot connect to your newly made VM! Don’t worry, public access will be removed later.
公共入站端口/ RDP —您*必须*将此端口保持打开状态,直到我们设置VPN,否则您将无法连接到新创建的VM! 不用担心,稍后会删除公共访问权限。
This is something I learned at this point. If you don’t know this already, RDP is not a safe protocol to leave open to the internet. The port is well known, and there are new malware / backdoors that are found every month. So, the rule is don’t leave it open on production systems. Period. Or you’re asking for trouble. You’ll see later when we run Snort on PFSense how real internet weather is for cyber attacks, especially on known Cloud IP ranges.
这是我现在学到的东西。 如果您还不了解这一点,那么RDP并不是开放互联网的安全协议。 该端口是众所周知的,并且每个月都会发现新的恶意软件/后门。 因此,规则是不要在生产系统上打开它。 期。 或您正在寻求麻烦。 稍后,当我们在PFSense上运行Snort时,您将看到真实的网络天气对网络攻击的影响,特别是在已知的Cloud IP范围上。
Say this to yourself 3 times now:
现在对自己说3次:
I promise to never leave RDP ports open to the public.
我保证永远不会将RDP端口向公众开放。
I promise to never leave RDP ports open to the public.
我保证永远不会将RDP端口向公众开放。
I promise to never leave RDP ports open to the public.
我保证永远不会将RDP端口向公众开放。
Your future clients will thank you when their data is not ransom-wared by a Russian botnet 😁
当俄罗斯僵尸网络未对他们的数据进行勒索存储时,您的未来客户将感谢您you
该图仅显示了Microsoft为我们提供的VM功能选择的一小部分 (This image shows you just a TINY fraction of the choices Microsoft gives us for VM power)
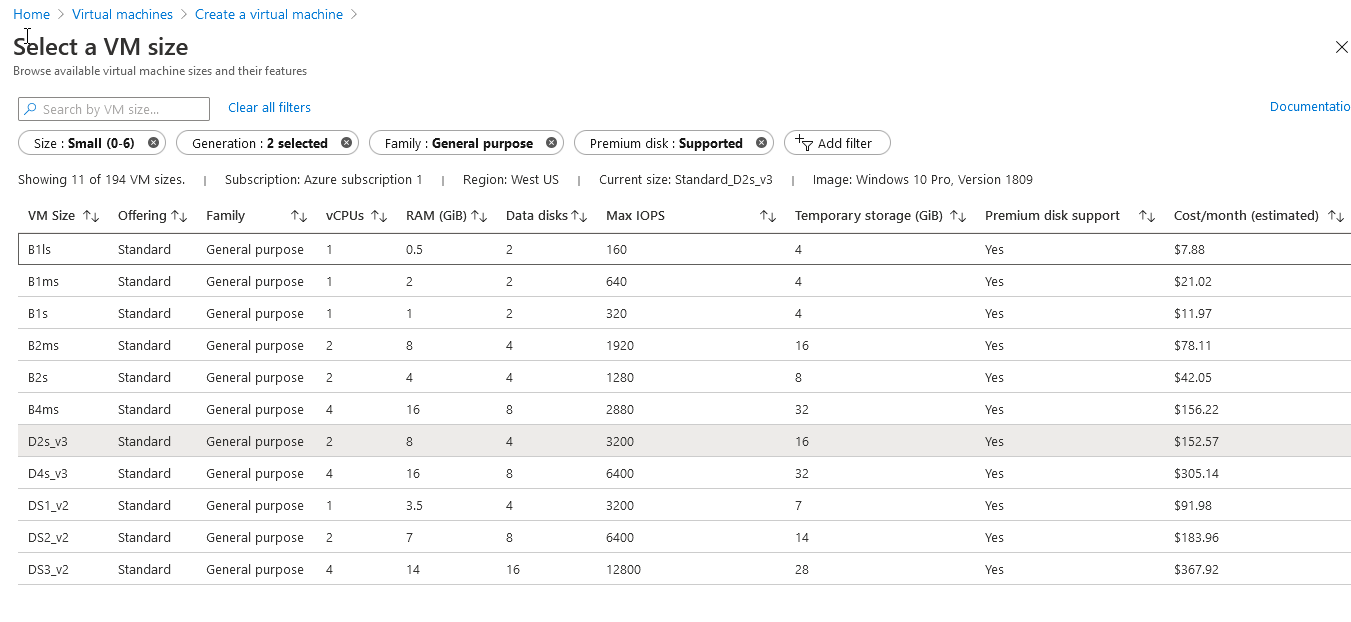
You should quickly notice how beastly the cost gets. I don’t know about your client, but $100+ for a single VM is pretty damn costly. So I advise you to go with the cheapest power possible and scale up slowly (it’s actually super easy to resize and is almost instant!)
您应该Swift注意到成本变得多么惊人 。 我不了解您的客户,但单个VM的$ 100 +成本实在太高了。 因此,我建议您使用尽可能便宜的电源并缓慢扩展(它实际上非常容易调整大小,几乎是即时的!)

I’ll also warn you — Windows 10 cannot run with less than 2 GB of ram, even 2GB is pushing it. I tried to run a client’s system with literally just Adobe PDFs and Microsoft Office products and it used up the 2GB within a few days rendering the VM completely unable to RDP into (and thus upset calls). So, for client work you are at a minimum looking at the B2s for $42 a month.
我还要警告您-Windows 10不能运行少于2 GB的内存,即使2GB的内存也不能运行它。 我试图在客户端系统上仅使用Adobe PDF和Microsoft Office产品运行,几天之内就用完了2GB的内存,导致VM完全无法RDP进入(从而使通话陷入困境)。 因此,对于客户工作,您至少要每月花42美元来购买B2。
To be thorough, you should run a calculation here and decide if you want run the VM 24/7 or if you want to setup a schedule to turn it on/off to save costs. This is how you can afford to run the more expensive systems with fixed hours. Sadly, there is no automatic VM start in Azure. Complain to Microsoft!!
为了更全面,您应该在此处进行计算,然后决定是否要运行VM 24/7,或者是否要设置时间表以打开/关闭VM以节省成本。 这样您就可以负担得起固定时间运行更昂贵的系统。 可悲的是,Azure中没有自动启动虚拟机。 向微软投诉!!
Click Next to Disks
单击磁盘旁边
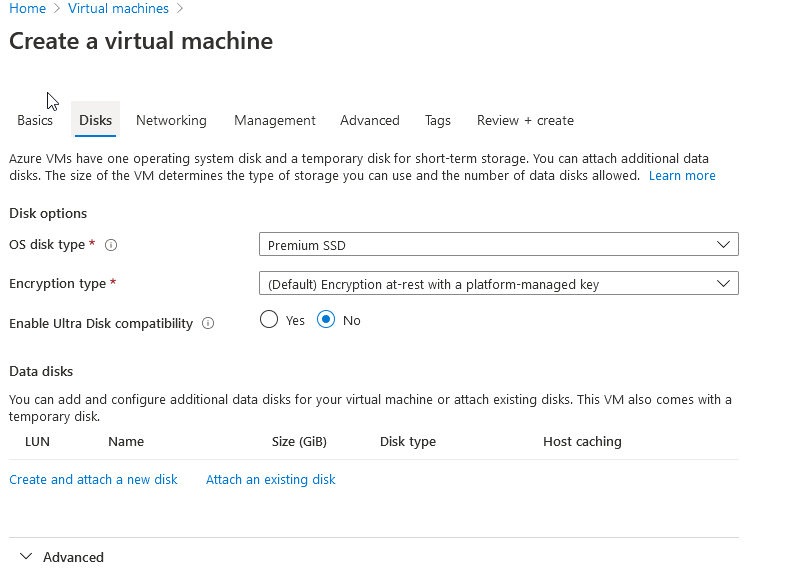
This step is important because I don’t recommend Premium SSDs (of course Microsoft does). If you dig through the cost pricing docs, you’ll find out that Azure charges for the entire SSD size of 127 GB, regardless if you use it. And you cannot size the disk under 127 GB for cryptic, Microsoft-ian reasons. So, choose Stanard SSD and you are only charged for data used. Problem solved (performance isn’t a huge hit unless you’re doing something seriously disk intensive, in which case price shouldn’t be so important to you).
此步骤很重要,因为我不建议您使用Premium SSD(Microsoft当然可以)。 如果您仔细阅读成本定价文档,就会发现Azure会为整个 127 GB的SSD收费,无论您是否使用它。 而且,出于神秘的,基于Microsoft的原因,您无法将磁盘的大小调整为127 GB以下。 因此,选择Stanard SSD,您只需为使用的数据付费。 解决问题的能力(除非您认真地进行磁盘密集型操作,否则性能不会受到太大影响,在这种情况下,价格对您而言并不那么重要)。
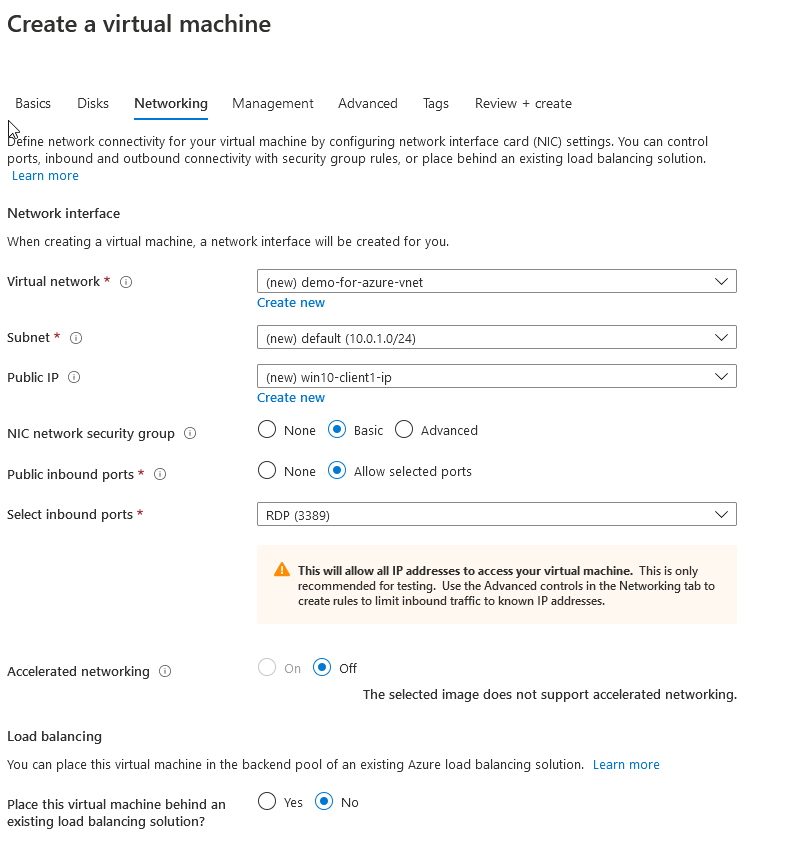
Don’t worry about the networking options for now, we’ll change them on the VPN setup stage. You don’t need to worry about most of them.
现在不用担心网络选项,我们将在VPN设置阶段进行更改。 您无需担心其中的大多数。
You can safely ignore the Management, Advanced, and Tags tabs.
您可以放心地忽略“管理”,“高级”和“标签”选项卡。
Go to the Review + Create and make sure it validates. Fix any errors you see if so. And Create!
转到审阅+创建,并确保它通过验证。 如果有,请更正所有错误。 并创造!
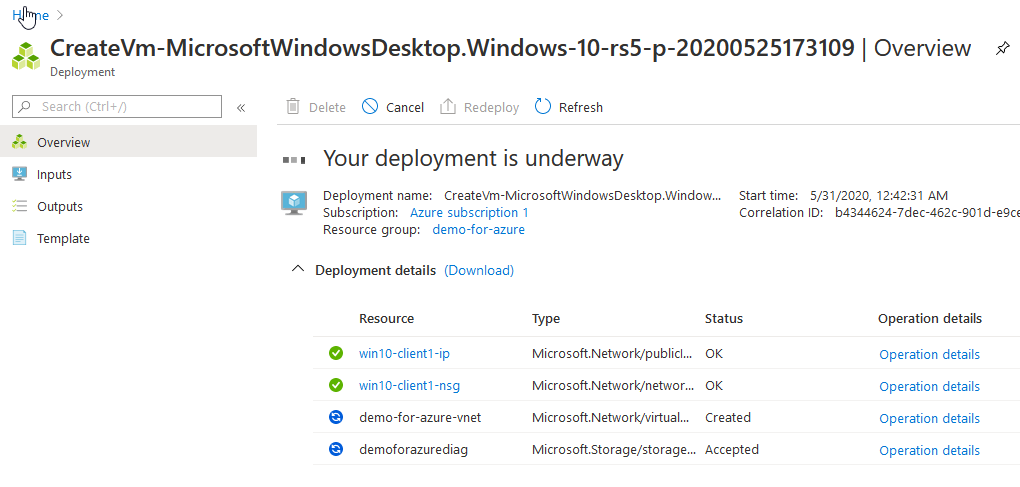
It takes a while, so be patient. About 5–10 minutes is average. When it’s done we can remote desktop in (RDP) to verify it’s up.
这需要一段时间,因此请耐心等待。 平均大约5-10分钟。 完成后,我们可以在(RDP)中进行远程桌面验证。
At this point you can treat the system like any other Windows 10 system, but you’ll quickly notice it’s hard to get files or data into the system! That’s where the fileshare will come in handy very soon.
在这一点上,您可以像对待其他任何Windows 10系统一样对待该系统,但是您会很快注意到,将文件或数据放入该系统非常困难! 这就是文件共享将很快派上用场的地方。

Also, the reference is here if you want more details (notice how skimpy the details are).
另外,如果您需要更多详细信息,请参考这里(注意这些详细信息有多精打细算)。
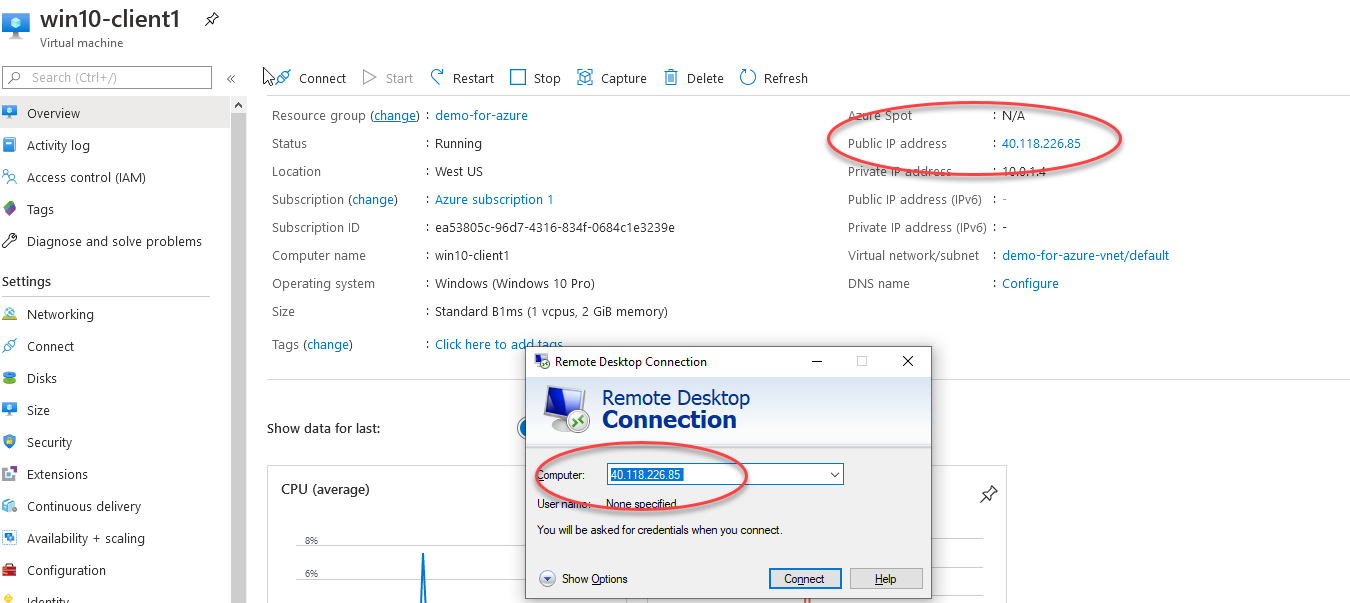
Before we move on, go ahead and RDP to the public IP to see what it looks like. We will be changing this IP to a private one after the VPN is working.
在继续之前,请先进行RDP到公共IP的查看。 VPN运行后,我们将把该IP更改为私有IP。
At this point you’re ready to setup the VPN!
至此,您已经准备好设置VPN!
2)设定VPN(PfSense) (2) Setup the VPN (PfSense))
Ah the fun part you’ve been waiting for right!
啊,您一直在等待的有趣部分!
We’re going to use a very popular, open-source VPN / Firewall from the lovely folks over at Netgate. This thing is seriously amazing.
我们将使用Netgate的一个非常受欢迎的,来自可爱的人们的开源VPN /防火墙。 这东西真是太神奇了。
I’ll take a moment here too to share my utter failure using Azure VPNs. You can skip this section if you just want the PFSense. I first started by using pure Azure resources, so naturally I went with this:
我也会在这里花点时间来分享使用Azure VPN的全部失败。 如果只需要PFSense,则可以跳过本节。 我首先开始使用纯Azure资源,因此自然而然地做到了:
You *must* look at the pricing tier first. The terms are incredibly vague, and the true cost winds up being a minimum of $130 / month just to run this gateway. That is because it’s not possible to “un-provision” or shut down the gateway. So even if all your systems are off, you must pay quite a pretty penny for this VPN. And as we’ll quickly see, it’s features are very limited compared to Netgate, as well as being flaky and difficult to use in production. I love a lot of Microsoft products, but this part of Azure is super misleading, expensive, and honestly doesn’t work at all as advertised.
您*必须*首先查看定价层。 条款令人难以置信的模糊不清,仅运行此网关的实际成本最低为每月130美元。 这是因为不可能“取消配置”或关闭网关。 因此,即使您的所有系统都已关闭,您也必须为此VPN付出相当高的代价。 而且我们很快就会看到,与Netgate相比,它的功能非常有限,而且片状且难以在生产中使用。 我喜欢很多Microsoft产品,但是Azure的这一部分极具误导性,价格昂贵,并且老实说根本不像广告宣传的那样起作用。
Here’s a few quick caveats — the Basic SKU only supports Windows SSTP (not Mac, which doesn’t support SSTP). You are stuck in VpnGw1 or higher minimum and it is PAINFUL to change later (you literally have to destroy the gateway and re-deploy it). This is a terrible business choice from Microsoft.
以下是一些简短的警告-基本SKU仅支持Windows SSTP(不支持Mac,不支持SSTP)。 您被限制在VpnGw1或更高的最低版本中,以后更改将是痛苦的 (实际上您必须销毁网关并重新部署它)。 这是Microsoft的糟糕业务选择。
Unfortunately, the documentation to learn to use this thing looks a lot like this sample. It’s long, obtuse, full of extra info you don’t need to know. Really the first thing you need to know is it takes 45–60 minutes to deploy one and that you cannot change many settings once deployed, making it a total pain in the ass to setup the first time.
不幸的是,学习使用此东西的文档看起来很像此示例。 这很长,很钝,到处都是多余的信息,您不需要知道。 确实,您需要了解的第一件事是部署它需要45–60分钟,并且一旦部署就无法更改许多设置,这使得首次安装成为一件麻烦事。
https://docs.microsoft.com/en-us/azure/vpn-gateway/point-to-site-about
https://docs.microsoft.com/zh-cn/azure/vpn-gateway/point-to-site-about
Speaking of which, let’s hop right to why I hated this thing. This is a picture of my LIVE production VPN from shortly after I deployed it in March 2020.
说到这,让我们跳到为什么我讨厌这个东西。 这是我在2020年3月部署LIVE之后不久的LIVE生产VPN的图片。
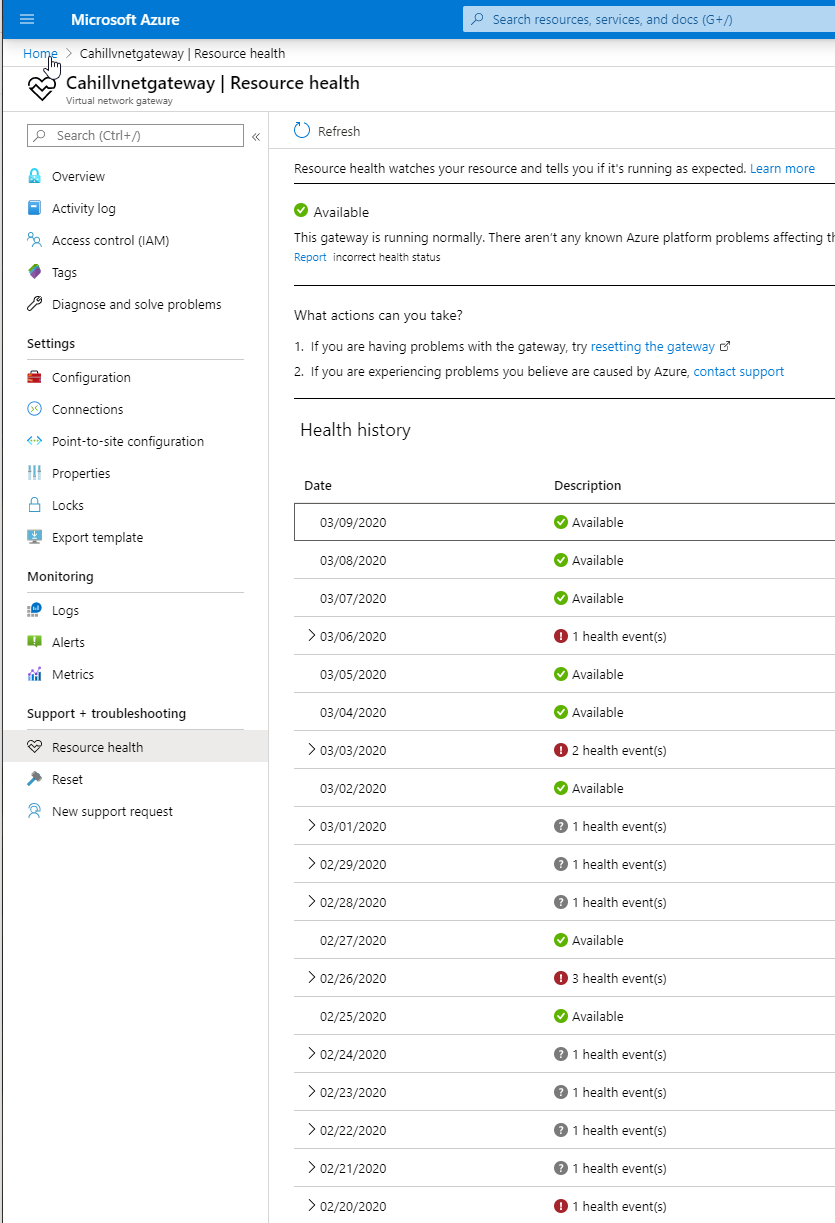
Every single non-green event on here represents a time when my clients got disconnected and couldn’t connect through the VPN gateway.
此处的每个非绿色事件都表示一个时间,即我的客户端断开连接并且无法通过VPN网关连接。
Sadly again, it seems Microsoft has deeply out-sourced the tech support for Azure. When you file a support ticket, you are sent first to what feels like a 3rd tier tech level that clearly does not understand Azure technology. While they are super, super nice and polite, they have to “escalate” every single problem to some unknown tech team that you are not allowed to speak to. This takes 24–48 hours each time and often results in no answers and rinse-repeat actions. So there’s no contact with the engineers who can actually help.
再次令人遗憾的是,微软似乎已经将对Azure的技术支持深度外包了。 提交支持请求时,您将首先被带到显然不了解Azure技术的3层技术级别。 尽管他们超级,超级友善和有礼貌,但他们必须将每个问题“升级”到一些您不允许与之交谈的未知技术团队。 每次需要24-48小时,并且经常导致无应答和重复冲洗动作。 因此,没有与可以提供实际帮助的工程师联系。
Basically, it looks like this for weeks.
基本上,它看起来像这样几个星期。

Issues get “resolved” and tend to be called “expected behavior”. I even had 5 or so different Microsoft employees emailing me at one point, but sadly nobody could figure out what was wrong and it all ended in mass confusion.
问题得到“解决”,并被称为“预期行为”。 我什至曾经有5个左右的Microsoft员工通过电子邮件向我发送电子邮件,但可悲的是没人能弄清楚出了什么问题,结果全都陷入了混乱。
At the end of the day, Microsoft was unable to figure out why their VPN kept disconnecting. I only had 3 clients using the VPN, a trivial number compared to the specs. I ended up having to solve it myself by deleting it and switching to Netgate. SO — I hope this saves you dear reader from using these things in Production and having to (embarassingly) explain to your client why you basically suck at your job (aka I blamed Microsoft haha).
最终,Microsoft无法弄清为什么他们的VPN一直断开连接。 我只有3个使用VPN的客户端,与规格相比,这个数字很小。 我最终不得不自己删除它并切换到Netgate来解决它 。 所以-我希望这可以使您节省亲爱的读者,使他们免于在Production中使用这些内容,而不得不(尴尬地)向客户解释为什么您基本上只能胜任工作(又名我指责Microsoft哈哈)。
Lucky me, they were quite forgiving and did not abandon the entire project.
幸运的是,他们相当宽容,并没有放弃整个项目。
Did Microsoft even so much as offer any subscription credit? Nope. No follow up at all on their part. Ah well.
微软是否甚至提供了任何订阅信用? 不。 他们完全没有后续行动。 呃,好吧。
Lucky for us, Azure supports 3rd party vendors!
对我们来说幸运的是,Azure支持第三方供应商!
输入Netgate以保存一天 (Enter Netgate To Save the Day)
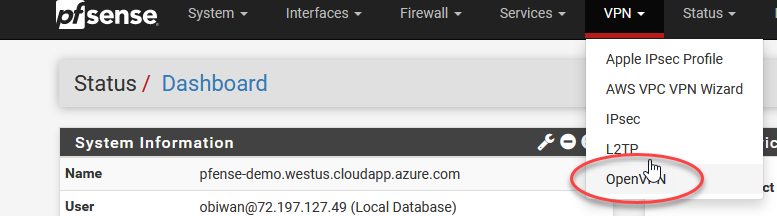
So go to the Azure search bar and type in “pfense” and pick this guy
因此,转到Azure搜索栏并输入“ pfense”,然后选择此人

Yes it will cost a monthly fee too, but it’s very reasonable. Not only does it come with a 30-day free trial, but it starts a very reasonable $70 /month for SO many features.
是的,它也将收取月租费,但这是非常合理的。 它不仅具有30天的免费试用期,而且它的起步价非常合理,每月70美元,可用于众多功能。
Go ahead and hit Create. It’ll take you to a half populated setup page. Fill it in like the Win10 VM in step 1. Care on these steps:
继续并点击创建。 它将带您到填充一半的设置页面。 像步骤1中的Win10 VM一样填充它。请注意以下步骤:
- Resource group — must be the same as your VM 资源组-必须与您的VM相同
- Name — pick something meaningful as it gets used a lot 名称-选择一些有意义的东西,因为它被大量使用
- Region — same as resource, must be the same across resources or there are extra complications 区域-与资源相同,跨资源必须相同,否则会带来额外的麻烦
- Image is pre-picked for you, its basically a FreeBSD Linux image 该映像是为您预先选择的,它基本上是FreeBSD Linux映像
- Size is pre-picked, don’t change it. On my account, the actual cost is less than the estimated A1 cost (go figure why). 尺寸已预先选择,请勿更改。 在我看来,实际成本低于估算的A1成本(请说明原因)。
- Username/pw — I just use the password, don’t need SSH but you can set it up if you prefer it. We’ll be using the PFSense GUI for most of this (it’s awesome). 用户名/密码-我只使用密码,不需要SSH,但可以根据需要进行设置。 我们将在大多数情况下使用PFSense GUI(它很棒)。

At this point let’s stop to talk about the Network piece briefly.
在这一点上,让我们停止简短地讨论网络部分。
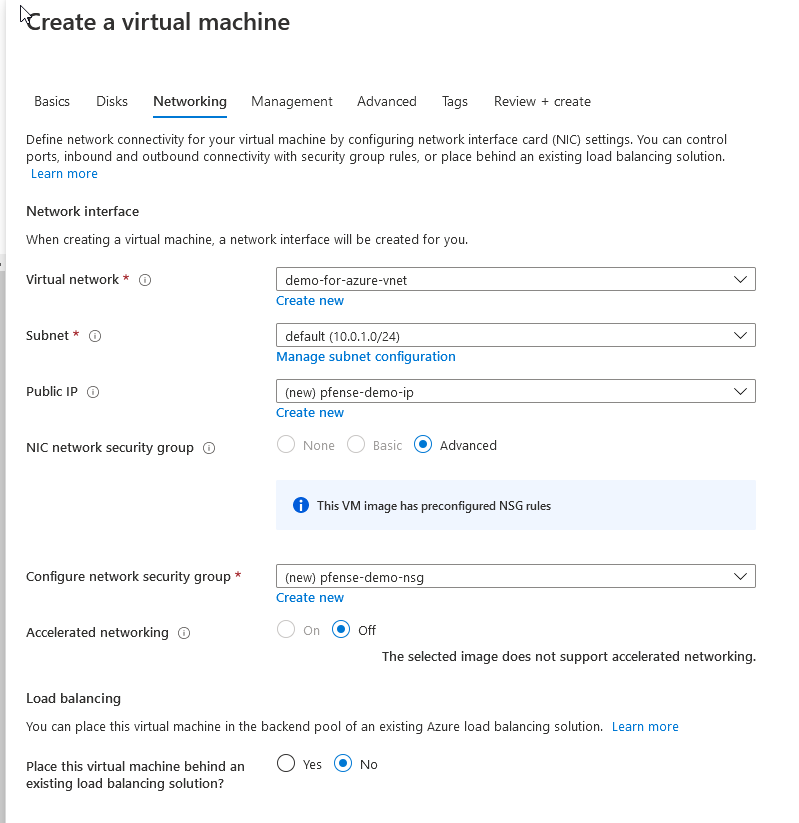
Click on “Create new” for Virtual Network.
点击“创建新”虚拟网络。
You’ll see this is where you choose the private network for your Azure resources. Honestly, you can use anything here like 192.168.x.x or the default 10.1.x.x. There’s only one piece of advice I’ll give — don’t conflict with your current local networks! Let me use my own (painful) example.
您将看到在这里为Azure资源选择专用网络。 老实说,您可以在此处使用192.168.xx或默认的10.1.xx之类的任何内容。我只提供一条建议- 不要与您当前的本地网络冲突 ! 让我用我自己的(痛苦的)例子。
The local network at my client’s was 192.168.10.xxx (0 to 255). I mistakenly chose this same 192.168.10.xxx address range for the virtual network too, and this would cause all sorts of terrible problems later (basically the VPN client will forward all local traffic to the Azure network. This will break your local resources like printers, etc). An oversight at the time on my part — save yourself the pain and don’t do that! Do some pre-lim research on what the local networks in use are and don’t cross them.
我客户的本地网络是192.168.10.xxx(0到255)。 我也错误地为虚拟网络选择了相同的192.168.10.xxx地址范围,这将在以后引起各种可怕的问题(基本上,VPN客户端会将所有本地流量转发到Azure网络。这将破坏您的本地资源,例如打印机等)。 我当时的疏忽-为自己省去痛苦,不要那样做! 对正在使用的本地网络进行一些初步研究,不要交叉使用。
Best to stick to patterns like 10.1.xxx or 172.18.xxx etc. These are industry standard private network spaces. So, for this demo I’ll use 10.1.0.0–10.1.255.255 but you are free to use whatever you want.
最好坚持使用10.1.xxx或172.18.xxx等格式。这是行业标准的专用网络空间。 因此,对于本演示,我将使用10.1.0.0–10.1.255.255,但您可以随意使用任何内容。
Don’t change the network security group, the automatic PFSense settings it adds are critical to the VPN’s functionality.
不要更改网络安全组,它添加的自动PFSense设置对于VPN的功能至关重要。
Once again skip Management, Advanced and Tags. Review + Create and we’re off!
再次跳过管理,高级和标签。 评论+创建,我们出发了!
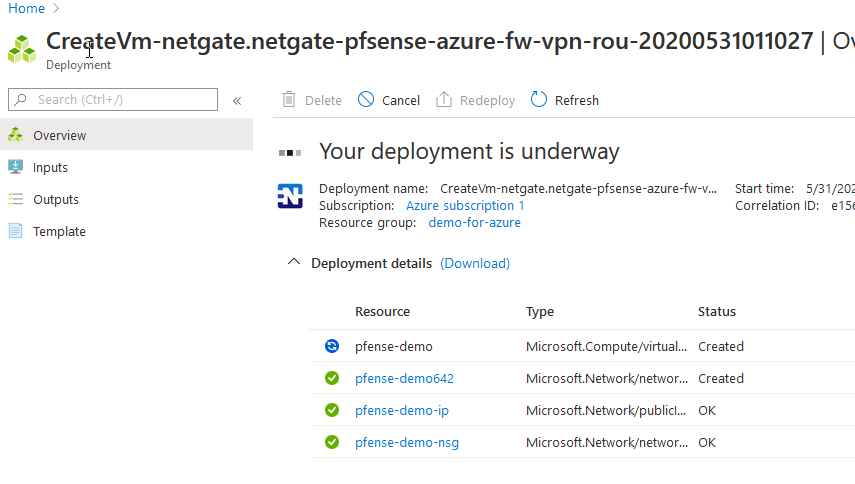
Much like the Azure VPN, this step is long. Sometimes it finishes in 10 minutes, but I’ve seen it also take over 30 minutes. Even when the VM is completed, I noticed it took 10 minutes to boot the first time so be patient if it does not respond at first. It will be listed as a Virtual Machine however, and not a VPN or Gateway.
与Azure VPN一样,此步骤很长。 有时它会在10分钟内完成,但我已经看到它也需要30分钟以上。 即使虚拟机完成,我也注意到第一次启动需要10分钟才能启动,因此请耐心等待,即使它一开始没有响应。 但是,它将被列为虚拟机,而不是VPN或网关。
This is a great time for a break, say, on YouTube checking out the amazing musicians on there. You worked hard if you made it this far!!
例如,这是度过美好时光的好时机,在YouTube上查看那里的出色音乐家。 如果你做到了这一点,你会努力的!!
休息时间结束了 (Break time is over)
Go to the Virtual Machines tabs and to your newly made pfsense VM.
转到“虚拟机”选项卡和新制作的pfsense VM。

You are looking for the public IP address that was auto-assigned. Go ahead and punch that into a web browser.
您正在寻找自动分配的公共IP地址。 继续并将其打入Web浏览器。
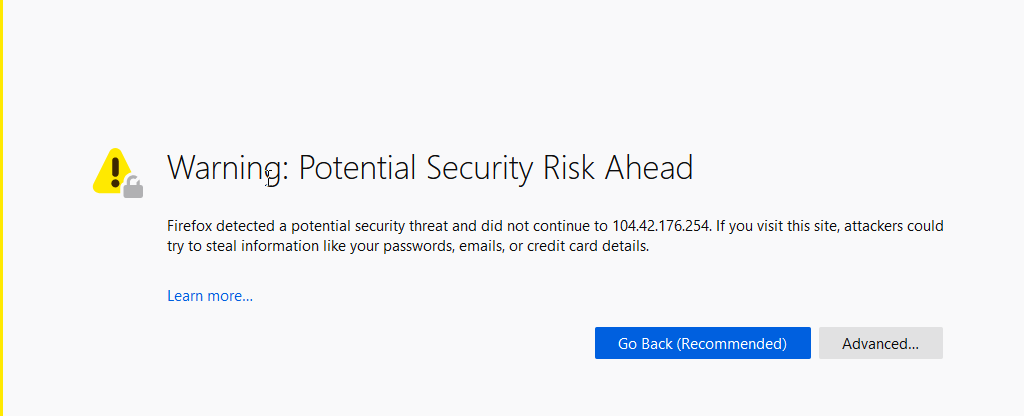
You’ll likely get a funny security warning, which you can safely ignore.
您可能会收到有趣的安全警告,可以放心地忽略它。
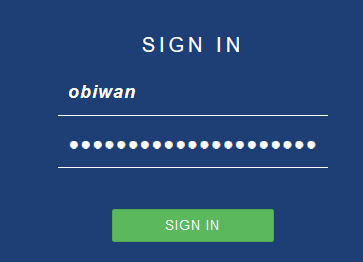
You will want to sign in with the admin/password we setup earlier. Welcome to the awesome PFSense GUI! Yay Linux.
您将要使用我们之前设置的管理员/密码登录。 欢迎使用超赞的PFSense GUI! Yay Linux。
Go ahead and accept all the defaults for Steps 1 through 5. We don’t need to set these as part of this setup (you can at a later time if you want, but you might need to read their docs first).
继续并接受步骤1到步骤5的所有默认设置。我们不需要在设置过程中设置这些默认设置(如果需要,可以稍后再设置,但是您可能需要先阅读其文档)。
On step 6, use the same password we just used (or make a new one, you should be using 1Password or something that can churn out awesome 32–64 char passwords).
在第6步中,使用与我们刚使用的相同的密码(或使用一个新密码,您应该使用1Password或会产生32-64个char超级密码的密码)。
Hit Reload.
点击刷新。
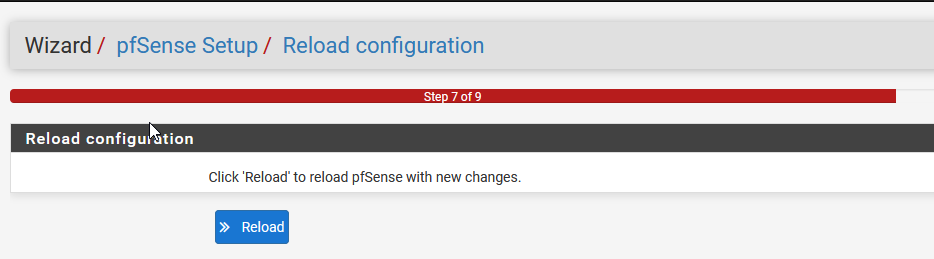
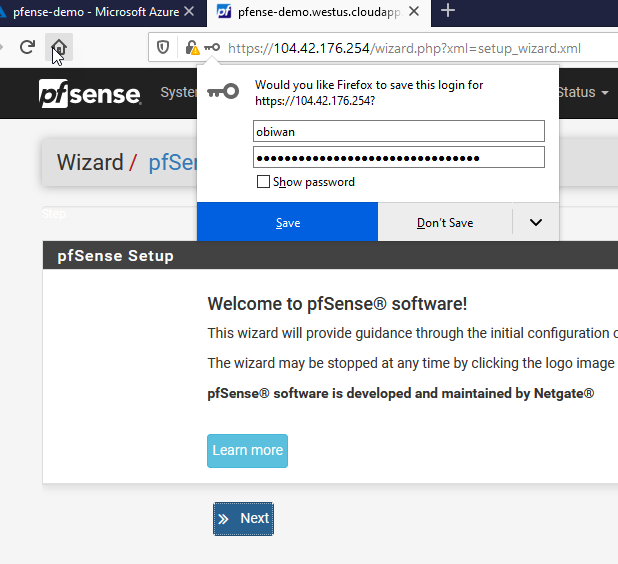
When it’s done, you are done with setup! Click the PFSense logo in the top left to see the default status page.
完成后,设置就完成了! 单击左上方的PFSense徽标以查看默认状态页面。

Now time to setup the VPN. For this, I used OpenVPN as it’s simpler than the others. But it’s super cool we have all these choices out of the box! (Where Azure charges quite a lot for IPSec and such).
现在是时候设置VPN。 为此,我使用了OpenVPN,因为它比其他方法更简单。 但是,我们提供了所有这些选择,这太酷了! (Azure在IPSec等方面收取很多费用)。
At this point I highly recommend reading a few sections of this excellent Netgate guide, their documentation is extremely well written and always answered my questions.
在这一点上,我强烈建议您阅读这份出色的Netgate指南的某些部分,它们的文档编写得非常好,并且总是能回答我的问题。
You’ll quickly see how deep this gets, with warnings like this:
您将通过以下警告Swift了解到这种情况的严重性:

That’s ok for now. You can endlessly configure this product so it’s good to know it has a ton of future-upgrade possibilities. For this article demo, we’re just going to avoid the book.
现在还可以。 您可以无休止地配置此产品,因此很高兴知道它有大量的未来升级可能性。 对于本文的演示,我们将避免使用该书。
重要提示:这里有很多选择! 抵制使用它们的冲动,我们几乎不需要更改任何内容。 (Important: THERE ARE SO MANY OPTIONS HERE! Resist the urge to use them all, we barely need to change anything.)
Instead just follow the above guide using the Wizard for Local User Access (not RADIUS).
相反,只需使用本地用户访问向导(而不是RADIUS)遵循上述指南即可。
Use this guide to fill out the server certificate authorities.
使用本指南填写服务器证书颁发机构。
Of particular importance is the “Step 9 of 11” page. This is where their document doesn’t really tell you what to do.
尤其重要的是“第11步(共11步)”页面。 这是他们的文档没有真正告诉您该怎么做的地方。
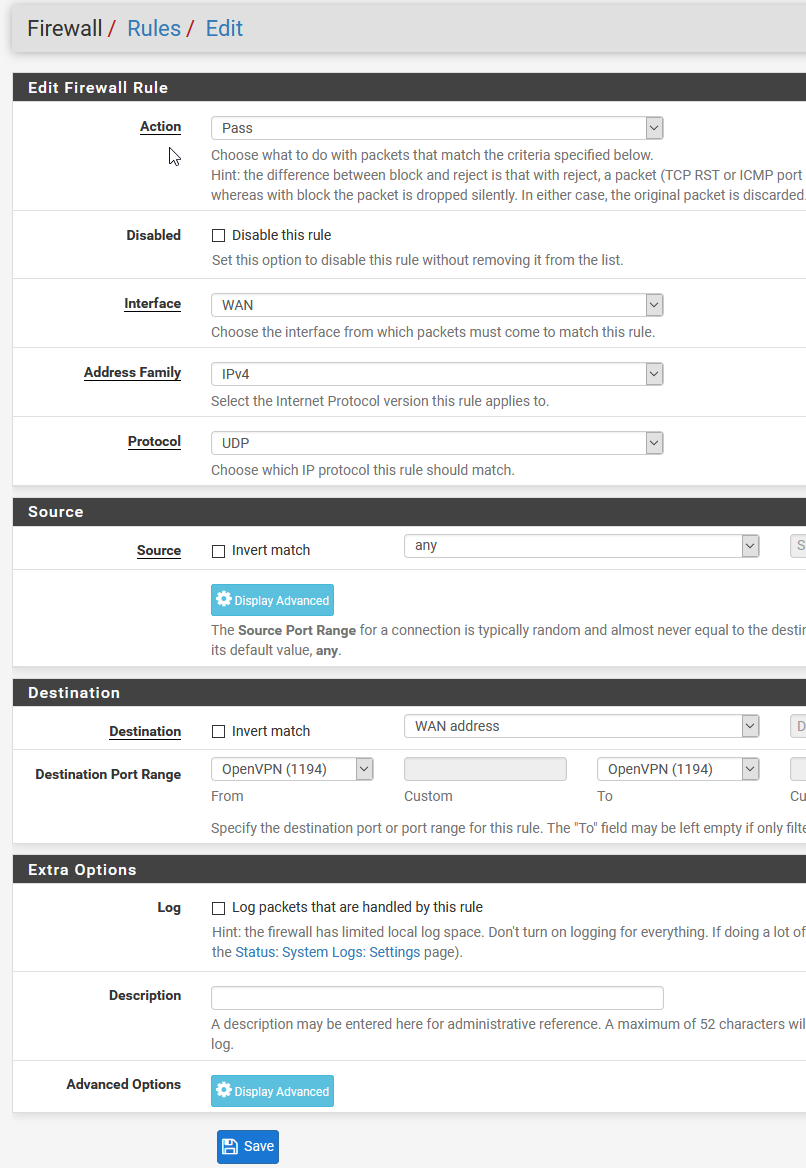
I highly recommend keeping the default port of 1194, or else a lot of the automatic firewall rules in both here and Azure will need to be manually changed.
我强烈建议保留默认端口1194,否则此处和Azure中的许多自动防火墙规则都需要手动更改。
Without going into a description of networks / subnets (which you can safely Google to your hearts content), we’re going to fill out a few specific fields here.
在不介绍网络/子网(您可以放心使用Google对其内容进行描述)的情况下,我们将在此处填写一些特定字段。

这仅适用于隧道,此处指定了实际的虚拟网络地址空间。 (This is *just* for the tunnel, the actual virtual network address space is specified here.)

Note the 1.0 not 10.0. This is what tells our VPN to assign 10.1.0.xxx addresses to the clients who connect. This matches what we set up in Azure. As long as these match, you’ll be good.
请注意1.0 而不是 10.0。 这就是告诉我们的VPN为连接的客户端分配10.1.0.xxx地址的原因。 这与我们在Azure中设置的内容匹配。 只要这些比赛,你会很好。

OK! Don’t touch anything else yet!
好! 不要触摸任何东西!
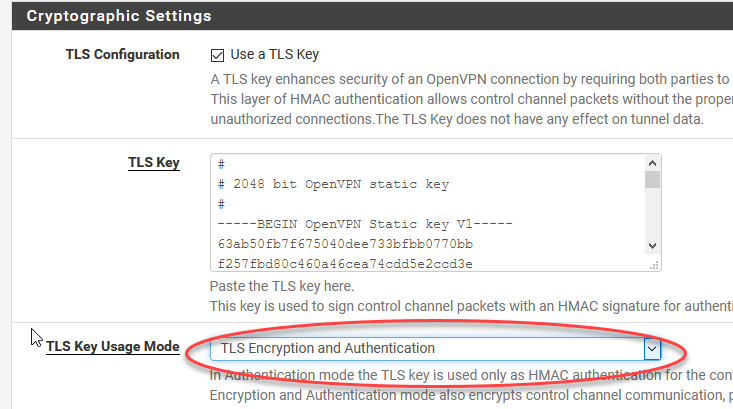
Now, we need to go back in and edit some settings that weren’t part of the wizard. This step wasn’t in the docs and took me an entire night to figure out!
现在,我们需要返回并编辑一些不属于向导的设置。 这一步不在文档中,我花了一整夜才弄清楚!

We need to change the TLS usage mode to *both* Encryption and Authentication, or else the TLS packets get all mangled up on transit. I never did quite figure out WHY, but I will tell you I did sit there staring at Wiresharks for at least 3 hours… don’t be that guy!! Somehow, this serverfault.com article led me to suspect the packets were being mangled. I don’t think they even talk about it but they still get credit for inspiring the solution!
我们需要将TLS使用模式更改为“加密和身份验证”两者,否则TLS数据包将在传输过程中被破坏。 我从来没有完全弄清楚为什么,但是我会告诉你我确实坐在那里盯着Wiresharks至少3个小时……别那个人! 不知何故,这篇serverfault.com文章使我怀疑数据包是否被篡改。 我认为他们甚至没有谈论它,但是他们仍然因启发解决方案而获得赞誉!

If you see this, its a bug, just deselect and reselect the default algorithm.
如果您看到此错误,则只需取消选择并重新选择默认算法即可。

Ack, such an easy fix. One we really don’t need to delve too deep on. Hit save at the bottom!
阿克,这么简单的解决方法。 我们真的不需要深入研究。 点击保存在底部!
The takeaway here, at this point, is there are SO many cool options you can do from here that BLOWS AZURE VPNs away. I’m super happy Azure has this firewall virtualized on their platform, which totally makes up for their lackluster VPN :) Netgate’s docs are great and there’s plenty of info you can Google to figure out how to customize this to your particular needs.
到目前为止,这里的要点是,您可以从这里进行很多很棒的选择,以免破坏AZURE VPN。 我非常高兴Azure在其平台上虚拟化了此防火墙,这完全弥补了他们乏善可陈的VPN :) Netgate的文档非常出色,您可以通过Google找到很多信息来找出如何根据您的特定需求对其进行自定义。
Let’s not get distracted though, all of this setup and still no connection to celebrate….
不过,让我们不要分心,所有这些设置仍然没有庆祝的关系……。
Maybe now is a good coffee break before we go in further. This is hard work!! Congrats to you if you’re still here plugging away.
在我们进一步研究之前,现在也许是个不错的休息时间。 这很辛苦!! 如果您还在这里,请恭喜您。

Whew! Almost there.
ew! 差不多了。
是时候设置用户了 (Time to setup users)
You’ll notice there are no options to do a “client export” and install the VPN client yet. Head over the users section, here
您会注意到尚无选择进行“客户端导出”并安装VPN客户端。 转到此处的用户部分
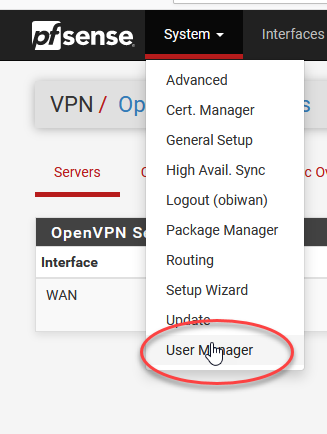
Add a new user (the default ones can’t be vpn users).
添加一个新用户(默认用户不能是VPN用户)。
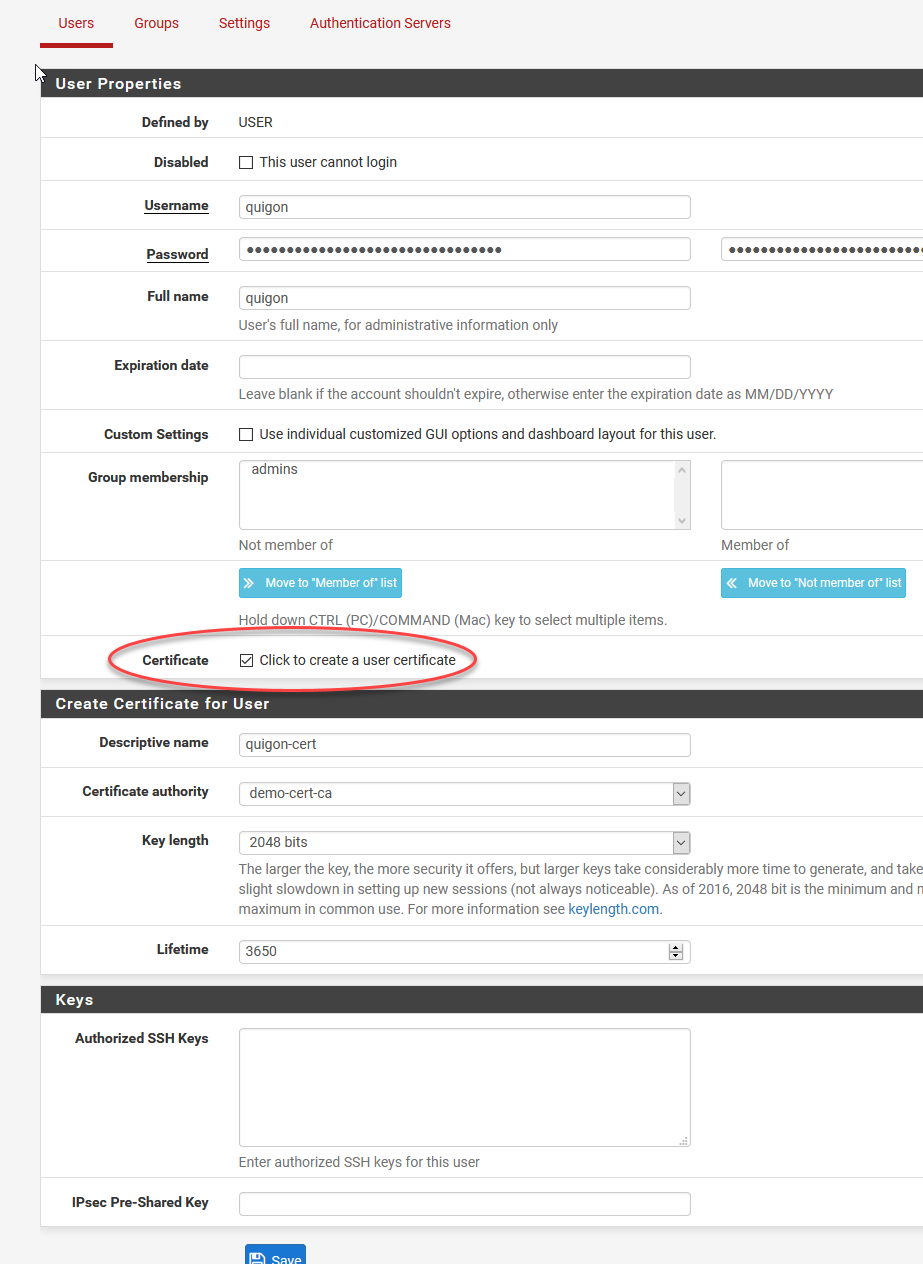
Again, some setup is needed here. Use the same 1Password to generate 32 char or greater passwords for a base level of security. We’re also going to add certificate validation on top of the password so it’s technically a “2-factor” authentication that doesn’t actually require VPN keys on the user side, but is still far more secure than a single password authentication.
同样,这里需要一些设置。 使用相同的1Password生成32个字符或更高的密码,以实现基本的安全级别。 我们还将在密码之上添加证书验证,因此从技术上讲它是一种“两因素”身份验证,实际上不需要用户端使用VPN密钥,但仍比单一密码身份验证安全得多。
It’s actually super simple! Just check the user certification box and name the cert something unique during this step. Ignore the SSH key.
它实际上非常简单! 只需选中用户证书框,然后在此步骤中将证书命名为唯一的即可。 忽略SSH密钥。
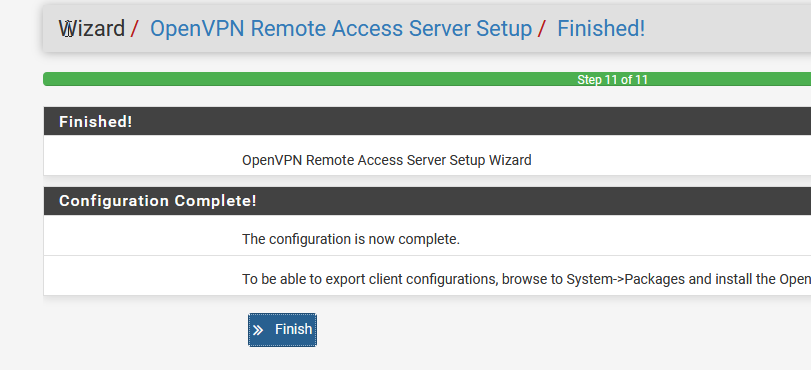
We’re going to use the OpenVPN client export tool to have a really easy time installing the required certificates on the client machines.
我们将使用OpenVPN客户端导出工具,非常轻松地在客户端计算机上安装所需的证书。
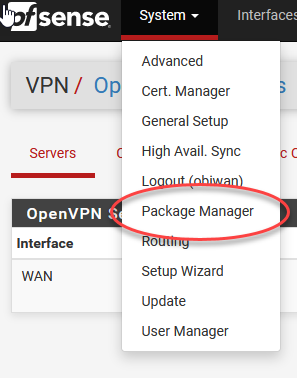
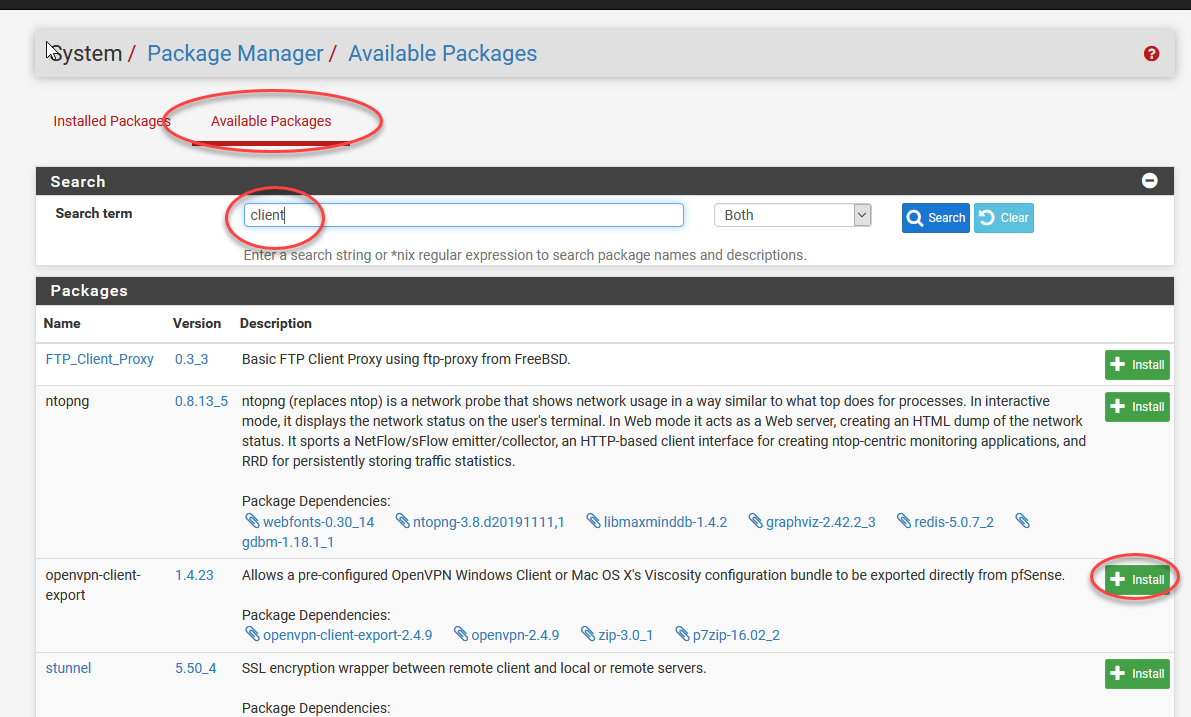
This will give you an idea how awesomely fast we can expand the power of PfSense! Head back over to the OpenVPN tab when this is done installing.
这将使您了解我们可以多么快速地扩展PfSense的功能! 完成安装后,请回到OpenVPN选项卡。
There should be a new option now:
现在应该有一个新选项:
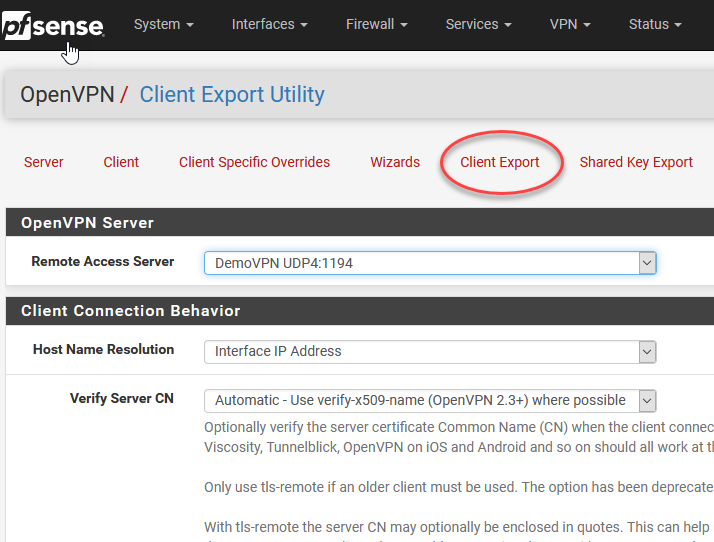
Scroll down to find auto-installers for all our supported operating systems. Grab the Win10 one.
向下滚动以找到我们所有支持的操作系统的自动安装程序。 抢Win10之一。

Now, we are ready to install the client on your local machine. Ideally you have a Windows 10 or other machine locally you are reading / doing this tutorial on. You are free to use the MacOS viscosity client too (but it’s a pay for client sadly, comes with a free trial if you want to try it out).
现在,我们准备将客户端安装在您的本地计算机上。 理想情况下,您在本地具有Windows 10或其他计算机,正在阅读/进行本教程。 您也可以自由使用MacOS粘度客户端(但是可悲的是,这是对客户端的付费,如果您想试用,则可以免费试用)。
I will show how to do this on Windows 10, since the OpenVPN client is free.
我将展示如何在Windows 10上执行此操作,因为OpenVPN客户端是免费的。
You will need to re-do the steps to create users / client export for every single user you want to connect to the VPN.
您将需要重新执行步骤以为要连接到VPN的每个用户创建用户/客户端导出。
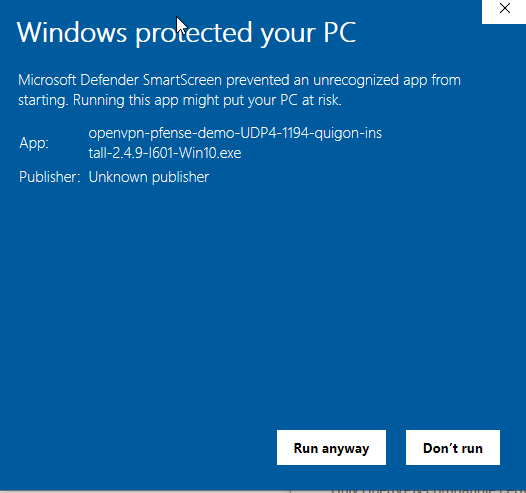
You may have to deal with one of these annoying Windows Defender issues… ah, Microsoft still hating on open source.
您可能必须处理这些令人讨厌的Windows Defender问题之一……啊,微软仍然讨厌开源。
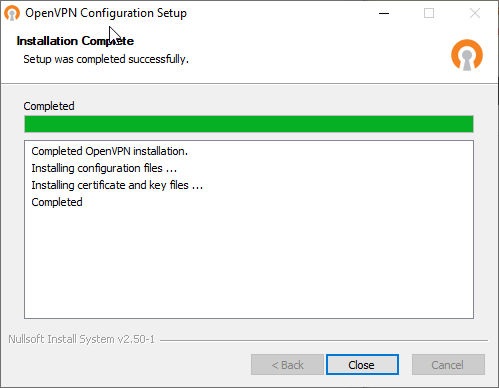
Now start up the GUI , it is weird and doesn’t pop up so check your bottom right tray.
现在启动GUI,它很奇怪并且没有弹出,因此请检查右下角的托盘。

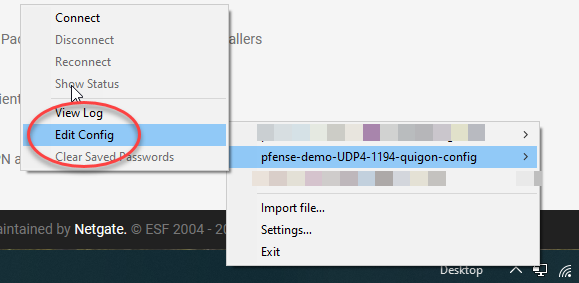
Time to find where this config file got installed as this is where things go off the rails again and I had to solve a bunch of weirdnesses. You’ll see!
是时候找到该配置文件的安装位置了,因为这是事情再次脱离正常的地方,我不得不解决一些怪异的问题。 你会看到的!
First, try connecting and put in the user/pass we added on the pfsense. I highly recommend saving the crazy long password, unless you want users to have to re-input it every single time (thus driving them nuts).
首先,尝试连接并放入我们在pfsense中添加的用户/密码。 我强烈建议保存疯狂的长密码,除非您希望用户每次都必须重新输入它(从而使他们感到烦恼)。
You should notice…. nothing happens.
您应该注意到…。 没发生什么事。
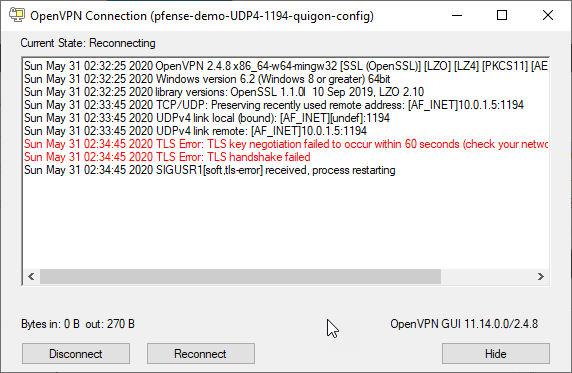

All that work for this?? Fear not, we have the answer.
所有为此工作? 不要害怕,我们有答案。
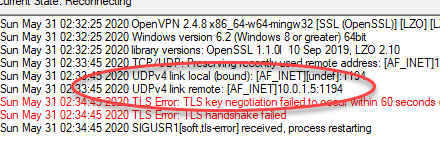
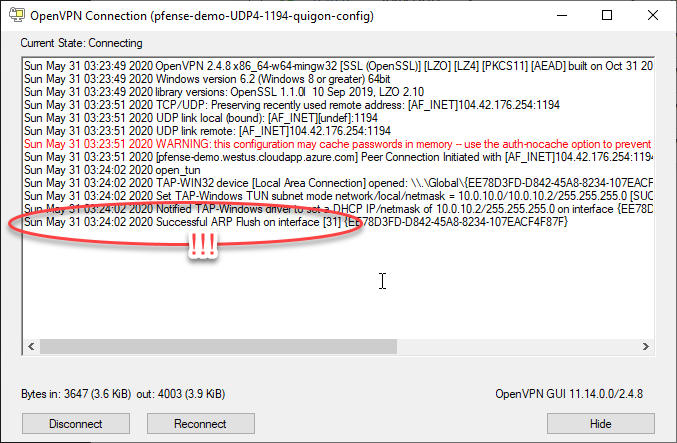
If you notice carefully where the UDP link is trying to connect, you’ll notice it’s a local 10.0.1.5 address!
如果您仔细注意到UDP链接尝试连接的位置,您会发现它是本地10.0.1.5地址!
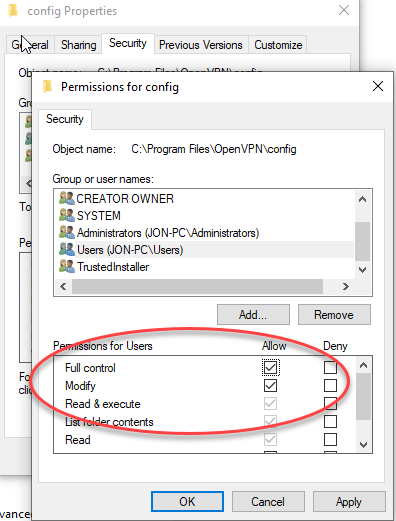
Oh but there’s more… if you directly try to edit the config file that comes up when you click the OpenVPN GUI “config” option from before, it will happily open in Notepad but then refuse to save because lo and behold, OpenVPN installed the file with admin read-only locked permissions. In spirit, it was a good idea, but it’s just annoying for us.
哦,还有更多…如果您直接尝试编辑从前单击OpenVPN GUI“配置”选项时出现的配置文件,它将很高兴在记事本中打开,但随后拒绝保存,因为瞧瞧,OpenVPN安装了该文件具有管理员只读锁定权限。 从本质上讲,这是个好主意,但对我们来说却很烦人。
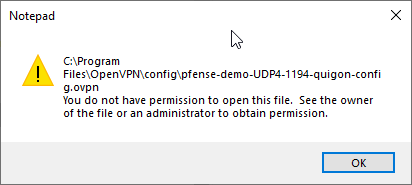
We can fix this. Go here in explorer C:\Program Files\OpenVPN\config
我们可以解决这个问题。 在资源管理器C:\ Program Files \ OpenVPN \ config中转到此处
Go into the properties of the config folder, and re-assign your current user (even if that user is an admin) full control.
进入config文件夹的属性,然后重新分配当前用户(即使该用户是管理员)的完全控制权。
Now, you can finally edit and open the *.ovpn file. It will be named a bunch of things, but look for the username + “-config”, so for this example it’s
现在,您终于可以编辑并打开* .ovpn文件。 它将被命名为一堆东西,但是要寻找用户名+“ -config”,因此在此示例中
pfense-demo-UDP4–1194-quigon-config.ovpn
pfense-demo-UDP4–1194-quigon-config.ovpn
Find the “remote” line and change the IP to the public IP you are connected to in the PFSense GUI in your web browser.
在网络浏览器的PFSense GUI中找到“远程”行,并将IP更改为您连接的公共IP。
remote 10.0.1.5 1194 udp4 -> remote 104.42.176.254 1194 udp4
远程10.0.1.5 1194 udp4->远程104.42.176.254 1194 udp4
All right there’s ONE more step we need to do to get this to work (did you try to connect?? It won’t work yet 😆)
好吧,我们还需要执行一个步骤才能使它正常工作(您是否尝试连接?目前还无法工作work)
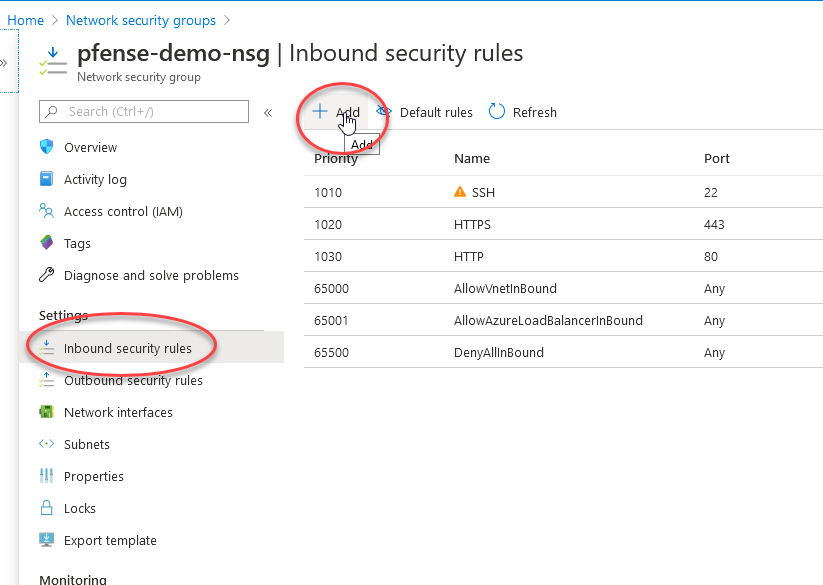
We now need to head back to the Azure portal and allow the OpenVPN protocol through our network security group (Azure’s poor mans firewall, basically).
现在,我们需要回到Azure门户,并通过我们的网络安全组(基本上是Azure的穷人防火墙)来允许OpenVPN协议。
We are looking for “network security groups” in the search bar.
我们正在搜索栏中寻找“网络安全组”。

Then navigate to your group named after your pfsense instance.
然后导航到以pfsense实例命名的组。

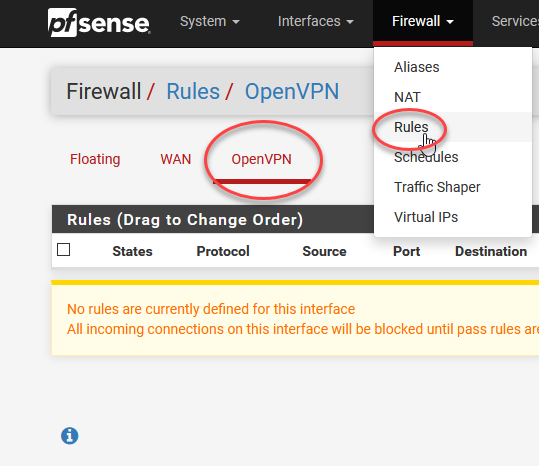
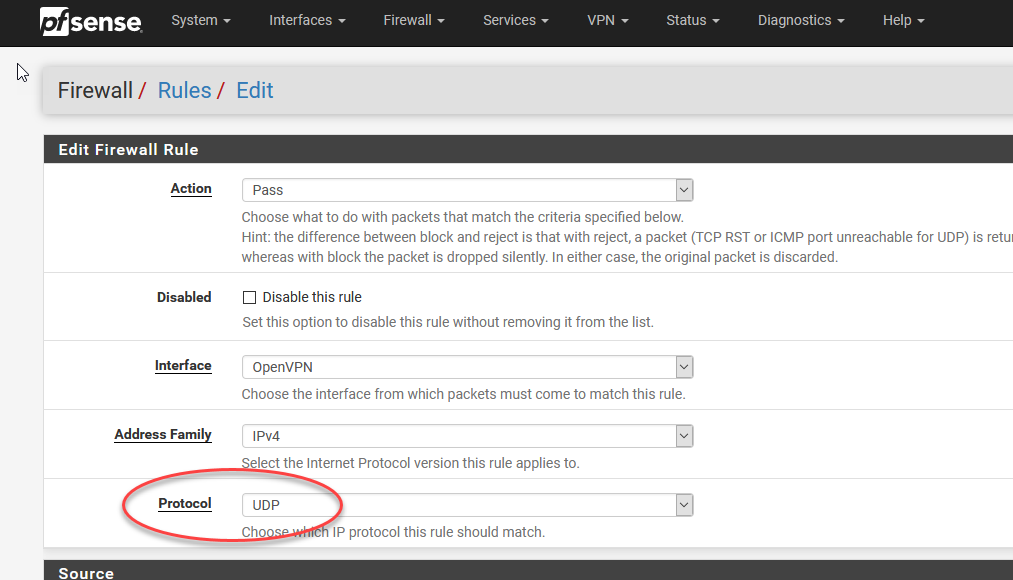
Similarly, we need to add the OpenVPN protocol to PFSense’s firewall (as the setup wizard doesn’t seem to always auto-enable it, so you need to check here). There are two to add, one WAN and one OpenVPN.
同样,我们需要将OpenVPN协议添加到PFSense的防火墙中(因为设置向导似乎并不总是自动启用它,因此您需要在此处进行检查)。 要添加两个,一个WAN和一个OpenVPN。
And finally, after applying those both, you can re-try the OpenVPN GUI connect and you should see this!
最后,在同时应用了这两种方法之后,您可以重试OpenVPN GUI连接,您应该会看到这一点!

但是,如果仍然不起作用怎么办? (But what if it still won’t work?)
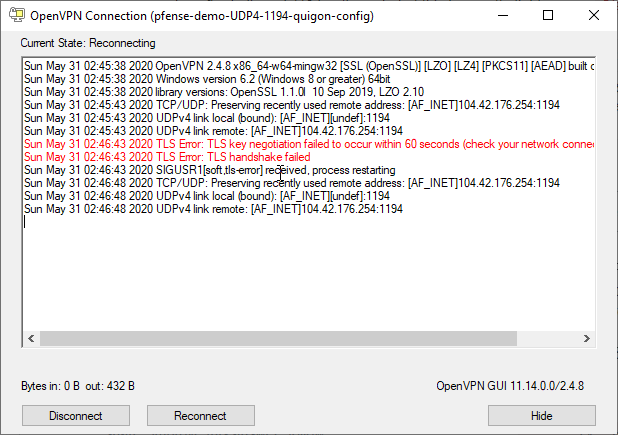
Again, you may still encounter this infamous TLS key negotiation error. Basically, if you missed ANY steps from above, you will need to slowly go back and check all of them one by one. This is not a very forgiving part of the setup.
同样,您仍然可能会遇到这个臭名昭著的TLS密钥协商错误。 基本上,如果您错过了上面的任何步骤,则需要慢慢返回并逐个检查所有步骤。 这不是设置中非常宽容的部分。
But stick with it. You will get there. You can read this serverfault article for possible inspiration as to whats wrong (it helped me).
但是坚持下去。 你会到达那里。 您可以阅读此serverfault文章,以获取有关错误之处的可能启发(它对我有所帮助)。
I’ll list a few re-cap points to go over here to get it working:
我将列出一些总结要点,以使其正常运行:
Verify you fixed the IP (I am not sure how to get the export plugin to write the correct public IP, not private, so manually fixing it is faster still than researching it). You will need to do this public IP fix for every user you export. Sorry. Still, it’s better than manually installing certificates!
验证您是否已修复IP(我不确定如何获取导出插件来编写正确的公共 IP(而非私有IP),因此手动进行修复仍比研究速度更快)。 您将需要为导出的每个用户执行此公共IP修复。 抱歉。 仍然比手动安装证书更好!
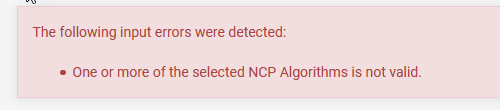
- Check the NCP is enabled, once in my demo prep for this article it exported disabled again, like you see below 检查NCP是否已启用,在本文的演示准备中,再次将其导出禁用,如下所示

Replace nsp-disable with ncp-ciphers AES-128-GCM
将nsp-disable替换为ncp-ciphers AES-128-GCM
3)设置客户端进行连接 (3) Setup Clients To Connect)
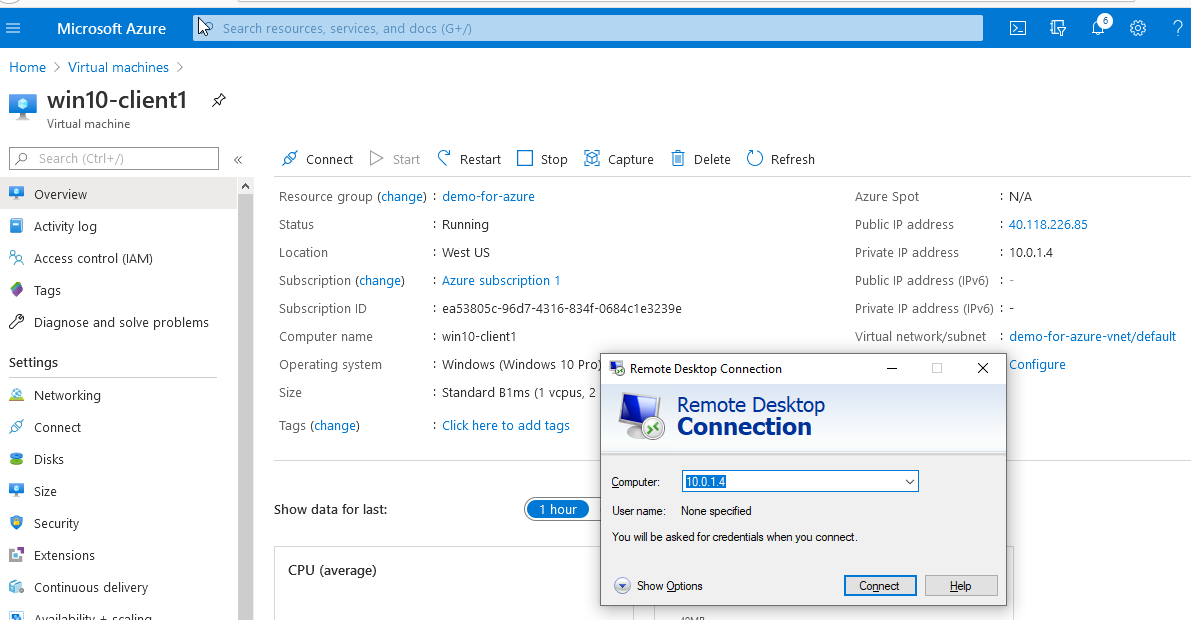
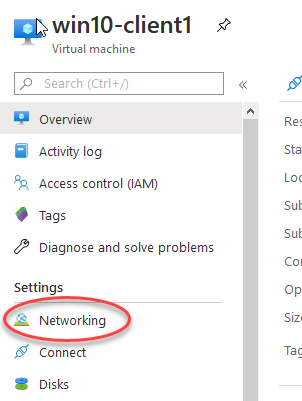
Now that we have the VPN working, we can go ahead and switch RDP to private IP only and get rid of that awful, awful wide open RDP port!
现在我们可以使用VPN了,我们可以继续并将RDP仅切换到专用IP,并摆脱那个可怕的,可怕的开放RDP端口!
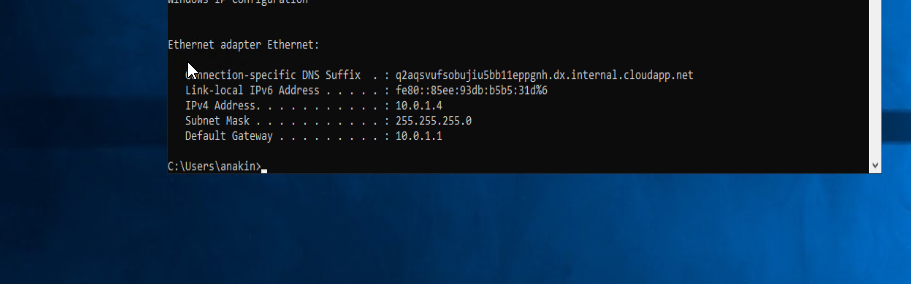
Plug in your private IP now instead of the public one, and you should be able to connect! (note: ping is disabled by default through the VPN so you cannot ping the Azure VMs from your local client).
现在插入您的私有IP而不是公共IP,您应该可以连接了! (注意:默认情况下,通过VPN禁用ping操作,因此您无法从本地客户端ping Azure VM。)
You should be able to connect via RDP to the local 10.0.x.x address if all is working.
如果一切正常,则应该能够通过RDP连接到本地10.0.xx地址。
Great, now we need to go block RDP in Azure from the Public and remove the public IP address entirely (it’s not safe).
太好了,现在我们需要从公共区域阻止Azure中的RDP并完全删除公共IP地址(这是不安全的)。
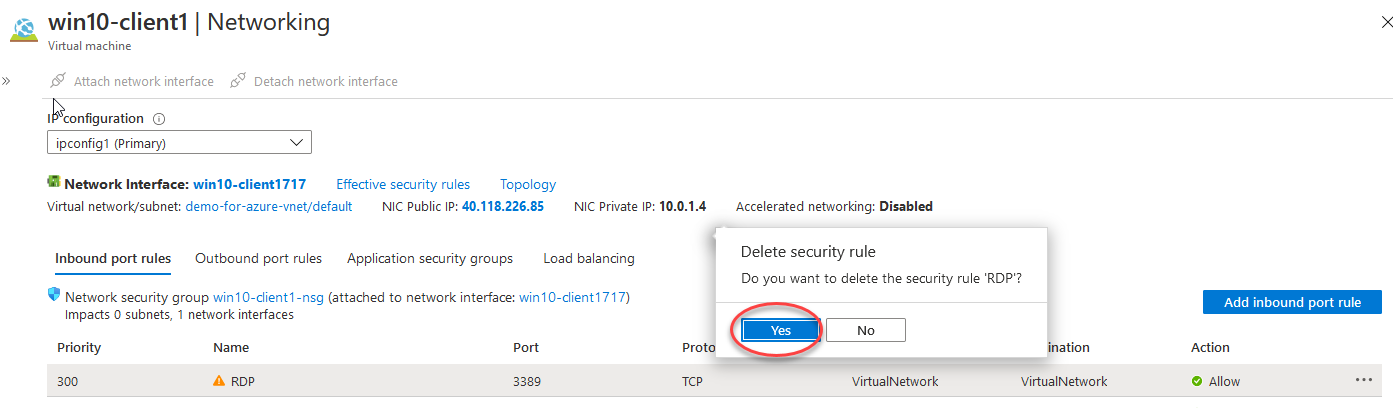
Delete the RDP port from the network device of your VM. Likewise we’ll completely delete the public IP to ensure this VM is not exposed to the internet.
从VM的网络设备中删除RDP端口。 同样,我们将完全删除公共IP,以确保此VM不暴露于Internet。

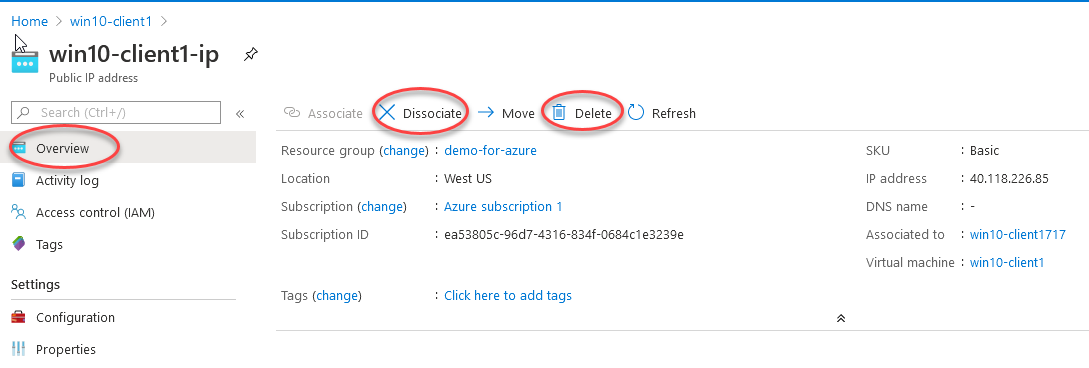
Now this VM is safely isolated behind the VPN firewall. The only IP address that is exposed should be the VPN, creating a single point of entry / exit.
现在,此VM已安全地隔离在VPN防火墙后面。 唯一公开的IP地址应该是VPN,从而创建一个单点进入/退出。
4)设置文件共享 (4) Setup File Shares)
Now we’ll add an Azure file share so we have easy mountable drive access from Windows or MacOS that we can use to move files to/from Azure VMs and local client machines. This will make installing any necessary programs or files way easier!
现在,我们将添加一个Azure文件共享,以便我们可以轻松地从Windows或MacOS进行可挂载的驱动器访问,可用于将文件移至Azure VM和本地客户端计算机或从中移出文件。 这将使安装任何必要的程序或文件变得更加容易!
And we’ll ensure this file share is also protected behind the VPN.
并且我们将确保此文件共享在VPN后面也受到保护。
I’ll explain in a second why this is critical!
我将在第二秒解释为什么这很关键!

You should have a storage account already as part of the creating a Virtual Machine step. If you skipped that somehow, you can easily make one now.
作为创建虚拟机步骤的一部分,您应该已经有一个存储帐户。 如果您以某种方式跳过了该操作,那么现在就可以轻松制作一个。
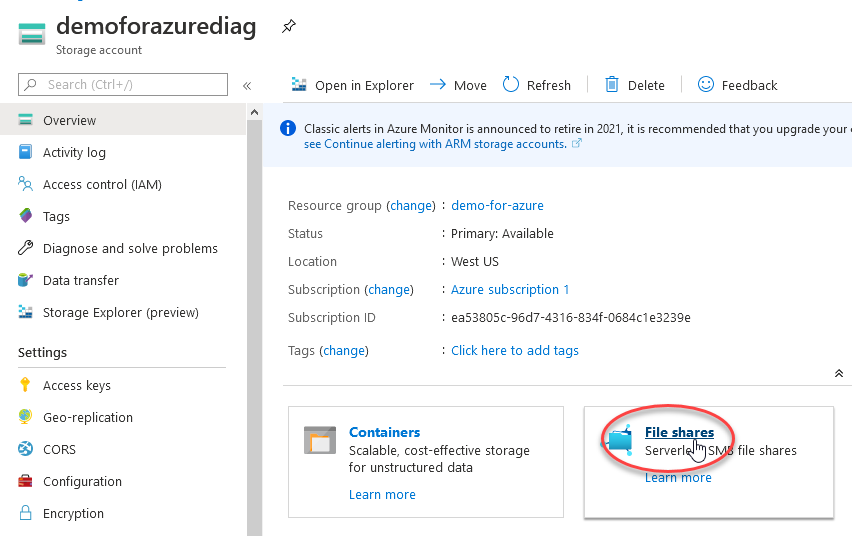
There are so many options here, we are just interested in File shares for now.
这里有很多选择,我们现在仅对文件共享感兴趣。
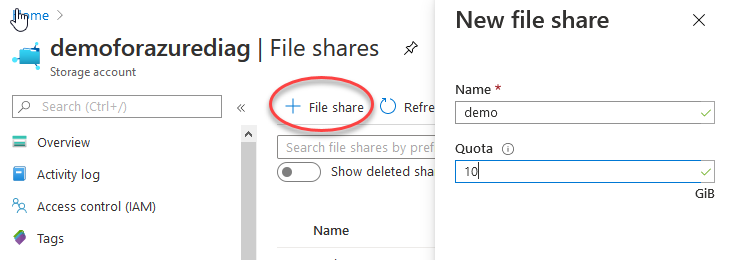
If you then click on the newly created file share, you will find a connect button.
如果然后单击新创建的文件共享,则会找到一个连接按钮。
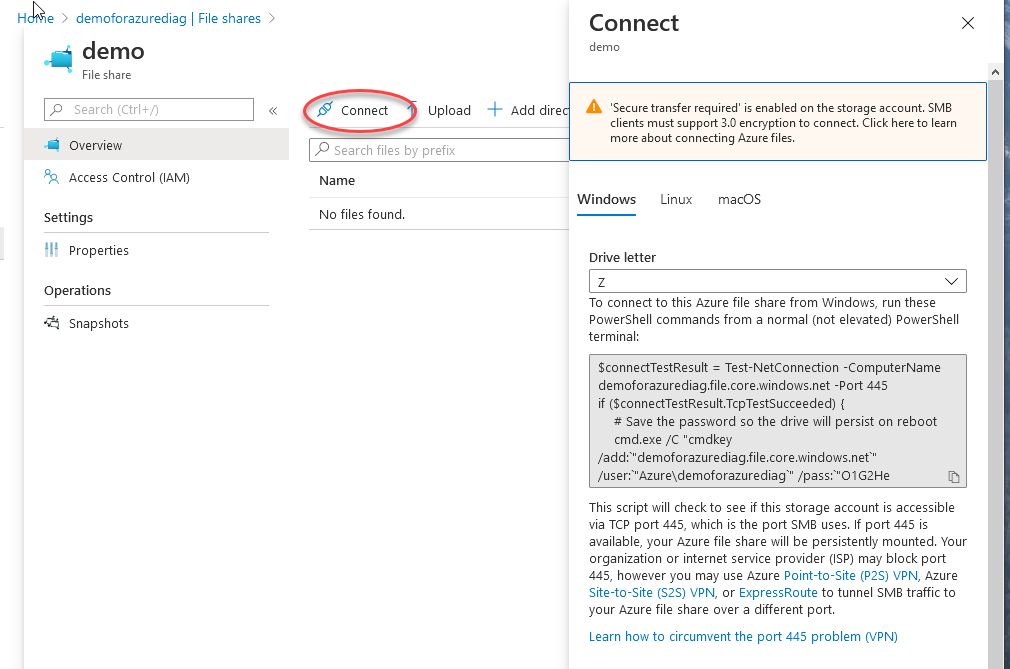
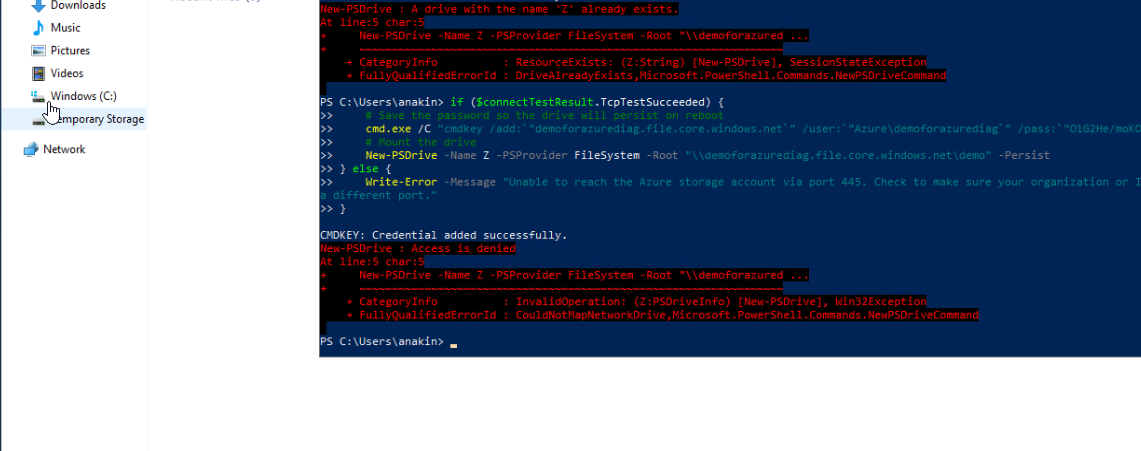
You’ll see a bunch of options to connect via different OS’s. The first thing to note right now is by using this powershell script, the Azure file share is being accessed on the open internet via port 445. The address is demoforazurediag.file.core.windows.net. Now there’s no reason to suspect your file share will immediately by hacked because in all likelihood it would take far too long to hack an SMB 3.0 secured file share.
您会看到很多通过不同操作系统进行连接的选项。 现在首先要注意的是使用此powershell脚本,正在通过端口445在开放的Internet上访问Azure文件共享。地址为demoforazurediag.file.core.windows.net 。 现在,您没有理由怀疑您的文件共享会立即遭到黑客入侵,因为很可能要花费很长时间才能破解SMB 3.0安全文件共享。
Rather, the issue is that port 445 is blocked randomly and without reason by different home and commercial internet providers. For example, on my home internet from Cox Cable, port 445 is blocked via the modem. Two of my clients have access at their homes to port 445 but one does not (who is on AT&T wifi).
相反,问题在于端口445被不同的家庭和商业互联网提供商无缘无故地封锁。 例如,在我通过Cox Cable进行的家庭互联网上,端口445通过调制解调器被阻止。 我的两个客户可以在家中访问445端口,但一个不能访问(谁在AT&T wifi上)。
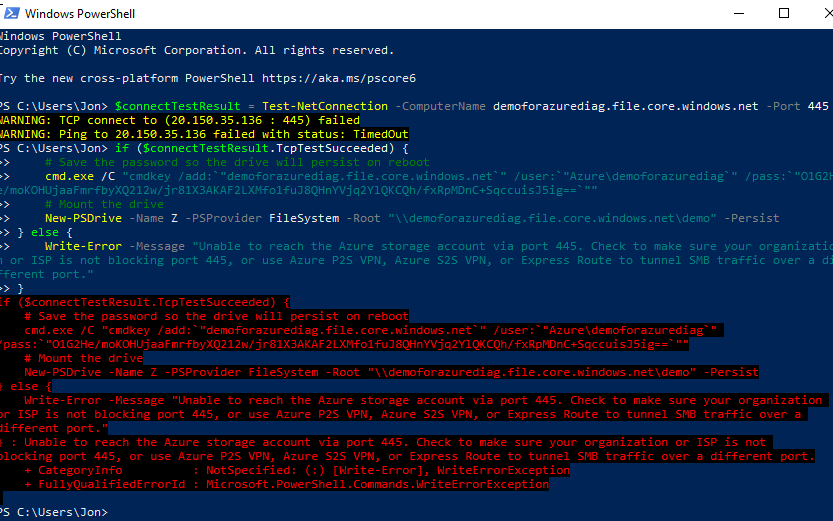
So this is a problem because it blocks local access to the file share and will result in endless errors like this:
因此这是一个问题,因为它阻止了对文件共享的本地访问,并会导致如下所示的无尽错误:
Right, well, there’s an elegant work-around for this. We can enable an Azure feature called Private Endpoints that allows us to tunnel the SMB traffic into the VPN, both securing it further to local IP access AND forcing the traffic over port 1194, which is not generally blocked. Two birds with one stone!
是的,对此有一个优雅的解决方法。 我们可以启用一个称为“专用端点”的Azure功能,该功能允许我们将SMB流量隧道传输到VPN中,既可以将其进一步保护到本地IP访问,又可以强制通过通常未被阻止的端口1194进行流量。 两只鸟和一块石头!
First we need to make sure the storage account is a V2, as of June 2020 the default is V1 when you make the storage. V1 is a legacy type that doesn’t support the private endpoints and will leave you confused why it is missing!
首先,我们需要确保存储帐户是V2,从2020年6月开始,创建存储时默认帐户是V1。 V1是不支持私有终结点的传统类型,会让您感到困惑,为什么会丢失它!
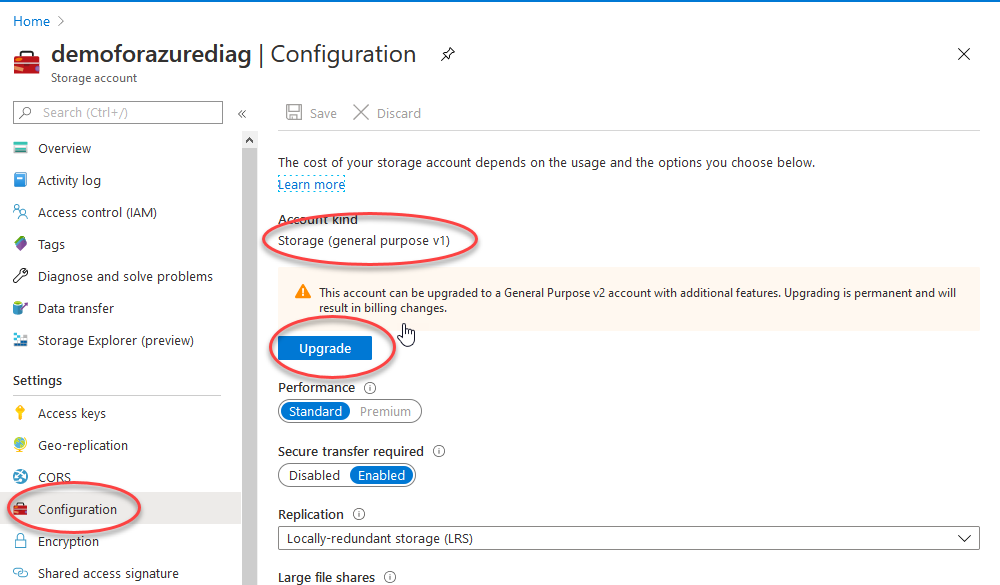
There’s no price difference when just using LRS file storage between v1 and v2. You’re welcome to use their calculator to figure out other differences, but we won’t need them here.
仅在v1和v2之间使用LRS文件存储时,没有价格差异。 欢迎您使用他们的计算器来找出其他差异,但是在这里我们不需要它们。
The upgrade has now granted us access to this:
升级现已授予我们访问权限:
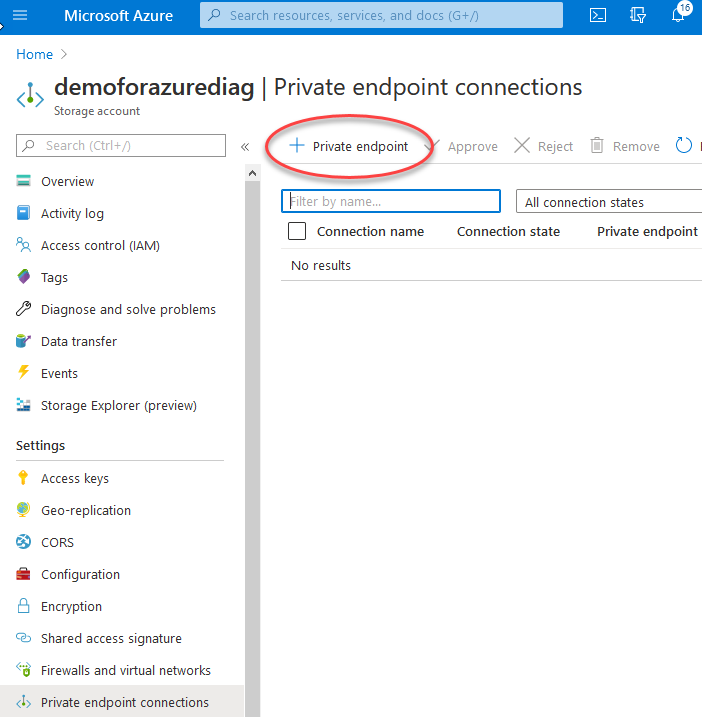
Go ahead and create an endpoint like so:
继续创建端点,如下所示:
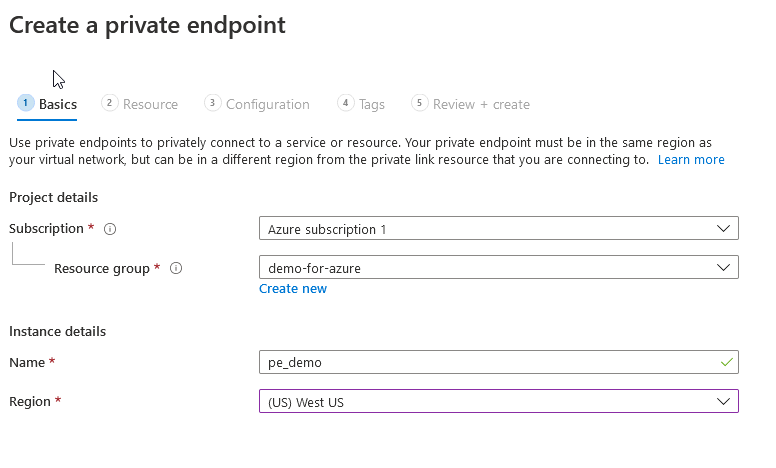
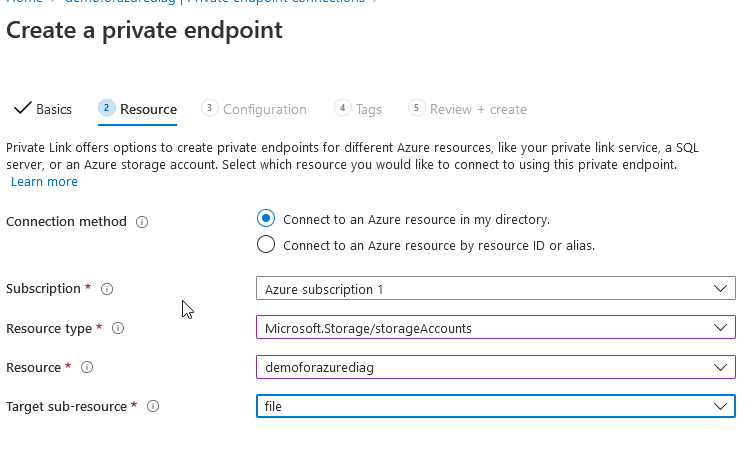
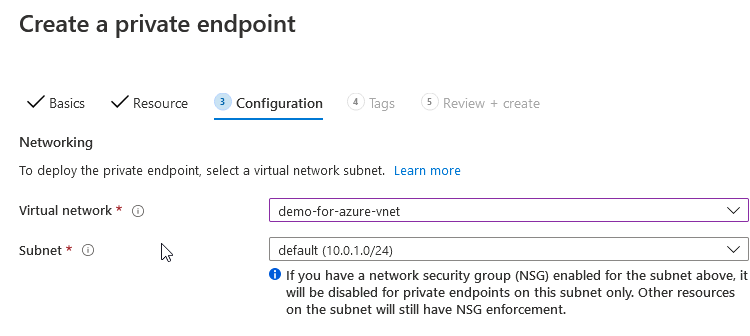
Leave the other settings as default and create / deploy.
将其他设置保留为默认设置并创建/部署。
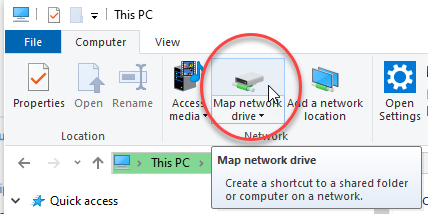
When it’s done, you’ll have a nice local IP address you can use to map via the Map Network drive. You’ll use the same Azure user/pass from the Powershell script from before as the login.
完成后,您将拥有一个不错的本地IP地址,可用于通过“映射网络”驱动器进行映射。 您将使用Powershell脚本中以前与登录相同的Azure用户/密码。
For more info on this particular piece, these are great resources
有关此特定作品的更多信息,这些都是不错的资源
Now, go to the private endpoint and grab the IP address.
现在,转到私有端点并获取IP地址。
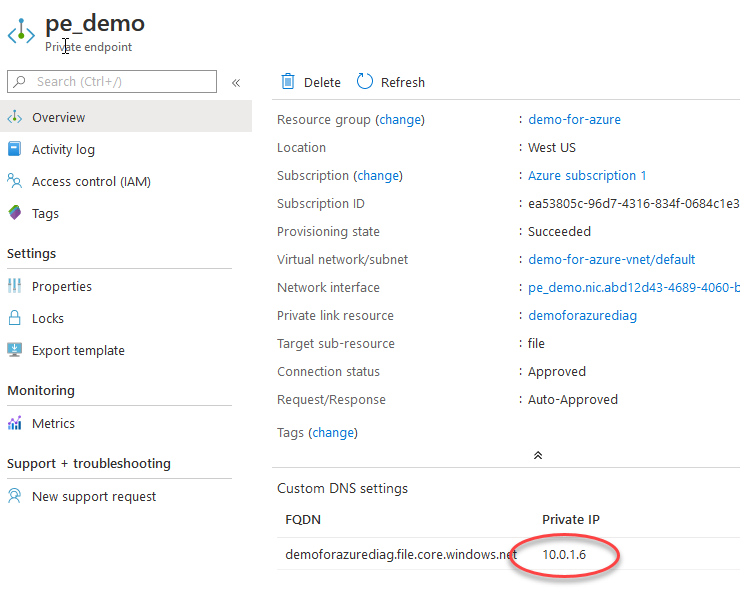
We’ll use that to do a classic Windows drive mapping.
我们将使用它来完成经典的Windows驱动器映射。
The folder path will be the IP + the name of the share. So in our example, it looks like this
文件夹路径将是IP +共享的名称。 所以在我们的示例中,它看起来像这样
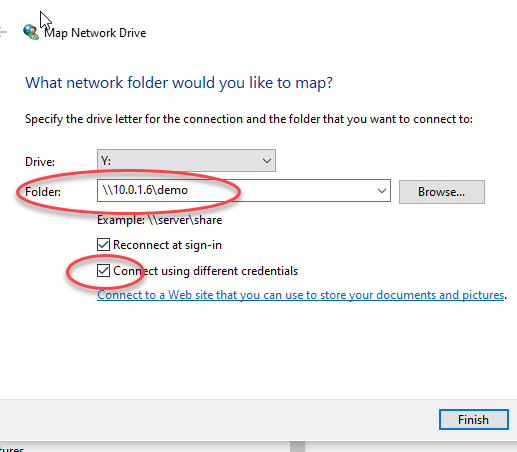
Make sure you choose to Connect using different credentials as we need to input the Azure user/pw.
确保您选择使用不同的凭据进行连接,因为我们需要输入Azure用户/密码。
A few paragraphs above we copy/pasted a “Connect” powershell script. Paste that into a notepad and use it to extract the user/pw. It is easy to find, right after cmd.exe /C “cmdkey /add:
上面的几段我们复制/粘贴了“ Connect” powershell脚本。 将其粘贴到记事本中,然后使用它来提取用户/密码。 在cmd.exe / C“ cmdkey / add”之后很容易找到:

Make sure you are connected to the VPN before doing the map, since we are now using the local IP address. Highly recommend checking “remember user” or else your users will hate you for having to copy/paste this very long password every login.
进行映射之前,请确保已连接到VPN,因为我们现在正在使用本地IP地址。 强烈建议选中“记住用户”,否则您的用户会讨厌您每次登录时都必须复制/粘贴此非常长的密码。

Now if all is well and your setup is correct, the drive should mount happily. You’ll be able to copy / delete / rename / move files just like a regular windows file share now, albeit completely over the VPN port 1194. This will work even when port 445 is blocked!
现在,如果一切正常,并且您的设置正确,则驱动器应该可以快乐地安装。 您现在可以像常规Windows文件共享一样复制/删除/重命名/移动文件,尽管完全通过VPN端口1194。即使端口445被阻止,此操作也将起作用!
You can now repeat these same steps across the virtual Azure machines to have both side using the local private SMB file shares.
现在,您可以在虚拟Azure计算机上重复这些相同的步骤,以使双方都使用本地私有SMB文件共享。
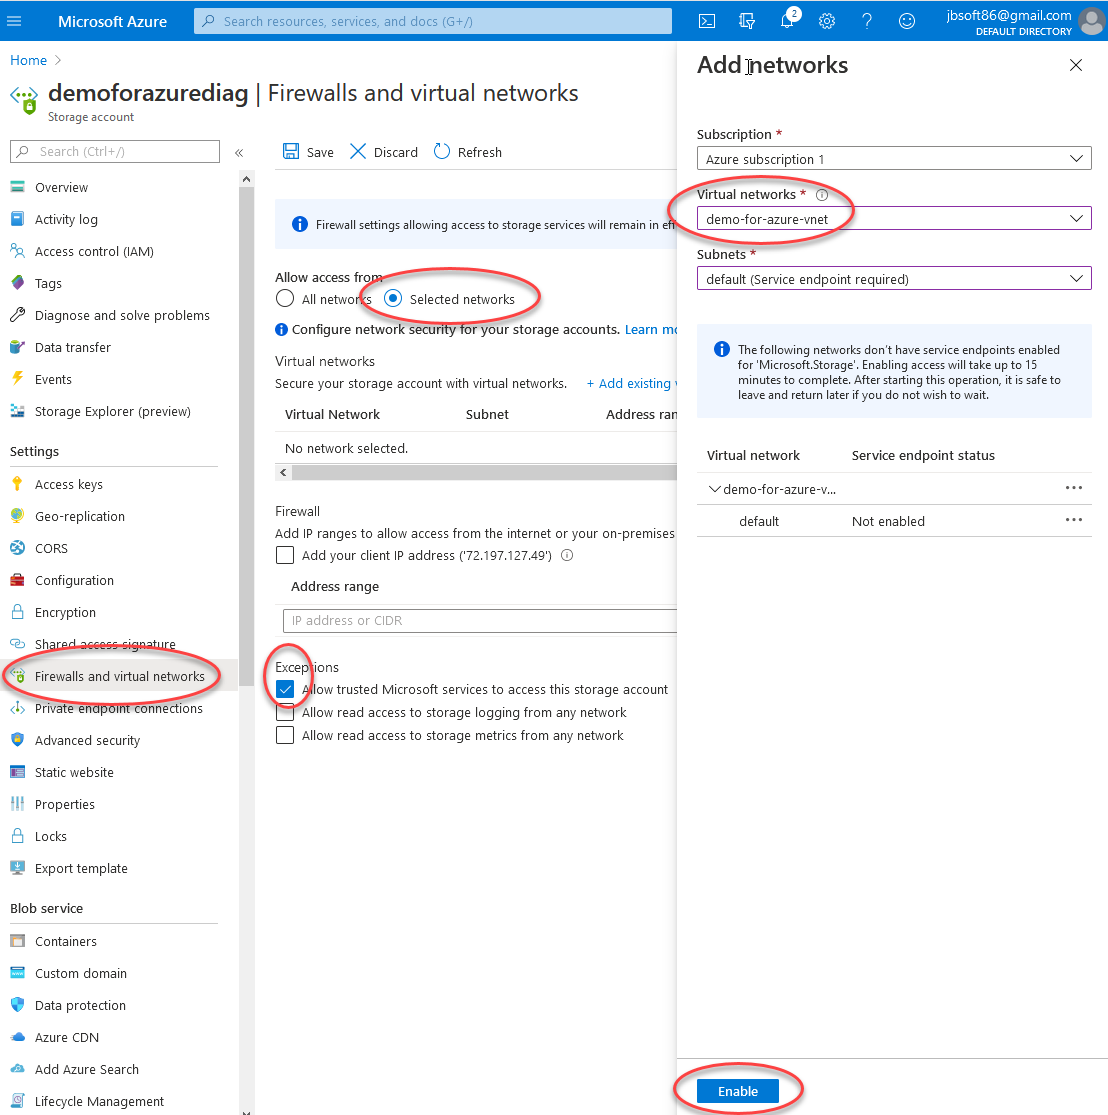
Now that that works, we’ll restrict access to the public endpoint side.
现在可以正常工作了,我们将限制对公共端点端的访问。
If you’d like to allow the public address to still work, you can add your subnets or specific IPs below. If not, you can just choose “selected networks” and Azure will automatically allow the private endpoint to access files behind the firewall. Only the public address will be restricted (so you are safe from random port 445 exploits).
如果您希望公共地址仍然可用,则可以在下面添加子网或特定IP。 如果没有,则可以只选择“选定的网络”,Azure将自动允许私有终结点访问防火墙后面的文件。 仅公共地址会受到限制(因此您可以免受445端口的随机攻击)。
Also, this is what it will look like if you try to connect to this file share after enabling the firewall.
另外,如果您在启用防火墙后尝试连接到此文件共享,则将是这样。
And that’s it! You can try copying a file to/from to see it work.
就是这样! 您可以尝试向/从文件复制以查看其工作。
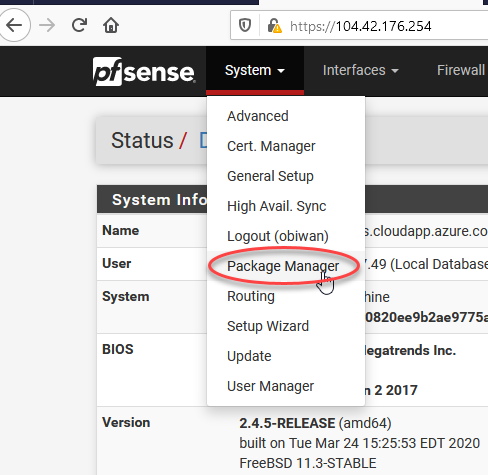
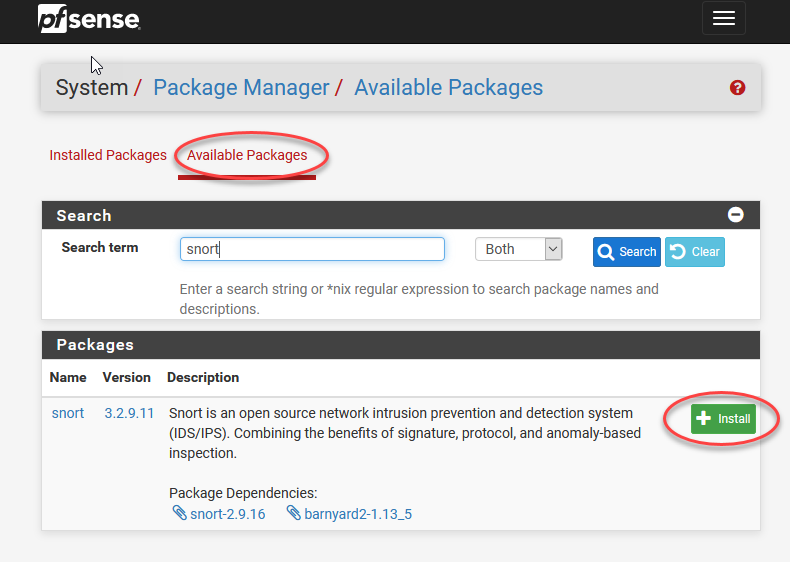
5)奖励:PFSense上的入侵检测和预防(使用Snort) (5) Bonus: Intrusion Detection and Prevention on PFSense (using Snort))
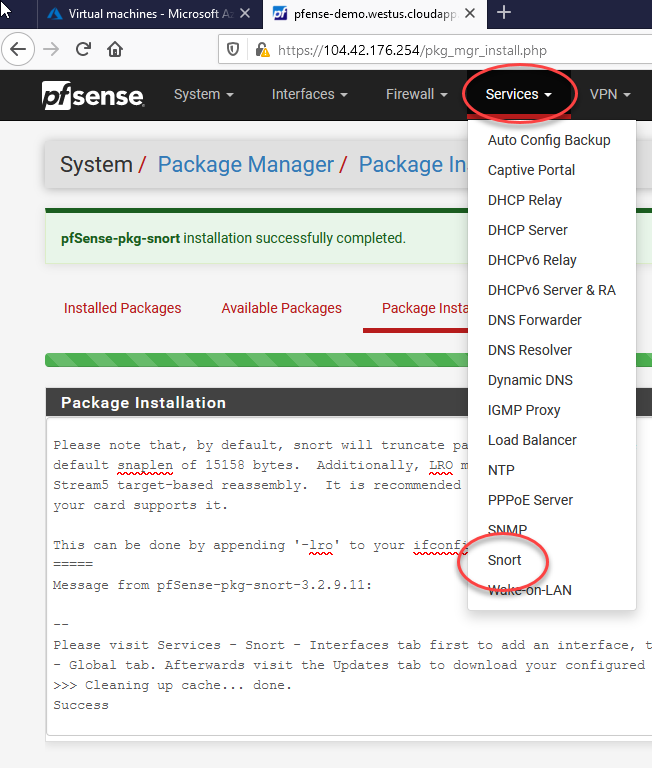
This article is getting beastly long so this section is an optional bonus. Check it out if you’d like to upgrade this setup to install the popular Snort intrusion detection software on this setup!
本文越来越长,因此本节是可选的。 检验一下是否要升级此安装程序,以便在此安装程序上安装流行的Snort入侵检测软件!
It’s by no means required to make use of this setup. But if you’re curious to get a feel for how the internet weather looks, this is for you. You’ll also get to see just how awesome and easy it is to expand the PFSense’s capabilities!
完全不需要使用此设置。 但是,如果您想对互联网的天气情况有所了解,这是给您的。 您还将看到扩展PFSense功能的强大和便捷!
此步骤非常有趣且容易。 (This step is pretty fun and easy.)
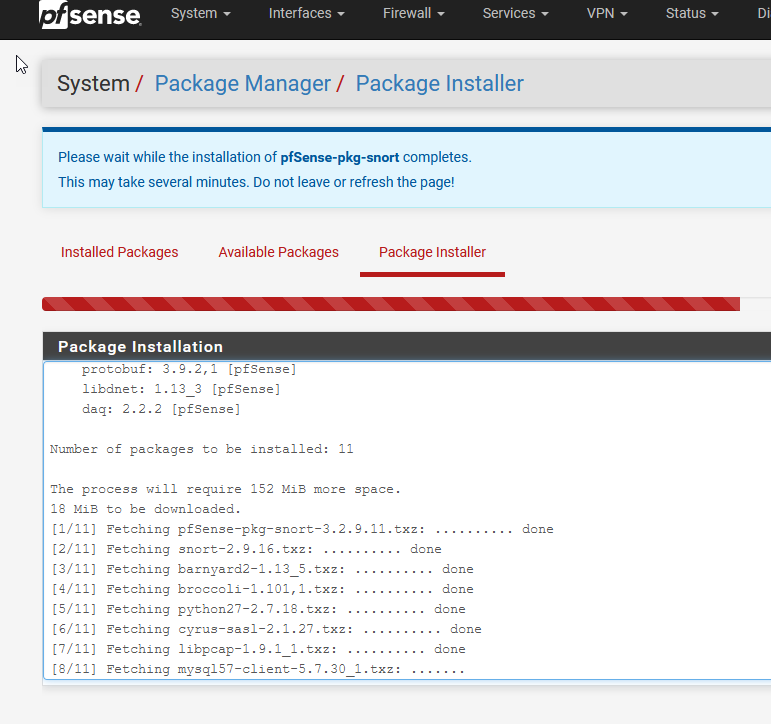
You will love how fast it is to get such a powerful, flexible open-source package going. It shows you how you can expand PFSense to meet future needs!
您将爱上如此强大,灵活的开源程序包的运行速度有多快。 它向您展示了如何扩展PFSense以满足未来的需求!
Now sit back and watch the fun part!
现在坐下来观看有趣的部分!
After a minute or two, head over here:
一两分钟后,前往此处:
Now, at this stage Snort needs a bit of configuration to be useful. There are numerous paid-for options but we’ll stick to the free ones for the time being. You can always upgrade later!
现在,在此阶段,Snort需要一些配置才能有用。 有许多付费选项,但我们暂时会保留免费选项。 您以后随时可以升级!
All the steps we’re going to cover are covered on PFSense’s official documentation here.
PFSense的官方文档涵盖了我们将介绍的所有步骤。
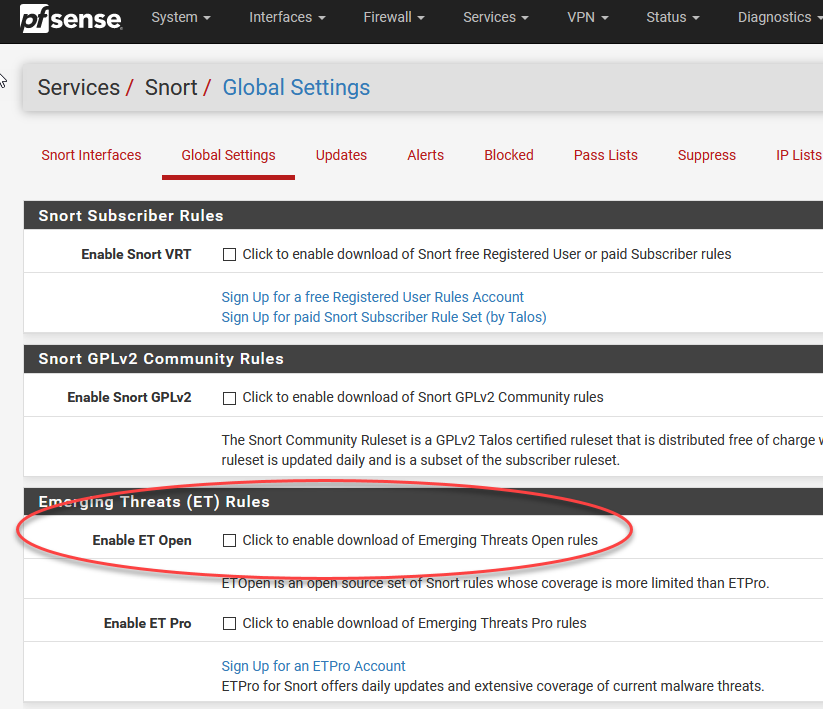
We’re just going to use a simple but effective set of free rules called the Emerging Threats (ET) Open ruleset. You’ll see it warns you about it not being super fresh, but 30 days out of date is still great compared to not having anything at all. And it’s free!
我们将使用一组简单但有效的免费规则,称为“新兴威胁(ET)开放规则集”。 您会看到它警告您它不是超级新鲜,但是与什么都没有相比,过时30天仍然很棒。 而且是免费的!
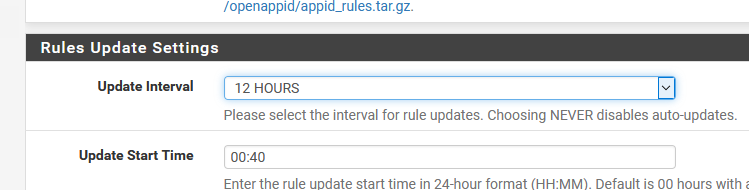
Next be sure to set the auto-updates interval or else the rules are not updated automatically!
接下来,请确保设置自动更新间隔,否则规则不会自动更新!
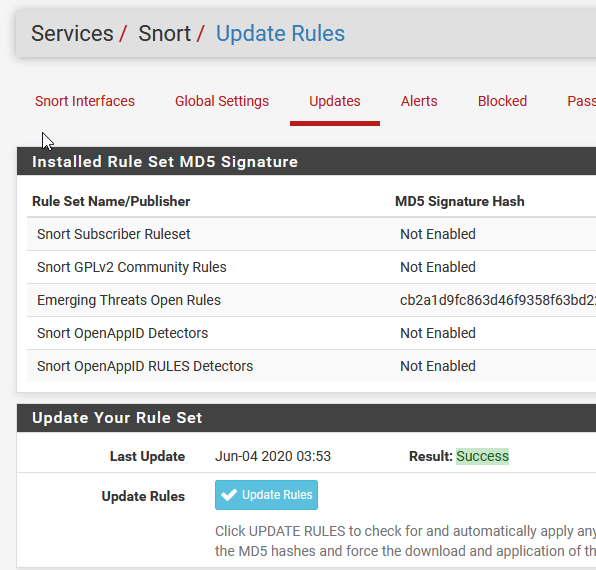
Next we need to manually ask for the first set of rules to be downloaded.
接下来,我们需要手动要求下载第一套规则。
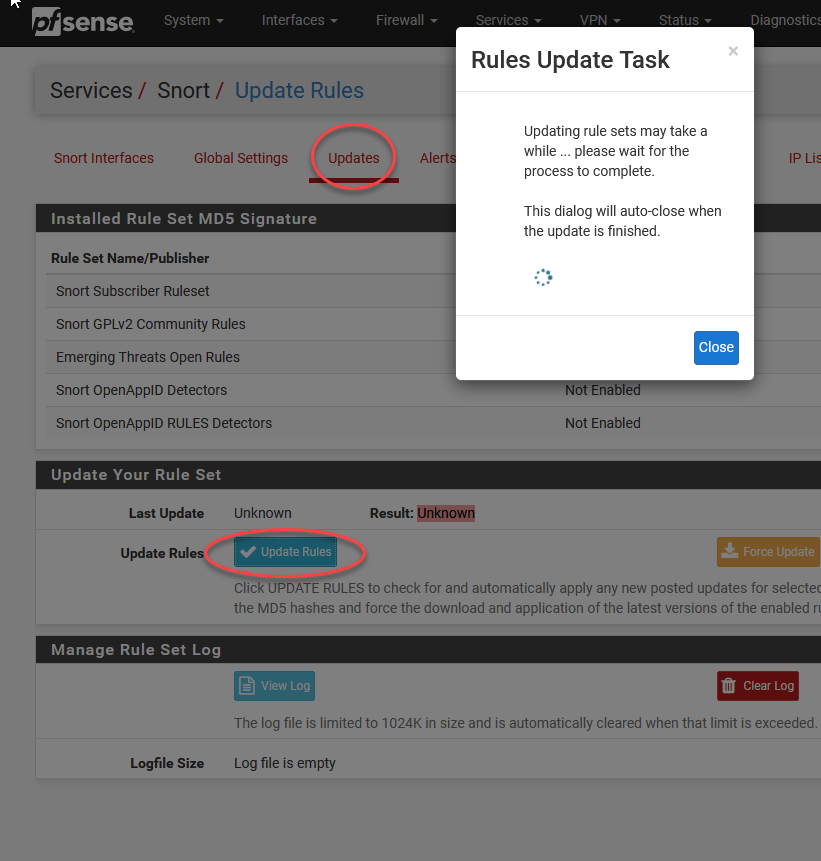
You can safely click close and wait about 60 seconds. You should see this:
您可以安全地单击关闭并等待大约60秒钟。 您应该看到以下内容:
Next up we set an interface.
Next up we set an interface.
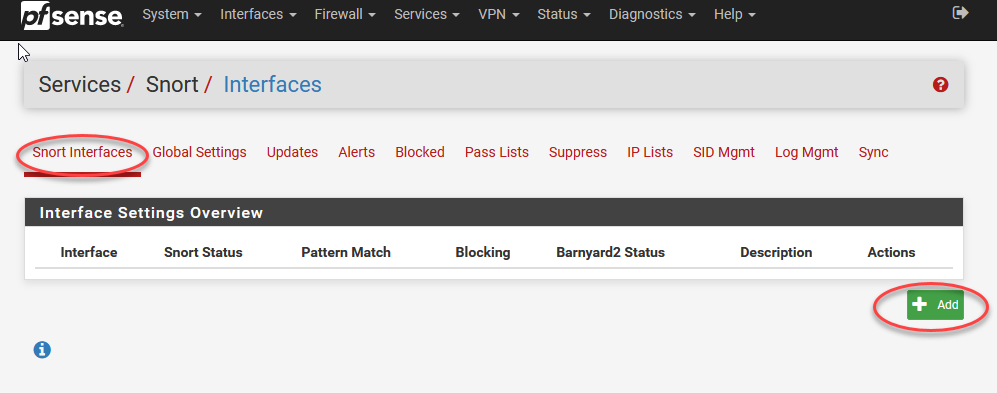
You actually don’t need to don’t need to do anything but hit “save” the first time. Then we’ll go back in and edit the rule set now that the interface is actually added.
You actually don't need to don't need to do anything but hit “save” the first time. Then we'll go back in and edit the rule set now that the interface is actually added.

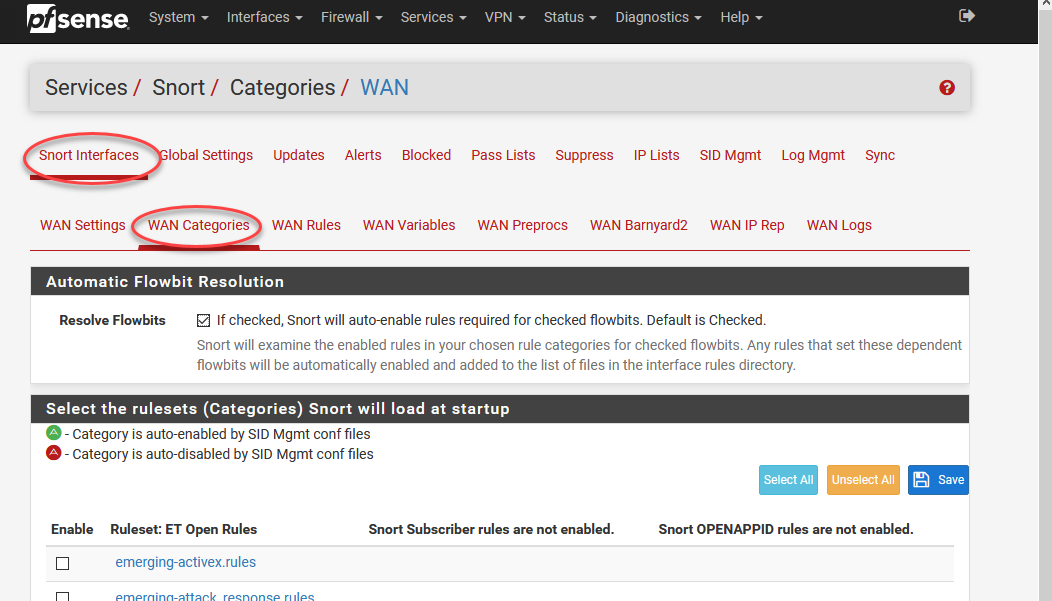
All right at this point it CAN get kind of deep, but that’s not the point of this. I’m no expert on intrusion prevention systems, but rather, I’m just showing you how to get started. Netgate’s documents are a great place to start learning about it as are Snorts.
All right at this point it CAN get kind of deep, but that's not the point of this. I'm no expert on intrusion prevention systems, but rather, I'm just showing you how to get started. Netgate's documents are a great place to start learning about it as are Snorts.
The jist is we do not want to turn up the security settings too high too fast or else you generate false positives and deny potentially your regular work traffic! So, we’ll stick to Netgate’s recommendations and take it easy. This is just a demo after all :)
The jist is we do not want to turn up the security settings too high too fast or else you generate false positives and deny potentially your regular work traffic! So, we'll stick to Netgate's recommendations and take it easy. This is just a demo after all :)
Likewise, if you turned on every rule, you’d blow out the log files and/or fill up the virtual PFsense disk with logging if you aren’t careful! In theory, you could also slow down the Linux VM so much that the VPN stops responding (max 100% cpu usage). Too many rules will definitely bog down the resources of your system so it’s something to be tuned and watched in a step-by-step process.
Likewise, if you turned on every rule, you'd blow out the log files and/or fill up the virtual PFsense disk with logging if you aren't careful! In theory, you could also slow down the Linux VM so much that the VPN stops responding (max 100% cpu usage). Too many rules will definitely bog down the resources of your system so it's something to be tuned and watched in a step-by-step process.
Here are the rules I recommend starting with that will be interesting to watch for.
Here are the rules I recommend starting with that will be interesting to watch for.
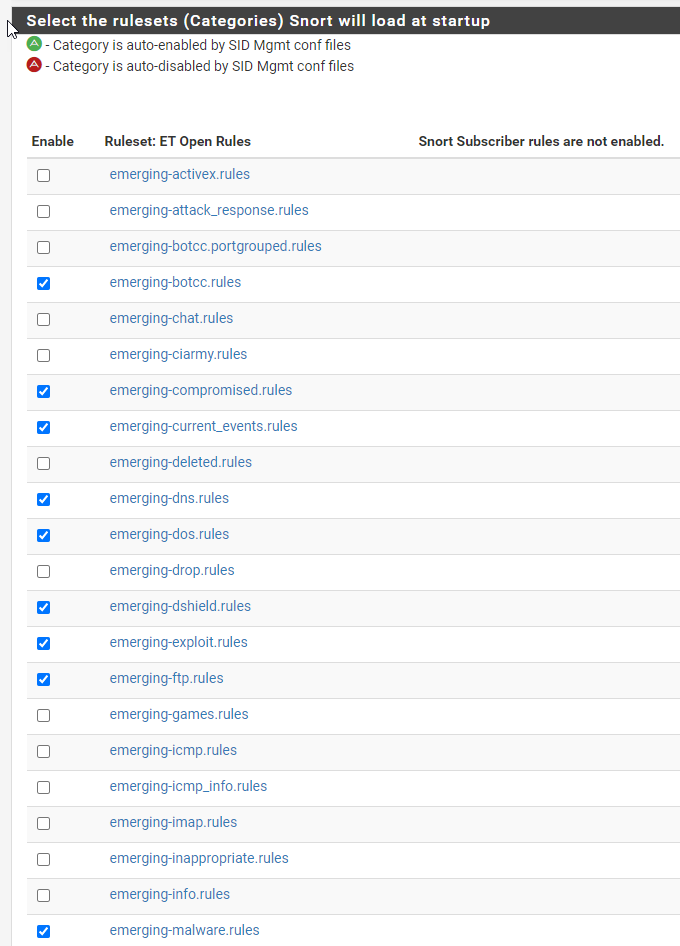
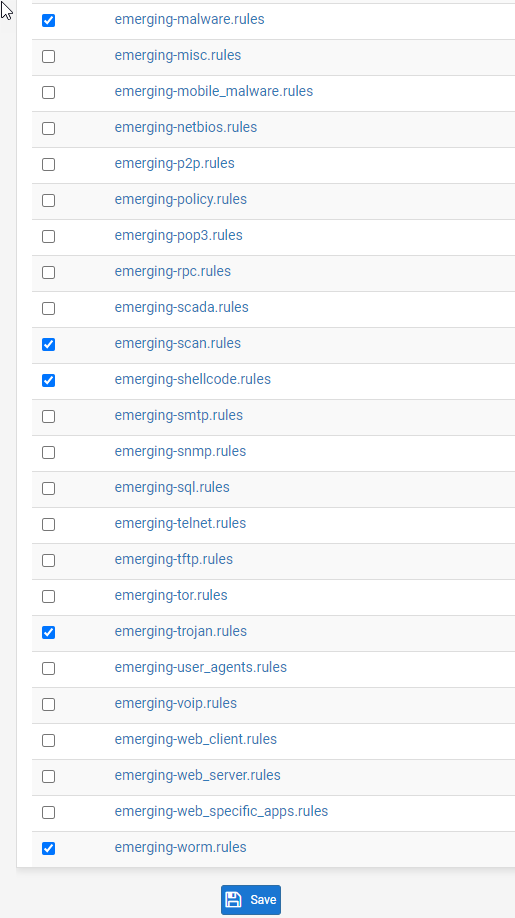
Don’t forget to hit save!
Don't forget to hit save!
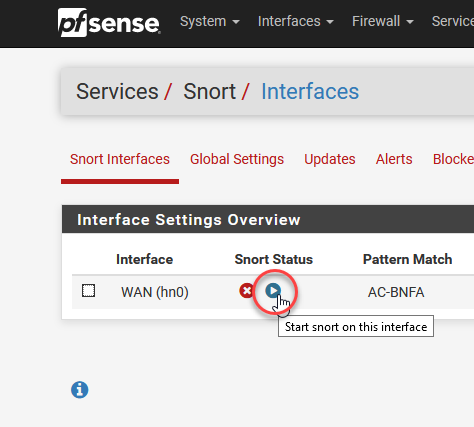
Now it’s time to go back to the interface tab and start Snort.
Now it's time to go back to the interface tab and start Snort.
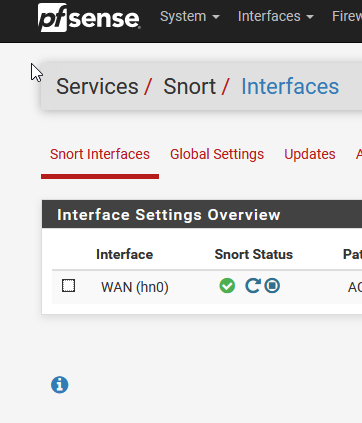
Assuming all is well, the icon will turn green
Assuming all is well, the icon will turn green
Now, we’ll do one more IMPORTANT step and then see if anything is detected yet. Why this isn’t part of the default setup guide for Netgate is beyond me… remember how we talked about not blowing out your storage space with logging? Yeah, we need to take care of this.
Now, we'll do one more IMPORTANT step and then see if anything is detected yet. Why this isn't part of the default setup guide for Netgate is beyond me… remember how we talked about not blowing out your storage space with logging? Yeah, we need to take care of this.
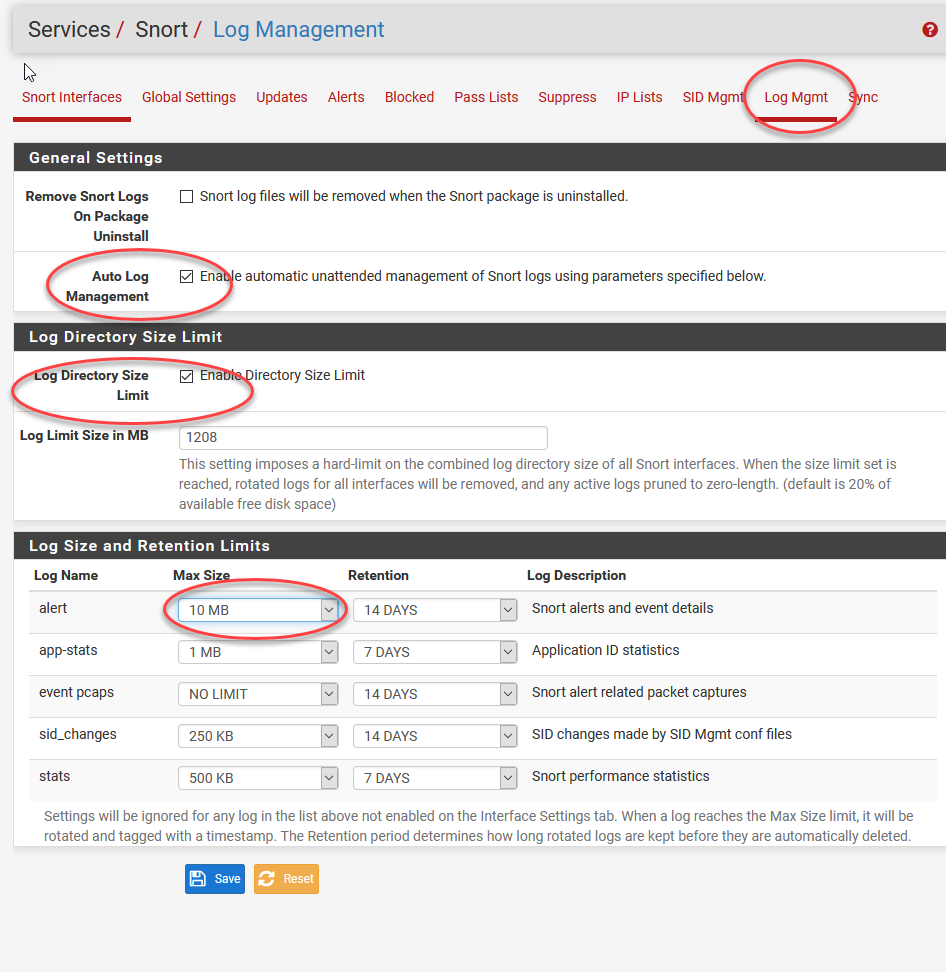
If you leave this off, and you have a lot of rules on and get lit up by some attacks, you will be in serious trouble. Your VM only has 8 GB of hard drive space so if you don’t think you can fill that up fast, think again! You haven’t seen how wasteful ASCII logging can be :)
If you leave this off, and you have a lot of rules on and get lit up by some attacks, you will be in serious trouble. Your VM only has 8 GB of hard drive space so if you don't think you can fill that up fast, think again! You haven't seen how wasteful ASCII logging can be :)
There’s no calculation since it depends on your rules and how targeted your system is, so to be safe, those options above will keep the logs under control no matter what you turn on and off.
There's no calculation since it depends on your rules and how targeted your system is, so to be safe, those options above will keep the logs under control no matter what you turn on and off.
Now it might take a while before you see any real alerts since we chose a very mellow set of rules. Here is an example from my production system.
Now it might take a while before you see any real alerts since we chose a very mellow set of rules. Here is an example from my production system.

You can see there’s plenty of random stuff floating around out there. Azure VPNs don’t give you this kind of visibility! So this is pretty cool stuff. We don’t necessarily need to do anything about it, it is just for informational purposes.
You can see there's plenty of random stuff floating around out there. Azure VPNs don't give you this kind of visibility! So this is pretty cool stuff. We don't necessarily need to do anything about it, it is just for informational purposes.
Intrusion is an entire industry and I recommend checking it out further if it interests you!
Intrusion is an entire industry and I recommend checking it out further if it interests you!
I love how easy it was to set all of that up, it takes less than 30 minutes! And you can see how there’s plenty of places to jump into if you are interested.
I love how easy it was to set all of that up, it takes less than 30 minutes! And you can see how there's plenty of places to jump into if you are interested.
6) Summary Recap (6) Summary Recap)
OK! Whew! You made it. Or you skipped to the end, either way, congrats!
好! ew! 你做到了。 Or you skipped to the end, either way, congrats!
By now you should be able to see and hopefully understand how to further build out your VPN and virtual machine setup!
By now you should be able to see and hopefully understand how to further build out your VPN and virtual machine setup!
At this point you can delve into the system architecture and figure out how many servers / clients you want to host in Azure. From before, you should have a rough idea how fast the monthly costs ramp up just for basic 1–2 CPU units. Azure VMs are like leasing / renting computing resources so it is to be expected to not be “cheap”.
At this point you can delve into the system architecture and figure out how many servers / clients you want to host in Azure. From before, you should have a rough idea how fast the monthly costs ramp up just for basic 1–2 CPU units. Azure VMs are like leasing / renting computing resources so it is to be expected to not be “cheap”.
I hope this has been helpful, even if you didn’t read all of it! Putting together everything can be a daunting task when the resources are scattered across 100 different URLs and website resources. Azure is an absolutely enormous platform with way too much complexity for many purposes. Likewise PFSense can do so much but you don’t need most of it to solve a given problem.
I hope this has been helpful, even if you didn't read all of it! Putting together everything can be a daunting task when the resources are scattered across 100 different URLs and website resources. Azure is an absolutely enormous platform with way too much complexity for many purposes. Likewise PFSense can do so much but you don't need most of it to solve a given problem.
Azure has tons and tons of tutorials and documentation, but sometimes having a first hand experience is good enough to give you a solid taste for how these tools work and feel. I deployed this setup to a client, so, you’re seeing a real-world example here. Of course, if you see any holes or improvements, feel free to leave a comment or suggestion below! I’m hardly saying I did it perfectly.
Azure has tons and tons of tutorials and documentation, but sometimes having a first hand experience is good enough to give you a solid taste for how these tools work and feel. I deployed this setup to a client, so, you're seeing a real-world example here. Of course, if you see any holes or improvements, feel free to leave a comment or suggestion below! I'm hardly saying I did it perfectly.
In my opinion and experience as an engineer, simplicity is king. The more elegant solution is generally the simplest, with the fewest parts to break. When your client is calling you every week and complaining about not being able to work, the lack of complexity will be an absolute life saver. That said, it’s okay to start out over-complex and slowly distill down to the essence. That’s essentially what a sculptor would do with stone, and we do here with computer systems :)
In my opinion and experience as an engineer, simplicity is king. The more elegant solution is generally the simplest, with the fewest parts to break. When your client is calling you every week and complaining about not being able to work, the lack of complexity will be an absolute life saver . That said, it's okay to start out over-complex and slowly distill down to the essence. That's essentially what a sculptor would do with stone, and we do here with computer systems :)
And finally, yes, you could probably build the same thing with Amazon AWS or Google. I’ve actually been super curious what it would be like, so if you want to know leave a comment and let me know!
And finally, yes, you could probably build the same thing with Amazon AWS or Google. I've actually been super curious what it would be like, so if you want to know leave a comment and let me know!
-jon
-jon
翻译自: https://medium.com/@jonathan.buehler/mega-guide-to-small-business-azure-cloud-migration-17287ff8db8e


 819
819


 被折叠的 条评论
为什么被折叠?
被折叠的 条评论
为什么被折叠?
 到【灌水乐园】发言


