


tekton
This tutorial should help you to get started with Helm Operations, referred to as HelmOps and CI/CD with Tekton on K3s running on your Laptop deployed on multipass Ubuntu VMs with MetalLB support. We’ll use Chartmuseum to store a simple Helm Chart in our own Helm Repository in Chartmuseum and deploy our apps from there through Tekton Pipelines in the next section of this tutorial.
本教程应该可以帮助您开始使用头盔操作,被称为HelmOps和CI / CD与Tekton的上K3s在你的笔记本电脑上部署多道Ubuntu的虚拟机与MetalLB支持运行。 我们将使用Chartmuseum将一个简单的Helm Chart存储在Chartmuseum中自己的Helm存储库中,并在本教程的下一部分中通过Tekton Pipelines从那里部署我们的应用程序。
This guide should work with any K8s implementation running locally or on any cloud with some minor adaptations to the scripts provided in the Github Repo of Bonsai.
本指南应适用于本地运行或在任何云上运行的任何K8s实现,并且对Bonsai的Github Repo中提供的脚本进行了一些小改动。
To learn more about K3s and our somehow opinionated Bonsai implementation on Multipass VMs with MetalLB support, please refer to this article about K3s with MetalLB on Multipass VMs.
要了解有关K3的更多信息以及我们对具有MetalLB支持的Multipass VM的自以为是的Bonsai实现的更多信息,请参阅本文,了解有关Multipass VM上具有MetalLB的K3的信息 。
开始吧 (Get started)
With the following commands you should get a K3s cluster running on your machine in about 3 minutes on real Ubuntu VMs, which we refer sometimes as a near-to-production environment.
使用以下命令,您应该在真正的Ubuntu VM上大约3分钟内使K3s集群在您的计算机上运行,有时我们将其称为接近生产的环境。
git clone https://github.com/kubernauts/bonsai.gitcd bonsai
./deploy-bonsai.sh
# please accept all default values (1 master and 2 workers)
部署海图博物馆 (Deploy Chartmuseum)
先决条件 (Prerequisites)
- A running k8s cluster 运行中的k8s集群
- LB service (it will be installed by default with Bonsai) LB服务(默认情况下将与Bonsai一起安装)
- helm3 version helm3版本
We deploy chartmuseum with custom values and create an ingress with the chartmuseum.local domain name.
我们使用自定义值部署chartmuseum,并使用chartmuseum.local域名创建一个入口。
Please set the following host entries in your /etc/hosts file:
请在/ etc / hosts文件中设置以下主机条目:
# please adapt the IP below with the external IP of the traefik LB (run `kubectl get svc -A` and find the external IP)192.168.64.26 chart-example.local192.168.64.26 chartmuseum.local192.168.64.26 tekton-dashboard.local192.168.64.26 registry-ui.local192.168.64.26 getting-started-triggers.localAnd deploy chartmuseum:
并部署chartmuseum:
cd addons/chartmuseum
helm repo add stable https://kubernetes-charts.storage.googleapis.com
kubectl create ns chartmuseum
kubectl config set-context --current --namespace chartmuseum
helm install chartmuseum stable/chartmuseum --values custom-values.yaml
kubectl apply -f ingress.yaml
Now you should be able to access chartmuseum through:
现在您应该可以通过以下方式访问Chartmuseum:
If you see the “Welcome to ChartMuseum!”, then you’re fine.
如果看到“欢迎使用ChartMuseum!”,那就很好。
Now we are ready to add the chartmuseum repo and install the helm-push plugin and package the sample hello-helm chart and push it to our chartmuseum repo running on K3s:
现在我们准备添加chartmuseum回购并安装helm-push插件,并将示例hello-helm图表打包并将其推送到在K3s上运行的chartmuseum回购中:
# add the repo
helm repo add chartmuseum http://chartmuseum.local
# install helm push plugin:
helm plugin install https://github.com/chartmuseum/helm-push.git
# build the package:
cd hello-helm/chart
helm package hello/
# the helm package name will be hello-1.tgz
ls -l hello-1.tgz
# push the package to chartmuseum
helm push hello-1.tgz chartmuseum
# You should get:
Pushing hello-1.tgz to chartmuseum…
Done.
安装图表 (Install the Chart)
To install a chart, this is the basic command used:
要安装图表,这是使用的基本命令:
helm install <chartmuseum-repo-name>/<chart-name> --name <release-name> (helm2)helm install <release-name> <chartmuseum-repo-name>/<chart-name> (helm3)We need to update our helm repos first and install the chart:
我们需要先更新头盔存储库并安装图表:
helm repo updatehelm install hello chartmuseum/helloWe should get a similar output like this:
我们应该得到类似的输出:
NAME: helloLAST DEPLOYED: Sat Jul 25 17:56:23 2020NAMESPACE: chartmuseumSTATUS: deployedREVISION: 1TEST SUITE: None收获你的工作 (Harvest your work)
curl http://chart-example.local/Welcome to Hello Chartmuseum for Private Helm Repos on K3s Bonsai!What happened here?
这里发生了什么?
We deployed the chart with helm through the command line, the hello service was defined in the values.yaml with the type LoadBalancer and received an external IP from MetalLB.
我们通过命令行在控制台上部署了图表,hello服务在values.yaml中定义为LoadBalancer类型,并从MetalLB接收了外部IP。

In the above values.yaml we define to have an ingress and the hostname which is chart-example.local as the domain name which is mapped in our /etc/hosts file to the IP address of the traefik load balancer, alternatively we could map the domain to the external IP address of the hello-hello service (in my case 192.168.64.27) as well.
在上面的values.yaml中,我们定义了一个入口和一个主机名,该主机名是chart-example.local作为域名,该主机名在我们的/ etc / hosts文件中映射到traefik负载均衡器的IP地址,或者我们可以映射域名到hello-hello服务的外部IP地址(在我的情况下为192.168.64.27)。
删除图表并释放头盔 (Delete the chart and the helm hello release)
Since we want to automate the deployment process in the next section with Tekton Pipelines and do the CI part as well, we’ll clean up the deployment and delete our chart from chartmuseum.
由于我们要使用Tekton Pipelines在下一节中自动化部署过程,并且还要执行CI部分,因此我们将清理部署并从Chartmuseum中删除图表。
helm delete hello
curl -i -X DELETE http://chartmuseum.local/api/charts/hello/1
Kubernetes上的CI / CD和HelmOps (CI/CD and HelmOps on Kubernetes)
In this section, we’re going to introduce Tekton and Tekton Pipelines which is the technological successor to Knative Build and provides a Kube-Native style for declaring CI/CD pipelines on Kubernetes. Tekton supports many advanced CI/CD patterns, including rolling, blue/green, and canary deployment. To learn more about Tekton, please refer to the official documentation page of Tekton and also visit the new neutral home for the next generation of continuous delivery collaboration by Continuous Delivery Foundation (CDF).
在本节中,我们将介绍Tekton和Tekton Pipelines,它们是Knative Build的技术后继产品,并提供了Kube-Native样式来在Kubernetes上声明CI / CD管道。 Tekton支持许多高级CI / CD模式,包括滚动,蓝/绿和金丝雀部署。 要了解有关Tekton的更多信息,请参考Tekton的官方文档页面,还可以访问新的中性之家,以获取由Continuous Delivery Foundation(CDF )进行的下一代连续交付协作。
对于急躁的人 (For the impatient)
Katakoda provides a very nice Scenario for Tekton which demonstrates building, deploying, and running a Node.js application with Tekton on Kubernetes using a private docker registry.
Katakoda 为Tekton提供了一个非常不错的方案,该方案演示了如何使用私有Docker注册表在kubernetes上使用Tekton构建,部署和运行Node.js应用程序。
By going through the Katakoda scenario in about 20 minutes, you should be able to learn about Tekton concepts and how to define various Tekton resources like Tasks, Resources and Pipelines to kick off a process through PipelineRuns to deploy our apps in a GitOps style manner on Kubernetes.
通过在大约20分钟内完成片假名场景,您应该能够了解Tekton概念以及如何定义各种Tekton资源(例如任务,资源和管道),以通过PipelineRuns启动流程,从而以GitOps风格部署我们的应用程序。 Kubernetes。
In this section, we’re going to extend that scenario with Chartmuseum from the first section and provide some insights about Tekton Triggers which rounds up this tutorial and hopefully helps you to use it for your daily projects.
在本节中,我们将在第一部分中使用Chartmuseum扩展该方案,并提供有关Tekton Triggers的一些见解,从而完善了本教程,并希望可以帮助您将其用于日常项目。
关于GitOps和xOps (About GitOps and xOps)
GitOps is buzzing these days after the dust around DevOps, DevSecOps, NoOps, or xOps has settled down. We asked the community about the future of xOps and what’s coming next, if you’d like to provide your feedback, we’d love to have it:
在DevOps,DevSecOps,NoOps或xOps周围的尘埃落定之后,GitOps如今嗡嗡作响。 我们向社区询问了xOps的未来以及接下来的发展,如果您想提供反馈,我们希望获得它:
The reality is we did CVS- and SVN- Ops about 15 years ago with CruiseControl for both CI and CD. Later Hudson from the awesome folks at Sun Micorsystems was born and renamed to Jenkins, which is still one of the most widely used CI/CD tools today.
现实情况是,大约15年前,我们使用CruiseControl的CI和CD进行了CVS和SVN- Ops。 后来,来自Sun Micorsystems令人敬畏的人们的Hudson诞生并重命名为Jenkins,它仍然是当今使用最广泛的CI / CD工具之一。
Times have changed and with the rise of Cloud Computing, Kubernetes and the still buzzing term Cloud-Native, which is a new way of thinking, the whole community is bringing new innovations at the speed of light.
时代变了,随着云计算,Kubernetes的兴起以及仍在嗡嗡作响的术语Cloud-Native( 一种新的思维方式) ,整个社区都在以光速飞速带来新的创新。
New terms like Kube-Native-Ops, AppsOps, InfraOps and now HelmOps are not so common or buzzing yet at this time of writing. We believe that Tekton or Jenkins-X which is based on Tekton along with other nice solutions like ArgoCD, FluxCD, Spinnaker or Screwdriver are going to change the way we’re going to automate the delivery and roll-out of our apps and services the Kube-Native way on Kubernetes.
在撰写本文时,诸如Kube-Native-Ops,AppsOps,InfraOps和现在的HelmOps之类的新术语还不那么普遍或嗡嗡作响。 我们认为,基于Tekton的Tekton或Jenkins-X以及ArgoCD,FluxCD,Spinnaker或Screwdriver等其他出色的解决方案将改变我们将应用程序和服务自动交付和推出的方式。 Kubernetes上的Kube本机方式。
With that said, let’s start with xOps and deploy our private docker registry and Tekton on K3s and run our simple node.js app from the previous section through helm triggered by Tekton Pipelines from Tekton Dashboard.
话虽如此,让我们从xOps开始,在K3s上部署我们的私有Docker注册表和Tekton,并通过Tekton Dashboard的Tekton Pipelines触发的掌舵来运行上一部分中的简单node.js应用程序。
Make sure you have helm3 version in place, add the stable and incubator Kubernetes Charts Helm Repo and install the docker registry proxy, the registry UI and the ingress for the registry UI:
确保已安装helm3版本,添加稳定器和孵化器Kubernetes Charts Helm Repo并安装docker Registry代理,注册表UI和注册表UI的入口:
helm version --shorthelm repo add stable https://kubernetes-charts.storage.googleapis.comhelm repo add incubator http://storage.googleapis.com/kubernetes-charts-incubatorhelm upgrade --install private-docker-registry stable/docker-registry --namespace kube-systemhelm upgrade --install registry-proxy incubator/kube-registry-proxy \
--set registry.host=private-docker-registry.kube-system \--set registry.port=5000 \--set hostPort=5000 \--namespace kube-systemkubectl apply -f docker-registry-ui.yamlkubectl apply -f ingress-docker-registry-ui.yaml
访问Docker注册表 (Access the Docker Registry)
部署Tekton资源,触发器和仪表板 (Deploy Tekton Resources, Triggers and Dashboard)
kubectl apply -f pipeline-release.yamlkubectl apply -f triggers-release.yamlkubectl config set-context --current --namespace tekton-pipelineskubectl apply -f tekton-dashboard-release.yamlkubectl apply -f ingress-tekton-dashboard.yaml访问Tekton仪表板 (Access the Tekton Dashboard)
The Tekton dashboard for this installation on K3s can be reached viahttp://tekton-dashboard.local/
可以通过http://tekton-dashboard.local/访问在K3上进行此安装的Tekton仪表板。
The dashboard is great to see how tasks and PipelineRuns are running or if something goes wrong to get the logs for troubleshooting or sell it as your xOps Dashboard ;-)
该仪表板非常适合查看任务和PipelineRuns的运行方式,或者是否出现问题以获取日志以进行故障排除或将其作为xOps仪表板出售;-)
For now we don’t have any pipelines running. We’re going to run some tasks first, build a pipeline and initiate it in the next steps along with pipeline runs. But before we fire the next commands, I’d like to explain what we’re going to do.
目前,我们没有任何管道在运行。 我们将首先运行一些任务,构建管道,并在下一步中与管道运行一起启动它。 但是在我们启动下一个命令之前,我想解释一下我们将要做什么。
We have 2 apps, the first app is named app, which builds an image from the source on github with kaniko executor and pushes ist to our private docker registry and deploy it from there into the hello namespace, where we deploy our hello app from our private chartmuseum repo for the HelmOps showcase as well.
我们有2个应用程序,第一个应用程序名为app,它使用kaniko executor从github上的源代码生成映像,并将ist推送到我们的私有Docker注册表,然后从那里将其部署到hello名称空间中,在该命名空间中,我们从HelmOps陈列柜的私人私人博物馆回购。
N.B.: we cleaned-up the same hello app at the end of the first section of this tutorial and are going to deploy it through HelmOps.
注意:我们在本教程第一部分末尾清理了相同的hello应用程序,并将通过HelmOps进行部署。
Take it easy or not, we’re going to create a task, build a pipeline containing our task, use the TaskRun resource to instantiate and execute a Task outside of the Pipeline and use the PipelineRun to instantiate and run the Pipeline containing our Tasks, oh my God? ;-)
轻松与否,我们将创建一个任务,构建包含我们任务的管道,使用TaskRun资源实例化并执行管道之外的任务,并使用PipelineRun实例化并运行包含任务的管道,哦,我的上帝? ;-)
放轻松,让我们从HelmOps或xOps开始 (Take it easy, let’s start with HelmOps or xOps)
You need the tkn cli to follow the next steps, I’m using the latest version at this time of writing.
您需要tkn cli才能执行后续步骤,在撰写本文时,我正在使用最新版本。
➜ pipeline git:(master) ✗ tkn versionClient version: 0.11.0
Pipeline version: v0.15.0
Triggers version: v0.7.0
We create a namespace named hello and switch to the namespace:
我们创建一个名为hello的名称空间,并切换到该名称空间:
kubectl create ns hello
kubectl config set-context --current --namespace hello
Now we need to define the git-resource, which is the source in our git repo defined through a custom resource definition PipelineResource:
现在我们需要定义git-resource,这是通过自定义资源定义PipelineResource在git repo中定义的源:
And apply the git-resource:
并应用git-resource:
kubectl apply -f node-js-tekton/pipeline/git-resource.yamlWith that we are defining where our source is coming from in git, in our case from Github.
这样我们就定义了我们的源代码来自git,在本例中是来自Github。
We can now list our first resource with the tkn cli tool as follow:
现在,我们可以使用tkn cli工具列出我们的第一个资源,如下所示:
tkn resources listIn the next step, we’re going to define a task named “build-image-from-source”. In the spec part of the Task object (CRD) we define the git-source with the type git and some parameters as pathToContext, patToDockerfile, imageUrl and imageTag as inputs and the steps needed to run the task, the list-src (which is optional) and the build-and-push step which uses the kanico-project executor image with the command /kaniko/executor/ and some args to build and push the image.
在下一步中,我们将定义一个名为“ build-image-from-source”的任务。 在任务对象(CRD)的规范部分中,我们定义了git-source,其类型为git,一些参数作为pathToContext,patToDockerfile,imageUrl和imageTag作为输入,以及运行任务所需的步骤,即list-src(可选)和其使用kanico项目执行图像与所述命令/ kaniko /执行/和一些参数传递给构建和推图像的构建-推步骤。
Now we need to deploy our task build and push Task resource to our cluster with:
现在,我们需要部署任务构建,并使用以下命令将 Task资源推送到我们的集群中:
kubectl apply -f node-js-tekton/pipeline/task-build-src.yamlAnd deploy another Task which is defined in the task-deploy.yaml
并部署在task-deploy.yaml中定义的另一个任务
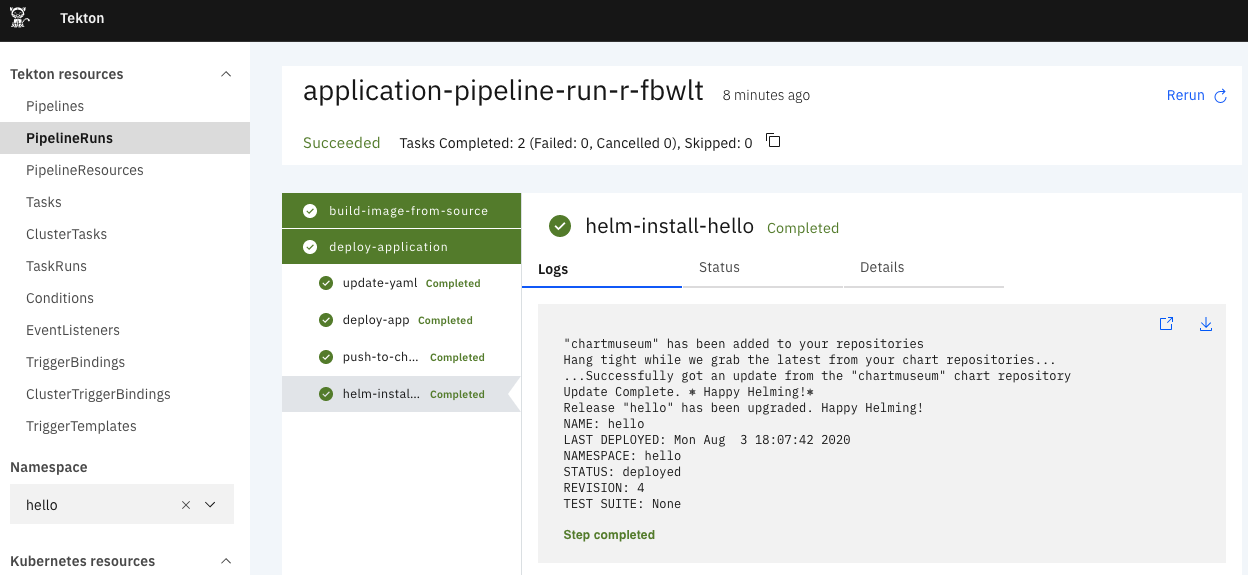
This Task has 4 steps:
此任务包含4个步骤:
- update-yaml # set the image tag update-yaml#设置图片标签
- deploy-app # deploy the first app deploy-app#部署第一个应用程序
- push-to-chartmuseum # push the hello helm chart to chartmuseum push-to-chartmuseum#将hello舵图推送到chartmuseum
- helm-install-hello # install the helm chart to the cluster helm-install-hello#将helm图表安装到集群
The last 3 tasks are using a slightly extended helm-kubectl image which has the helm push plugin installed.
最后3个任务是使用稍微扩展的helm-kubectl映像,其中安装了helm push插件。
N.B. the Dockerfile for helm-kubectl is provided under addons/helm-kubectl.
注意,在addons / helm-kubectl下提供了helm-kubectl的Dockerfile。
We can now list our tasks with:
现在,我们可以列出我们的任务:
tkn tasks listAnd finally we’ll declare the pipeline and run it with the pipeline-run entity.
最后,我们将声明管道并使用管道运行实体运行它。
Nice to know: In PipelineRun we define a collection of resources that define the elements of our Pipeline which include tasks.
很高兴知道:在PipelineRun中,我们定义了资源集合,这些资源定义了包含任务的管道元素。
kubectl apply -f node-js-tekton/pipeline/pipeline.yamltkn pipelines listkubectl apply -f node-js-tekton/pipeline/service-account.yamlkubectl get ServiceAccountskubectl apply -f node-js-tekton/pipeline/pipeline-run.yamltkn pipelineruns listtkn pipelineruns describe application-pipeline-runkubectl get all -n hellocurl chart-example.localWelcome to Hello Chartmuseum for Private Helm Repos on K3s Bonsai!收获您的Helm-X-Ops工作 (Harvest your Helm-X-Ops work)
If all steps worked, in the Tekton Dashboard you should get what you did in the hello namespace, enjoy :-)
如果所有步骤都有效,则在Tekton仪表板中,您应该获得在hello名称空间中所做的操作,请享受:-)
下一步是什么:自动化 (What’s coming next: Automation)
In the third section of this tutorial, we’ll see how to use Tekton Triggers to automate our HelmOps process, stay tuned.
在本教程的第三部分中,我们将了解如何使用Tekton触发器来自动化HelmOps流程,敬请期待。
相关资源 (Related resources)
适用于tekton的示例Node.js应用 (Sample nodes-js app for tekton)
https://github.com/javajon/node-js-tekton
https://github.com/javajon/node-js-tekton
GitHub上的Tekton管道 (Tekton Pipelines on Github)
https://github.com/tektoncd/pipeline
https://github.com/tektoncd/pipeline
片假名 (Katacoda Scenarions)
https://www.katacoda.com/javajon/courses/kubernetes-pipelines/tektonhttps://katacoda.com/ncskier/scenarios/tekton-dashboard
https://www.katacoda.com/javajon/courses/kubernetes-pipelines/tekton https://katacoda.com/ncskier/scenarios/tekton-dashboard
Tekton管道教程 (Tekton Pipelines Tutorial)
https://github.com/tektoncd/pipeline/blob/master/docs/tutorial.md
https://github.com/tektoncd/pipeline/blob/master/docs/tutorial.md
开放工具链Tekton目录 (Open-Toolchain Tekton Catalog)
GitOps (GitOps)
使用Tekton构建ChatOps Bot (Building a ChatOps Bot With Tekton)
翻译自: https://blog.kubernauts.io/hello-helmops-with-tekton-and-chartmuseum-on-kubernetes-4ffd2038425d
tekton


 294
294


 被折叠的 条评论
为什么被折叠?
被折叠的 条评论
为什么被折叠?
 到【灌水乐园】发言


