


 本文详细介绍了在MDN文档标记document.execCommand为过时后,如何重新实现这一功能,以支持文字样式更改,如加粗、斜体等,同时保持跨设备兼容性和优化DOM操作。
This feature is obsolete. Although it may still work in some browsers, its use is discouraged since it could be removed at any time. Try to avoid using it. — MDN web docs
此功能已过时。 尽管它可能在某些浏览器中仍然可以使用,但不建议使用它,因为可以随时将其删除。 尽量避免使用它。 — MDN网站文档
Without a clear explanation on why nor when, document.execCommand() has been marked as obsolete in the MDN web docs. Fun fact, it is not marked as deprecated in all languages, as for example French or Spanish which do not mention anything 😜.
在没有明确说明原因和时间的情况下, MDN Web文档中 document.execCommand()已被标记为过时。 有趣的是,并非所有语言都将其标记为已弃用,例如法语或西班牙语,其中未提及任何内容😜。
For DeckDeckGo, an open source web editor for slides, we have developed and published a custom WYSIWYG editor which relied on such feature.
对于DeckDeckGo (幻灯片的开放源代码网络编辑器),我们开发并发布了基于该功能的自定义WYSIWYG编辑器 。
Because it may be future proof to proactively replace its usage by a custom implementation, I spent quite some time re-implementing it 😄.
因为用自定义实现主动替换其用法可能是将来的证明,所以我花了很多时间重新实现它。
Even though my implementation does not look that bad (I hope), I kind of feel, I had to re-implement the wheel. That’s why I am sharing with you my solution, hoping that some of you might point out some improvements or even better, send us pull requests to make the component rock solid 🙏.
尽管我的实现看起来并不差(我希望),但我还是觉得,我不得不重新实现。 这就是为什么我与您分享我的解决方案的原因,希望你们中的某些人可能会指出一些改进甚至更好的方法,向我们发送拉取请求以使该组件坚如磐石。
介绍 (Introduction)
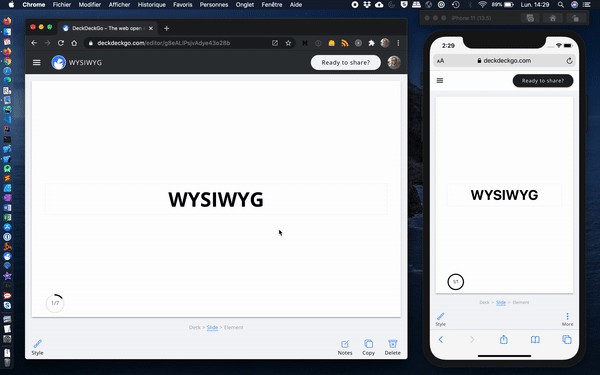
One thing I like about our WYSIWYG editor is its cross devices compatibility. It works on desktop as on mobile devices where, instead of appearing as a floating popup, it will be attached either at the top (iOS) or bottom of the viewport (Android) according how the keyboard behaves.
我喜欢所见即所得(WYSIWYG)编辑器的一件事是其跨设备兼容性。 它可以在桌面设备上使用,也可以在移动设备上使用,而不是显示为浮动弹出窗口,而是根据键盘的行为将其附着在视口的顶部(iOS)或视口的底部(Android)。
It can change text style (bold, italic, underline and strikethrough), fore- and background color, alignment (left, center or right), lists (ordered and not ordered) and even exposes a slot for a custom action.
它可以改变文字样式(粗体,斜体,下划线和删除),fore-和背景颜色,对齐(左,中,右),列表(有序和无序的),甚至暴露了一个slot用于自定义操作。
局限性 (Limitation)
My following re-implementation of document.execCommand do seems to work well but, it does not support an undo functionality (yet), what’s still a bummer 😕.
我下面对document.execCommand重新实现确实可以很好地工作,但是,它还不支持撤消功能(还),这仍然令人still目结舌。
As for the code itself, I am open to any suggestions, ping me with your best ideas!
至于代码本身,我愿意接受任何建议,并以您的最佳想法为我加油!
目标 (Goal)
The objective shared in the blog post is the re-implementation of following functions (source MDN web docs):
博客文章中分享的目标是重新实现以下功能(源MDN Web文档 ):
document.execCommand(aCommandName, aShowDefaultUI, aValueArgument)bold: Toggles bold on/off for the selection or at the insertion point.
粗体 :切换选择或插入点的粗体开/关。
italic: Toggles italics on/off for the selection or at the insertion point.
斜体 :打开/关闭斜体以进行选择或在插入点。
underline: Toggles underline on/off for the selection or at the insertion point.
下划线:切换选择项或插入点的下划线。
strikeThrough: Toggles strikethrough on/off for the selection or at the insertion point.
StrikeThrough :在选择或插入点处切换打开/关闭删除线。
foreColor: Changes a font color for the selection or at the insertion point. This requires a hexadecimal color value string as a value argument.
foreColor :更改所选内容或插入点的字体颜色。 这需要十六进制颜色值字符串作为值参数。
backColor: Changes the document background color.
backColor :更改文档背景色。
实作 (Implementation)
I feel more comfortable using TypeScript when I develop, well, anything JavaScript related, that’s why the following code is type and why I also began the implementation by declaring an interface for the actions.
当我开发任何与JavaScript相关的东西时,我都觉得使用TypeScript感到更自在,这就是为什么以下代码是类型,也是为什么我也通过声明动作的接口来开始实现的原因。
export interface ExecCommandStyle {
  style: 'color' |
         'background-color' |
         'font-size' |
         'font-weight' |
         'font-style' |
         'text-decoration';
  value: string;
  initial: (element: HTMLElement | null) => Promise<boolean>;
}
Instead of trying to create new elements as the actual API does per default, I decided that it should instead modifies CSS attributes. The value can take for example the value bold if the style is font-weight or #ccc if a color is applied. The interface also contains a function initial which I am going to use to determine is a style should be applied or removed.
我决定不像实际的API那样默认创建新元素,而是决定应修改CSS属性。 例如,如果样式是font-weight #ccc则该value可以采用bold值;如果应用颜色,则该value可以采用#ccc值。 该界面还包含一个函数initial ,我将使用它来确定应应用还是应删除样式。
Once the interface declared, I began the implementation of the function which take cares of applying the style. It begin by capturing the user selected text, the selection , and identifying its container . Interesting to notice that the container can either be the text itself or the parent element of the selection.
声明接口后,我便开始执行该函数,该函数将应用样式。 首先从捕获用户选择的文本, selection并标识其container 。 有趣的是,容器可以是文本本身,也可以是所选内容的父元素。
It is also worth to notice that the function takes a second parameter containers which defines a list of elements in which the function can be applied. Per default h1,h2,h3,h4,h5,h6,div . I introduced this limitation to not iterate through the all DOM when searching for information.
还需要注意的是,该函数带有第二个参数containers ,该containers定义了可以在其中应用该函数的元素列表。 默认为h1,h2,h3,h4,h5,h6,div 。 我引入了此限制,以便在搜索信息时不会遍历整个DOM。
export async function execCommandStyle(
                 action: ExecCommandStyle, containers: string) {
  const selection: Selection | null = await getSelection();  if (!selection) {
    return;
  }  const anchorNode: Node = selection.anchorNode;
  if (!anchorNode) {
    return;
  }  const container: HTMLElement =
    anchorNode.nodeType !== Node.TEXT_NODE
    && anchorNode.nodeType !== Node.COMMENT_NODE ?
      (anchorNode as HTMLElement) : anchorNode.parentElement;  // TODO: next chapter
}async function getSelection(): Promise<Selection | null> {
  if (window && window.getSelection) {
    return window.getSelection();
  } else if (document && document.getSelection) {
    return document.getSelection();
  } else if (document && (document as any).selection) {
    return (document as any).selection.createRange().text;
  }
  return null;
}
The idea is to style the text with CSS attributes. That’s why I am going to convert the user’s selection into span .
这个想法是用CSS属性设置文本样式。 这就是为什么我要将用户的选择转换为span 。
Even though, I thought that it would be better to not always add new elements to the DOM. For example, if a user select a background color red and then green for the exact same selection, it is probably better to modify the existing style rather than adding a span child to another span with both the same CSS attributes. That’s why I implemented a text based comparison to either updateSelection or replaceSelection .
即使如此,我认为最好不要总是向DOM添加新元素。 例如,如果用户选择背景颜色为红色,然后选择绿色作为完全相同的选择,则最好修改现有样式,而不是将span子项添加到具有两个相同CSS属性的span 。 这就是为什么我对updateSelection或replaceSelection实现了基于文本的比较。
const sameSelection: boolean =
      container && container.innerText === selection.toString();
if (sameSelection &&
  !isContainer(containers, container)
  && container.style[action.style] !== undefined) {

    await updateSelection(container, action, containers);
    return;
}
await replaceSelection(container, action, selection, containers);
更新选择 (Update Selection)
By updating the selection, I mean applying the new style to an existing element. For example transforming <span style="background-color: red;"/> to <span style="background-color: green;"/> because the user selected a new background color.
通过更新选择,我的意思是将新样式应用于现有元素。 例如,将<span style="background-color: red;"/>为<span style="background-color: green;"/>因为用户选择了新的背景色。
Furthermore, when user applies a selection, I noticed, as for example with MS Word, that the children should inherit the new selection. That’s why after having applied the style, I created another function to clean the style of the children.
此外,当用户应用选择时,例如使用MS Word,我注意到孩子应该继承新选择。 这就是为什么在应用样式之后,我创建了另一个函数来清理孩子的样式。
async function updateSelection(container: HTMLElement, action: ExecCommandStyle, containers: string) {
  container.style[action.style] =
            await getStyleValue(container, action, containers);
  await cleanChildren(action, container);
}
Applying the style needs a bit more work than setting a new value. Indeed, as for example with bold or italic , the user might want to apply it, then remove it, then apply it again, then remove it again etc.
应用样式比设置新值需要更多的工作。 确实,例如使用bold或italic ,用户可能想要应用它,然后将其删除,然后再次应用,然后再次将其删除,等等。
async function getStyleValue(container: HTMLElement, action: ExecCommandStyle, containers: string): Promise<string> {
  if (!container) {
    return action.value;
  }
  if (await action.initial(container)) {
    return 'initial';
  }
  const style: Node | null =
        await findStyleNode(container, action.style, containers);
  if (await action.initial(style as HTMLElement)) {
    return 'initial';
  }
  return action.value;
}
In case of bold , the initial function is a simple check on the attribute.
在bold情况下, initial功能是对属性的简单检查。
{
  style: 'font-weight',
  value: 'bold',
  initial: (element: HTMLElement | null) =>
           Promise.resolve(element &&
                           element.style['font-weight'] === 'bold')}
When it comes to color, it becomes a bit more tricky as the value can either be an hex or a rgb value. That’s why I had to check both.
当涉及颜色时,它变得有些棘手,因为该值可以是hex或rgb值。 这就是为什么我必须检查两者。
{
  style: this.action,
  value: $event.detail.hex, // The result of our color picker
  initial: (element: HTMLElement | null) => {
    return new Promise<boolean>(async (resolve) => {
      const rgb: string = await hexToRgb($event.detail.hex);
      resolve(element && (element.style[this.action] ===
              $event.detail.hex ||
              element.style[this.action] === `rgb(${rgb})`));
  });
}
With the help of such definition, I can check if style should be added or removed respectively set to initial .
借助这样的定义,我可以检查是否应将style分别添加或删除或设置为initial 。
Unfortunately, it is not enough. The container might inherit its style from a parent as for example <div style="font-weight: bold"><span/></div> . That’s why I created the method findStyleNode which recursively iterates till it either find an element with the same style or the container.
不幸的是,这还不够。 容器可以从父级继承其样式,例如<div style="font-weight: bold"><span/></div> 。 这就是为什么我创建了方法findStyleNode ,该方法递归地迭代直到找到具有相同样式的元素或容器。
async function findStyleNode(node: Node,
                        style: string,
                        containers: string): Promise<Node | null> {
  // Just in case
  if (node.nodeName.toUpperCase() === 'HTML' ||
     node.nodeName.toUpperCase() === 'BODY') {
    return null;
  }
  if (!node.parentNode) {
    return null;
  }
  if (DeckdeckgoInlineEditorUtils.isContainer(containers, node)) {
    return null;
  }
  const hasStyle: boolean =
    (node as HTMLElement).style[style] !== null &&
    (node as HTMLElement).style[style] !== undefined &&
    (node as HTMLElement).style[style] !== '';
  if (hasStyle) {
    return node;
  }
  return await findStyleNode(node.parentNode, style, containers);
}
Finally, the style can be applied and cleanChildren can be executed. It is also a recursive method but instead of iterating to the top of the DOM tree, in iterates to the bottom of the container until it has processed all children.
最后,可以应用样式并可以执行cleanChildren 。 它也是一种递归方法,而不是迭代到DOM树的顶部,而是迭代到容器的底部,直到处理完所有子级为止。
async function cleanChildren(action: ExecCommandStyle,
                             span: HTMLSpanElement) {
  if (!span.hasChildNodes()) {
    return;
  }
  // Clean direct (> *) children with same style
  const children: HTMLElement[] =
        Array.from(span.children)
             .filter((element: HTMLElement) => {
                return element.style[action.style] !== undefined &&
                       element.style[action.style] !== '';
              }) as HTMLElement[];
  if (children && children.length > 0) {
    children.forEach((element: HTMLElement) => {
      element.style[action.style] = '';
      if (element.getAttribute('style') === '' ||
          element.style === null) {
        element.removeAttribute('style');
      }
    });
  }
  // Direct children (> *) may have children (*) to be clean too
  const cleanChildrenChildren: Promise<void>[] =
    Array.from(span.children).map((element: HTMLElement) => {
      return cleanChildren(action, element);
  });
  if (!cleanChildrenChildren || cleanChildrenChildren.length <= 0) {
    return;
  }
  await Promise.all(cleanChildrenChildren);
}
替换选择 (Replace Selection)
Replacing a selection to apply a style is a bit less verbose fortunately. With the help of a range, I extract a fragment which can be added as content of new span .
幸运的是,替换选择以应用样式不会那么冗长。 借助范围,我提取了一个片段,可以将其添加为新span内容。
async function replaceSelection(container: HTMLElement,
                                action: ExecCommandStyle,
                                selection: Selection,
                                containers: string) {
  const range: Range = selection.getRangeAt(0);
  const fragment: DocumentFragment = range.extractContents();
  const span: HTMLSpanElement =
              await createSpan(container, action, containers);
  span.appendChild(fragment);
  await cleanChildren(action, span);
  await flattenChildren(action, span);
  range.insertNode(span);
  selection.selectAllChildren(span);
}
To apply the style to the new span , fortunately, I can reuse the function getStyleValue as already introduced in the previous chapter.
要将样式应用于新的span ,幸运的是,我可以重用上一章已经介绍的getStyleValue函数。
async function createSpan(container: HTMLElement,
                     action: ExecCommandStyle,
                     containers: string): Promise<HTMLSpanElement> {
  const span: HTMLSpanElement = document.createElement('span');
  span.style[action.style] =
            await getStyleValue(container, action, containers);
  return span;
}
Likewise, once the new span is created, and the fragment applied, I have to cleanChildren to apply the new style to all descendants. Fortunately, again, that function is the same as the one introduced in the previous chapter.
同样,一旦创建了新的span并应用了片段,我必须要cleanChildren才能将新样式应用于所有后代。 再次幸运的是,该功能与上一章介绍的功能相同。
Finally, because I am looking to avoid span elements without style, I created a function flattenChildren which aims to find children of the new style and which, after having been cleaned, do not contain any styles at all anymore. If I find such elements, I convert these back to text node.
最后,由于我要避免没有样式的span元素,因此创建了一个flattenChildren函数,该函数旨在查找新样式的子项,并且在清理后不再包含任何样式。 如果找到此类元素,则将它们转换回文本节点。
async function flattenChildren(action: ExecCommandStyle,
                               span: HTMLSpanElement) {
  if (!span.hasChildNodes()) {
    return;
  }
  // Flatten direct (> *) children with no style
  const children: HTMLElement[] =
      Array.from(span.children).filter((element: HTMLElement) => {
         const style: string | null = element.getAttribute('style');
         return !style || style === '';
      }) as HTMLElement[];
  if (children && children.length > 0) {
    children.forEach((element: HTMLElement) => {
      const styledChildren: NodeListOf<HTMLElement> =
            element.querySelectorAll('[style]');      if (!styledChildren || styledChildren.length === 0) {
        const text: Text =
              document.createTextNode(element.textContent);
        element.parentElement.replaceChild(text, element);
      }
    });
    return;
  }
  // Direct children (> *) may have children (*) to flatten too
  const flattenChildrenChildren: Promise<void>[] =
    Array.from(span.children).map((element: HTMLElement) => {
       return flattenChildren(action, element);
    });
  if (!flattenChildrenChildren ||
      flattenChildrenChildren.length <= 0) {
    return;
  }
  await Promise.all(flattenChildrenChildren);
}
共 (Altogether)
You can find the all code introduced in this blog post in our repo, more precisely:
您可以在我们的仓库中找到此博客文章中介绍的所有代码,更确切地说是:
the WYSIWYG Web Component
WYSIWYG Web组件
the ExecCommandStyle interface
ExecCommandStyle 接口
the implementation of the function
功能的实现
If you are looking to try it out locally, you will need to clone our mono-repo.
如果您想在本地尝试,则需要克隆我们的mono-repo 。
结论 (Conclusion)
As I am reaching the conclusion of this blog post, looking back at it once again, I am honestly not sure anyone will ever understand my explanations 😅. I hope at least it has aroused your curiosity for our WYSIWYG component and generally speaking, for our editor.
坦白说,当我到达本博客文章的结尾时,我再次不确定是否有人会理解我的解释。 我希望至少它引起了您对所见即所得组件的好奇心,总的来说,引起了我们编辑的好奇心。
Give a try to DeckDeckGo to compose your next slides and ping us with your best ideas and feedbacks afterwards 😁.
尝试DeckDeckGo撰写您的下一张幻灯片,然后向我们提供您的最佳创意和反馈ping。
To infinity and beyond!
超越无限!
David
大卫
翻译自: https://medium.com/swlh/reimplementing-document-execcommand-6ffc33a80f02


 3119
3119

 被折叠的 条评论
为什么被折叠?
被折叠的 条评论
为什么被折叠?
 到【灌水乐园】发言


