


GitHub recently released a feature that allows users to create a profile-level README.md file, that is displayed on your profile page, above repositories.
GitHub最近发布了一项功能,该功能允许用户创建配置文件级别的README.md文件,该文件显示在您的配置文件页面上的存储库上方。
That’s a great feature you can use to display more information about yourself and your work, especially because it allows more content than the regular profile bio.
这是一个很棒的功能,可以用来显示有关您自己和您的工作的更多信息,尤其是因为它比常规的个人简介具有更多的内容。
You might have noticed how people went crazy and are already pushing the limits of what can be done with Markdown and GitHub!
您可能已经注意到人们是如何发疯的,并且已经在限制Markdown和GitHub可以完成的工作!
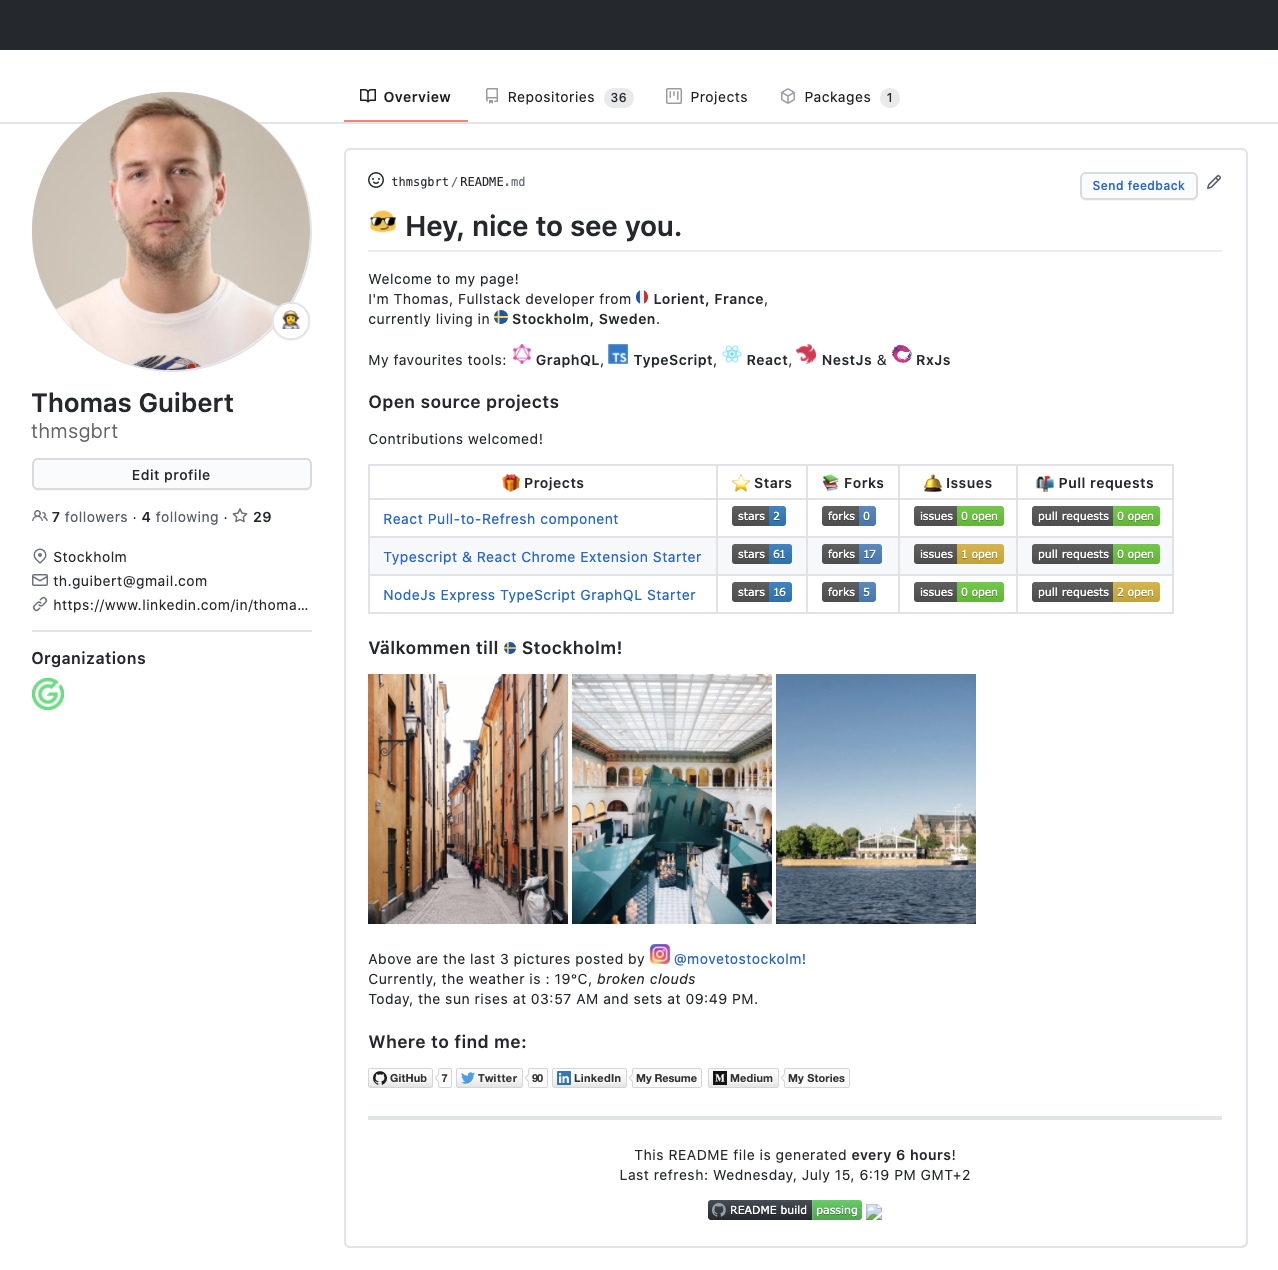
Above is my GitHub README at the time of writing this article.
以上是撰写本文时的GitHub README 。
I use it to tell it more about myself, show a list of my Open Source Projects and their status. Which is also useful for me as I can see quickly if I have any new open issues on them.
我用它来告诉我更多有关我自己的信息,并显示我的开源项目及其状态的列表。 这对我也很有用,因为如果我有任何新的未解决的问题,可以很快看到。
Now, more exciting, I made it self-updating, so I can give “live” information about the city where I live, Stockholm:
现在,更令人兴奋的是,我使它自我更新,因此我可以提供有关我所居住的城市斯德哥尔摩的“实时”信息:
Using Puppeteer, I fetch the 3 latest pictures posted on @visitstockholm Instagram account,
使用Puppeteer ,我获取了@visitstockholm Instagram帐户上发布的3张最新图片,
I retrieve the weather information, temperature and daylight hours with the OpenWeatherMap,
我使用OpenWeatherMap检索天气信息,温度和白天,
While you are quite limited with Markdown, there are still a lot of cool things you can do!
虽然Markdown的功能有限,但您仍然可以做很多有趣的事情!
In this tutorial, you are going to create your own README.md file for your GitHub Profile and learn how to make it dynamic, using GitHub Actions!
在本教程中,您 将为GitHub Profile 创建自己的 README.md 文件,并学习如何使用GitHub Actions使它动态化!
If you feel stuck or lost, check how I did it in my repository.
如果您感到卡住或迷路,请检查我在存储库中的处理方式 。
创建一个新的仓库 (Create a new repository)
First thing first, to unlock this feature, you need to create a new repository. It needs to be named the same name as your GitHub username.
首先,要解锁此功能,您需要创建一个新的存储库。 它的名称必须与您的GitHub用户名相同。
You will notice that GitHub informs you of how special this new repository is!
您会注意到GitHub会通知您这个新存储库有多特别!
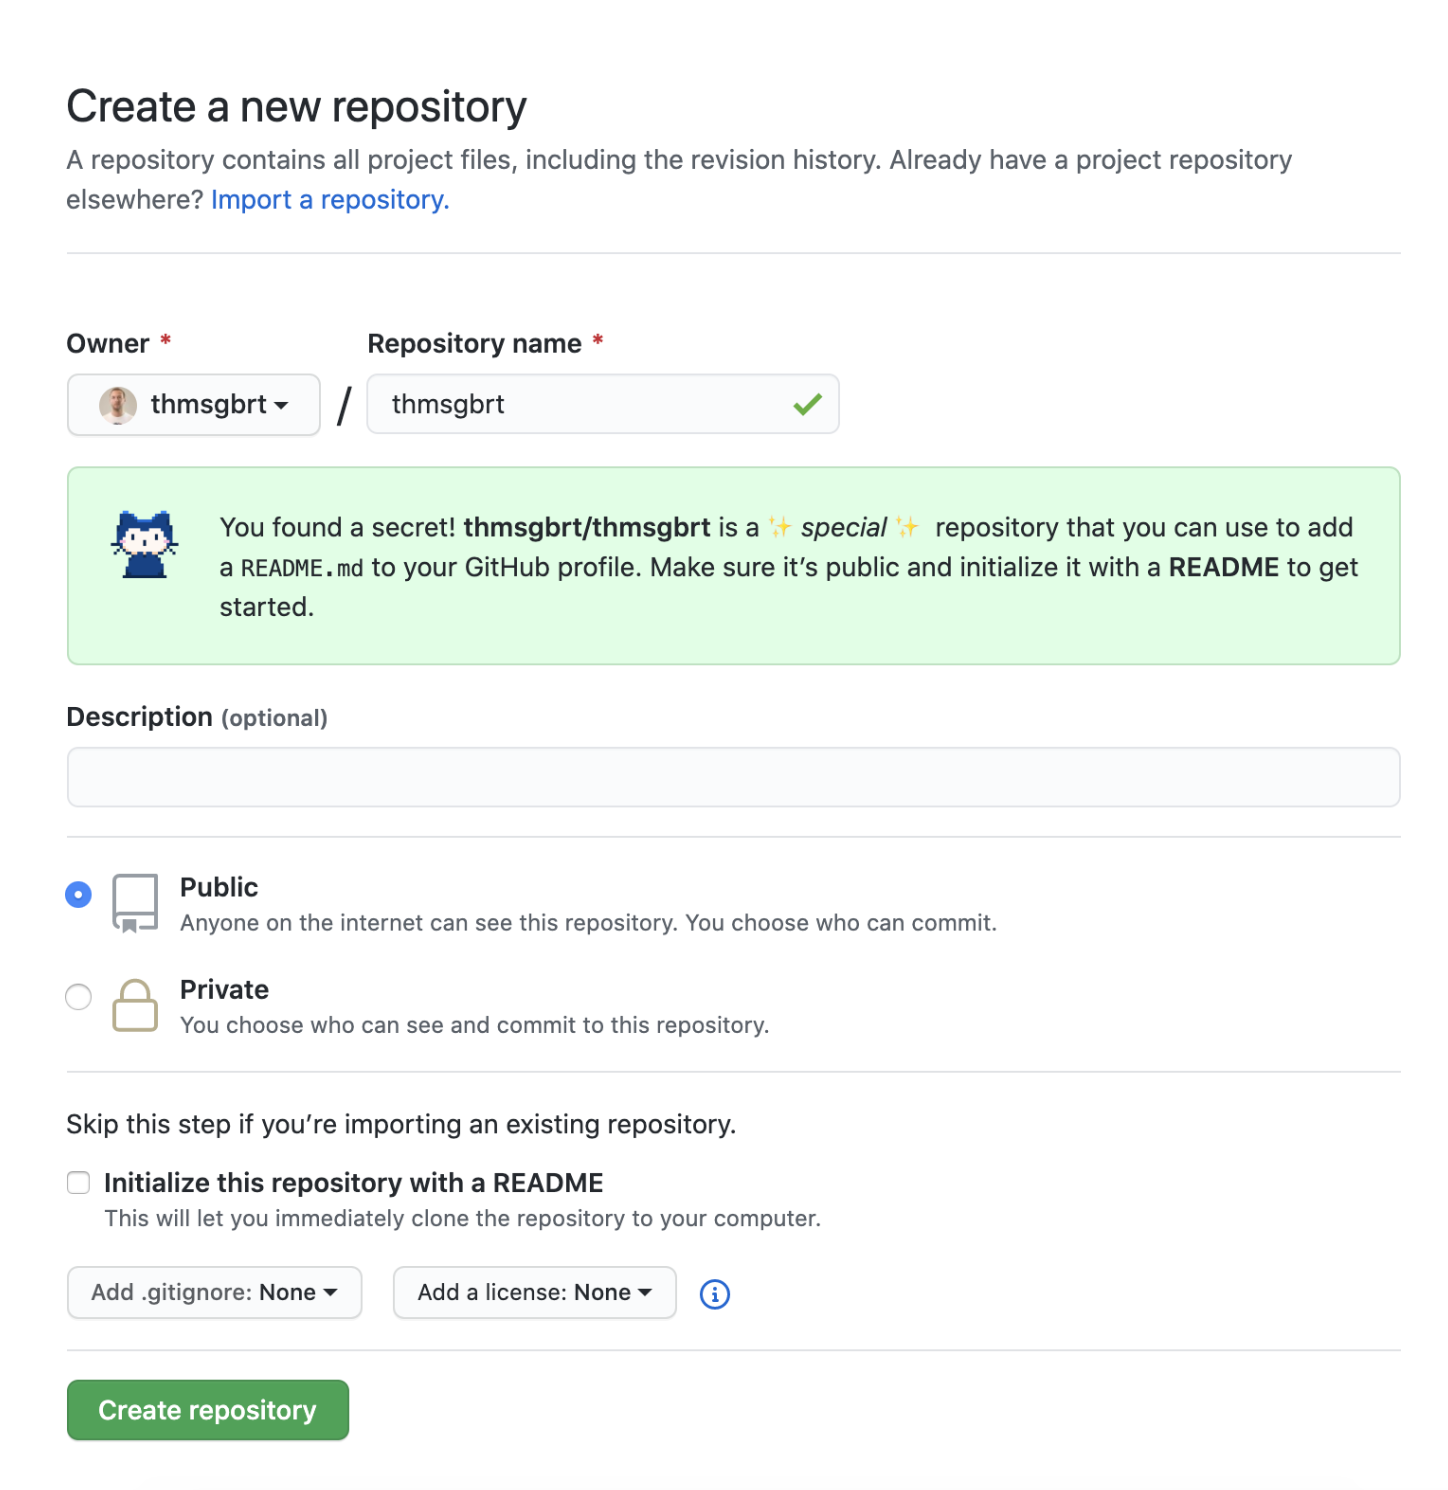
If you check the Initialize this repository with a README checkbox, then you should already see something if you go back to your Profile page.
如果选中“ 使用自述文件初始化此存储库”复选框,那么返回“配置文件”页面,您应该已经看到了一些内容。
设置项目 (Setup the project)
Let’s make this README.md a bit more dynamic!Clone the repository to your computer and open a terminal to its directory and create a new npm project.
让此README.md更具动态性!将存储README.md到您的计算机,并在其目录中打开一个终端,然后创建一个新的npm项目。
$ npm initWe are going to use Mustache, which allows us to create a template and easily replace tags with data we will provide later.
我们将使用Mustache ,它使我们能够创建模板并轻松地用稍后提供的数据替换标签。
$ npm i mustache创建一个胡子模板 (Create a mustache template)
Create a new mustache file in the directory.
在目录中创建一个新的髭须文件。
$ touch main.mustacheOpen it and fill it with …anything your want :).
打开它,并在其中添加...任何您想要的:)。
Let’s keep it simple for now:
现在让我们保持简单:
My name is {{name}} and today is {{date}}.Notice the {{___}} tag? That’s how Mustache recognizes something can be placed there.
注意{{___}}标签吗? 这就是Moustache识别可以放置在其中的东西的方式。
从Moustache模板生成README.md文件 (Generate README.md file from a Mustache template)
Create a index.js file, where we will write the code:
创建一个index.js文件,我们将在其中编写代码:
$ touch index.jsFill it with the code below:
用下面的代码填充它:
// index.js
const Mustache = require('mustache');
const fs = require('fs');
const MUSTACHE_MAIN_DIR = './main.mustache';/**
  * DATA is the object that contains all
  * the data to be provided to Mustache
  * Notice the "name" and "date" property.
*/
let DATA = {
  name: 'Thomas',
  date: new Date().toLocaleDateString('en-GB', {
    weekday: 'long',
    month: 'long',
    day: 'numeric',
    hour: 'numeric',
    minute: 'numeric',
    timeZoneName: 'short',
    timeZone: 'Europe/Stockholm',
  }),
};/**
  * A - We open 'main.mustache'
  * B - We ask Mustache to render our file with the data
  * C - We create a README.md file with the generated output
  */
function generateReadMe() {
  fs.readFile(MUSTACHE_MAIN_DIR, (err, data) =>  {
    if (err) throw err;
    const output = Mustache.render(data.toString(), DATA);
    fs.writeFileSync('README.md', output);
  });
}generateReadMe();
With that, you can now run node index.js in your terminal and it should generate a brand new README.md file in the same directory:
这样,您现在可以在终端中运行node index.js ,它应该在同一目录中生成一个全新的README.md文件:
// Generated content in README.md
My name is Thomas and today is Thursday, July 23.
Awesome! Commit and push everything. Now, you can see that your README.md displayed on your Profile page has been updated.
太棒了! 承诺并推动一切。 现在,您可以看到显示在“个人资料”页面上的README.md已更新。
使用Github Actions自动生成您的自述文件: (Generate your README automatically with Github Actions:)
That’s great but you don’t want to be having to commit a new version of your README.md every day. Let’s automate this!
很好,但是您不想每天都提交新版本的README.md 。 让我们自动化它!
We are going to use GitHub Actions for that. If you have never used it before, this is going to be a good first project.
我们将为此使用GitHub Actions 。 如果您以前从未使用过它,那么这将是一个不错的第一个项目。
With Actions, you can create workflows to automate tasks. Actions live in the same place as the rest of the code, in a special directory: ./.github/worflows .
使用动作,您可以创建工作流程以自动执行任务。 操作与代码的其余部分位于相同的位置,位于一个特殊目录中: ./.github/worflows . ./.github/worflows 。
$ mkdir .github && cd .github && mkdir workflowsIn this ./workflows folder, create a ./main.yaml file that will hold our Action.
在此./workflows文件夹中,创建一个保存我们的Action的./main.yaml文件。
$ cd ./workflows && touch main.yamlFill it with this content:
填写以下内容:
This Action has one Job, build , that runs on the specified machine, ubuntu-latest .
该操作具有一个build作业,可在指定的计算机ubuntu-latest 。
Lines 3 to 8 define when is triggered this action:
第3至8行定义了何时触发此操作:
- On every push to the Master branch, 每次向Master分支推送时,
- Or on a specified schedule, here 6 hours. 或按照指定的时间表,这里是6个小时。
The scheduler allows you to trigger a workflow at a scheduled time. The cron syntax has five fields separated by a space, and each field represents a unit of time.
通过scheduler可以在计划的时间触发工作流。 cron语法有五个用空格隔开的字段,每个字段代表一个时间单位。
If you want to know more about it and set your own schedule, read the Scheduled Events documentation.
如果您想了解更多信息并设置自己的时间表,请阅读Scheduled Events文档 。
When triggered, this job will execute the steps one after the other.
触发后,此作业将一个接一个地执行步骤。
For the rest of the file, read what I wrote next to name: to understand what is happening for each step.
对于文件的其余部分,请阅读我在name:旁边写的内容name:了解每个步骤正在发生的情况。
而已! (That’s it!)
Commit and push your work to GitHub and you are done! Every 6 hours, the Action will be triggered, generate a new README.md file, and push it to the master branch.
提交您的工作并将其推送到GitHub,您就完成了! 每隔6个小时,该操作将被触发,生成一个新的README.md文件,并将其推送到master分支。
Now, this is the most simple example I could come up with and I kept it simple to only talk about how to make your personal README.md automatically generated.
现在,这是我能想到的最简单的示例,我只简单讲了如何使您的个人README.md自动生成。
Let’s see some examples of what you can do:
让我们看一些可以做什么的例子:
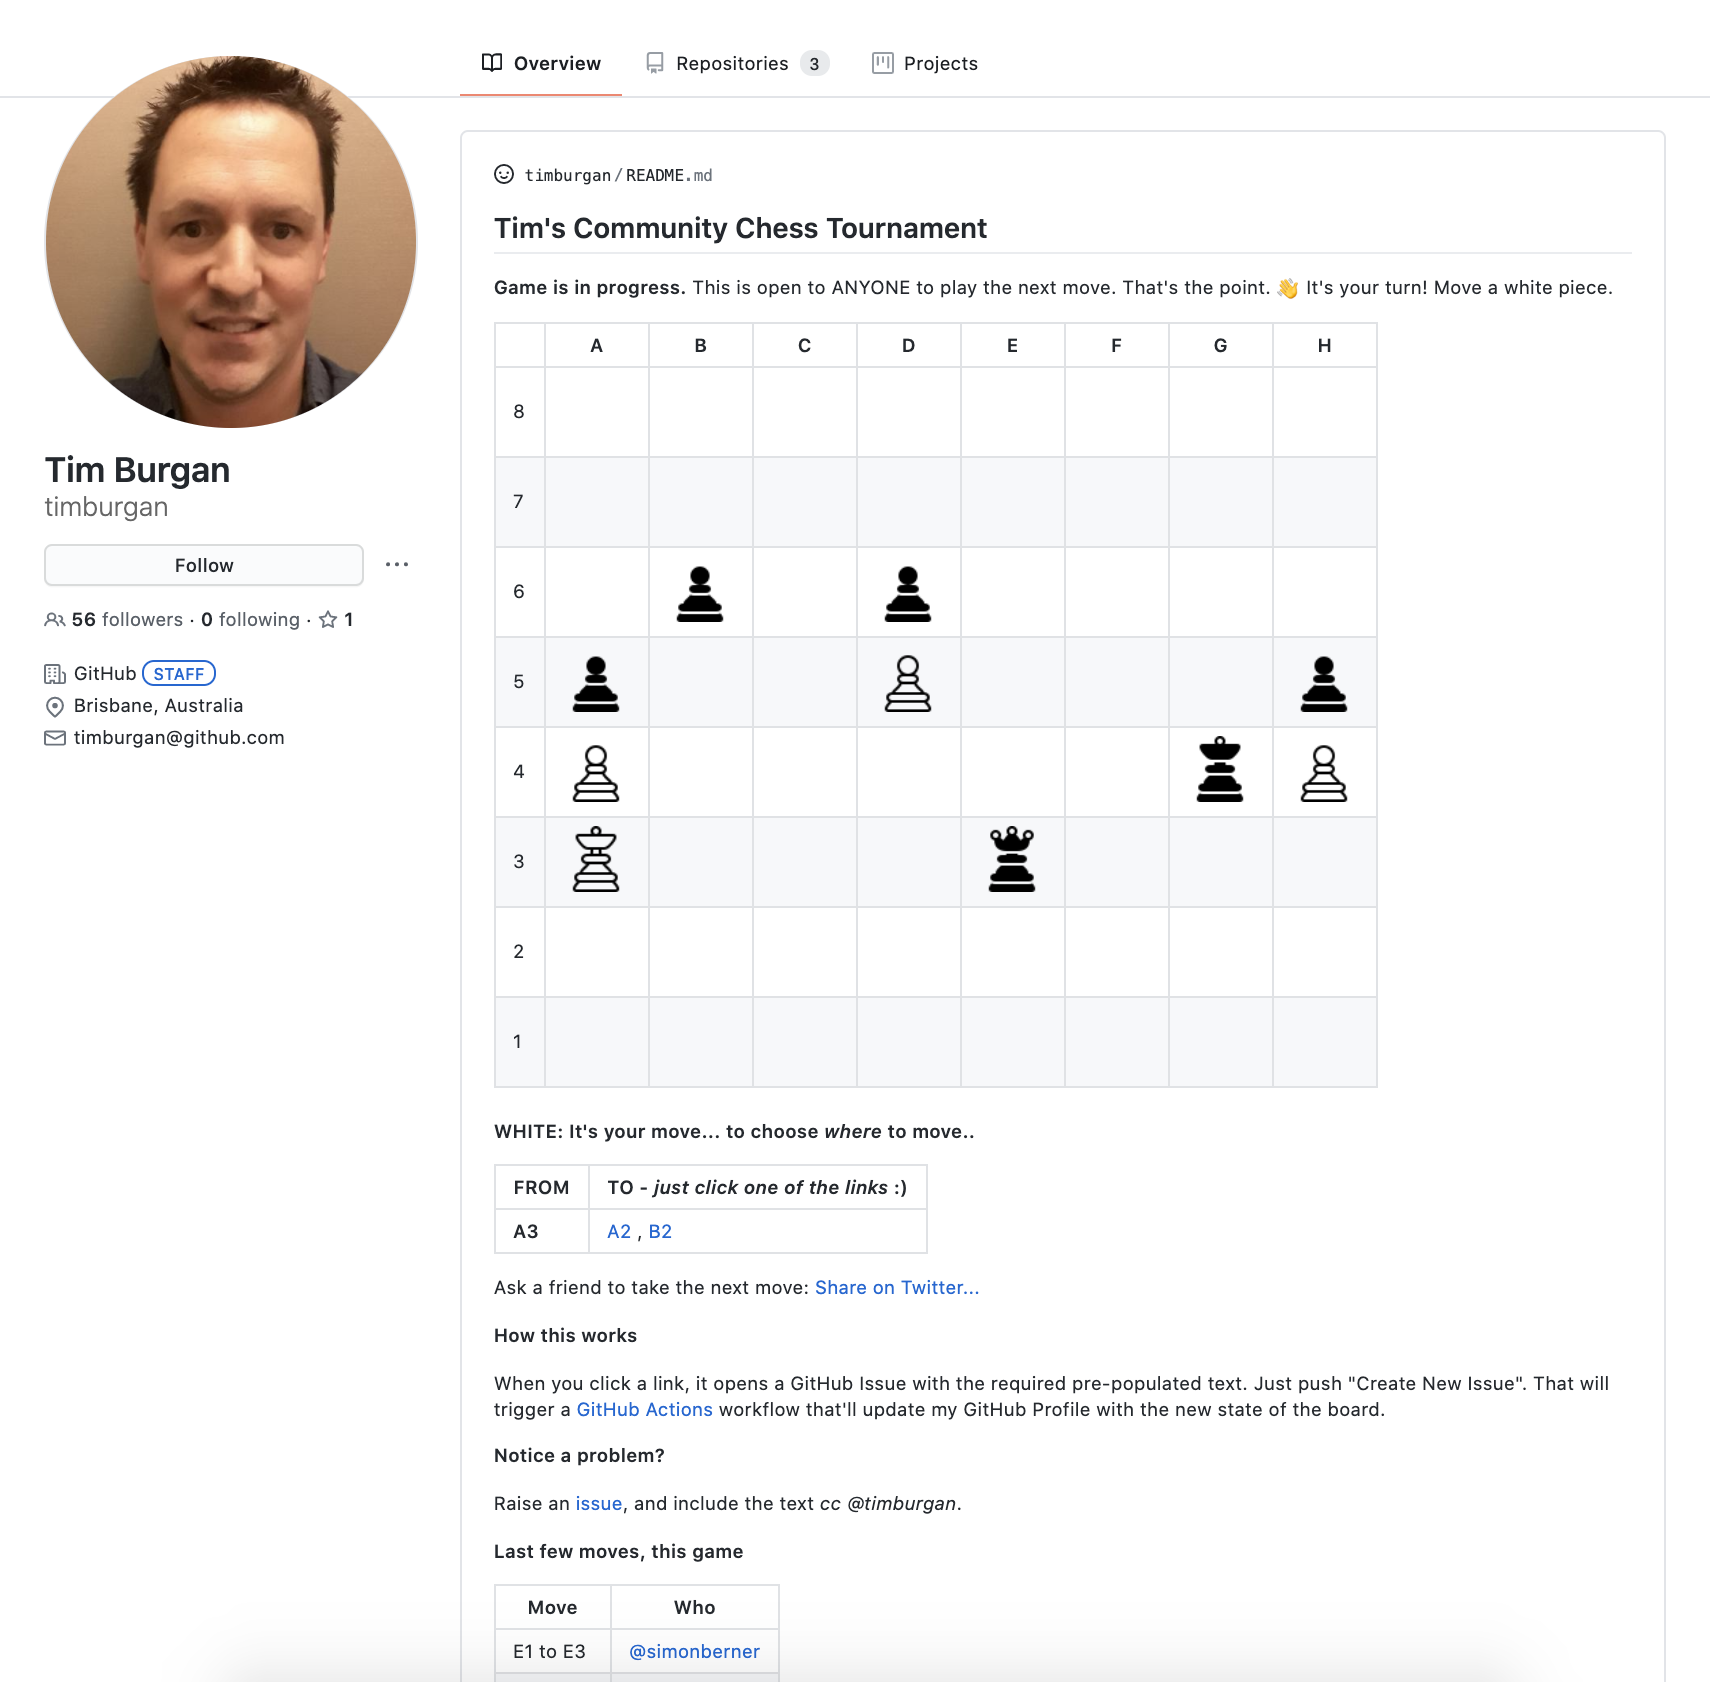
Play Chess with Tim Burgan
与Tim Burgan下棋
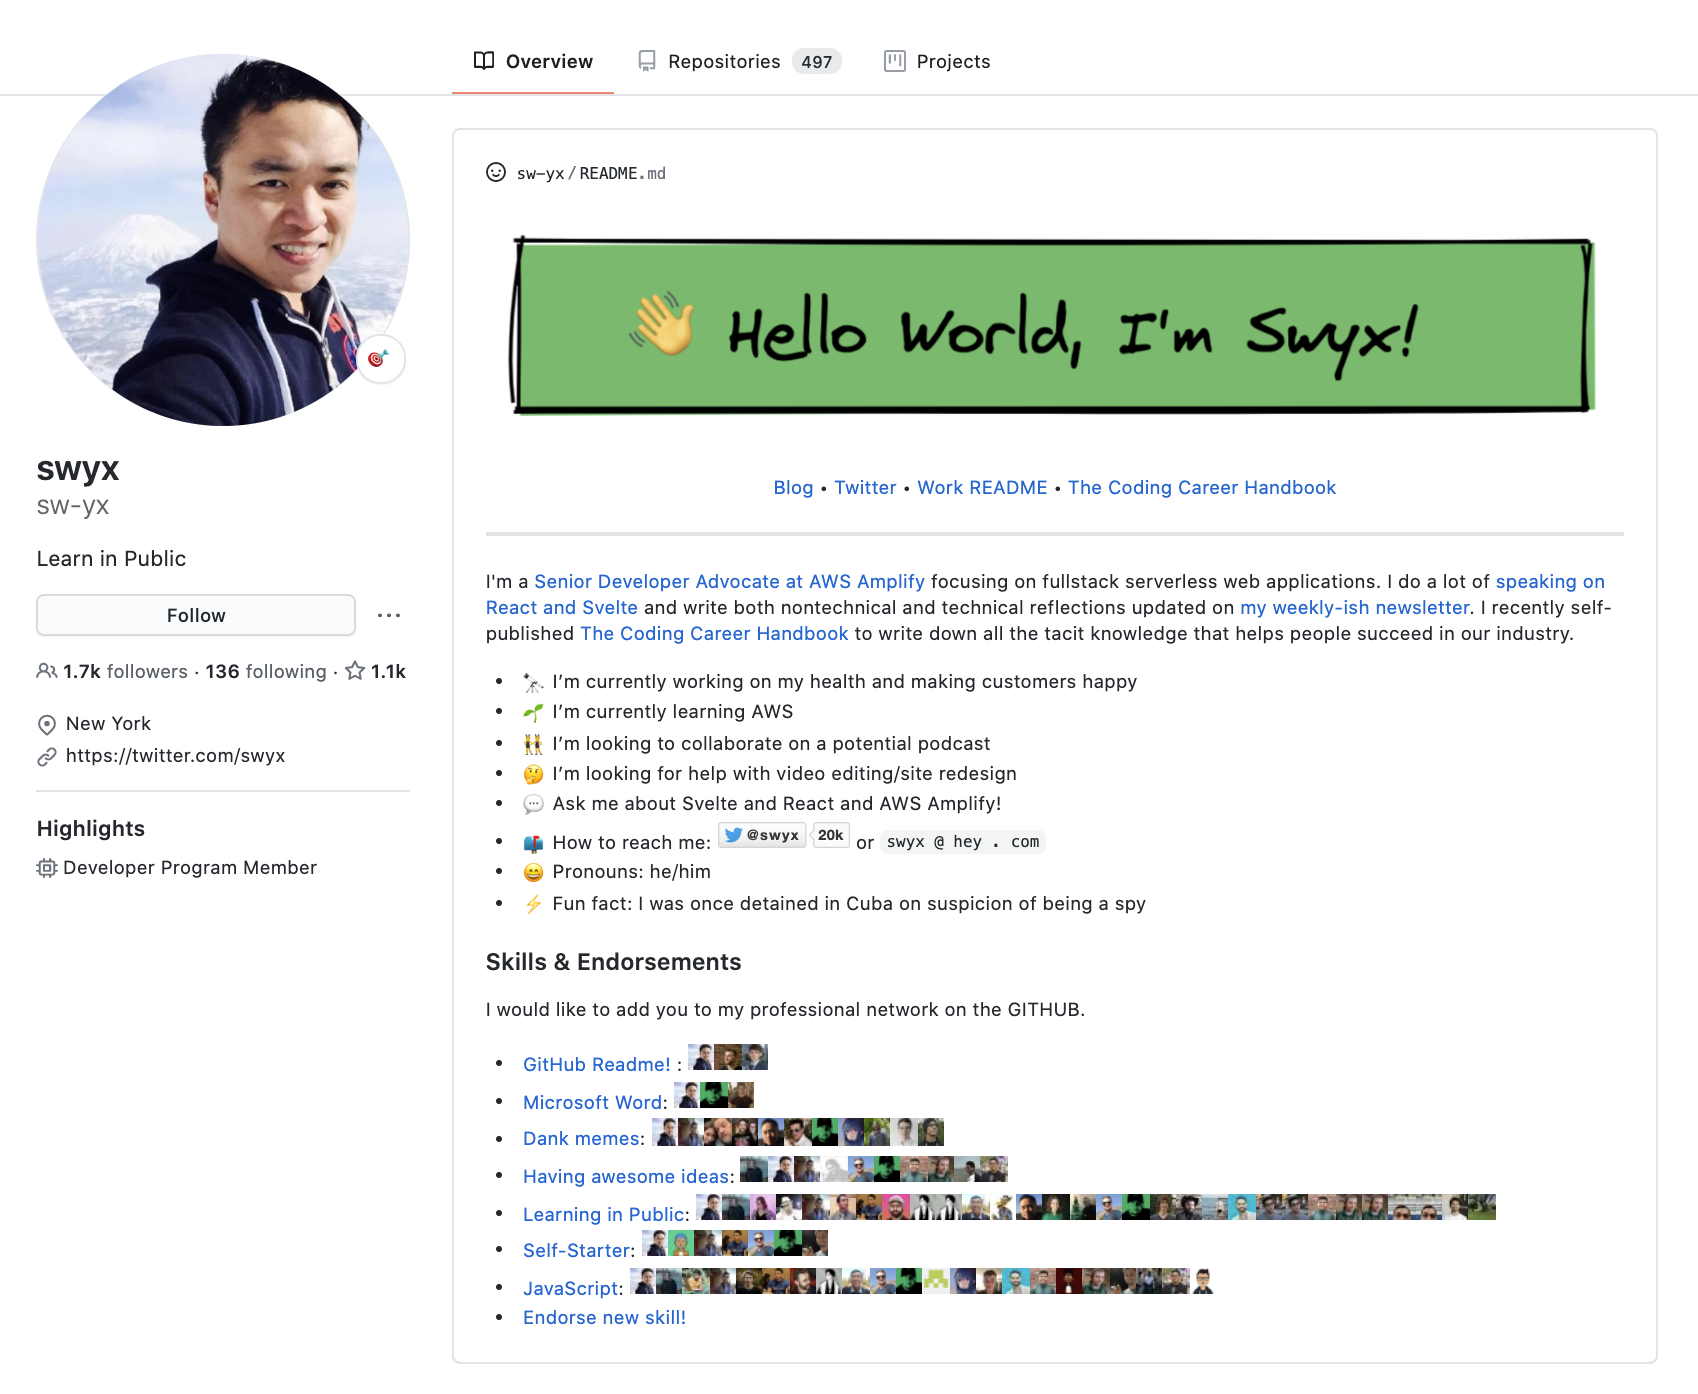
Endorse Swyx for his awesome README idea
支持Swyx的出色自述思想
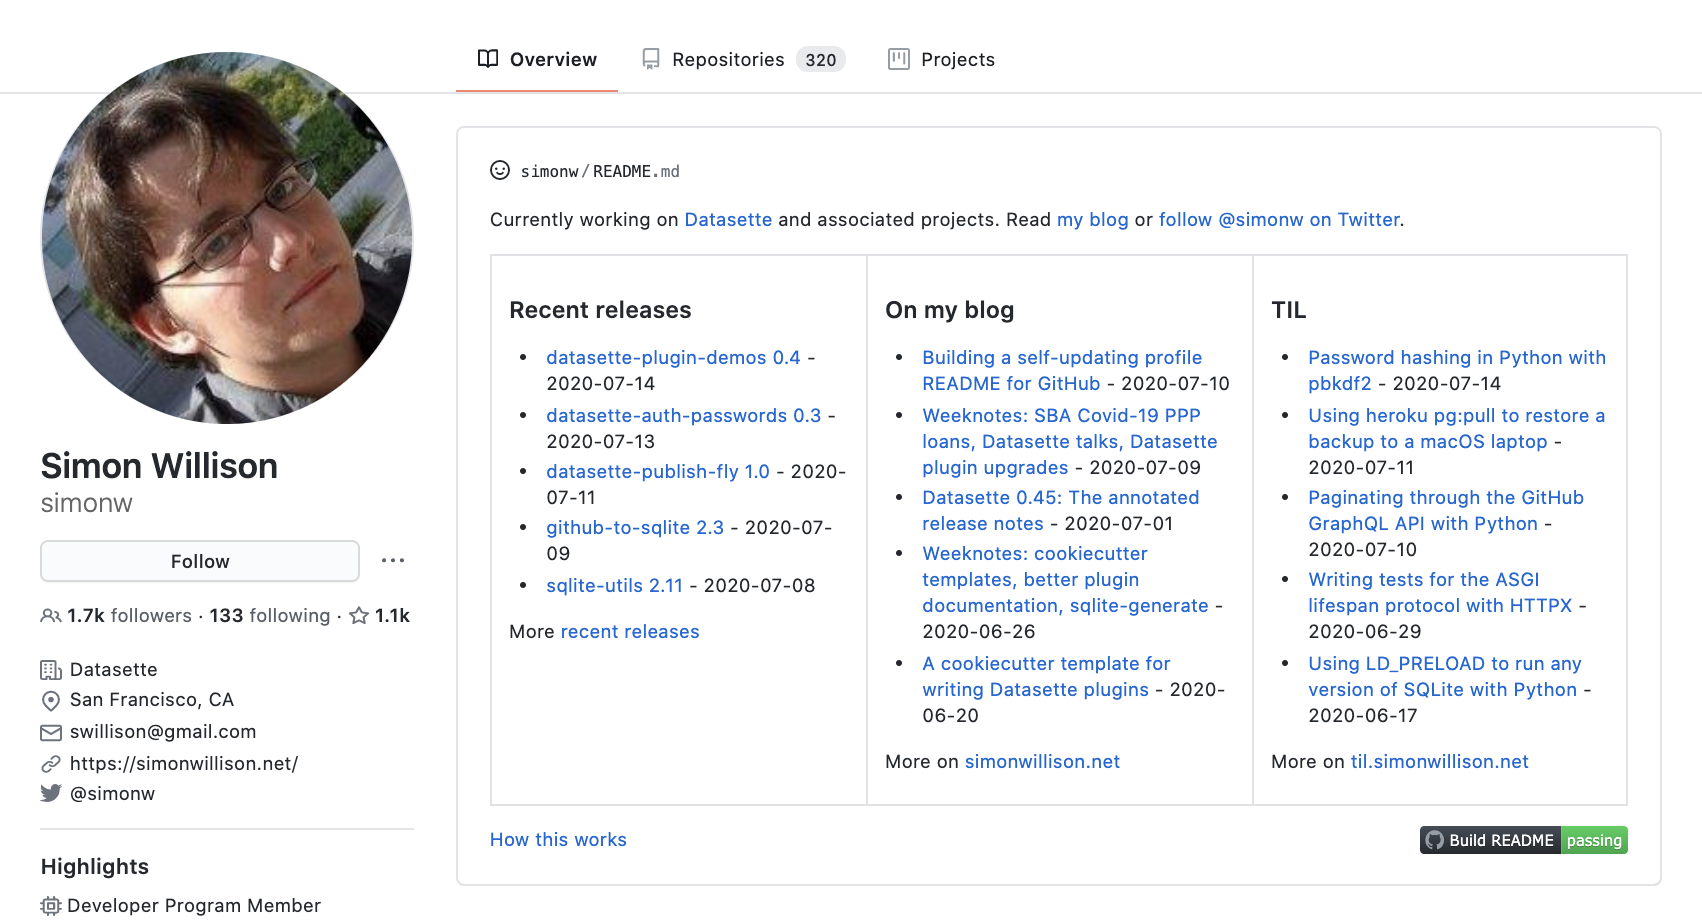
Read latest posts of Simon Wilison
阅读西蒙·威尔逊的最新文章
Find more crazy ideas by checking the repository below:
通过检查以下存储库,找到更多疯狂的想法:
Thanks for reading and I hope you will be having fun with this new feature!
感谢您的阅读,希望您会喜欢这项新功能!
翻译自: https://medium.com/swlh/how-to-create-a-self-updating-readme-md-for-your-github-profile-f8b05744ca91


 1万+
1万+


 被折叠的 条评论
为什么被折叠?
被折叠的 条评论
为什么被折叠?
 到【灌水乐园】发言


