


 本文详细介绍了如何在Django项目中使用allauth库实现用户注册、登录及注销功能,重点聚焦于用户注销的实现过程。
django用户注销
初学者指南 (The Beginners Guide)
If I tell you that you can implement user signup, login, and logout, and other features like email change, forgot password, etc just in 10 mins using Django AllAuth then would you like to read this blog further?
如果我告诉您可以使用Django AllAuth 在10分钟内实现用户注册,登录和注销以及其他功能(如电子邮件更改,忘记密码等) ,那么您想进一步阅读此博客吗?
Note: I will start from scratch so 1st step would be setup virtual environment but if you know this then skip this and start from 2nd step, also templates are not added for these features. you can check out GitHub link for this blog code reference: https://github.com/vgautam99/Django-Allauth/tree/master/UserAuth
注意:我将从头开始,因此第一步将是设置虚拟环境,但是如果您知道这一点,则跳过此步骤并从第二步开始,也不会为这些功能添加模板。 您可以查看GitHub链接以获取此博客代码参考: https : //github.com/vgautam99/Django-Allauth/tree/master/UserAuth
首先,我们需要创建一个虚拟环境并激活它 (First, we need to create a virtual environment and activate it)
Install virtualenv:
安装virtualenv :
pip install virtualenvOpen cmd and change directory to where you want to create your virtual environment and then create environment name allauth_env:
打开cmd并将目录更改到要创建虚拟环境的位置,然后创建环境名称allauth_env :
virtualenv allauth_envWhen allauth_env is created you need to activate it before moving forward so In Windows change directory and go the allauth_env/Scripts/ in cmd and type:
创建allauth_env ,您需要先激活它,然后再继续操作,以便在Windows中更改目录并在cmd中进入allauth_env/Scripts/并输入:
activateWhen allauth_env is active you will see something like this in your cmd:
当allauth_env处于活动状态时,您将在cmd中看到以下内容:
(ALLAUT~1) C:\\...\allauth_env\Scripts>In Linux, change directory go allauth_env/bin and type source activate to activate your allauth_env.
在Linux中,将目录转到allauth_env / bin并键入source activate激活您的allauth_env。
第二步是安装需求 (The second step is installing requirements)
Django Installation:
Django安装:
pip install djangoDjango AllAuth Installation:
Django AllAuth安装:
pip install django-allauth第三步是在项目LocalUser中创建一个项目名称UserAuth和一个应用程序 (The third step is creating a project name UserAuth and an app inside project LocalUser)
Create a project:
创建一个项目:
django-admin startproject UserAuthGo inside UserAuth directory and create an app:
进入UserAuth目录并创建一个应用程序:
django-admin startapp LocalUserAdd these in the UserAuth/Settings.py installed app:
将它们添加到已安装的UserAuth / Settings.py应用程序中:
INSTALLED_APPS = ['django.contrib.admin','django.contrib.auth','django.contrib.contenttypes','django.contrib.sessions','django.contrib.messages','django.contrib.staticfiles',# custom apps'LocalUser',# alluth'django.contrib.sites','allauth','allauth.account','allauth.socialaccount',
]SITE_ID = 1# allout login settingsLOGIN_URL = '/accounts/login'LOGIN_REDIRECT_URL = '/home/'AUTH_USER_MODEL = 'LocalUser.UserModel'EMAIL_BACKEND = 'django.core.mail.backends.console.EmailBackend'
Add allauth path in UserAuth.urls.py:
在UserAuth.urls.py中添加allauth路径:
from django.contrib import adminfrom django.urls import path, include
urlpatterns = [
    path('admin/', admin.site.urls),
    path('accounts/', include('allauth.urls')),
]
Now we need to create a model in LocalUser models.py:
现在我们需要在LocalUser models.py中创建一个模型:
from django.contrib.auth.models import AbstractUserclass UserModel(AbstractUser):passAfter this, you just need to create migrations:
之后,您只需要创建迁移:
python manage.py makemigrationsThen apply migrations:
然后应用迁移:
python manage.py migrateIf everything goes fine then just run server:
如果一切正常,请运行服务器:
python manage.py runserverAnd go to address http://127.0.0.1:8000/accounts/
并转到地址http://127.0.0.1:8000/accounts/
在这里,您将找到现在可以使用的所有功能: (Here you will find all the features that you can now access:)
- accounts/ signup/ [name=’account_signup’] 帐户/注册/ [名称='account_signup']
- accounts/ login/ [name=’account_login’] 帐户/登录名/ [名称='account_login']
- accounts/ logout/ [name=’account_logout’] 帐户/注销/ [名称='account_logout']
- accounts/ password/change/ [name=’account_change_password’] 帐户/密码/更改/ [名称='account_change_password']
- accounts/ password/set/ [name=’account_set_password’] 帐户/密码/设置/ [名称='account_set_password']
- accounts/ inactive/ [name=’account_inactive’] 帐户/无效/ [名称='account_inactive']
- accounts/ email/ [name=’account_email’] 帐户/电子邮件/ [名称='account_email']
- accounts/ confirm-email/ [name=’account_email_verification_sent’] 帐户/确认电子邮件/ [名称='account_email_verification_sent']
- accounts/ ^confirm-email/(?P<key>[-:\w]+)/$ [name=’account_confirm_email’] accounts / ^ confirm-email /(?P <key> [-:\ w] +)/ $ [name ='account_confirm_email']
- accounts/ password/reset/ [name=’account_reset_password’] 帐户/密码/重置/ [名称='account_reset_password']
- accounts/ password/reset/done/ [name=’account_reset_password_done’] 帐户/密码/重置/完成/ [名称='account_reset_password_done']
- accounts/ ^password/reset/key/(?P<uidb36>[0–9A-Za-z]+)-(?P<key>.+)/$ [name=’account_reset_password_from_key’] accounts / ^ password / reset / key /(?P <uidb36> [0–9A-Za-z] +)-(?P <key>。+)/ $ [name ='account_reset_password_from_key']
- accounts/ password/reset/key/done/ [name=’account_reset_password_from_key_done’] 帐户/密码/重置/密钥/完成/ [名称='account_reset_password_from_key_done']
- accounts/ social/ 帐户/社交/
让我们检查注册,登录和注销流程 (Let’s check signup, login and logout flow)
To signup go to http://127.0.0.1:8000/accounts/signup/
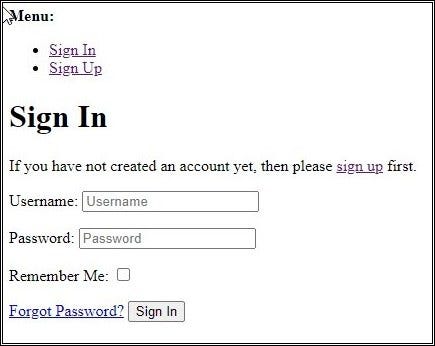
2. To login go to http://127.0.0.1:8000/accounts/login/
2.要登录,请访问http://127.0.0.1:8000/accounts/ login /
3. To log out go to http://127.0.0.1:8000/accounts/logout/


奖金部分 (Bonus Section)
Let me show you if you want to set up authentication for any method in your views.py.
让我告诉您是否要为views.py中的任何方法设置身份验证。
I have created a method inside our LocalUser/views.py and when you add the decorator @login_required then this means only logged in users can access this.
我在LocalUser / views.py中创建了一个方法,当您添加装饰器@login_required这意味着只有登录用户才能访问此方法。
from allauth.account.decorators import login_requiredfrom django.http import HttpResponse
@login_requireddef home(request):
    html = "<html><body>you are logged in, welcome!</body></html>"
    return HttpResponse(html)
Add home in UserAuth/urls.py:
在UserAuth/urls.py添加主页:
from django.contrib import adminfrom django.urls import path, includefrom LocalUser.views import home
urlpatterns = [
    path('admin/', admin.site.urls),
    path('accounts/', include('allauth.urls')),
    path('home', home),
]
Now if you are logged out then accessing home http://127.0.0.1:8000/home will send you to the login page and after login, you will be redirected to the home page.
现在,如果您已注销,则访问主页http://127.0.0.1:8000/home会将您发送到登录页面,登录后,您将被重定向到主页。

结论 (Conclusion)
Django AllAuth is really simple to integrate into your Django project, Django AllAuth will provide you user Registration, login, logout, email update, forgot password, and many more features already implemented and ready to use. Django AllAuth also does data validation. For more information check out Django AllAuth Doc.
Django AllAuth非常易于集成到您的Django项目中,Django AllAuth将为您提供用户注册,登录,注销,电子邮件更新,忘记密码以及许多已经实现并可以使用的功能。 Django AllAuth还执行数据验证。 有关更多信息,请查看Django AllAuth Doc。
you can check out GitHub link for this blog code reference https://github.com/vgautam99/Django-Allauth/tree/master/UserAuth
您可以查看GitHub链接以获取此博客代码参考 https://github.com/vgautam99/Django-Allauth/tree/master/UserAuth
下一节 (Next Section)
If you liked this blog then in the next part I will show you how you can add social apps icon for a user to log in using social apps like Facebook, Linkedin, Google, etc something like the below image. Checkout my next blog https://medium.com/python-in-plain-english/why-you-should-let-the-user-to-authenticate-with-social-accounts-df30b0ba4793
如果您喜欢此博客,那么在下一部分中,我将向您展示如何为用户添加社交应用程序图标以使用Facebook,Linkedin,Google等社交应用程序登录,如下图所示。 查看我的下一个博客https://medium.com/python-in-plain-english/why-you-should-let-the-user-to-authenticate-with-social-accounts-df30b0ba4793

django用户注销


 853
853

 被折叠的 条评论
为什么被折叠?
被折叠的 条评论
为什么被折叠?
 到【灌水乐园】发言


