


Traffic Light Detection for a Self-driving Car — a step-by-step guide how to apply Tensorflow Object Detection API
自动驾驶汽车的交通信号灯检测—如何应用Tensorflow对象检测API的分步指南
The computer vision is one of the top fast growing domain and the deep learning based approach is now widely applied to solve real-world problems such as face recognition, cancer detection, etc.
计算机视觉是增长最快的领域之一,基于深度学习的方法现已广泛应用于解决诸如面部识别,癌症检测等现实问题。
One of the most effective tool is Tensorflow Object Detection API and use their pre-trained model, replacing the last layer for the particular problem trying to solve and fine tune the model.
最有效的工具之一是Tensorflow Object Detection API,并使用其预先训练的模型,针对试图解决和微调模型的特定问题替换最后一层。
Now the API is adopted to Tensorflow 2.x. However, the runtime environment sometimes does not allow to use the latest version and still need to use Tensorflow 1.x. This blog post demonstrate how to use the API in such a situation. If you can use Tensorflow 2.x for inference, best to go for it — see another post explaining how to.
现在,该API被Tensorflow 2.x采用。 但是,运行时环境有时不允许使用最新版本,而仍然需要使用Tensorflow1.x。 这篇博客文章演示了在这种情况下如何使用API。 如果您可以使用Tensorflow 2.x进行推理,则最好去做- 请参阅另一篇解释如何做的文章 。

Here, I take the traffic light detection for a self-driving car, where red, yellow or green traffic light have to be detected at high frequency (~10fps) even on a small computing resource on the car by older libraries due to dependencies.
在这里,我采用自动驾驶汽车的交通信号灯检测方法,其中由于依赖关系,即使是较早的库在汽车上的少量计算资源上,也必须以较高的频率(〜10fps)检测红色,黄色或绿色的交通信号灯。
Please note that this post only describes the object detection by a machine learning approach. An actual self-driving car uses Lidar, Rader, GPS and map, and apply various filters for localization, object detection, trajectory planning and so on then apply actuators to accelerate, decelerate or turn the car, which is beyond this post.
请注意,本文仅描述通过机器学习方法进行的对象检测。 实际的自动驾驶汽车使用激光雷达,雷达,GPS和地图,并应用各种过滤器进行定位,目标检测,轨迹规划等,然后应用执行器来加速,减速或转弯汽车,这已超出了本文的范围。
The below uses Google Colab. If you train on a local environment, please refer to README in the repo.
下面使用Google Colab。 如果你训练的本地环境,请参考README的回购 。
第一部分:在本地PC上进行准备 (Part1: Preparation on Local PC)
1. Clone the project repo or create new one
If you created a new repo, make the following directories
如果创建了新的仓库,请创建以下目录
mkdir annotations        # To store annotated inputs
mkdir images             # To store training images
mkdir models             # To store training pipeline config and training output
mkdir pre-trained-models # To store pre-trained models
mkdir scripts            # For scripts
mkdir exported-models    # To store exported models after training
When creating a new repo, copy all scripts in scripts dir.
创建新存储库时,请复制脚本目录中的所有脚本 。
2. Select which pre-trained model to use
2.选择要使用的预训练模型
Go to Tensorflow 1 Detection Model Zoo in github and download the one which fits for the purpose. Models trained by coco dataset works well in most cases. Speed and accuracy (mAP) are trade-off. I selected SSD Mobilenet v2 for fast inference speed, but one can choose larger models with better accuracy such as Faster RCNN Resnet101, which is about 100 times model size and 10 times slower in my machine, but comes with a great accuracy.
转到github中的Tensorflow 1 Detection Model Zoo ,并下载适合该目的的模型。 由coco数据集训练的模型在大多数情况下效果很好。 速度和准确性(mAP)是折衷方案。 我选择SSD Mobilenet v2可以加快推理速度,但是可以选择精度更高的大型模型,例如Faster RCNN Resnet101,它的体积大约是模型大小的100倍,而在我的计算机中则慢10倍,但准确性很高。
Once the model is decided, unarchive and copy pipeline.config. Alternatively, you can copy sample pipeline config from the tensorflow model repo.
确定模型后,取消存档并复制pipeline.config。 或者,您可以从tensorflow模型repo复制样本管道配置。
cd pre-trained-models
tar -xzvf ssd_mobilenet_v2_coco.tar.gz # Download the archive beforehand
mkdir ../models/my_ssd_mobilenet_v2_coco
cp ssd_mobilenet_v2_coco/pipeline.config ../models/my_ssd_mobilenet_v2_coco/
3. Prepare training data
3.准备训练数据
As is always the case for supervised learning, you need to spend a few hours to manually label input data. Save training images under images directory where I provided traffic light detection images in a simulator with labels in Pascal VOC in my repo. There are a number of tools available and labelImg is one of the simplest classic ones for box type. Make sure you have python 3 and simply install it from PyPI, or refer to installation guide.
与监督学习一样,您需要花费几个小时来手动标记输入数据。 将训练图像保存在图像目录下,在该目录中我在模拟器中提供了带有信号灯的Pascal VOC中带有标签的模拟器中的交通信号检测图像。 有许多可用的工具,labelImg是用于框类型的最简单的经典工具之一。 确保您拥有python 3并只需从PyPI安装它,或参考安装指南 。
pip3 install labelImg # Install
labelImg # launch the app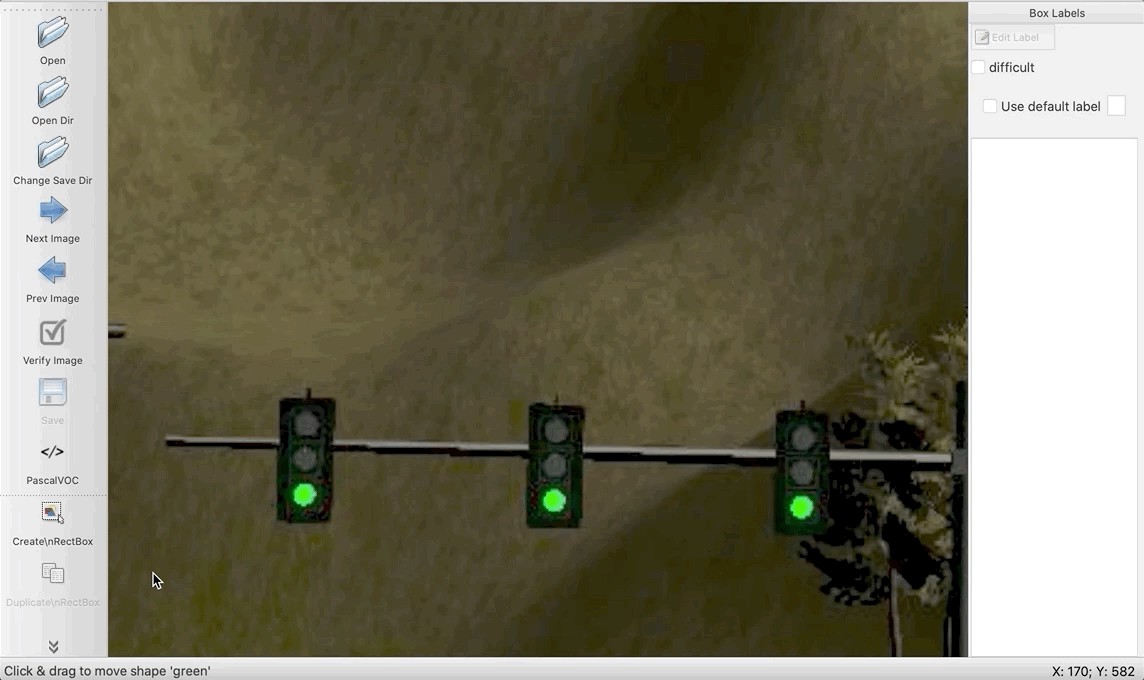
Save the xml files in the same directory. Good news is, no need to prepare tens of thousands of labels as this is a transfer learning and 100 labels per category will yield good results for fine tuning.
将xml文件保存在同一目录中。 好消息是,无需准备数万个标签,因为这是一项转移学习,每个类别100个标签将产生良好的微调效果。
4. Create Label Map
4.创建标签图
This is just a list of labels. Names should match with the annotated labels in the previous step. Save the file as annotations/label_map.pbtxt
这只是标签列表。 名称应与上一步中带注释的标签匹配。 将文件另存为注释/label_map.pbtxt
item {
    id: 1
    name: 'green'
}


item {
    id: 2
    name: 'yellow'
}


item {
    id: 3
    name: 'red'
}
Next step of training set preparation is to separate images to train set and test set, then generate .TFRecord for each the xml files. This can be done locally here but I included in the step on Colab so that any additional labelling are not missed in TFRecord.
训练集准备的下一步是将图像分为训练集和测试集,然后为每个xml文件生成.TFRecord。 这可以在这里本地完成,但是我包括在Colab的步骤中,因此TFRecord中不会遗漏任何其他标签。
5. Edit pipeline.config
5.编辑pipeline.config
Some changes are mandatory and others are optional but better to fit for the training data.
有些更改是强制性的,而另一些则是可选的,但更好地适合于培训数据。
model {
  ssd {
    num_classes: 3   # [MUST] match the number of categories in the training set
    image_resizer {
      fixed_shape_resizer {   # [OPTION] depending on the models, different resizer or parameters can be used
        height: 300
        width: 300
      }
    }
    feature_extractor {
      type: "ssd_mobilenet_v2"   # [MUST] make sure this matches with the model to be used
      ## omitted ##
    }
    ## omitted ##
    anchor_generator {
      ssd_anchor_generator {   # [SHOULD] update scales and aspect_ratios which match with most boxes drown
        num_layers: 6
        min_scale: 0.04
        max_scale: 0.4
        aspect_ratios: 0.5
        aspect_ratios: 0.46
        aspect_ratios: 0.43
        aspect_ratios: 0.4
        aspect_ratios: 0.37
      }
    }
## omitted ##
train_config {
  batch_size: 8   # [MUST] too big number will cause out of memory error
  ## omitted ##
  optimizer {
    rms_prop_optimizer {
      learning_rate {
        exponential_decay_learning_rate {   # [MUST] dependin on how many steps to execute, change the values
          initial_learning_rate: 0.005
          decay_steps: 40000
          decay_factor: 0.1
          burnin_learning_rate: 0.005
          burnin_steps: 2000
          min_learning_rate: 0.0001
          staircase: false
        }
      }
      ## omitted ##
    }
  }
  fine_tune_checkpoint: "/content/models/research/pretrained_model/model.ckpt"   # [MUST] update the path (/content is for Colab)
  num_steps: 50000    # [MUST] update how many steps to execute
  fine_tune_checkpoint_type: "detection"   # [MUST] update to "detection" if it is different
}
train_input_reader {
  label_map_path: "annotations/label_map.pbtxt"   # [MUST] update the path
  tf_record_input_reader {
    input_path: "annotations/train.record"   # [MUST] update the path
  }
}
eval_config {
  num_examples: 50    # [OPTION] fine as long as the number is larger than the number of test images
  metrics_set: "coco_detection_metrics"   # [OPTION] can be added to use coco metrix in the evaluation
  use_moving_averages: false   # [MUST] update to false if it is different
}
eval_input_reader {
  label_map_path: "annotations/label_map.pbtxt"   # [MUST] update the path
  shuffle: false
  num_readers: 1
  tf_record_input_reader {
    input_path: "annotations/test.record"   # [MUST] update the path
  }
}
Push the repo to github— all set!
将仓库推送到github-全部设置好了!
第2部分:Google Colab (Part 2: Google Colab)
Next, go to Google Colab and create a new notebook. traffic-light-detection-tf1.ipynb is a sample in my repo.
接下来,转到Google Colab并创建一个新笔记本。 traffic-light-detection-tf1.ipynb是我的仓库中的一个示例。
1. Install Tensorflow 1.14 and required libraries
1.安装Tensorflow 1.14和所需的库
%tensorflow_version # check version


# Uninstall 2.x and install 1.14
!pip uninstall -y tensorflow tensorboard tensorflow-estimator tensorboard-plugin-wit
!pip install tensorflow-gpu==1.14.0 tensorboard==1.14.0 tensorflow-estimator==1.14.0


# Install required libraries
!apt-get install -qq protobuf-compiler python-pil python-lxml python-tk
!pip install -q pillow lxml jupyter matplotlib cython pandas contextlib2
!pip install -q pycocotools tf_slim
2. Set up the variables
2.设置变量
import os


# Repo URL (change this to your own)
repo_url = 'https://github.com/yuki678/driving-object-detection'


# Model
model_name = 'ssd_mobilenet_v2_coco_2018_03_29'
model_path = '/models/my_ssd_mobilenet_v2/'
pipeline_file = 'pipeline.config'


# Set Repository Home Directory
repo_dir_path = os.path.abspath(os.path.join('.', os.path.basename(repo_url)))


# Set Label Map (.pbtxt) path and pipeline.config path
label_map_pbtxt_fname = repo_dir_path + '/annotations/label_map.pbtxt'
pipeline_fname = repo_dir_path + model_path + pipeline_file


# Set .record path
test_record_fname = repo_dir_path + '/annotations/test.record'
train_record_fname = repo_dir_path + '/annotations/train.record'


# Set output directories and clean up
model_dir = repo_dir_path + '/training/'
output_dir = repo_dir_path + '/exported-models/'


!rm -rf {model_dir} {output_dir}
os.makedirs(model_dir, exist_ok=True)
os.makedirs(output_dir, exist_ok=True)
3. Clone Tensorflow model repo
3.克隆Tensorflow模型库
Download tensorflow model repo to the Colab env, compile protocol buffers, set PYTHONPATH and install COCO API for evaluation.
将tensorflow模型存储库下载到Colab env,编译协议缓冲区,设置PYTHONPATH并安装COCO API进行评估。
# Clone Tensorflow model repo
%cd /content
!git clone --quiet -b r1.13.0 https://github.com/tensorflow/models.git
# Compile protocol buffers
%cd /content/models/research
!protoc object_detection/protos/*.proto --python_out=.
# Set environment variables
import os
os.environ['PYTHONPATH'] += ':/content/models/research/:/content/models/research/slim/'
# Install libraries
!pip install .
# Test
!python object_detection/builders/model_builder_test.py


## Coco Installation (Optional, required when using Coco Evaluation)
%cd /content
!git clone --quiet https://github.com/cocodataset/cocoapi.git
%cd cocoapi/PythonAPI
!make
!cp -r pycocotools /content/models/research/
4. Download a pre-trained models
4.下载预训练的模型
Download the pre-trained model to the Colab environment.
将预训练的模型下载到Colab环境。
%cd /content/models/research


import os
import shutil
import glob
import urllib.request
import tarfile
MODEL_FILE = model_name + '.tar.gz'
DOWNLOAD_BASE = 'http://download.tensorflow.org/models/object_detection/'
DEST_DIR = '/content/models/research/pretrained_model'


if not (os.path.exists(MODEL_FILE)):
    urllib.request.urlretrieve(DOWNLOAD_BASE + MODEL_FILE, MODEL_FILE)


tar = tarfile.open(MODEL_FILE)
tar.extractall()
tar.close()


os.remove(MODEL_FILE)
if (os.path.exists(DEST_DIR)):
    shutil.rmtree(DEST_DIR)
os.rename(model_name, DEST_DIR)


fine_tune_checkpoint = os.path.join(DEST_DIR, "model.ckpt")
5. Clone the project repo
5.克隆项目仓库
Make sure the local changes are committed in master branch and pushed to github beforehand.
确保本地更改已在master分支中提交并事先推送到github。
import os
%cd /content


# Clone
!git clone {repo_url}


# Pull (just in case the repo already exists)
%cd {repo_dir_path}
!git pull


# Check if label map and pipeline files exist
assert os.path.isfile(label_map_pbtxt_fname), '`{}` not exist'.format(label_map_pbtxt_fname)
assert os.path.isfile(pipeline_fname), '`{}` not exist'.format(pipeline_fname)
6. Process input images (training dataset)
6.处理输入图像(训练数据集)
- First, split the images and labels to train set and test set 首先,将图像和标签分割为训练集和测试集
- Next, convert xml files into a csv 接下来,将xml文件转换为csv
- Then, convert the csv into TFRecord 然后,将csv转换为TFRecord
%cd {repo_dir_path}
# Split images to train:test = 9:1
!python scripts/partition_dataset.py -x -i images/ -r 0.1


# Convert xml files to a csv
!python scripts/xml_to_csv.py -i images/train -o annotations/train_labels.csv
!python scripts/xml_to_csv.py -i images/test -o annotations/test_labels.csv


# Convert csv to TFRecord
!python scripts/generate_tfrecord_v1.py \
    --csv_input=annotations/train_labels.csv \
    --output_path=annotations/train.record \
    --img_path=images/train \
    --label_map annotations/label_map.pbtxt


!python scripts/generate_tfrecord_v1.py \
    --csv_input=annotations/test_labels.csv \
    --output_path=annotations/test.record \
    --img_path=images/test \
    --label_map annotations/label_map.pbtxt


# Check if the files have been generated
assert os.path.isfile(test_record_fname), '`{}` not exist'.format(test_record_fname)
assert os.path.isfile(train_record_fname), '`{}` not exist'.format(train_record_fname)
7. Set up Tensorboard
7.设置Tensorboard
It is very useful to launch tensorboard to monitor the training progress. To access the tensorboard process, use ngrok tunnel here.
启动张量板来监视训练进度非常有用。 要访问张量板过程,请在此处使用ngrok隧道。
# Set log directory for tensorboard to watch
LOG_DIR = model_dir


# Clean up the directory
!rm -rf {LOG_DIR}/*


# Download ngrok tunneling module
!wget https://bin.equinox.io/c/4VmDzA7iaHb/ngrok-stable-linux-amd64.zip
!unzip -o ngrok-stable-linux-amd64.zip


# Launch the tensorboard
!sleep 2
get_ipython().system_raw(
    'tensorboard --logdir={} &'.format(LOG_DIR)
)


# Run ngrok tunneling
!sleep 2
get_ipython().system_raw('./ngrok http 6006 &')


# Get URL
!sleep 2
! curl -s http://localhost:4040/api/tunnels | python3 -c \
    "import sys, json; print(json.load(sys.stdin)['tunnels'][0]['public_url'])"
8. Train! finally:)
8.火车! 最后:)
This takes a while, depending on the model and parameters though, a few minutes to hours or more. Take a couple of tea, or even dinner and shower and TV and sleep…
根据模型和参数,这可能需要花费几分钟到几小时甚至更长的时间。 喝杯茶,甚至晚餐,淋浴和电视,然后入睡……
%cd {repo_dir_path}
!python /content/models/research/object_detection/model_main.py \
--pipeline_config_path={pipeline_fname} \
--model_dir={model_dir} \
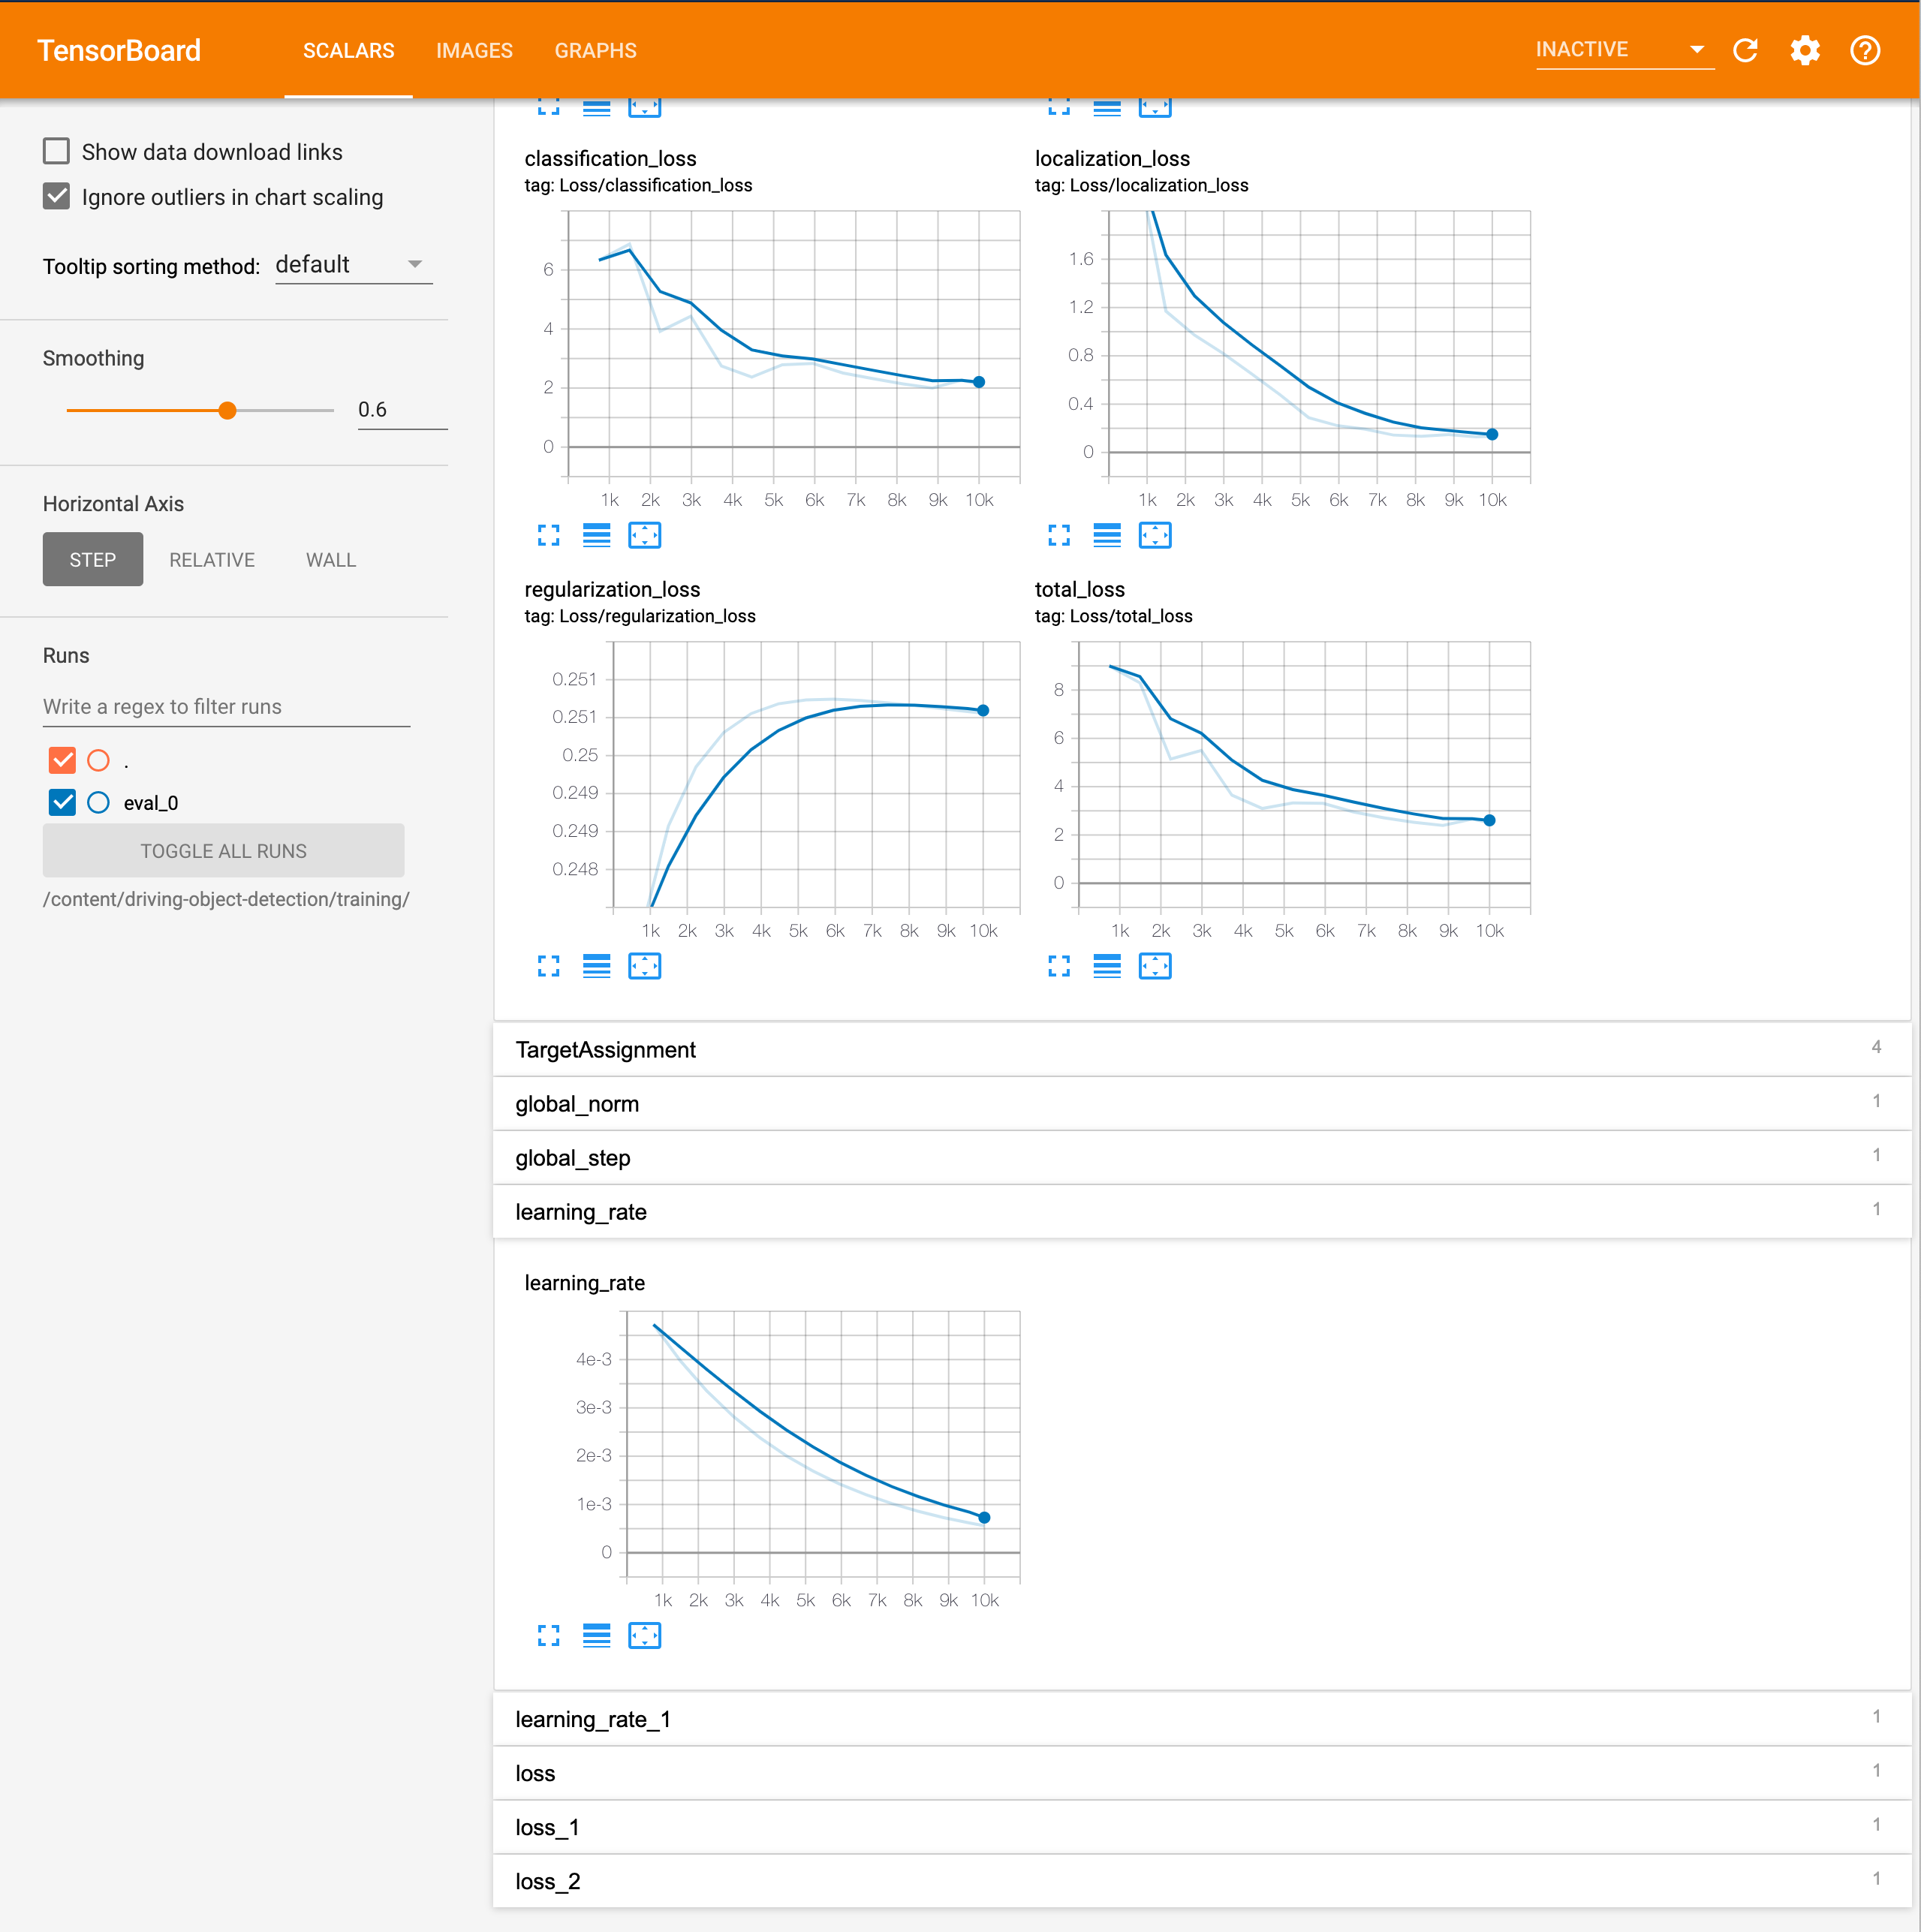
--alsologtostderrIn TF1, the evaluation runs at the checkpoint during the training as specified in pipeline.config. Good to check the progress on Tensorboard and adjust parameters in pipeline.config if the loss is not decreased, accuracy/recall is not improved or learning curve is not as expected. Target total loss under 2.
在TF1中,评估在pipeline.config中指定的训练期间在检查点运行。 如果没有减少损失,准确性/召回率没有改善或学习曲线不符合预期,可以检查Tensorboard上的进度并调整pipeline.config中的参数。 目标总损失低于2。
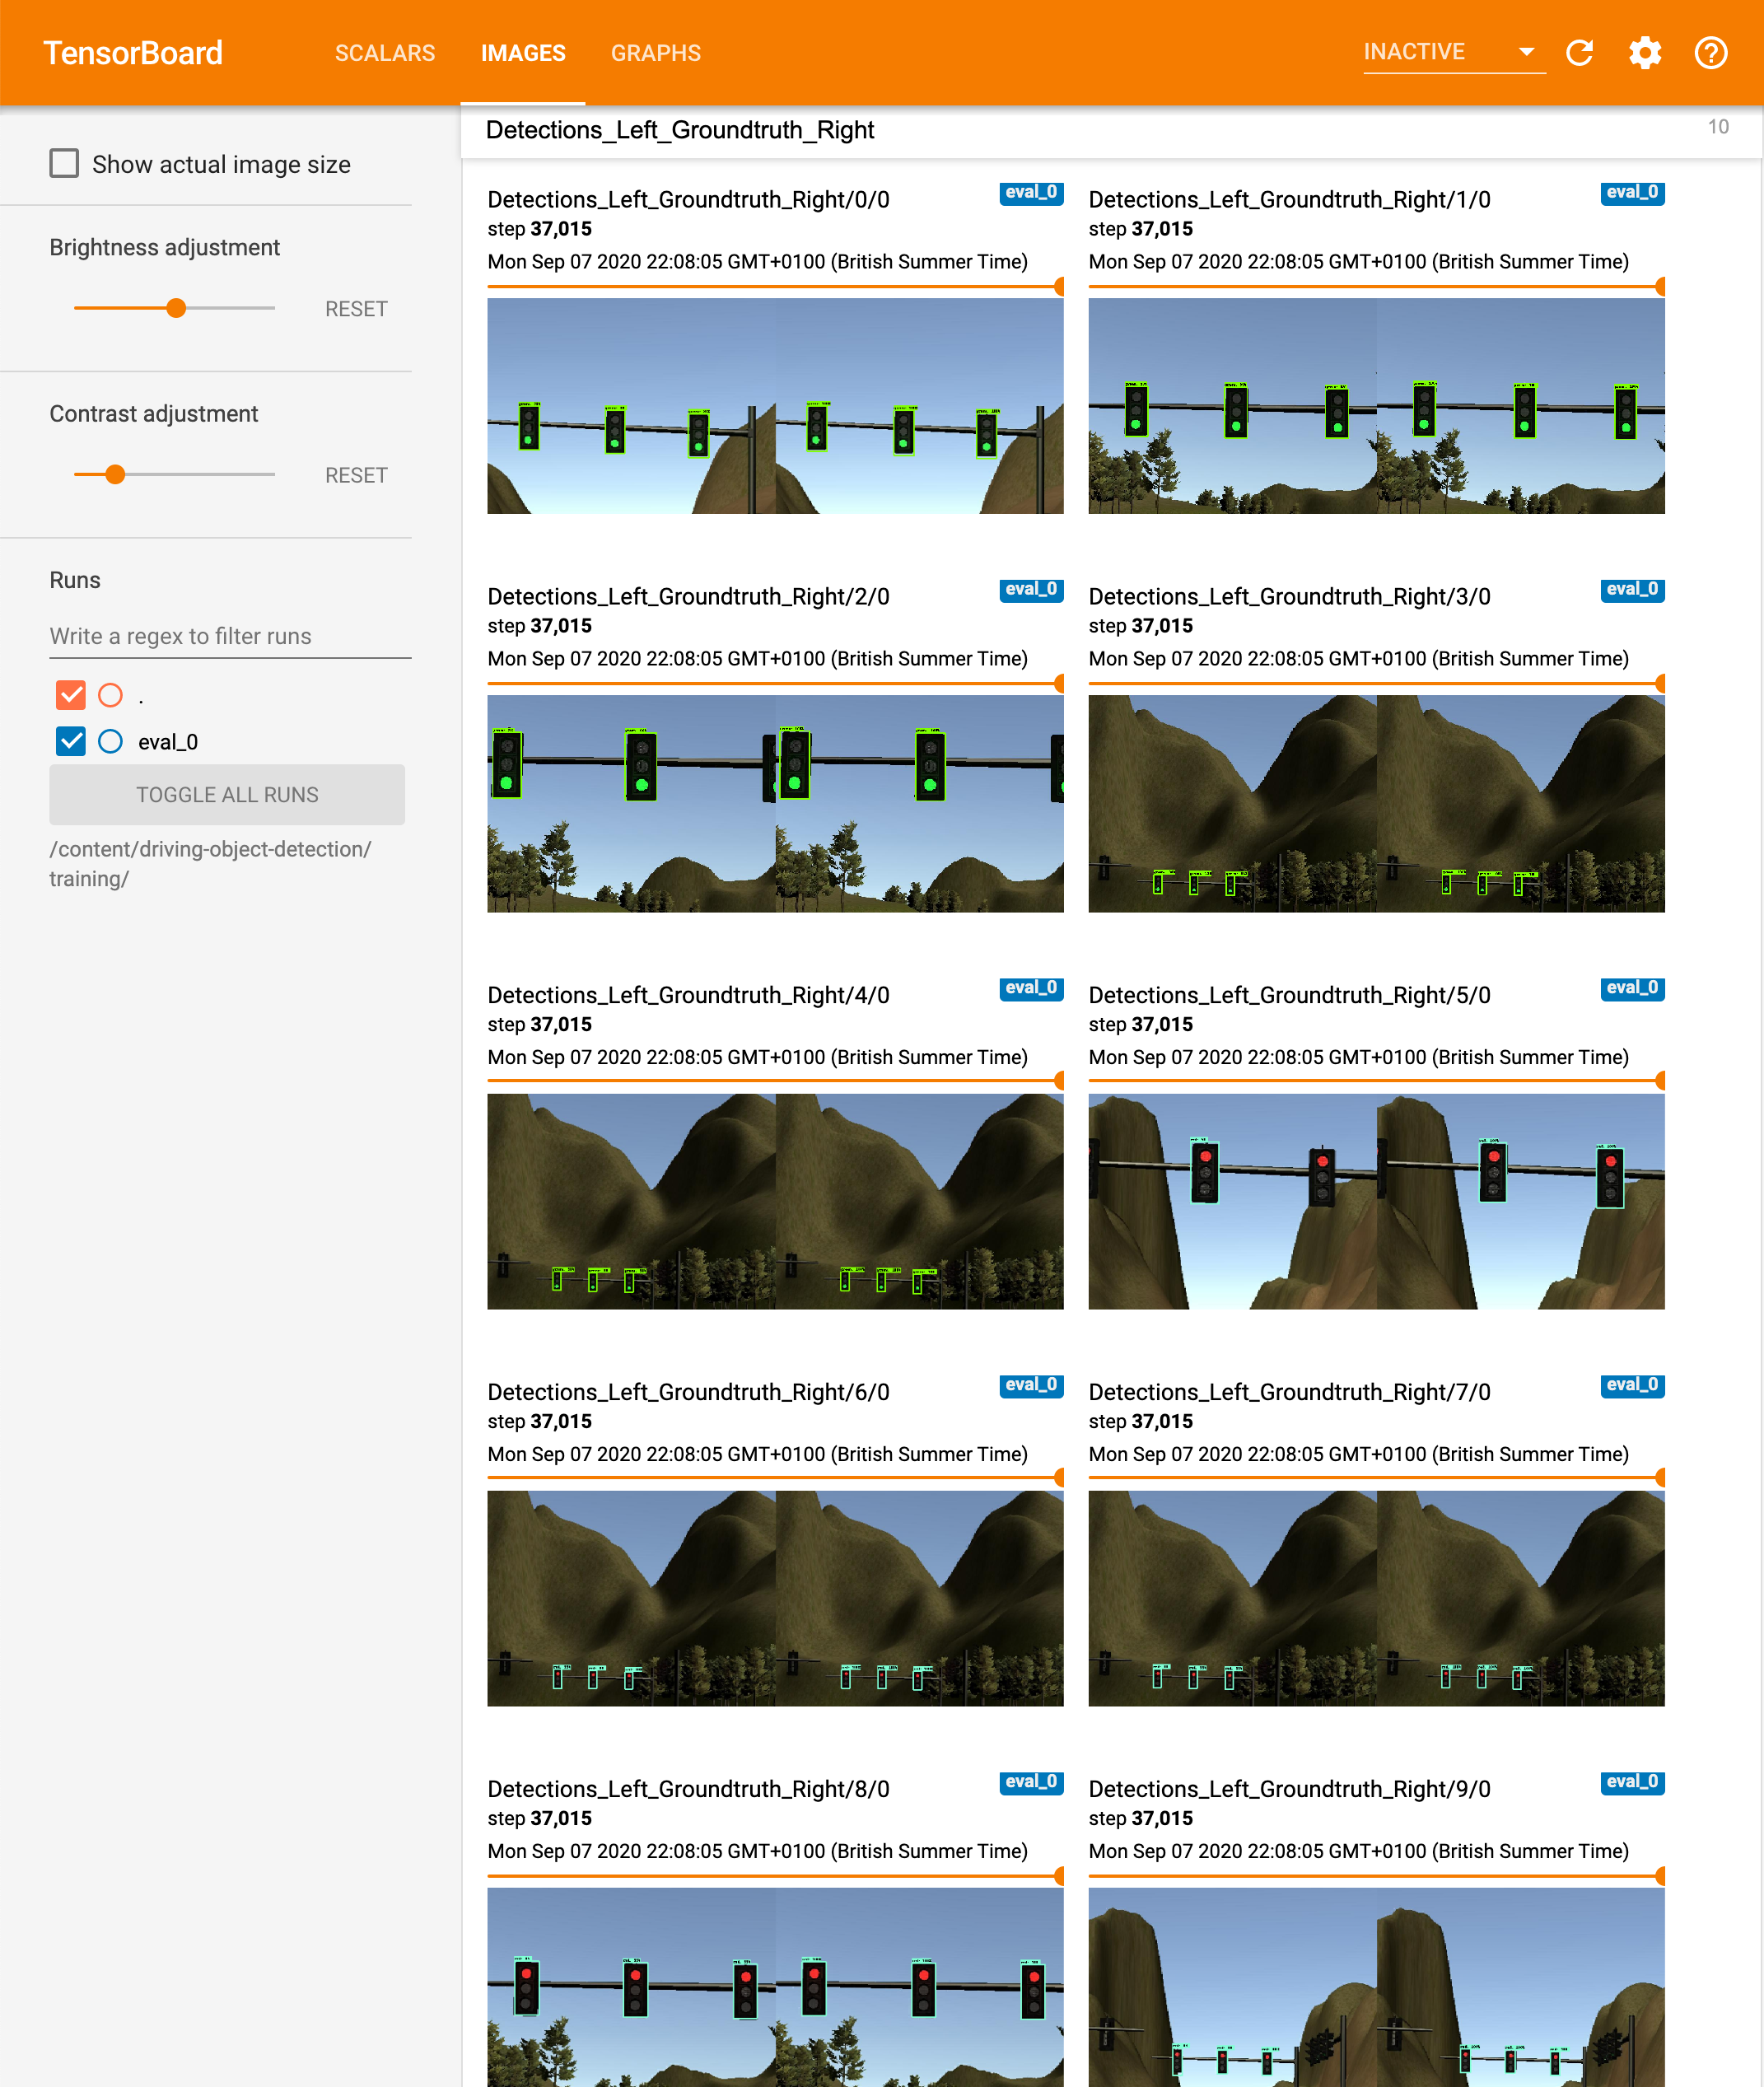
It provides nice comparison between ground truth and detection in images too, at each evaluation step.
在每个评估步骤中,它也提供了地面真实情况与图像检测之间的良好比较。
9. Export the outputs
9.导出输出
Don’t forget to export and download the trained model, which will be used for inference.
不要忘记导出和下载经过训练的模型,该模型将用于推理。
%cd {repo_dir_path}
import re
import numpy as np


lst = os.listdir(model_dir)
lst = [l for l in lst if 'model.ckpt-' in l and '.meta' in l]
steps=np.array([int(re.findall('\d+', l)[0]) for l in lst])
last_model = lst[steps.argmax()].replace('.meta', '')


last_model_path = os.path.join(model_dir, last_model)
print(last_model_path)
!python /content/models/research/object_detection/export_inference_graph.py \
    --input_type=image_tensor \
    --pipeline_config_path={pipeline_fname} \
    --output_directory={output_dir} \
    --trained_checkpoint_prefix={last_model_path}


# Archive the exported models
!tar zcvf trained_model.tar.gz {output_dir}


# Download the archive - run this again unless the download starts
from google.colab import files
files.download('trained_model.tar.gz')


# If you want, also download entire output
# !tar zcvf model_dir.tar.gz {model_dir}
# files.download('model_dir.tar.gz')
Once downloaded, unarchive the file to exported_models/[model name] dir.
下载后,将文件解压缩到exported_models / [模型名称]目录。
10. Predict! (Optional)
10.预测! (可选的)
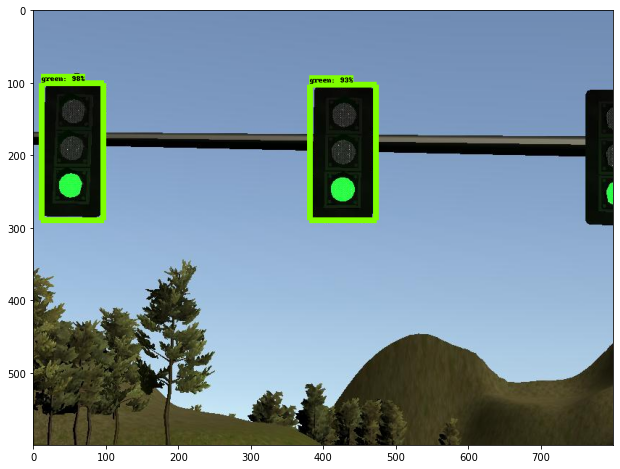
Tensorboard already provides prediction images, so here is just a demonstration how to use the trained model for inference and draw images.
Tensorboard已经提供了预测图像,因此这里只是一个演示如何使用训练好的模型进行推理和绘制图像。
# Change these values for the model used
num_classes = 3 # Change this value to the number of classes of the model
IMAGE_SIZE = (12, 8) # Output display size as you want
# Use images in test dir
IMAGE_DIR = os.path.join(repo_dir_path, "images", "test")
IMAGE_PATHS = []
for file in os.listdir(IMAGE_DIR):
if file.endswith(".jpg") or file.endswith(".png"):
IMAGE_PATHS.append(os.path.join(IMAGE_DIR, file))
# Set paths to the trained model
PATH_TO_LABELS = label_map_pbtxt_fname
PATH_TO_CKPT = os.path.join(os.path.abspath(output_dir), "frozen_inference_graph.pb")
# Perform the inference
%cd /content/models/research/object_detection
import numpy as np
import os
import six.moves.urllib as urllib
import sys
import tarfile
import tensorflow as tf
import zipfile
from collections import defaultdict
from io import StringIO
from matplotlib import pyplot as plt
from PIL import Image
# This is needed since the notebook is stored in the object_detection folder.
sys.path.append("..")
from object_detection.utils import ops as utils_ops
# This is needed to display the images.
%matplotlib inline
from object_detection.utils import label_map_util
from object_detection.utils import visualization_utils as vis_util
# Set tensorflow graph
detection_graph = tf.Graph()
with detection_graph.as_default():
od_graph_def = tf.GraphDef()
with tf.gfile.GFile(PATH_TO_CKPT, 'rb') as fid:
serialized_graph = fid.read()
od_graph_def.ParseFromString(serialized_graph)
tf.import_graph_def(od_graph_def, name='')
# Set categories
label_map = label_map_util.load_labelmap(PATH_TO_LABELS)
categories = label_map_util.convert_label_map_to_categories(
label_map, max_num_classes=num_classes, use_display_name=True)
category_index = label_map_util.create_category_index(categories)
# Convert input image to a numpy array
def load_image_to_numpy(image):
(im_width, im_height) = image.size
return np.array(image.getdata()).reshape(
(im_height, im_width, 3)).astype(np.uint8)
# Inference pipeline
def run_inference(image, graph):
with graph.as_default():
with tf.Session() as sess:
# Get handles to input and output tensors
ops = tf.get_default_graph().get_operations()
all_tensor_names = {
output.name for op in ops for output in op.outputs}
tensor_dict = {}
for key in [
'num_detections', 'detection_boxes', 'detection_scores',
'detection_classes', 'detection_masks'
]:
tensor_name = key + ':0'
if tensor_name in all_tensor_names:
tensor_dict[key] = tf.get_default_graph().get_tensor_by_name(
tensor_name)
if 'detection_masks' in tensor_dict:
# The following processing is only for single image
detection_boxes = tf.squeeze(
tensor_dict['detection_boxes'], [0])
detection_masks = tf.squeeze(
tensor_dict['detection_masks'], [0])
# Reframe is required to translate mask from box coordinates to image coordinates and fit the image size.
real_num_detection = tf.cast(
tensor_dict['num_detections'][0], tf.int32)
detection_boxes = tf.slice(detection_boxes, [0, 0], [
real_num_detection, -1])
detection_masks = tf.slice(detection_masks, [0, 0, 0], [
real_num_detection, -1, -1])
detection_masks_reframed = utils_ops.reframe_box_masks_to_image_masks(
detection_masks, detection_boxes, image.shape[0], image.shape[1])
detection_masks_reframed = tf.cast(
tf.greater(detection_masks_reframed, 0.5), tf.uint8)
# Follow the convention by adding back the batch dimension
tensor_dict['detection_masks'] = tf.expand_dims(
detection_masks_reframed, 0)
image_tensor = tf.get_default_graph().get_tensor_by_name('image_tensor:0')
# Run inference
output_dict = sess.run(tensor_dict,
feed_dict={image_tensor: np.expand_dims(image, 0)})
# all outputs are float32 numpy arrays, so convert types as appropriate
output_dict['num_detections'] = int(
output_dict['num_detections'][0])
output_dict['detection_classes'] = output_dict[
'detection_classes'][0].astype(np.uint8)
output_dict['detection_boxes'] = output_dict['detection_boxes'][0]
output_dict['detection_scores'] = output_dict['detection_scores'][0]
if 'detection_masks' in output_dict:
output_dict['detection_masks'] = output_dict['detection_masks'][0]
return output_dict
# Run the inference for each image
for image_path in IMAGE_PATHS:
image = Image.open(image_path)
# Conver the image to numpy array
image_np = load_image_to_numpy(image)
# Expand dimensions since the model expects images to have shape: [1, None, None, 3]
image_np_expanded = np.expand_dims(image_np, axis=0)
# Perform the interence
output_dict = run_inference(image_np, detection_graph)
# Visualize
vis_util.visualize_boxes_and_labels_on_image_array(
image_np,
output_dict['detection_boxes'],
output_dict['detection_classes'],
output_dict['detection_scores'],
category_index,
instance_masks=output_dict.get('detection_masks'),
use_normalized_coordinates=True,
line_thickness=8)
plt.figure(figsize=IMAGE_SIZE)
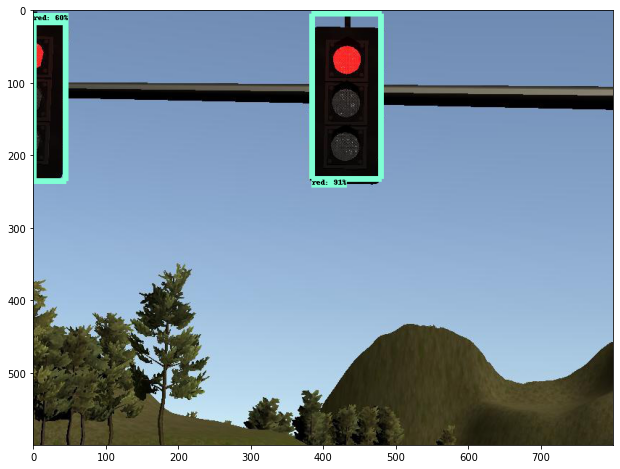
plt.imshow(image_np)Here are some sample outputs.
这是一些示例输出。

第3部分:将训练后的模型转换为Tensoflow运行时的旧版本(可选) (Part 3: Convert the trained model to older version of tensoflow runtime (optional))
If your runtime for inference has limitation of the tensorflow version, the exported model may get errors as referring to parameters which did not exist in the older version. This can be avoided by converting the exported model in the environment which matches the runtime version.
如果您的推理运行时具有tensorflow版本的限制,则导出的模型可能会由于引用旧版本中不存在的参数而出现错误。 通过在与运行时版本匹配的环境中转换导出的模型,可以避免这种情况。
Here, my runtime is tensorflow v1.3. The oldest available Object Detection API is on v1.4 but luckily it seems to be compatible with v1.3, so use this version.
在这里,我的运行时是tensorflow v1.3。 最早可用的对象检测API在v1.4上,但幸运的是它似乎与v1.3兼容,因此请使用此版本。
1. Create an env and install libraries
1.创建一个环境并安装库
I use conda but you can use any one of virtual environment management tool.
我使用conda,但是您可以使用任何一种虚拟环境管理工具。
# Create a new virtual environment
conda create -n tf1.4 python=3.6
conda activate tf1.4


# Install libraries
pip install tensorflow==1.4.0
conda install pillow lxml matplotlib
2. Clone tensorflow model repo, copy the compatible version
2.克隆tensorflow模型仓库,复制兼容版本
cd [repository home]


# clone model repo and checkout compatible version
mkdir export_model && cd "$_"
git clone https://github.com/tensorflow/models.git
cd models
git checkout d135ed9c04bc9c60ea58f493559e60bc7673beb7
cd ../


# copy object_detection and slim
mkdir exporter
mkdir converted
cp -r models/research/object_detection exporter/object_detection
cp -r models/research/slim exporter/slim
rm -rf models
cd exporter


# Now, your repository should look like
# [project home]
# ├─ annotations
# ├─ images
# ├─ models
# │   ├─ my_ssd_mobilenet_v2_coco
# │   │   ├─ pipeline.config
# │   ├─ :
# ├─ pre-trained-models
# │   ├─ ssd_mobilenet_v2_coco
# │   ├─ :
# ├─ scripts
# ├─ exported_models
# │   ├─ exporter
# │   ├─ mkdir converted
# │   ├─ my_ssd_mobilenet_v2_coco
# │   ├─ :
# └─ scripts
3. Download protoc and compile protocol buffers
3.下载协议并编译协议缓冲区
The compatible protoc version is v3.4.0, which can be downloaded from here. After downloaded, compile the protocol buffers.
兼容的协议版本是v3.4.0,可以从此处下载。 下载后,编译协议缓冲区。
# Only required protoc binary
cp [dowload foler]/protoc-3.4.0-*/bin/protoc .
rm [dowload foler]/protoc-3.4.0-*


# Compile
protoc object_detection/protos/*.proto --python_out=.


# Set environment variable
export PYTHONPATH=$PYTHONPATH:`pwd`:`pwd`/slim


# Run test
python object_detection/builders/model_builder_test.py
4. Convert the model
4.转换模型
If you launch a new console, make sure to set PYTHONPATH, which can be also saved to automatically run every time you switch the virtual env — e.g. for conda, refer to Saving environment variables.
如果启动新控制台,请确保设置PYTHONPATH,也可以将其保存为在每次切换虚拟环境时自动运行,例如,关于conda,请参阅保存环境变量 。
# Set PYTHONPATH for a new shell
# export PYTHONPATH=$PYTHONPATH:`pwd`:`pwd`/slim


# Export the inference graph
python exporter/object_detection/export_inference_graph.py --input_type=image_tensor --pipeline_config_path=tf1_ssd_mobilenet_v2/pipeline.config  --trained_checkpoint_prefix=tf1_ssd_mobilenet_v2/model.ckpt --output_directory=converted


# Now, you can use converted/frozen_inference_graph.pb
This post explains how to use Tensorflow Object Detection API for training and perform inference on the fine-tuned model by the older version of Tensorflow 1.x. If you don’t have such limitation, please see another post, which explains how to use the latest Tensorflow 2.x Object Detection API . Sample code and images are available in my github repo.
这篇文章说明了如何使用Tensorflow对象检测API进行训练,以及如何通过Tensorflow 1.x的较早版本对微调的模型进行推断。 如果您没有此类限制,请参阅另一篇文章,其中介绍了如何使用最新的Tensorflow 2.x对象检测API 。 示例代码和图像可在我的github存储库中找到 。
翻译自: https://medium.com/@yukitakahashi_46678/object-detection-by-tensorflow-1-x-5a8cb72c1c4b


 506
506


 被折叠的 条评论
为什么被折叠?
被折叠的 条评论
为什么被折叠?
 到【灌水乐园】发言


