


前几天要用到PopupWindow,一时竟想不起来怎么用,赶紧上网查了查,自己写了个demo,并在此记录一下PopupWindow的用法。
使用场景
PopupWindow,顾名思义,就是弹窗,在很多场景下都可以见到它。例如ActionBar/Toolbar的选项弹窗,一组选项的容器,或者列表等集合的窗口等等。
基本用法
使用PopupWindow很简单,可以总结为三个步骤:
创建PopupWindow对象实例;
设置背景、注册事件监听器和添加动画;
显示PopupWindow。
其中,第二步是可选的(不过基本上都要进行第二步的设置)。下面是一个简单的例子:
// 用于PopupWindow的View
View contentView=LayoutInflater.from(context).inflate(layoutRes, null, false);
// 创建PopupWindow对象,其中:
// 第一个参数是用于PopupWindow中的View,第二个参数是PopupWindow的宽度,
// 第三个参数是PopupWindow的高度,第四个参数指定PopupWindow能否获得焦点
PopupWindow window=new PopupWindow(contentView, 100, 100, true);
// 设置PopupWindow的背景
window.setBackgroundDrawable(new ColorDrawable(Color.TRANSPARENT));
// 设置PopupWindow是否能响应外部点击事件
window.setOutsideTouchable(true);
// 设置PopupWindow是否能响应点击事件
window.setTouchable(true);
// 显示PopupWindow,其中:
// 第一个参数是PopupWindow的锚点,第二和第三个参数分别是PopupWindow相对锚点的x、y偏移
window.showAsDropDown(anchor, xoff, yoff);
// 或者也可以调用此方法显示PopupWindow,其中:
// 第一个参数是PopupWindow的父View,第二个参数是PopupWindow相对父View的位置,
// 第三和第四个参数分别是PopupWindow相对父View的x、y偏移
// window.showAtLocation(parent, gravity, x, y);
每个方法的作用都写在注解里了,相信大家都能看懂。不过这里要注意这两行:
window.setBackgroundDrawable(new ColorDrawable(Color.TRANSPARENT));
window.setOutsideTouchable(true);
只有同时设置PopupWindow的背景和可以响应外部点击事件,它才能“真正”响应外部点击事件。也就是说,当你点击PopupWindow的外部或者按下“Back”键时,PopupWindow才会消失。
使用showAsDropDown方法显示PopupWindow
通常情况下,调用showAsDropDown方法后PopupWindow将会在锚点的左下方显示(drop down)。但是,有时想让PopupWindow在锚点的上方显示,或者在锚点的中间位置显示,此时就需要用到showAsDropDown方法的xoff和yoff参数了。
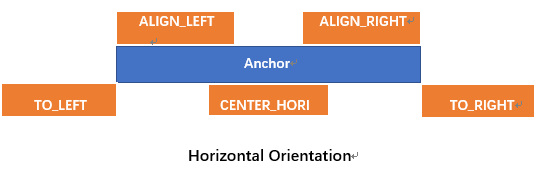
这里我们的目的不仅包括上面提到的两种情况(锚点上方或锚点中部),而是囊括了水平和垂直方向各5种显示方式:
水平方向:
ALIGN_LEFT:在锚点内部的左边;
ALIGN_RIGHT:在锚点内部的右边;
CENTER_HORI:在锚点水平中部;
TO_RIGHT:在锚点外部的右边;
TO_LEFT:在锚点外部的左边。
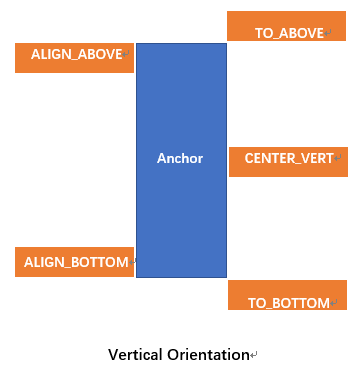
垂直方向:ALIGN_ABOVE:在锚点内部的上方;
ALIGN_BOTTOM:在锚点内部的下方;
CENTER_VERT:在锚点垂直中部;
TO_BOTTOM:在锚点外部的下方;
TO_ABOVE:在锚点外部的上方。
下面来看张图:
我们先定义一个类对PopupWindow进行简单的封装:
public abstract class CommonPopupWindow {
protected Context context;
protected View contentView;
protected PopupWindow mInstance;
public CommonPopupWindow(Context c, int layoutRes, int w, int h) {
context=c;
contentView=LayoutInflater.from(c).inflate(layoutRes, null, false);
initView();
initEvent();
mInstance=new PopupWindow(contentView, w, h, true);
initWindow();
}
public View getContentView() { return contentView; }
public PopupWindow getPopupWindow() { return mInstance; }
protected abstract void initView();
protected abstract void initEvent();
protected void initWindow() {
mInstance.setBackgroundDrawable(new ColorDrawable(Color.TRANSPARENT));
mInstance.setOutsideTouchable(true);
mInstance.setTouchable(true);
}
public void showBashOfAnchor(View anchor, LayoutGravity layoutGravity, int xmerge, int ymerge) {
int[] offset=layoutGravity.getOffset(anchor, mInstance);
mInstance.showAsDropDown(anchor, offset[0]+xmerge, offset[1]+ymerge);
}
public void showAsDropDown(View anchor, int xoff, int yoff) {
mInstance.showAsDropDown(anchor, xoff, yoff);
}
public void showAtLocation(View parent, int gravity, int x, int y) {
mInstance.showAtLocation(parent, gravity, x, y);
}
}
这里我们要实现的就是“showBashOfAnchor”方法,其中有一个“LayoutGravity”类型的参数,这就是控制PopupWindow相对锚点位置的对象。下面来定义“LayoutGravity”:
public static class LayoutGravity {
private int layoutGravity;
// waring, don't change the order of these constants!
public static final int ALIGN_LEFT=0x1;
public static final int ALIGN_ABOVE=0x2;
public static final int ALIGN_RIGHT=0x4;
public static final int ALIGN_BOTTOM=0x8;
public static final int TO_LEFT=0x10;
public static final int TO_ABOVE=0x20;
public static final int TO_RIGHT=0x40;
public static final int TO_BOTTOM=0x80;
public static final int CENTER_HORI=0x100;
public static final int CENTER_VERT=0x200;
public LayoutGravity(int gravity) {
layoutGravity=gravity;
}
public int getLayoutGravity() { return layoutGravity; }
public void setLayoutGravity(int gravity) { layoutGravity=gravity; }
public void setHoriGravity(int gravity) {
layoutGravity&=(0x2+0x8+0x20+0x80+0x200);
layoutGravity|=gravity;
}
public void setVertGravity(int gravity) {
layoutGravity&=(0x1+0x4+0x10+0x40+0x100);
layoutGravity|=gravity;
}
public boolean isParamFit(int param) {
return (layoutGravity & param) > 0;
}
public int getHoriParam() {
for(int i=0x1; i<=0x100; i=i<<2)
if(isParamFit(i))
return i;
return ALIGN_LEFT;
}
public int getVertParam() {
for(int i=0x2; i<=0x200; i=i<<2)
if(isParamFit(i))
return i;
return TO_BOTTOM;
}
public int[] getOffset(View anchor, PopupWindow window) {
int anchWidth=anchor.getWidth();
int anchHeight=anchor.getHeight();
int winWidth=window.getWidth();
int winHeight=window.getHeight();
View view=window.getContentView();
if(winWidth<=0)
winWidth=view.getWidth();
if(winHeight<=0)
winHeight=view.getHeight();
int xoff=0;
int yoff=0;
switch (getHoriParam()) {
case ALIGN_LEFT:
xoff=0; break;
case ALIGN_RIGHT:
xoff=anchWidth-winWidth; break;
case TO_LEFT:
xoff=-winWidth; break;
case TO_RIGHT:
xoff=anchWidth; break;
case CENTER_HORI:
xoff=(anchWidth-winWidth)/2; break;
default:break;
}
switch (getVertParam()) {
case ALIGN_ABOVE:
yoff=-anchHeight; break;
case ALIGN_BOTTOM:
yoff=-winHeight; break;
case TO_ABOVE:
yoff=-anchHeight-winHeight; break;
case TO_BOTTOM:
yoff=0; break;
case CENTER_VERT:
yoff=(-winHeight-anchHeight)/2; break;
default:break;
}
return new int[]{ xoff, yoff };
}
}
这里的主要方法就是“getOffset”,它会根据水平和垂直方向的gravity决定PopupWindow相对锚点的位置。
使用“LayoutGravity”时,可以通过“setHoriGravity”和“setVertGravity”方法设置水平和垂直方向的gravity,或者新建一个“LayoutGravity”对象。
下面是一个demo:
使用setAnimationStyle方法添加动画
上面我们提到了为PopupWindow设置背景和注册事件监听器,现在我们再来为PopupWindow添加动画。
这里的动画是指PopupWindow出现和消失时的动画。默认是直接弹出和消失,这样难免让用户有一种突兀的感觉;如果PopupWindow能够“滑入”屏幕和“滑出”屏幕(或者其他方式),用户体验会更好。
为PopupWindow添加动画可以调用`setAnimationStyle`方法,该方法只有一个参数,就是指定动画的样式,因此我们需要定义动画资源和样式资源。
下面是一个“滑入滑出”动画:
android:fromXDelta="0"
android:toXDelta="0"
android:fromYDelta="100%"
android:toYDelta="0"
android:duration="200" >
android:fromXDelta="0"
android:toXDelta="0"
android:fromYDelta="0"
android:toYDelta="100%"
android:duration="200" >
然后定义“滑动”动画样式:
@anim/translate_in
@anim/translate_out
现在我们就可以为PopupWindow添加“滑动”动画了:
window.setAnimationStyle(R.style.animTranslate);
我们来看下效果:

PS:这里由于动画的时间太短(200ms),另外转GIF的时候可能截取的频率有点低,导致滑动效果不是很明显,建议自己运行demo查看
现在PopupWindow的出现/消失已经不是那么突兀了。不过,当弹窗出现后,发现弹窗和背景不是很容易区分,如果此时弹窗的背景能“变暗”就好了。
没问题,我们可以在弹窗出现后让背景变暗,并在弹窗消失后让背景还原:
window.setOnDismissListener(new PopupWindow.OnDismissListener() {
@Override
public void onDismiss() {
WindowManager.LayoutParams lp=getWindow().getAttributes();
lp.alpha=1.0f;
getWindow().clearFlags(WindowManager.LayoutParams.FLAG_DIM_BEHIND);
getWindow().setAttributes(lp);
}
});
window.showAtLocation(activityPopup, Gravity.BOTTOM, 0, 0);
WindowManager.LayoutParams lp=getWindow().getAttributes();
lp.alpha=0.3f;
getWindow().addFlags(WindowManager.LayoutParams.FLAG_DIM_BEHIND);
getWindow().setAttributes(lp);
现在再来看下效果:

现在PopupWindow就比较明显了。
另外,我们还实现了透明度、缩放和旋转三种动画样式,实现方式和上述大同小异,这里就不再赘述。
源代码
以上就是本文的全部内容,希望对大家的学习有所帮助,也希望大家多多支持脚本之家。


 1万+
1万+


 被折叠的 条评论
为什么被折叠?
被折叠的 条评论
为什么被折叠?
 到【灌水乐园】发言


