


API 接口文档: https://face-recognition.readthedocs.io
定位图片中所有人脸


1 import face_recognition
2 image = face_recognition.load_image_file("your_file.jpg")
3 face_locations = face_recognition.face_locations(image)
4 #face_locations 以列表形式返回图片中的所有人脸
 1 import face_recognition
 2 from PIL import Image
 3
 4 image = face_recognition.load_image_file("your_file.jpg")
 5 face_locations = face_recognition.face_locations(image)
 6 #face_locations 以列表形式返回图片中的所有人脸
 7
 8 top, right, bottom, left = face_locations[0]
 9 face_image = image[top:bottom, left:right]
10 pil_image = Image.fromarray(face_image)
11 pil_image.save(fp=“your_new_file_path.jpg”)
你也可以使用深度学习模型达到更加精准的人脸定位。
注意:这种方法需要GPU加速(通过英伟达显卡的CUDA库驱动),你在编译安装dlib的时候也需要开启CUDA支持。
import face_recognition

image = face_recognition.load_image_file("my_picture.jpg") face_locations = face_recognition.face_locations(image, model="cnn")

# face_locations is now an array listing the co-ordinates of each face!
如果你有很多图片需要识别,同时又有GPU,那么你可以参考这个例子:案例:使用卷积神经网络深度学习模型批量识别图片中的人脸.
识别单张图片中人脸的关键点
import face_recognition

image = face_recognition.load_image_file("my_picture.jpg")
face_landmarks_list = face_recognition.face_landmarks(image) # face_landmarks_list is now an array with the locations of each facial feature in each face. # face_landmarks_list[0]['left_eye'] would be the location and outline of the first person's left eye.
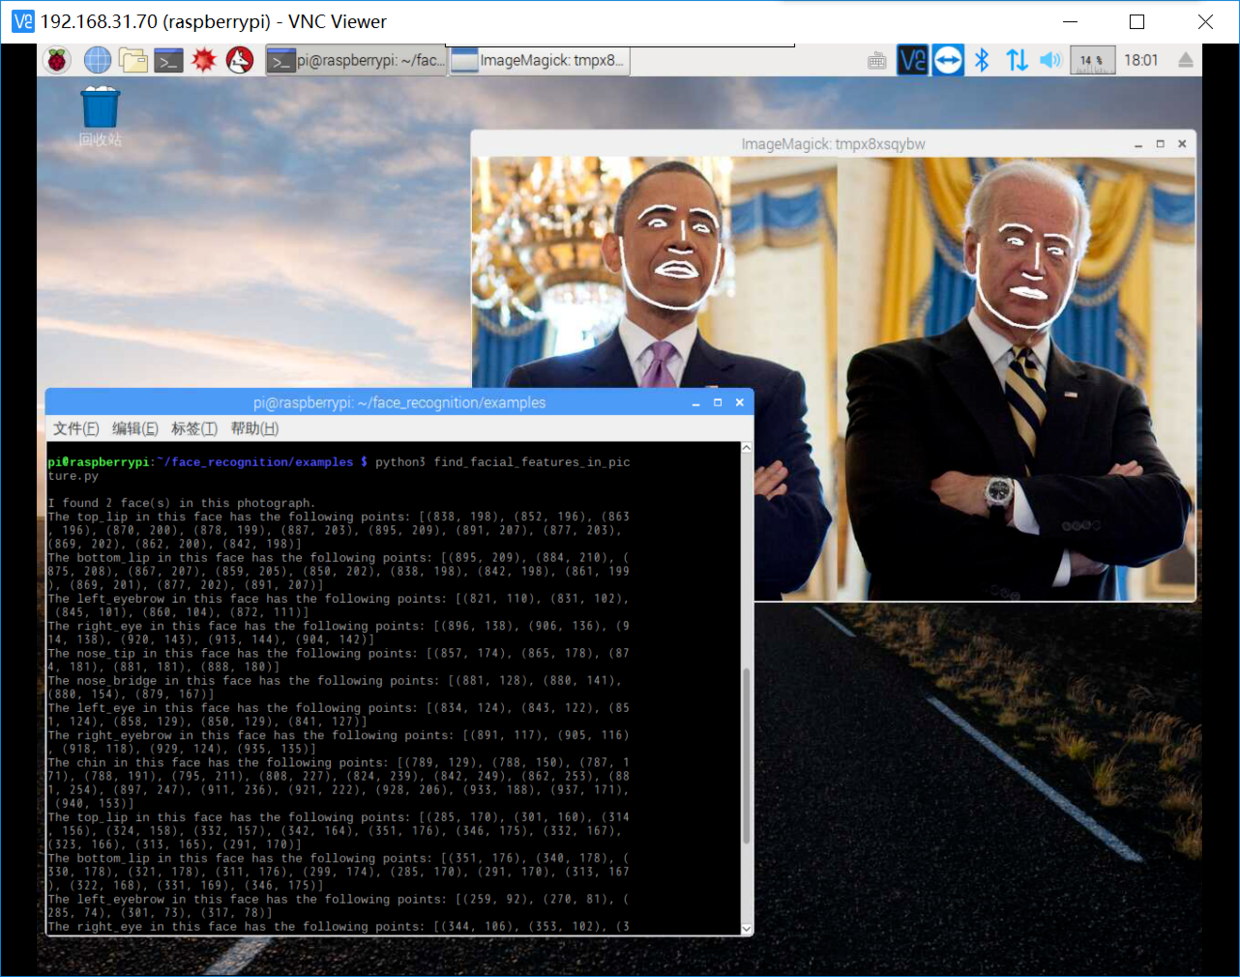
看这个案例 案例:提取奥巴马和拜登的面部关键点
import face_recognitionimage = face_recognition.load_image_file("my_picture.jpg") face_landmarks_list = face_recognition.face_landmarks(image)
face_landmarks源码中五官对应的点"chin": points[0:17],
"left_eyebrow": points[17:22],
"right_eyebrow": points[22:27],
"nose_bridge": points[27:31],
"nose_tip": points[31:36],
"left_eye": points[36:42],
"right_eye": points[42:48],
"top_lip": points[48:55] + [points[64]] + [points[63]] + [points[62]] + [points[61]] + [points[60]],
"bottom_lip": points[54:60] + [points[48]] + [points[60]] + [points[67]] + [points[66]] + [points[65]] + [points[64]
top_lip --上嘴唇

    face_landmarks_list[0]['top_lip'][0]   --points[48]

    face_landmarks_list[0]['top_lip'][1] --points[49] face_landmarks_list[0]['top_lip'][2] --points[50] face_landmarks_list[0]['top_lip'][3] --points[51] face_landmarks_list3[0]['top_lip'][4] --points[52] face_landmarks_list3[0]['top_lip'][5] --points[53] face_landmarks_list3[0]['top_lip'][6] --points[54] face_landmarks_list3[0]['top_lip'][7] --points[64] face_landmarks_list3[0]['top_lip'][8] --points[63] face_landmarks_list3[0]['top_lip'][9] --points[62] face_landmarks_list3[0]['top_lip'][10] --points[61] face_landmarks_list3[0]['top_lip'][11] --points[60] bottom_lip --下嘴唇 face_landmarks_list[0]['bottom_lip'][0] --points[54] face_landmarks_list[0]['bottom_lip'][1] --points[55] face_landmarks_list[0]['bottom_lip'][2] --points[56] face_landmarks_list[0]['bottom_lip'][3] --points[57] face_landmarks_list[0]['bottom_lip'][4] --points[58] face_landmarks_list[0]['bottom_lip'][5] --points[59] face_landmarks_list[0]['bottom_lip'][6] --points[48] face_landmarks_list[0]['bottom_lip'][7] --points[60] face_landmarks_list[0]['bottom_lip'][8] --points[67] face_landmarks_list[0]['bottom_lip'][9] --points[66] face_landmarks_list[0]['bottom_lip'][10] --points[65] face_landmarks_list[0]['bottom_lip'][11] --points[64]
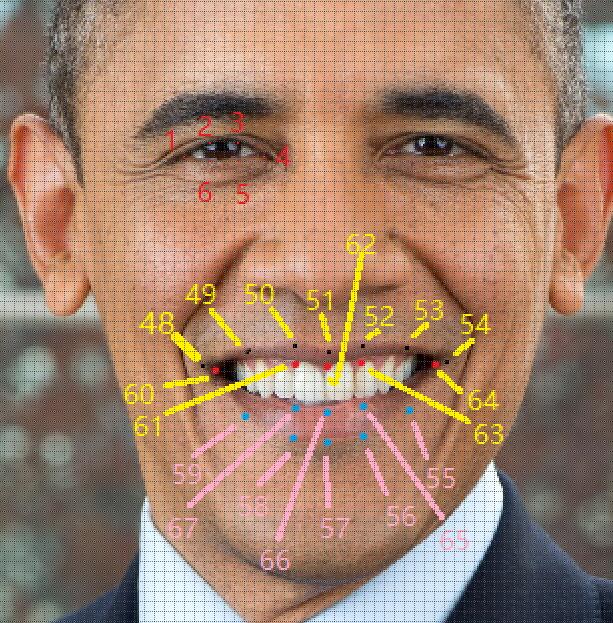
上图是采用奥巴马一张照片识别五官后 上嘴唇以及下嘴唇 对应点以及对应位置的标注,左眼1-6是返回列表1-6的数值对应的像素位置。
识别图片人物
import face_recognition

picture_of_me = face_recognition.load_image_file("me.jpg") my_face_encoding = face_recognition.face_encodings(picture_of_me)[0] # my_face_encoding now contains a universal 'encoding' of my facial features that can be compared to any other picture of a face!  unknown_picture = face_recognition.load_image_file("unknown.jpg") unknown_face_encoding = face_recognition.face_encodings(unknown_picture)[0] # Now we can see the two face encodings are of the same person with `compare_faces`!  results = face_recognition.compare_faces([my_face_encoding], unknown_face_encoding) if results[0] == True: print("It's a picture of me!") else: print("It's not a picture of me!")
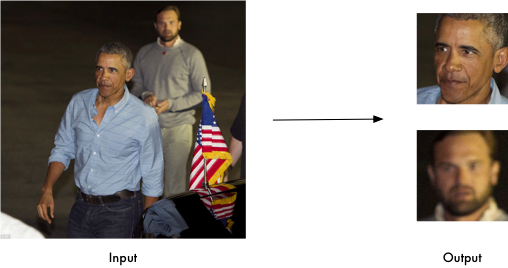
看这个案例 案例:是奥巴马还是拜登?
调整人脸识别的容错率和敏感度
如果一张脸识别出不止一个结果,那么这意味着他和其他人长的太像了(Face_Recognition对于小孩和亚洲人的人脸识别准确率有待提升)。你可以把容错率调低一些,使识别结果更加严格。
通过传入参数 tolerance 来实现这个功能,默认的容错率是0.6,容错率越低,识别越严格准确。
如果想要更准确的识别,可以在计算编码时设定要重新采样的次数,face_encodings传入 num_jitters 来实现,默认0,范围为0-100,越高越准确,但速度越慢,(100就会慢100倍)
import face_recognition

picture_of_me = face_recognition.load_image_file("me.jpg") my_face_encoding = face_recognition.face_encodings(picture_of_me,num_jitters=100)[0]  unknown_picture = face_recognition.load_image_file("unknown.jpg") unknown_face_encoding = face_recognition.face_encodings(unknown_picture,num_jitters=100)[0]

# 由于对亚洲人识别率不高tolerance一般设置在0.3-0.38之间可满足大部分需求
results = face_recognition.compare_faces([my_face_encoding], unknown_face_encoding,tolerance=0.38)
Python 案例
人脸定位
人脸关键点识别
人脸识别
参考: https://github.com/ageitgey/face_recognition#face-recognition


 1209
1209


 被折叠的 条评论
为什么被折叠?
被折叠的 条评论
为什么被折叠?
 到【灌水乐园】发言


