


1、Hibernate之生成SessionFactory源码追踪
Hibernate的所有session都是由sessionFactory来生成的,那么,sessionFactory是怎么得来的呢?它与我们配置的xxx.cfg.xml文件以及xxx.hbm.xml文件之间又有着怎么样的联系呢?
先看一小段生成sessionFactory的代码:
code_1:
public class HibernateTest {
    @Test
    public void test() {
        System.out.println("test...");

        //1. 创建一个 SessionFactory 对象
        SessionFactory sessionFactory = null;

        //1). 创建 Configuration 对象: 对应 hibernate 的基本配置信息和 对象关系映射信息
        Configuration configuration = new Configuration().configure();

        //4.0 之前这样创建
        //sessionFactory = configuration.buildSessionFactory();

        //2). 创建一个 ServiceRegistry 对象: hibernate 4.x 新添加的对象
        //hibernate 的任何配置和服务都需要在该对象中注册后才能有效.
        ServiceRegistry serviceRegistry =
            new ServiceRegistryBuilder().applySettings(configuration.getProperties())
            .buildServiceRegistry();

        //3). 利用serviceRegistry来创建sessionFactory实例
        sessionFactory = configuration.buildSessionFactory(serviceRegistry);

        //2. 创建一个 Session 对象
        Session session = sessionFactory.openSession();

        //3. 开启事务
        Transaction transaction = session.beginTransaction();

        //4. 执行保存操作
        News news = new News("Java12345", "ATGUIGU", new Date(new java.util.Date().getTime()));
        session.save(news);

        //5. 提交事务
        transaction.commit();

        //6. 关闭 Session
        session.close();

        //7. 关闭 SessionFactory 对象
        sessionFactory.close();
    }
}
从上面的代码很清晰的可以看见,这一切的源头都在 Configuration configuration = new Configuration().configure() 这条语句上:创建ServiceRegistry 需要用到configuration,生成sessionFactory同样需要用到configuration。
Configuration的生成过程
从源代码中可以看到,Configuration的configure()方法共有5中重载方式:
code_2:
public Configuration configure();        //无参
public Configuration configure(String resource)
public Configuration configure(URL url)
public Configuration configure(File configFile)
public Configuration configure(org.w3c.dom.Document document)
现在从无参的configure()方法开始分析,它代表了一种默认的行为,默认读取类路径下的hibernate.cfg.xml文件作为hibernate的配置文件:
code_3:
public Configuration configure() throws HibernateException {
    configure( "/hibernate.cfg.xml" );    //默认读取classpath路径下的hibernate.cfg.xml文件
    return this;
}
继续追踪configure( “/hibernate.cfg.xml” )方法:
code_4:
1 public Configuration configure(String resource) throws HibernateException {
2     InputStream stream = getConfigurationInputStream( resource );    //通过传入的资源路径获取一个输入流
3     return doConfigure( stream, resource );    //这个方法会完成解析的第一步:将输入流转换成Document对象
4 }
继续追踪 return doConfigure( stream, resource ) 语句,可以发现底层会通过SAX解析工具将输入流转换成Document对象。然后调用然后调用doConfigure(Document doc)来继续解析这个文档:
code_5:
 1 protected Configuration doConfigure(InputStream stream, String resourceName) throws HibernateException {
 2
 3     ErrorLogger errorLogger = new ErrorLogger( resourceName );  //将输入流转换成Document对象
 5     Document document = xmlHelper.createSAXReader( errorLogger,  entityResolver )
 6                 .read( new InputSource( stream ) );
 7         //具体解析document树,并将结果以键值对的形式存放到properties中
 8     doConfigure( document );
 9
10     return this;
11 }
doConfigure(Document doc)是实际解析文档的方法,前面configure()的5种重载方法最后都要调用这个方法来完成实际的解析。我们看看它的解析思路:
code_6:
 1 protected Configuration doConfigure(Document doc) throws HibernateException {
 2     Element sfNode = doc.getRootElement().element( "session-factory" );
 3     String name = sfNode.attributeValue( "name" );
 4     if ( name != null ) {    //session-factory根节点是可以有name属性值的
 5         properties.setProperty( Environment.SESSION_FACTORY_NAME, name );
 6     }
 7     //遍历文档中所有的property节点,读取器name属性值以及节点的文本,
 8     //以name-value的形式放入到properties中
 9     addProperties( sfNode );
10     //解析除了property之外的节点:mapping、class-cache、collection-cache
11     parseSessionFactory( sfNode, name );
12
13     Element secNode = doc.getRootElement().element( "security" );
14     if ( secNode != null ) {
15         parseSecurity( secNode );
16     }
17
18     LOG.configuredSessionFactory( name );
19     LOG.debugf( "Properties: %s", properties );
20
21     return this;
22 }
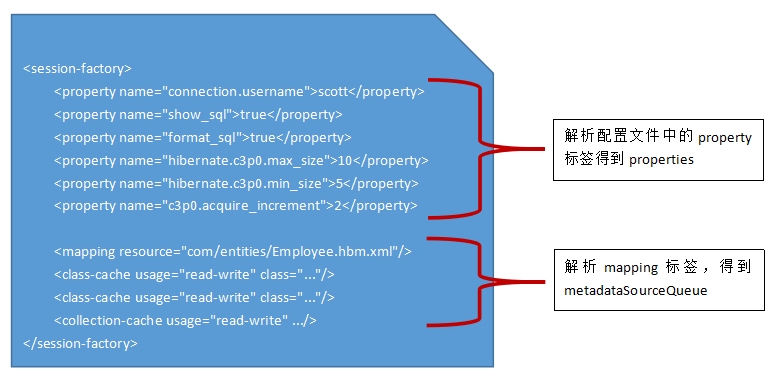
doConfigure(Document doc)方法中对Document的解析主要分为两个步骤进行:
①解析xxx.cfg.xml配置文档中所有的property节点;
②解析xxx.cfg.xml配置文档中除了property节点之外的其它5种节点。
先来看看第
①步,它在addProperties(…)方法中完成(code_6代码段的第9行)思路很清晰,用一个迭代器来遍历文档中所有的property节点,并将name-value存放到Configuration的properties属性中:
code_7:
 1 private void addProperties(Element parent) {
 2     //指定,只会遍历property节点
 3     Iterator itr = parent.elementIterator( "property" );
 4     while ( itr.hasNext() ) {//循环遍历
 5         Element node = (Element) itr.next();
 6         //读取节点的name属性值
 7         String name = node.attributeValue( "name" );
 8         //读取节点的文本值
 9         String value = node.getText().trim();
10         LOG.debugf( "%s=%s", name, value );
11         //将name-value值存放如properties中
12         properties.setProperty( name, value );
13         //待研究...
14         if ( !name.startsWith( "hibernate" ) ) {
15             properties.setProperty( "hibernate." + name, value );
16         }
17     }
18         Environment.verifyProperties( properties );
19 }
再来看看第②步,它在parseSessionFactory( …)方法中进行(code_6代码段的第10行),它主要解析3类标签:mapping、class-cache、collection-cache:
code_8:
 1 private void parseSessionFactory(Element sfNode, String name) {
 2     Iterator elements = sfNode.elementIterator();
 3     while ( elements.hasNext() ) {
 4         Element subelement = (Element) elements.next();
 5         String subelementName = subelement.getName();
 6         //解析mapping节点,mapping可以指定hibernate的映射文件位置
 7         if ( "mapping".equals( subelementName ) ) {
 8             //具体解析mapping节点
 9             parseMappingElement( subelement, name );
10         }
11         //下面两个是和hibernate的二级缓存相关的配置,不做深入探讨
12         else if ( "class-cache".equals( subelementName ) ) {
13             String className = subelement.attributeValue( "class" );
14             Attribute regionNode = subelement.attribute( "region" );
15             final String region = ( regionNode == null ) ? className : regionNode.getValue();
16             boolean includeLazy = !"non-lazy".equals( subelement.attributeValue( "include" ) );
17             setCacheConcurrencyStrategy( className, subelement.attributeValue( "usage" ), region, includeLazy );
18         }
19         else if ( "collection-cache".equals( subelementName ) ) {
20             String role = subelement.attributeValue( "collection" );
21             Attribute regionNode = subelement.attribute( "region" );
22             final String region = ( regionNode == null ) ? role : regionNode.getValue();
23             setCollectionCacheConcurrencyStrategy( role, subelement.attributeValue( "usage" ), region );
24         }
25     }
26 }
后面两个标签class-cache和collection-cache是和hibernate的二级缓存相关,不作深入探讨。主要看看解析mapping的方法:
code_9:
 1 private void parseMappingElement(Element mappingElement, String name) {
 2     // 从源代码可以看出,mapping节点支持的属性值有5个
 3     final Attribute resourceAttribute = mappingElement.attribute( "resource" );
 4     final Attribute fileAttribute = mappingElement.attribute( "file" );
 5     final Attribute jarAttribute = mappingElement.attribute( "jar" );
 6     final Attribute packageAttribute = mappingElement.attribute( "package" );
 7     final Attribute classAttribute = mappingElement.attribute( "class" );
 8
 9     if ( resourceAttribute != null ) {
10         final String resourceName = resourceAttribute.getValue();
11         LOG.debugf( "Session-factory config [%s] named resource [%s] for mapping", name, resourceName );
12         //将hibernate的映射文件作进一步的解析
13         addResource( resourceName );
14     }
15     else if ( fileAttribute != null ) {
16         final String fileName = fileAttribute.getValue();
17         LOG.debugf( "Session-factory config [%s] named file [%s] for mapping", name, fileName );
18         addFile( fileName );
19     }
20     else if ( jarAttribute != null ) {
21         final String jarFileName = jarAttribute.getValue();
22         LOG.debugf( "Session-factory config [%s] named jar file [%s] for mapping", name, jarFileName );
23         addJar( new File( jarFileName ) );
24     }
25     else if ( packageAttribute != null ) {
26         final String packageName = packageAttribute.getValue();
27         LOG.debugf( "Session-factory config [%s] named package [%s] for mapping", name, packageName );
28         addPackage( packageName );
29     }
30     else if ( classAttribute != null ) {
31         final String className = classAttribute.getValue();
32         LOG.debugf( "Session-factory config [%s] named class [%s] for mapping", name, className );
33         try {
34             addAnnotatedClass( ReflectHelper.classForName( className ) );
35         }
36         catch ( Exception e ) {
37             throw new MappingException(
38                     "Unable to load class [ " + className
    					+ "] declared in Hibernate configuration <mapping/> entry",e);
41         }
42     }
43     else {
44         throw new MappingException( "<mapping> element in configuration specifies no known attributes" );
45     }
46 }
addResource( resourceName )是如何解析的呢?那么它是如何工作的呢?这里不再一步一步追踪源代码,因为嵌套太深,直接给出一个感性的认识即可:
在Configuration中定义了一个名为MetadataSourceQueue的内部内,同时Configuration中还有一个该队列的属性值:metadataSourceQueue。
addResource( resourceName )方法嵌套到最后会调用metadataSourceQueue.add(…)方法来将映射的元数据存储到metadataSourceQueue队列中。要使用的时候,从该队列中取就可以了。
metadataSourceQueue的底层存储是一个Map类型…
到现在为止,Configuration对象就得到了,总结一下,其重要的几个点:
1、configure()方法默认读取/hibernate.cfg.xml作为hibernate的配置文件。当然,configure()方法还有其它重载形式可用。
2、doConfigure(Document document)方法会调用两个重要的方法:addProperties( sfNode )和parseSessionFactory( sfNode, name );
3、addProperties( sfNode )方法会解析配置文件中的property节点,并将解析到的name-value放入到properties中
4、parseSessionFactory( sfNode, name )方法会解析配置文件中除了property节点外的其它3个类型的节点(4.2版本):mapping、class-cache和collection-cache
5、mapping配置是和映射相关的,class-cache和collection-cache是与二级缓存相关的。
6、mapping解析的结果会存放到metadataSourceQueue对象中。
7、所以,整个过程得到Configuration中两个重要的属性值:properties和metadataSourceQueue。
2、Spring的LocalSessionFactoryBean创建过程源码分析
spring的LocalSessionFactoryBean生成过程与hibernate的SessionFactory生成过程是高度吻合的。
为了后面源码分析,首先讲解一个接口,一个类的功能:
①、接口InitializingBean
接口的功能:这个接口专门为bean设计的,它只有一个方法。我们知道所有的bean都是由beanFactory来生成的,如果一个bean实现了该接口,在beanFactory为该bean装配好了所有的属性以后,在返回实际bean之前还会调用一次该接口的afterPropertiesSet(…)方法。其设计目的是为了实现个性化,或者是为了检查bean属性值的完整性等。
public interface InitializingBean {
    void afterPropertiesSet() throws Exception;
}
②、类LocalSessionFactoryBuilder
显然,LocalSessionFactoryBuilder继承自org.hibernate.cfg.Configuration,那么Configuration拥有的属性,LocalSessionFactoryBuilder也具有
public class LocalSessionFactoryBuilder extends Configuration{
    //...
}
从LocalSessionFactoryBean源码中分析出其于hibernate的sessionFactory和configuration之间的关系:
public interface InitializingBean {
    void afterPropertiesSet() throws Exception;
}

//②、类LocalSessionFactoryBuilder
//显然,LocalSessionFactoryBuilder继承自org.hibernate.cfg.Configuration,那么Configuration拥有的属性,LocalSessionFactoryBuilder也具有
public class LocalSessionFactoryBuilder extends Configuration{
    //...
}

//现在主要分析LocalSessionFactoryBean
//1、看一下几个非常重要的属性值定义
public class LocalSessionFactoryBean extends... implements InitializingBean, ...{
    //数据源
    private DataSource dataSource;
    //hibernate的配置文件Xxx.cfg.xml所在的
    //位置多个可以用","隔开
    private Resource[] configLocations;
    private String[] mappingResources;
    //hibernate的映射文件位置
    private Resource[] mappingLocations;
    //hibernate的properties属性,存放了配置
    //文件中解析property标签的结果
    private Properties hibernateProperties;
    //hibernate的configuration属性
    private Configuration configuration;
    //这个sessionfactory是hibernate的sessionFactory
    private SessionFactory sessionFactory;

    //省略其它的属性以及setter方法...

    //注意这个set方法,说明当只有一个配置文件
    //的时候可以使用configLocation属性来配置,
    //最终也会被转换成configLocations
    public void setConfigLocation(Resource configLocation) {
        this.configLocations = new Resource[] {configLocation};
    }

    @Override
    public void afterPropertiesSet() throws IOException {
        LocalSessionFactoryBuilder sfb = new LocalSessionFactoryBuilder(this.dataSource, this.resourcePatternResolver);

        if (this.configLocations != null) {
            for (Resource resource : this.configLocations) {
                //sfb.configure(...)实际上也就是调用其父类
                //org.hibernate.cfg.Configuration的configure(...)方法
                //这里完成xxx.cfg.xml文件中property节点
                //的解析,得到一个properties
                sfb.configure(resource.getURL());
            }
        }

        //mappingResources和mappingLocations效果是一样的,
        //都会将资源转换成输入流,并调用sfb.addInputStream(...)方法
        //sfb.addInputStream(...)最终会完成xxx.cfg.xml文件的
        //非property节点解析(主要有3类:mapping、class-cache和collection-cache)
        //将解析结果放入到metadataSourceQueue中
        if (this.mappingResources != null) {
            for (String mapping : this.mappingResources) {
                Resource mr = new ClassPathResource(mapping.trim(), this.resourcePatternResolver.getClassLoader());
                sfb.addInputStream(mr.getInputStream());
            }
        }
        if (this.mappingLocations != null) {
            for (Resource resource : this.mappingLocations) {
                sfb.addInputStream(resource.getInputStream());
            }
        }

        //sfb.addProperties(...)方法会调用properties.putAll( extraProperties )方法
        //说明我们可以配置一个properties对象来达到配置xxx.cfg.xml相同的效果!!
        //两方面的配置最终都会放入到properties对象中
        if (this.hibernateProperties != null) {
            sfb.addProperties(this.hibernateProperties);
        }

        //省略若干其它方法...

        // 将sfb向上转型,LocalSessionFactoryBean中的configuration属性实际上
        // 就是org.hibernate.cfg.Configuration
        this.configuration = sfb;
        //在得到configuration以后,通过它来创建一个sessionFactory,
        //并赋值给sessionFactory属性(LocalSessionFactoryBean的属性)
        //在底层会调用return super.buildSessionFactory()来的到一个
        //sessionFactory,由于其父类是org.hibernate.cfg.Configuration
        //所以,相当于调用了configuration.buildSessionFactory()来生成
        //sessionFactory,这是hibernate4.0版本之前的做法,新版本已经
        //被buildSessionFactory(ServiceRegistry)所取代。
        this.sessionFactory = buildSessionFactory(sfb);
    }
}
总结:
spring的LocalSessionFactoryBean实际完成的工作有:
1、通过解析bean中的configLocation和mappingLocations等属性,得到一个hibernate的原生态的org.hibernate.cfg.Configuration属性
2、通过org.hibernate.cfg.Configuration生成一个hibernate原生态的org.hibernate.SessionFactory属性
3、可以在外部配置一个Properties对象,并将其配置为properties属性,可以达到与xxx.cfg.xml相同的配置效果
3、Spring整合Hibernate
我们可以得到这样一个结论,spring的LocalSessionFactoryBean具体是调用Hibernate的Configuration中configure(…)方法来读取并解析xxx.cfg.xml文件的,同样也会得到一个原生态的org.hibernate.cfg.Configuration 和 org.hibernate.SessionFactory属性。
所以,我们可以看见LocalSessionFactoryBean中保存有hibernate的configuration、sessionFactory、properties 以及 metadataSourceQueue。
从前面两节分析中我们知道,LocalSessionFactoryBean会读取并解析xxx.cfg.xml和xxx.hbm.xml文件,所以在配置LocalSessionFactoryBean的时候需要明确指定这两个文件的位置。当然,连接数据库的dataSource也要配置在spring的bean中:
下面是一个spring整合hibernate的实例:
 1 <?xml version="1.0" encoding="UTF-8"?>
 2 <beans xmlns="http://www.springframework.org/schema/beans"
 3     xmlns:xsi="http://www.w3.org/2001/XMLSchema-instance"
 4     xmlns:aop="http://www.springframework.org/schema/aop"
 5     xmlns:context="http://www.springframework.org/schema/context"
 6     xmlns:tx="http://www.springframework.org/schema/tx"
 7     xsi:schemaLocation="http://www.springframework.org/schema/beans http://www.springframework.org/schema/beans/spring-beans.xsd
 8         http://www.springframework.org/schema/aop http://www.springframework.org/schema/aop/spring-aop-4.1.xsd
 9         http://www.springframework.org/schema/context http://www.springframework.org/schema/context/spring-context-4.1.xsd
10         http://www.springframework.org/schema/tx http://www.springframework.org/schema/tx/spring-tx-4.1.xsd">
11
12     <!-- 配置自动扫描的包 -->
13     <!-- 实体和dao -->
14     <context:component-scan base-package="comentity,com.dao.impl"></context:component-scan>
15     <!-- service -->
16     <context:component-scan base-package="com.service.impl"></context:component-scan>
17
18     <!-- 导入数据库资源文件 -->
19     <context:property-placeholder location="classpath:db.properties"/>
20
21     <!-- 配置c3p0数据源 -->
22     <bean id="dataSource" class="com.mchange.v2.c3p0.ComboPooledDataSource">
23         <property name="user" value="${jdbc.user}"></property>
24         <property name="password" value="${jdbc.password}"></property>
25         <property name="driverClass" value="${jdbc.driverClass}"></property>
26         <property name="jdbcUrl" value="${jdbc.jdbcUrl}"></property>
27
28         <property name="initialPoolSize" value="${jdbc.initialPoolSize}"></property>
29         <property name="minPoolSize" value="${jdbc.minPoolSize}"></property>
30         <property name="maxPoolSize" value="${jdbc.maxPoolSize}"></property>
31         <property name="acquireIncrement" value="${jdbc.acquireIncrement}"></property>
32     </bean>
33
34     <!-- 配置sessionFacory -->
35     <bean id="sessionFactory" class="org.springframework.orm.hibernate4.LocalSessionFactoryBean">
36         <property name="dataSource" ref="dataSource"></property>
37         <!-- 如果有多个配置文件,可以使用属性configLocations来配置,多个配置文件之间用逗号“,”来分割,
38             如:classpath:hibernate.cfg.xml,classpath:extension.cfg.xml -->
39         <property name="configLocation" value="classpath:hibernate.cfg.xml"></property>
40         <!-- ORM映射关系配置文件 -->
41         <property name="mappingLocations" value="classpath:com/gzpp123/web/entity/*.hbm.xml"></property>
42     </bean>
43
44     <!-- 配置spring的声明式事物 -->
45     <!-- 1、配置hibernate的事物管理器 -->
46     <bean id="transactionManager" class="org.springframework.orm.hibernate4.HibernateTransactionManager">
47         <property name="sessionFactory" ref="sessionFactory"></property>
48     </bean>
49
50     <!-- 2、配置事物属性 -->
51     <tx:advice id="txAdvice" transaction-manager="transactionManager">
52         <tx:attributes>
53             <tx:method name="get*" read-only="true"/>
54             <tx:method name="*"/>
55         </tx:attributes>
56     </tx:advice>
57
58     <!-- 3、配置事物切入点,再把事物属性和事务切入点关联起来 -->
59     <aop:config>
60         <aop:pointcut expression="execution(* com.service.*.*(..))" id="txPointcut"/>
61         <aop:advisor advice-ref="txAdvice" pointcut-ref="txPointcut"/>
62     </aop:config>
63
64     <aop:config>
65         <aop:pointcut expression="execution (* com.service.CoreService.*(..))" id="txPointcut1"/>
66         <aop:advisor advice-ref="txAdvice" pointcut-ref="txPointcut1"/>
67     </aop:config>
68
69 </beans>
再看看类路径下的db.properties文件:
jdbc.user=root
jdbc.password=tiger123
jdbc.driverClass=com.mysql.jdbc.Driver
jdbc.jdbcUrl=jdbc:mysql://localhost:3306/gzpp

jdbc.initialPoolSize=2
jdbc.maxPoolSize=10
jdbc.minPoolSize=1
jdbc.acquireIncrement=5
#...
#appSecret: 62e5c0141c2fc9a3bc9d2ae73fb7cd12
#appid: wx15fc2152e1406d02
由于mapping以及dataSource都在spring中配置完成了,所以hibernate.cfg.xml文件则相对简单:
 1 <?xml version="1.0" encoding="UTF-8"?>
 2 <!DOCTYPE hibernate-configuration PUBLIC
 3         "-//Hibernate/Hibernate Configuration DTD 3.0//EN"
 4         "http://hibernate.sourceforge.net/hibernate-configuration-3.0.dtd">
 5 <hibernate-configuration>
 6     <session-factory>
 7
 8         <!-- 配置 hibernate 的基本属性 -->
 9
10         <!-- 方言 -->
11         <property name="hibernate.dialect">org.hibernate.dialect.MySQL5InnoDBDialect</property>
12
13         <!-- 是否显示及格式化 SQL -->
14         <property name="hibernate.show_sql">true</property>
15         <property name="hibernate.format_sql">true</property>
16
17         <!-- 生成数据表的策略 -->
18         <property name="hibernate.hbm2ddl.auto">update</property>
19
20         <!-- 二级缓存相关 -->
21
22     </session-factory>
23 </hibernate-configuration>


 5835
5835


 被折叠的 条评论
为什么被折叠?
被折叠的 条评论
为什么被折叠?
 到【灌水乐园】发言


