


很长时间没写WorldWind方面的东西啦!一方面是自己最近工作上忙点,一方面因为自己热情衰减了,俗话说,“一鼓作气,再而衰,三而竭”,我现在学习WW就有点没太有毅力和士气了!本来想这周末总结一下前段时间的WorldWind学习,没想自己放假期间自制力很差,没一点效率,几乎都上网玩了。
WW的总结只能拖后了,可能过段时间有兴趣有时间了,可能会把总结写了,然后继续深入研究吧。我感觉自己学习或做事都缺点毅力,总是搞定虎头蛇尾的!本来研究WW好好的,可是看了.NET互操作方面的书感觉很好,于是兴致勃勃地学习.NET互操作。看了三章,遇到难点又想放弃来搞线程方面的。我有时都服了自己了:三心二意的!不扯周末的思想了。
WW学习研究虽没像以前那样专注,但也还是时不时关注一下的,前段时间看到3D Cross Section插件,感觉很惊奇,就想研究一下,没想到自已一拖再拖,现在才准备写点东西。
3D Cross Section插件主要是提取WW中当前视图的地形数据和影像数据,然后在新的窗口TerrainViewer中显示。也就是提取一部分三维在新的窗体里重点显示。功能就简单一说,3D Cross Section插件中实现提取WW数据的插件部分我们下次再说,我这次主要是关注TerrainViewer的实现。

TerrainViewer的功能可以单独使用,正如其名字就是一个简单的三维地形数据的浏览器,简直是Mini型的WW。但它里面内容很丰富,有很多知识点值得我们学习借鉴:一方面是C#知识;一方面是Direct3D方面知识;还有就是其中涉及数据算法方面的处理。
首先,说一下其中的C#拖拽文件到窗体打开功能的实现,看过很多软件特别是视频播放器软件,只要将视频文件拖到上面就能播放该视频;看过Office软件普遍支持拖放打开相应的文件;看过只要将文件拖入回收站就能自己删除等等。这些拖拽方法是如何在C#实现的?自己搞编程很久了,没遇到过这样的需求,也没见过这样代码实现案例,所以自己也就没深入研究这方面的知识。在研究TerrainViewer功能时,看到支持拖拽功能,就首先学习了一下它是如何实现的。自己以后的程序支持类似的拖放打开文件功能多酷?!分析一下该功能代码,与大家分享一下。
this .AllowDrop = true ; //允许窗口拖放
this .DragEnter += new DragEventHandler( this .OnDragEnter);
this .DragDrop += new DragEventHandler( this .OnDragDrop);
看看this.OnDragEnter和this.OnDragDrop事件处理中都分别做了什么。
private void OnDragEnter( object sender, System.Windows.Forms.DragEventArgs e)
{
e.Effect = DragDropEffects.Copy; // set the cursor to show a drop copy
}
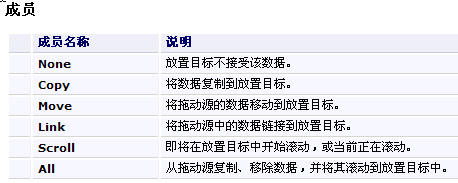
上面的代码里主要是告诉,拖放的目的和效果是COPY。从下面的截图中,可以看到各种各种拖放效果。

从MSDN上截取的DragDropEffects说明:
真正处理拖放文件的打开实现的代码:
{
string theFile;
try
{
// check to make sure the dropped item is of type FileDrop
if (e.Data.GetDataPresent(DataFormats.FileDrop))
{
object filename = e.Data.GetData(DataFormats.FileDrop);
theFile = ( string )((System.Array)filename).GetValue( 0 );
// Create map from file
// MessageBox.Show("Dropped file : " + theFile);
string ext = Path.GetExtension(theFile);
string sky = skyFileName == null ? "" : skyFileName;
string tex = textureFileName == null ? "" : textureFileName;
if ( ! tex.StartsWith( " colors " )) tex = " colors/Geo_Water_1.png " ;
switch (ext)
{
case " .jpg " :
break ;
case " .png " : // Load terrain from 8bit .png
DisposeMap();
terrainFileName = theFile;
skyFileName = sky;
textureFileName = tex;
mapName = terrainFileName;
mapSpan = 0 ;
mapWidth = 0 ;
dem16 = false ;
verticalFactor = 1.0f ;
LoadMap();
break ;
case " .bil " : // Load terrain from 16bit SRTM binary .bil
DisposeMap();
terrainFileName = theFile;
skyFileName = sky;
textureFileName = tex;
mapName = terrainFileName;
mapSpan = 0 ;
mapWidth = 0 ;
dem16 = true ;
verticalFactor = 1.0f ;
LoadMap();
break ;
case " .xml " : // Load map list from .xml
DisposeMap();
mapListFileName = theFile;
InitializeMapList(); // Create Map menu from .xml
MapMenuSelectMap( 0 ); // Load first map
break ;
}
}
}
catch (Exception ex)
{
// MessageBox.Show(ex.Message.ToString());
}
}
从上面分析可知,我们如果要在自己的程序中实现拖放功能,只需分别实现相应的自己的事件处理。大家也可以在网上搜搜相关资料,相信大致步骤是一样的。
其次,说一下其中的键盘事件监听处理,其实在前面WW学习系列中已经分析了键盘监听处理。但是这次要分析的有的不同是,DirectX里面的键盘监听实现。该思路很新颖,自己之前没见过,在DirectX编程里可以借鉴一下。但不推荐使用,Form里的键盘监听处理已经很好很方便了,而且DirectX里键盘监听需要DirectX运行环境的。另外,除了新颖方面,我没看到该方法的优势。
public void InitializeKeyboard()
{
keyb = new Microsoft.DirectX.DirectInput.Device(SystemGuid.Keyboard);
keyb.SetCooperativeLevel( this , CooperativeLevelFlags.Background | CooperativeLevelFlags.NonExclusive);
keyb.Acquire();
}
键盘监听处理方法实现:

 DirectX键盘监听实现
{
KeyboardState keys = keyb.GetCurrentKeyboardState();
//通过 keys[Key.LeftShift]方式 获取SHIFT键是否按下
bool ctrl = keys[Key.LeftControl] || keys[Key.RightControl];
double moveFactor = dist * 0.01f ;
// Toggle Light
if (keys[Key.L] && ! shift && ! ctrl)
{
showLight = true ;
menuItemShowLight.Checked = showLight;
redraw = true ;
}
if (keys[Key.L] && shift && ! ctrl)
{
showLight = false ;
menuItemShowLight.Checked = showLight;
redraw = true ;
}
// Create/delete light map
if (keys[Key.L] && ! shift && ctrl)
{
if (textureFileName.IndexOf( " colors " ) == - 1 ) // only on textured maps
{
if (lightMapTexture != null ) lightMapTexture.Dispose();
lightMapTexture = null ;
this .Cursor = Cursors.WaitCursor;
lightMapTexture = LightMap(device, DEM, 1 );
this .Cursor = Cursors.Default;
redraw = true ;
}
}
if (keys[Key.L] && shift && ctrl)
{
if (lightMapTexture != null ) lightMapTexture.Dispose();
lightMapTexture = null ;
redraw = true ;
}
// Create/delete section mesh
if (keys[Key.S] && ! shift && ! ctrl)
{
if (sectionMesh != null ) sectionMesh.Dispose();
sectionMesh = null ;
showSection = true ;
sectionMesh = TerrainSection(device, DEM);
showTransparentTerrain = true ;
menuItemShowSection.Checked = showSection;
redraw = true ;
}
if (keys[Key.S] && shift && ! ctrl)
{
if (sectionMesh != null ) sectionMesh.Dispose();
sectionMesh = null ;
showSection = false ;
showTransparentTerrain = false ;
menuItemShowSection.Checked = showSection;
redraw = true ;
}
// Toggle Fog
if (keys[Key.F] && ! shift)
{
showFog = true ;
menuItemShowFog.Checked = showFog;
redraw = true ;
}
if (keys[Key.F] && shift)
{
showFog = false ;
menuItemShowFog.Checked = showFog;
redraw = true ;
}
// Toggle map spin
if (keys[Key.Space])
{
spin = false ;
menuItemShowSpin.Checked = spin;
redraw = true ;
}
if (keys[Key.Return])
{
spin = true ;
menuItemShowSpin.Checked = spin;
redraw = true ;
}
// Rotate map
if (keys[Key.RightArrow] && ! shift)
{
angle -= 0.02f ;
redraw = true ;
}
if (keys[Key.LeftArrow] && ! shift)
{
angle += 0.02f ;
redraw = true ;
}
if (keys[Key.UpArrow] && shift)
{
angle2 += 0.02f ;
redraw = true ;
}
if (keys[Key.DownArrow] && shift)
{
angle2 -= 0.02f ;
redraw = true ;
}
// Move map
if (keys[Key.RightArrow] && shift)
{
dx -= ( float )(Math.Sin(angle) * moveFactor);
dy -= ( float )(Math.Cos(angle) * moveFactor);
redraw = true ;
}
if (keys[Key.LeftArrow] && shift)
{
dx += ( float )(Math.Sin(angle) * moveFactor);
dy += ( float )(Math.Cos(angle) * moveFactor);
redraw = true ;
}
if (keys[Key.UpArrow] && ! shift)
{
dx -= ( float )(Math.Cos(angle) * moveFactor);
dy += ( float )(Math.Sin(angle) * moveFactor);
redraw = true ;
}
if (keys[Key.DownArrow] && ! shift)
{
dx += ( float )(Math.Cos(angle) * moveFactor);
dy -= ( float )(Math.Sin(angle) * moveFactor);
redraw = true ;
}
// Change Distance
if (keys[Key.NumPadPlus] && ! shift && ! ctrl)
{
dist -= dist * 0.02f ;
redraw = true ;
}
if (keys[Key.NumPadMinus] && ! shift && ! ctrl)
{
dist += dist * 0.02f ;
redraw = true ;
}
// Change FOV
if (keys[Key.NumPadPlus] && shift && ! ctrl)
{
fov -= 0.01f ;
redraw = true ;
}
if (keys[Key.NumPadMinus] && shift && ! ctrl)
{
fov += 0.01f ;
redraw = true ;
}
// Change alt scale factor (vert exaggeration)
if ((keys[Key.X] || keys[Key.NumPadPlus]) && ! shift && ctrl)
{
verticalFactor *= 1.3333f ;
MenuClearCheck(menuItemVerticalFactor);
menuItemVerticalFactor.MenuItems[ 0 ].Text = " x " + verticalFactor.ToString(CultureInfo.InvariantCulture);
menuItemVerticalFactor.MenuItems[ 0 ].Checked = true ;
this .Cursor = Cursors.WaitCursor;
// Rebuilt terrain mesh
DisposeTerrainMesh();
BuildTerrainMesh();
if (sidesMesh != null ) sidesMesh.Dispose();
sidesMesh = TerrainSides(device, DEM);
this .Cursor = Cursors.Default;
redraw = true ;
}
if ((keys[Key.Z] || keys[Key.NumPadMinus]) && ! shift && ctrl)
{
verticalFactor *= 0.75f ;
MenuClearCheck(menuItemVerticalFactor);
menuItemVerticalFactor.MenuItems[ 0 ].Text = " x " + verticalFactor.ToString(CultureInfo.InvariantCulture);
menuItemVerticalFactor.MenuItems[ 0 ].Checked = true ;
this .Cursor = Cursors.WaitCursor;
// Rebuilt terrain mesh
DisposeTerrainMesh();
BuildTerrainMesh();
if (sidesMesh != null ) sidesMesh.Dispose();
sidesMesh = TerrainSides(device, DEM);
this .Cursor = Cursors.Default;
redraw = true ;
}
}
上面按键处理,主要是通过特定的按键实现一些功能的执行,跟菜单里相应项是对应的。这里并没有事件调用,只是个键盘按键响应处理方法而已,真正的调用是放在OnPaint()事件处理中1089行:
// Read keyboard
if(this.Focused) ReadKeyboard();
再者,讲一些TerrainViewer的核心实现,即Direct3D编程方面。这个TerrainViewer虽然很小,总共只要三千多行代码,但这该说“麻雀虽小,五脏俱全”,我称TerrainViewer是Mini版的WorldWind一点不过分,它完全拥有了WW的核心实现:Direct3D编程和地理坐标转换。Direct3D编程如果想写好是有点难,但是要实现Direct3D编程还是不难的,因为所有的Direct3D编程的套路都是一样的,简直是工厂流水线式的。大的基本步骤为Device基本参数设置和Device初始化——》构建Mesh集合——》设置Texture——》绘制渲染参数设置——》渲染。真正的难点是构建Mesh集合,就是三维建模吧!最后渲染过程是在OnPaint()事件里实现的,这里一般会在最后调用 this.Invalidate();实现不断刷新界面实现不断重绘。
OnPaint()里面的重绘渲染,是通过redraw标识来控制是否需要重绘的。
else // No redraw
{
device.BeginScene();
device.EndScene();
device.Present();
System.Threading.Thread.Sleep(50);
}
上面的代码很好地解决了不必要的重绘问题,WorldWind的里面的重绘是“牵一发而动全身”,我一直在想能否减少WW里不必要的重绘,难道不能尽可能地只重渲染必须的部分嘛?!WW提高效率问题可以考虑从此点开始。这部分Direct3D编程是重点,但是没有深入一步步分析各部分MESH的如何构建,因为几乎所有插件在实现三维渲染上步骤一致,实现上也是反复说Direct3D编程,几乎跟处理上WW里的一致,所以就不再赘述啦!
最后,说一下DEM数据的使用,主要包括两方面:DEM文件使用和高程值获取。
DEM文件使用:jpg和png直接使用,bil格式的先要转换成BitMap.请看下面LoadMap()方法的734行代码:
if (Path.GetExtension(terrainFileName) != " .bil " )
{
DEM = new Bitmap(filePath); // .jpg, .png
dem16 = false ;
}
else
{
DEM = BitmapFromBil(filePath); // .bil
dem16 = true ;
}
将bil格式转换成BitMap:
private Bitmap BitmapFromBil( string bilFile)
{
int width = 150 ; // default size
int height = 150 ;
// Bitmap DEM;
using ( Stream s = File.OpenRead(bilFile))
{
// Find out dem size
FileInfo demFile = new FileInfo(bilFile);
long length = demFile.Length;
if (length != 0 )
{
width = height = ( int )Math.Sqrt(length / 2 );
if (width * height * 2 != length) throw new ApplicationException( " .bil file size not double of a square (eg. 150x150x2) " );
}
DEM = new Bitmap(width, height, System.Drawing.Imaging.PixelFormat.Format32bppArgb);
byte [] tfBuffer = new byte [width * height * 2 ];
if (s.Read(tfBuffer, 0 ,tfBuffer.Length) < tfBuffer.Length)
throw new IOException( string .Format( " End of file error while reading file '{0}'. " , bilFile) );
int offset = 0 ;
for ( int y = 0 ; y < height; y ++ )
{
for ( int x = 0 ; x < width; x ++ )
{
// 16 bit values
int low = tfBuffer[offset ++ ];
int hi = tfBuffer[offset];
int hi2 = ( short )(tfBuffer[offset ++ ] << 8 );
// Scale down to 0..255
int alt = ( int )(( float )(hi2 + low) * 255f / 9000f);
if (alt < 0 ) alt = 0 ;
if (alt > 255 ) alt = 255 ;
// Store altitude in red, and original 16 bit value in g and b
DEM.SetPixel(x, y, Color.FromArgb( 0xff , alt, low, hi));
}
}
}
dem16 = true ;
return DEM;
}
高程值获取获取方法, float GetAlt(Bitmap DEM, float x, float y)和int GetAlt(Bitmap DEM, int x, int y)。这两个不同之处是,第一个方法里面调用了第二个方法,第二个是真正获取高程值的,而且是获取整数点上的高程值。
public int GetAlt(Bitmap DEM, int x, int y)
{
int alt = 0 ;
if (x >= 0 && x <= DEM.Width - 1 && y >= 0 && y <= DEM.Height - 1 )
{
Color p = DEM.GetPixel(x, y);
alt = ( int )p.R; // Get altitude from red (8 bit)
if (dem16)
{
// Get 16bit altitude from g/b
alt = ( short )(p.B << 8 ) + ( int )p.G;
// Check for negative values
if (alt > 32767 ) alt = 65536 - alt;
}
}
return alt;
}
第一个方法是通过调用第一个方法,然后通过插值计算的方法,获取任意点的插值。
获取任意点高程的代码
public float GetAlt(Bitmap DEM, float x, float y)
{
float alt = 0f;
if (x >= 0 && x <= DEM.Width - 1 && y >= 0 && y <= DEM.Height - 1 )
{
int xNW = ( int )Math.Floor(x); // North-West corner
int yNW = ( int )Math.Floor(y);
float xF = ( float )x - xNW; // x factor 0...1
float yF = ( float )y - yNW; // y factor 0...1
int altNW = GetAlt(DEM, xNW, yNW); // Alt north-west
int altNE = GetAlt(DEM, xNW + 1 , yNW); // Alt north-east
int altSW = GetAlt(DEM, xNW, yNW + 1 ); // Alt south-west
int altSE = GetAlt(DEM, xNW + 1 , yNW + 1 ); // Alt south-east
float altN = ( float )altNW * (1f - xF) + ( float )altNE * xF; // North average
float altS = ( float )altSW * (1f - xF) + ( float )altSE * xF; // South average
alt = altN * (1f - yF) + altS * yF; // North-South average
}
return alt;
}
太晚了,不再详细分析最后部分代码了。下次有时间说一下3D Cross Section插件加载部分的代码实现,也算是完整分析个插件功能。希望大家能有所收获。


 5万+
5万+

 被折叠的 条评论
为什么被折叠?
被折叠的 条评论
为什么被折叠?
 到【灌水乐园】发言


