


实现功能:一个管理系统中有几大类功能模块,根据登录用户的角色来判断显示可以进行的操作。
这里我举例的是图书信息管理系统,该系统功能与用户角色关系表如下:
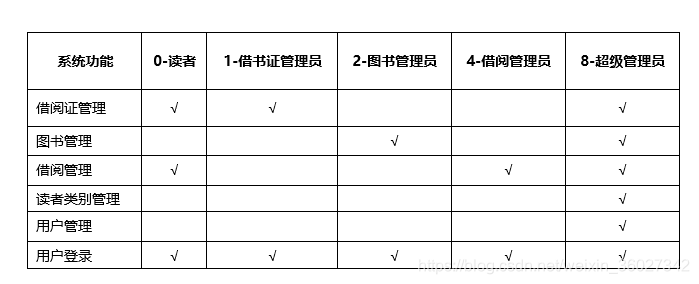
根据该关系,我们来理一下解决思路:
- 在主页面的左边为功能导航,根据角色来确定功能导航
- js先获取角色
- 根据角色,来控制各个功能的显示(show)与隐藏(hide)
实现代码:
- jsp页面代码:
在session中存放了登陆用户信息(reader),因此在jsp页面中用${}直接来获取的登录用户角色:
<label id="role" hidden="hidden">${reader.rdAdminRoles}</label>一个大的功能模块用<div>;大功能模块下的小操作用<ul><li>:
   <div id="readerMaster">
            <h1 class="type" ><a href="#">借书证管理</a></h1>
            <div class="content">
                <table width="100%" border="0" cellspacing="0" cellpadding="0">
                <tr>
                    <td><img src="img/bg.jpg" width="100%" height="5"/></td>
                  </tr>
              </table>
                <ul class="MM">
                <li><a href="showReader!showReader.action" target="main">借书证显示</a></li>
                <li><a href="goAddReader!goAddReader.action" target="main">办理图书证</a></li>
              </ul>
              </div>
</div> 
2.js代码 :
    //权限实现操作
        $(window).load(function () {
            //8-系统管理
            if ($("#role").text() === "0") { //0-读者
                $("#readerMaster").show();
                $("#bookMaster").hide();
                $("#borrowMaster").show();
                $("#userMaster").hide();
                $("#typeMaster").hide();
            }else if ($("#role").text() === "1") { //1-借书证管理员
                $("#readerMaster").show();
                $("#bookMaster").hide();
                $("#borrowMaster").hide();
                $("#userMaster").hide();
                $("#typeMaster").hide();
            }else if ($("#role").text() === "2") {  //2-图书管理员
                $("#readerMaster").hide();
                $("#bookMaster").show();
                $("#borrowMaster").hide();
                $("#userMaster").hide();
                $("#typeMaster").hide();
            }else if ($("#role").text() === "4") {   //4-借阅管理
                $("#readerMaster").hide();
                $("#bookMaster").hide();
                $("#borrowMaster").show();
                $("#userMaster").hide();
                $("#typeMaster").hide();
            }else {
                $("#readerMaster").show();
                $("#bookMaster").show();
                $("#borrowMaster").show();
                $("#userMaster").show();
                $("#typeMaster").show();
            }
        });
完整代码:
<%@ page contentType="text/html;charset=UTF-8" language="java" %>
<html>
    <head>
    <meta charset="UTF-8">
    <title>图书馆信息管理系统</title>
    <style>
	*{
	font-family:"微软雅黑";
}
body {
	color: #fff;
	margin: 0px;
	padding-left:25%;

}
#container {
	width: 150px;
}
H1 {
	font-size: 18px;
	margin: 0px;
	width: 150px;
	cursor: pointer;
	height: 30px;
	line-height: 20px;
}
H1 a {
	display: block;
	width: 150px;
	color: #fff;
	height: 30px;
	text-decoration: none;
	moz-outline-style: none;
	background-color: #90d7d7;
	line-height: 30px;
	text-align: center;
	margin: 0px;
	padding: 0px;
}
.content {
	width: 150px;
	height: 52px;
}
.MM ul {
	list-style-type: none;
	margin: 0px;
	padding: 0px;
}
.MM li {
	font-size: 16px;
	line-height: 26px;
	color: #fff;
	list-style-type: none;
	display: block;
	text-decoration: none;
	height: 26px;
	width: 150px;
	padding-left: 0px;
}
.MM {
	width: 100%;
	margin: 0px;
	padding: 0px;
	left: 0px;
	top: 0px;
	right: 0px;
	bottom: 0px;
	clip: rect(0px, 0px, 0px, 0px);
}
.MM a:link {
	font-size: 16px;
	line-height: 26px;
	color: #fff;
	background-color: #c9ebec;
	height: 26px;
	width: 150px;
	display: block;
	text-align: center;
	margin: 0px;
	padding: 0px;
	overflow: hidden;
	text-decoration: none;
	display: block;
}
.MM a:visited {
	font-size: 16px;
	line-height: 26px;
	color: #fff;
	background-color: #90d7d7;
	display: block;
	text-align: center;
	margin: 0px;
	padding: 0px;
	height: 26px;
	width: 150px;
	text-decoration: none;
}
.MM a:active {
	font-size: 16px;
	line-height: 26px;
	color: #fff;
	background-color: #90d7d7;
	height: 26px;
	width: 150px;
	display: block;
	text-align: center;
	margin: 0px;
	padding: 0px;
	overflow: hidden;
	text-decoration: none;
}
.MM a:hover {
	font-size: 16px;
	line-height: 26px;
	font-weight: bold;
	color: #fff;
	background-color: #90d7d7;
	text-align: center;
	display: block;
	margin: 0px;
	padding: 0px;
	height: 26px;
	width: 150px;
	text-decoration: none;
}
</style>
    <script type="text/javascript" src="js/jquery-1.8.3.js"></script>
    <script type="text/javascript">
        //点击显示大功能下的小操作
	$(function(){
	$("h1").click(function(){
           $(this).next(".content").fadeToggle("fast");
        });
		});
	//权限实现操作
        $(window).load(function () {
            //8-系统管理
            if ($("#role").text() === "0") { //0-读者
                $("#readerMaster").show();
                $("#bookMaster").hide();
                $("#borrowMaster").show();
                $("#userMaster").hide();
                $("#typeMaster").hide();
            }else if ($("#role").text() === "1") { //1-借书证管理员
                $("#readerMaster").show();
                $("#bookMaster").hide();
                $("#borrowMaster").hide();
                $("#userMaster").hide();
                $("#typeMaster").hide();
            }else if ($("#role").text() === "2") {  //2-图书管理员
                $("#readerMaster").hide();
                $("#bookMaster").show();
                $("#borrowMaster").hide();
                $("#userMaster").hide();
                $("#typeMaster").hide();
            }else if ($("#role").text() === "4") {   //4-借阅管理
                $("#readerMaster").hide();
                $("#bookMaster").hide();
                $("#borrowMaster").show();
                $("#userMaster").hide();
                $("#typeMaster").hide();
            }else {
                $("#readerMaster").show();
                $("#bookMaster").show();
                $("#borrowMaster").show();
                $("#userMaster").show();
                $("#typeMaster").show();
            }
        });
    </script>
    </head>
    <body>
    <table width="150" height="600" border="0" cellpadding="0" cellspacing="0">
      <tr>
        <td width="150" colspan="3"><label id="role" hidden="hidden">${reader.rdAdminRoles}</label></td>
      </tr>
      <tr>
      <tr>
        <td width="150" valign="top"><div id="container">
            <div id="readerMaster">
            <h1 class="type" ><a href="#">借书证管理</a></h1>
            <div class="content">
                <table width="100%" border="0" cellspacing="0" cellpadding="0">
                <tr>
                    <td><img src="img/bg.jpg" width="100%" height="5"/></td>
                  </tr>
              </table>
                <ul class="MM">
                <li><a href="showReader!showReader.action" target="main">借书证显示</a></li>
                <li><a href="goAddReader!goAddReader.action" target="main">办理图书证</a></li>
              </ul>
              </div>
          </div>
            <div id="bookMaster">
            <h1 class="type"><a href="#">图书管理</a></h1>
            <div class="content">
                <table width="100%" border="0" cellspacing="0" cellpadding="0">
                <tr>
                    <td><img src="img/bg.jpg" width="100%" height="5"/></td>
                  </tr>
              </table>
                <ul class="MM">
                <li><a href="showBook!showBook.action" target="main">图书显示</a></li>
                <li><a href="goAddBook!goAddBook.action" target="main">新书入库</a></li>
              </ul>
              </div>
          </div>
            <div id="borrowMaster">
            <h1 class="type" ><a href="#">借阅管理</a></h1>
            <div class="content">
                <table width="100%" border="0" cellspacing="0" cellpadding="0">
                <tr>
                    <td><img src="img/bg.jpg" width="100%" height="5"/></td>
                  </tr>
              </table>
                <ul class="MM">
                <li><a href="showBorrow!showBorrow.action" target="main">借阅信息显示</a></li>
                <li><a href="goAddBorrow!goAddBorrow.action" target="main">借阅书籍</a></li>
              </ul>
              </div>
          </div>
            <div id="typeMaster">
            <h1 class="type" ><a href="#">读者类别管理</a></h1>
            <div class="content">
                <table width="100%" border="0" cellspacing="0" cellpadding="0">
                <tr>
                    <td><img src="img/bg.jpg" width="100%" height="5"/></td>
                  </tr>
              </table>
                <ul class="MM">
                <li><a href="showReaderType!showReaderType.action" target="main">读者类别显示</a></li>
                <li><a href="goAddReaderType!goAddReaderType.action" target="main">读者类别添加</a></li>
              </ul>
              </div>
          </div>
            <div id="userMaster">
            <h1 class="type" ><a href="#">用户管理</a></h1>
            <div class="content">
                <table width="100%" border="0" cellspacing="0" cellpadding="0">
                <tr>
                    <td><img src="img/bg.jpg" width="100%" height="5"/></td>
                  </tr>
              </table>
                <ul class="MM">
                <li><a href="showUser!showUser.action" target="main">用户信息显示</a></li>
              </ul>
              </div>
          </div>
          </div></td>
      </tr>
    </table>
</body>
</html>


 1309
1309


 被折叠的 条评论
为什么被折叠?
被折叠的 条评论
为什么被折叠?
 到【灌水乐园】发言


