


Quickstart guide: Use UEStudio to develop Java applications
If you are a Java developer looking for an alternative development environment, then you came to the right place. UEStudio natively supports over 30 popular compilers, one of which is Java.
Step 1: Download the compiler
In order to create Java Applications, you will need to download/install the Java SDK (Software Development Kit). You may download the SDK from the following URL:
For the purposes of this tutorial, we are using the 1.4.2 development kit.
Step 2: Install the compiler
After downloading the installer, run the executable to install the SDK.
Step 3: Start a Project
After you have installed the Java SDK, you can now get started with UEStudio. UEStudio offers the ability to create a "new project using templates" or "create a new project".
If you do not wish to create a "new project using templates" but would prefer to use existing code, select the option for "create a new project". Proceed to Step 4 below.
If you wish to create a "new project using templates" select the option for "new project using templates". Proceed to Step 5 below.
Step 4: Using existing code
For this example, the file which we will be using to create a Java Console Application is "HelloWorld.java":

From the Project menu, select the option for "create a new project".

Name and Save the project. For the purposes of this Power Tip, we will use "HelloWorld". Project Settings: Files/Folders
After saving your project, you will be presented with the Project Settings dialog. The dialog is also accessible from within the Project menu.

To add files to your project, click on the Add File button, then browse and add the appropriate files. When you are finished, you should see something similar to:
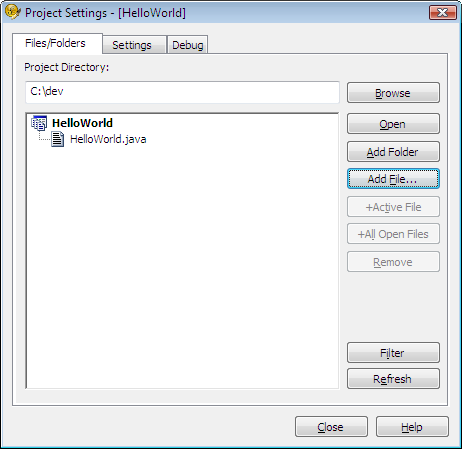
Now that you have added your files/folders, click on the Settings tab.
Project Settings: Settings In order to compile the code, you must make your project "Compilable". After you enable this, the "Set/Change Compiler" and "Compiler Options" will be enabled.
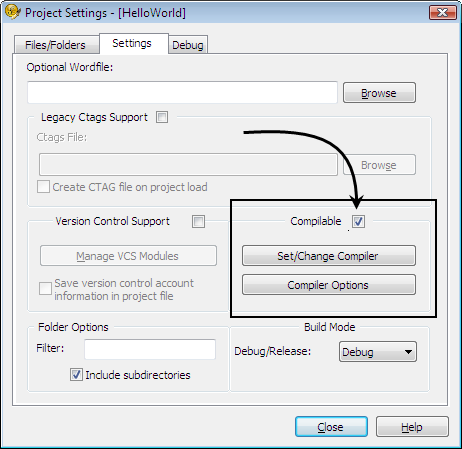
Click on the "Set/Change Compiler" button and choose the "Java Compiler". Because we are working with a console appliction, choose the "Console Application" rather than the Windows Application.
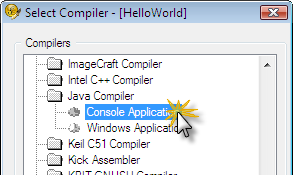
The option you select may vary depending on your code. Click OK to set your Compiler.
You can additionally edit the compiler options or configuration, however that is not covered in the scope of this powertip. Please see the UEStudio Help for further information regarding this.
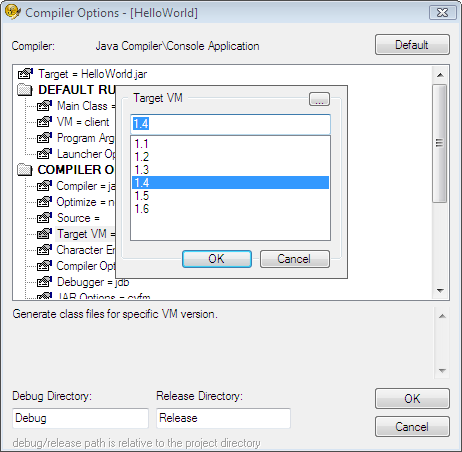
After you have closed the "Set/Change Compiler" dialog, you will need to make an additional configuration change to the compiler options. Click on the "Compiler Options" button in the Project Settings dialog.
Under the "Compiler Options" heading, because we installed the Java 1.4 SDK, we will need to change the "Target VM" from 1.5 to 1.4. You can change this by double-clicking on the Target VM key, selecting the 1.4 option, then click OK.
You are now finshished configuring the project, so you may click Close, to close the Project Settings dialog.
You may now proceed to Step 6.
Step 5: Using a template
Select the option for "create project using templates".

Select the "Java Compiler" in the Compilers list and "Windows Application". Then type your project's name in the Project Name field.

Click "Create". Your project will be created as MyJavaApp.
Step 6: Build
Now that you have configured the project you are ready to build it! Click on the "Build" icon on the Build toolbar, or go to the Build menu and select Build.

UEStudio will build your application and the Output Window will indicate when the build is complete. You will also see the output window list any errors/warnings encountered during the build:

Step 7: Run
To run the application, click on the Run button on the build toolbar.

From the example above, "Using existing code", the console application launches and runs appropriately.

From the example above, "Using a template", the windows application launches and runs appropriately.


 1358
1358

 被折叠的 条评论
为什么被折叠?
被折叠的 条评论
为什么被折叠?
 到【灌水乐园】发言


