使用代码,看卷积是如何计算的。
torch.nn
torch.nn.functional
srtide 的用法,代表卷积核的步幅
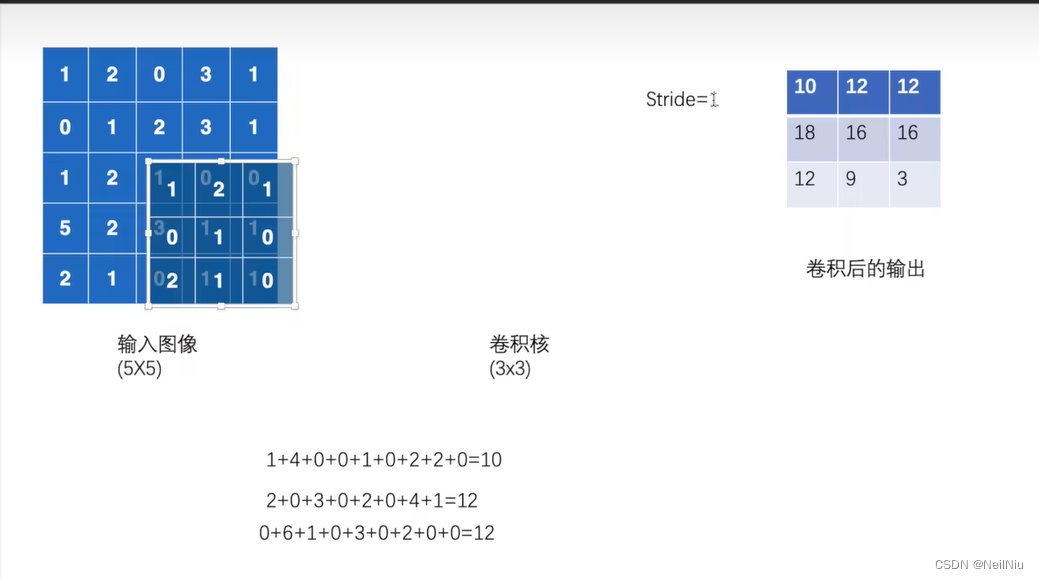
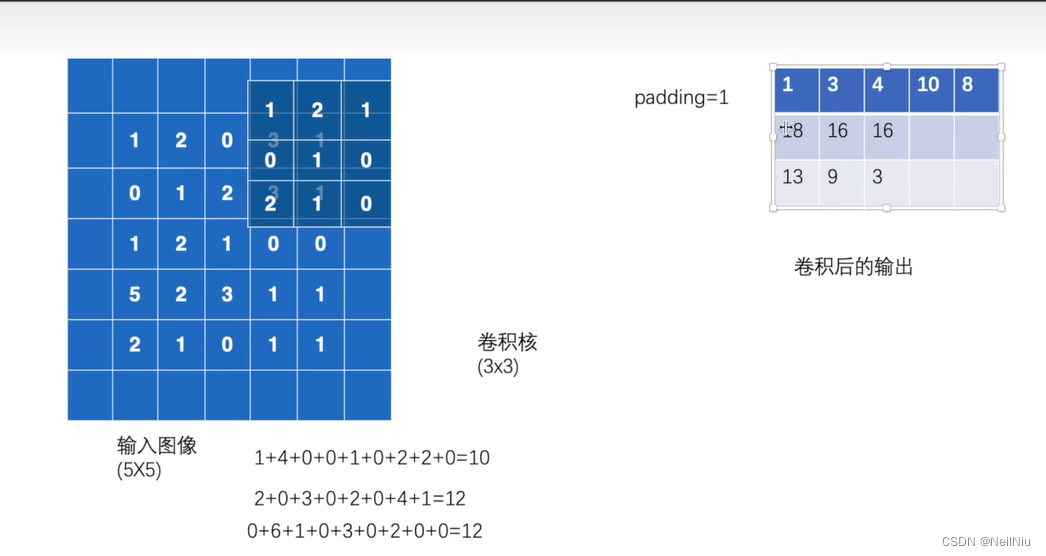
import torch
import torch.nn.functional as F
#  这个是输入的一个二维矩阵
input = torch.tensor([[1,2,0,3,1],
								[0,1,2,3,1],
								[1,2,1,0,0],
								[5,2,3,1,1],
								[2,1,0,1,1]
								])

kernel = torch.tensor([[1,2,1],
									[0,1,0],
									[2,1,0]
									])

# 尺寸变化,5*5 ,3*3
input = torch.reshape(input, (1,1,5,5))
kernel  = torch.reshape(kernel, (1,1,3,3))

print(input.shape)
print(kernel.shape)
# stride 代表每次移动的次数或者步幅
output = F.conv2d(input, kernel, stride=1)
print(output)

output2 = F.conv2d(input, kernel, stride=2)
print(output2)


output3 = F.conv2d(input, kernel, stride=1,padding=1)
print(output3)- 1.
- 2.
- 3.
- 4.
- 5.
- 6.
- 7.
- 8.
- 9.
- 10.
- 11.
- 12.
- 13.
- 14.
- 15.
- 16.
- 17.
- 18.
- 19.
- 20.
- 21.
- 22.
- 23.
- 24.
- 25.
- 26.
- 27.
- 28.
- 29.
- 30.
- 31.
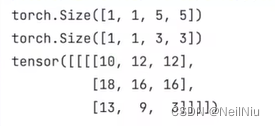
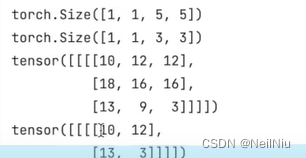
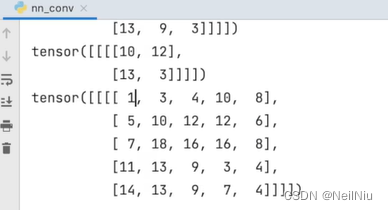
padding 的用法为1的时候,代表把之前的矩阵四周拓展一个像素,
卷积层的使用
图片的一般都是二维矩阵,都使用CONV2D,1D 和3D用的较少
in_channels 输入的通道数
out_channels 输出的通道数
kernel_size 卷积核的大小
stride=1 卷积核的步幅大小
padding =0 对原始数据的一个填充数
dilation =1 卷积核的对应位
groups =1
bias =True 对卷积后的数是否加减一个数
padding_mode=‘zeros’
Parameters:
输入的通道数
in_channels (int) – Number of channels in the input image
输出的通道数 当等于2,就会出现2个卷积核,就会有两个输出
out_channels (int) – Number of channels produced by the convolution
卷积核的大小例如设置为3, 卷积核就是3*3,训练过程中不断的调整。
kernel_size (int or tuple) – Size of the convolving kernel
卷积核移动的步幅
stride (int or tuple, optional) – Stride of the convolution. Default: 1
填充
padding (int, tuple or str, optional) – Padding added to all four sides of the input. Default: 0
填充的地方设置为0
padding_mode (str, optional) – 'zeros', 'reflect', 'replicate' or 'circular'. Default: 'zeros'

dilation (int or tuple, optional) – Spacing between kernel elements. Default: 1

groups (int, optional) – Number of blocked connections from input channels to output channels. Default: 1
偏置
bias (bool, optional) – If True, adds a learnable bias to the output. Default: True- 1.
- 2.
- 3.
- 4.
- 5.
- 6.
- 7.
- 8.
- 9.
- 10.
- 11.
- 12.
- 13.
- 14.
- 15.
- 16.
- 17.
- 18.
- 19.
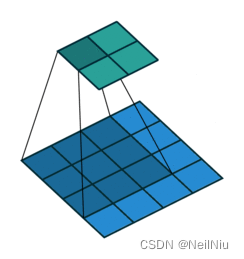
动图,蓝色部分为输入图像,青色部分为输出图像
卷积层,
池化层
最常用的nn.MaxPool2d
kernel_size (Union[int, Tuple[int, int]]) – the size of the window to take a max over

stride (Union[int, Tuple[int, int]]) – the stride of the window. Default value is kernel_size

padding (Union[int, Tuple[int, int]]) – Implicit negative infinity padding to be added on both sides

dilation (Union[int, Tuple[int, int]]) – a parameter that controls the stride of elements in the window

return_indices (bool) – if True, will return the max indices along with the outputs. Useful for torch.nn.MaxUnpool2d later

ceil_mode (bool) – when True, will use ceil instead of floor to compute the output shape- 1.
- 2.
- 3.
- 4.
- 5.
- 6.
- 7.
- 8.
- 9.
- 10.
- 11.
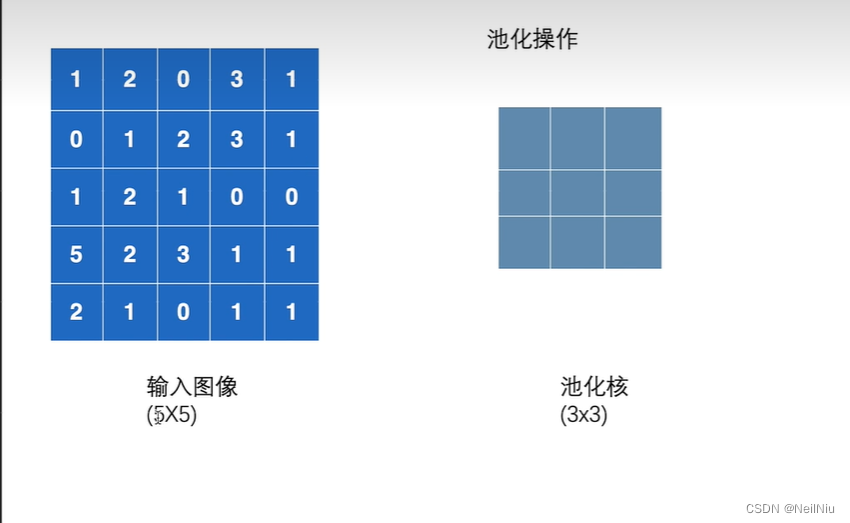
cell_mode 为True的时候,要保留最大的值,当cell_mode为False的时候,不保留最大值。
import torch
import torchvision
from torch import nn
from torch.nn import MaxPool2d
from torch.utils.data import DataLoader
from torch.utils.tensorboard import SummaryWriter

dataset = torchvision.datasets.CIFAR10("../data", train=False, download=True,
                                       transform=torchvision.transforms.ToTensor())

dataloader = DataLoader(dataset, batch_size=64)

class Tudui(nn.Module):
    def __init__(self):
        super(Tudui, self).__init__()
        self.maxpool1 = MaxPool2d(kernel_size=3, ceil_mode=False)

    def forward(self, input):
        output = self.maxpool1(input)
        return output

tudui = Tudui()

writer = SummaryWriter("../logs_maxpool")
step = 0
for data in dataloader:
    imgs, targets = data
    writer.add_images("input", imgs, step)
    output = tudui(imgs)
    writer.add_images("output", output, step)
    step = step + 1

writer.close()- 1.
- 2.
- 3.
- 4.
- 5.
- 6.
- 7.
- 8.
- 9.
- 10.
- 11.
- 12.
- 13.
- 14.
- 15.
- 16.
- 17.
- 18.
- 19.
- 20.
- 21.
- 22.
- 23.
- 24.
- 25.
- 26.
- 27.
- 28.
- 29.
- 30.
- 31.
- 32.
- 33.
为什么池化的作用,保留输入的一个特征,同时把数据量减小,数据量减小了,训练的更快
经过一层卷积之后,来一层池化,然后再来一次非线性激活。
非线性激活层,RELU
import torch
import torchvision
from torch import nn
from torch.nn import ReLU, Sigmoid
from torch.utils.data import DataLoader
from torch.utils.tensorboard import SummaryWriter

input = torch.tensor([[1, -0.5],
                      [-1, 3]])

input = torch.reshape(input, (-1, 1, 2, 2))
print(input.shape)

dataset = torchvision.datasets.CIFAR10("../data", train=False, download=True,
                                       transform=torchvision.transforms.ToTensor())

dataloader = DataLoader(dataset, batch_size=64)

class Tudui(nn.Module):
    def __init__(self):
        super(Tudui, self).__init__()
        self.relu1 = ReLU()
        self.sigmoid1 = Sigmoid()

    def forward(self, input):
        output = self.sigmoid1(input)
        return output

tudui = Tudui()

writer = SummaryWriter("../logs_relu")
step = 0
for data in dataloader:
    imgs, targets = data
    writer.add_images("input", imgs, global_step=step)
    output = tudui(imgs)
    writer.add_images("output", output, step)
    step += 1

writer.close()- 1.
- 2.
- 3.
- 4.
- 5.
- 6.
- 7.
- 8.
- 9.
- 10.
- 11.
- 12.
- 13.
- 14.
- 15.
- 16.
- 17.
- 18.
- 19.
- 20.
- 21.
- 22.
- 23.
- 24.
- 25.
- 26.
- 27.
- 28.
- 29.
- 30.
- 31.
- 32.
- 33.
- 34.
- 35.
- 36.
- 37.
- 38.
- 39.
- 40.
非线性变换的主要目的就是网络中引入一些非线性特征,非线性越多,才会训练出符合各种曲线,各种特征的一个模型,
正则化层
线性层
import torch
import torchvision
from torch import nn
from torch.nn import Linear
from torch.utils.data import DataLoader

dataset = torchvision.datasets.CIFAR10("../data", train=False, transform=torchvision.transforms.ToTensor(),
                                       download=True)

dataloader = DataLoader(dataset, batch_size=64)

class Tudui(nn.Module):
    def __init__(self):
        super(Tudui, self).__init__()
        self.linear1 = Linear(196608, 10)

    def forward(self, input):
        output = self.linear1(input)
        return output

tudui = Tudui()

for data in dataloader:
    imgs, targets = data
    print(imgs.shape)
    output = torch.flatten(imgs)
    print(output.shape)
    output = tudui(output)
print(output.shape)- 1.
- 2.
- 3.
- 4.
- 5.
- 6.
- 7.
- 8.
- 9.
- 10.
- 11.
- 12.
- 13.
- 14.
- 15.
- 16.
- 17.
- 18.
- 19.
- 20.
- 21.
- 22.
- 23.
- 24.
- 25.
- 26.
- 27.
- 28.
- 29.
Sequential
CIFAR 10 model 结构, 的网络结构
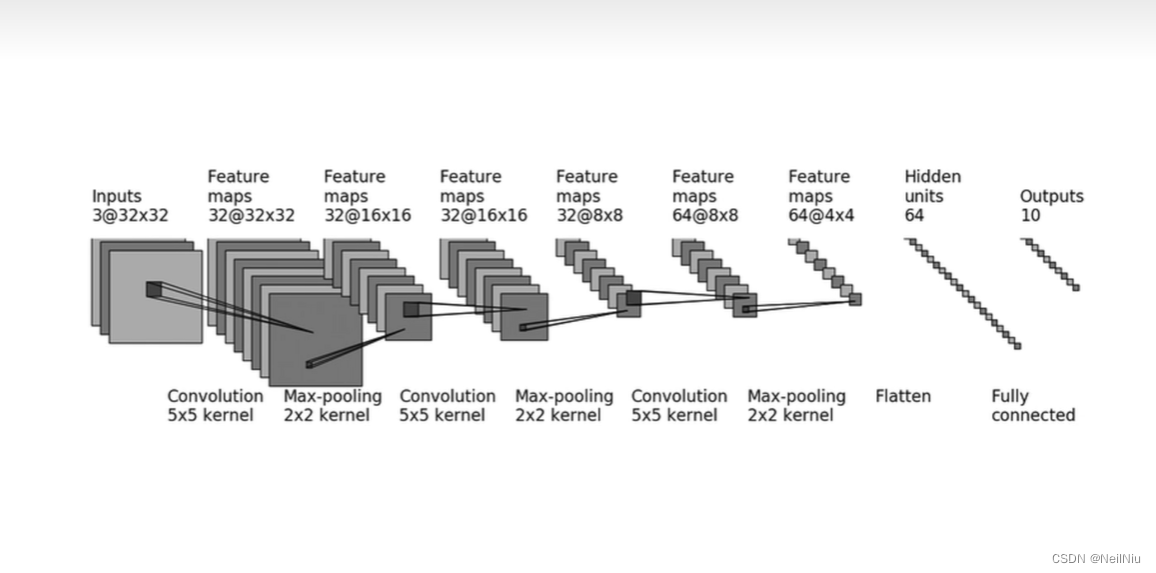

import torch
from torch import nn
from torch.nn import Conv2d, MaxPool2d, Flatten, Linear, Sequential
from torch.utils.tensorboard import SummaryWriter


class Tudui(nn.Module):
    def __init__(self):
        super(Tudui, self).__init__()
        self.model1 = Sequential(
            Conv2d(3, 32, 5, padding=2),
            MaxPool2d(2),
            Conv2d(32, 32, 5, padding=2),
            MaxPool2d(2),
            Conv2d(32, 64, 5, padding=2),
            MaxPool2d(2),
            Flatten(),
            Linear(1024, 64),
            Linear(64, 10)
        )

    def forward(self, x):
        x = self.model1(x)
        return x

tudui = Tudui()
print(tudui)
input = torch.ones((64, 3, 32, 32))
output = tudui(input)
print(output.shape)

writer = SummaryWriter("../logs_seq")
writer.add_graph(tudui, input)
writer.close()- 1.
- 2.
- 3.
- 4.
- 5.
- 6.
- 7.
- 8.
- 9.
- 10.
- 11.
- 12.
- 13.
- 14.
- 15.
- 16.
- 17.
- 18.
- 19.
- 20.
- 21.
- 22.
- 23.
- 24.
- 25.
- 26.
- 27.
- 28.
- 29.
- 30.
- 31.
- 32.
- 33.
- 34.
损失函数与反向传播
3.1 计算实际输出和目标之间的差距(损失函数)
3.2 为更新输出提供一定的依据(反向传播) grad 梯度下降
当使用反向传播的时候,每个节点,或者每个要更新的参数,都会求出一个对应的梯度,然后对参数进行优化,最终达到Loss降低的目的, 梯度下降
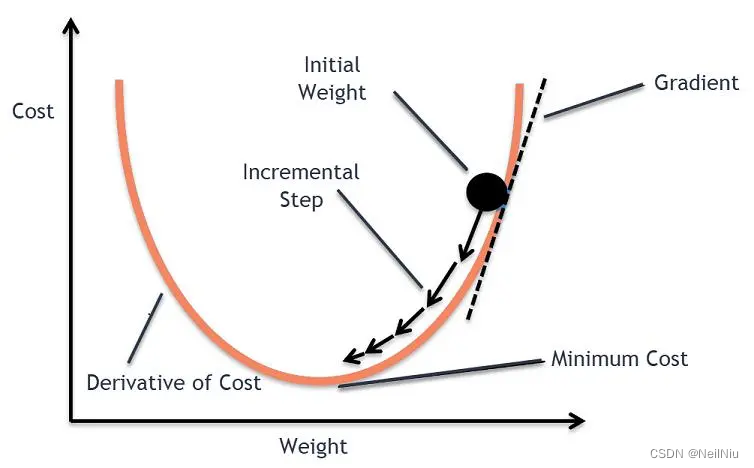
误差Loss 越小越好
Loss Function用于分析实际输出与目标之间的差距。
1、L1Loss
2、MSELoss 平方差
3、CrossEntropyLoss(交叉熵损失)
当训练分类问题的时候,
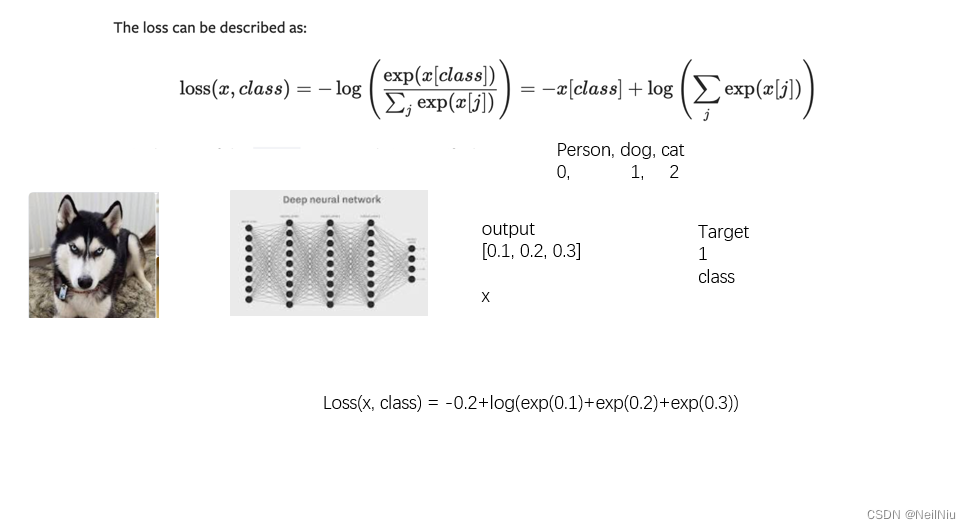
-0.2+ln(exp(0.1)+exp(0.2)+exp(0.3))
# Loss Function:(CrossEntropyLoss)https://pytorch.org/docs/stable/generated/torch.nn.CrossEntropyLoss.html#torch.nn.CrossEntropyLoss
import torch
from torch import nn


x = torch.tensor([0.1, 0.2, 0.3])
y = torch.tensor([1])
x = torch.reshape(x, (1, 3))
loss_cross = nn.CrossEntropyLoss()

result_cross = loss_cross(x, y)
print(result_cross) # tensor(1.1019)- 1.
- 2.
- 3.
- 4.
- 5.
- 6.
- 7.
- 8.
- 9.
- 10.
- 11.
- 12.
运行结果
3.4交叉熵在神经网络的运用
import torch
from torch import nn
import torchvision

# 准备数据集:
from torch.utils.data import DataLoader

dataset = torchvision.datasets.CIFAR10("./7dataset", train=False, download=True,
                                       transform=torchvision.transforms.ToTensor())
dataloader = DataLoader(dataset, batch_size=1, drop_last=True)


# 搭建神经网络:
class Model(nn.Module):
    def __init__(self):
        super(Model, self).__init__()
        self.model1 = nn.Sequential(
            nn.Conv2d(3, 32, 5, padding=2),
            nn.MaxPool2d(2),
            nn.Conv2d(32, 32, 5, padding=2),
            nn.MaxPool2d(2),
            nn.Conv2d(32, 64, 5, padding=2),
            nn.MaxPool2d(2),
            nn.Flatten(),
            nn.Linear(1024, 64),
            nn.Linear(64, 10)
        )

    def forward(self, x):
        x = self.model1(x)
        return x


if __name__ == "__main__":
    loss = nn.CrossEntropyLoss()
    model_1 = Model()
    for data in dataloader:
        imgs, targets = data
        outputs = model_1(imgs)
        result_loss = loss(outputs, targets)
        print(result_loss)   # 计算神经网络输出与实际的误差

        # 反向传播,梯度下降
        result_loss.backward()   # 能够生成梯度
print("ok")- 1.
- 2.
- 3.
- 4.
- 5.
- 6.
- 7.
- 8.
- 9.
- 10.
- 11.
- 12.
- 13.
- 14.
- 15.
- 16.
- 17.
- 18.
- 19.
- 20.
- 21.
- 22.
- 23.
- 24.
- 25.
- 26.
- 27.
- 28.
- 29.
- 30.
- 31.
- 32.
- 33.
- 34.
- 35.
- 36.
- 37.
- 38.
- 39.
- 40.
- 41.
- 42.
- 43.
- 44.
- 45.
优化器
反向传播可以求出每个需要调节的参数,每个参数对应的梯度,有了梯度就可以利用优化器,这个优化器对参数进行调整,以达到整体误差降低的目的。
Torch.optim
设置
# 官方文档:https://pytorch.org/docs/stable/optim.html
# lr(learning rate):学习速率
import torch
import torchvision
from torch import nn
from torch.utils.data import DataLoader


dataset = torchvision.datasets.CIFAR10("../7. dataset", train=False, transform=torchvision.transforms.ToTensor(),
                                       download=True)

dataloader = DataLoader(dataset, batch_size=1, drop_last=True)


class Model(nn.Module):
    def __init__(self):
        super(Model, self).__init__()
        self.model1 = nn.Sequential(
            nn.Conv2d(3, 32, 5, padding=2),
            nn.MaxPool2d(2),
            nn.Conv2d(32, 32, 5, padding=2),
            nn.MaxPool2d(2),
            nn.Conv2d(32, 64, 5, padding=2),
            nn.MaxPool2d(2),
            nn.Flatten(),
            nn.Linear(1024, 64),
            nn.Linear(64, 10)
        )

    def forward(self, x):
        x = self.model1(x)
        return x


loss = nn.CrossEntropyLoss()
model_1 = Model()

# 1. 设置优化器:(设置随机梯度下降优化器)
optim = torch.optim.SGD(model_1.parameters(), lr=0.01)  # lr不能设置得太大或太小,太大模型会不稳定,太小模型训练会很慢(推荐开始选择较大的lr,后面选择较小的lr)

for epcoh in range(5):   # 循环几次就是尽行几轮学习
    running_loss = 0.0   # 保存整体误差总和
    for data in dataloader:  # 仅进行了一轮的学习
        imgs, targets = data
        outputs = model_1(imgs)
        result_loss = loss(outputs, targets)
        optim.zero_grad()  # 2. 调用优化器,让网络中的每一个参数的梯度置零
        result_loss.backward()  # 反向传播,求出每一个节点的梯度
        optim.step()  # 3. 调用优化器,对每一个参数进行调优
        # print(result_loss)
        running_loss += result_loss   # 整体误差总和
print(running_loss)- 1.
- 2.
- 3.
- 4.
- 5.
- 6.
- 7.
- 8.
- 9.
- 10.
- 11.
- 12.
- 13.
- 14.
- 15.
- 16.
- 17.
- 18.
- 19.
- 20.
- 21.
- 22.
- 23.
- 24.
- 25.
- 26.
- 27.
- 28.
- 29.
- 30.
- 31.
- 32.
- 33.
- 34.
- 35.
- 36.
- 37.
- 38.
- 39.
- 40.
- 41.
- 42.
- 43.
- 44.
- 45.
- 46.
- 47.
- 48.
- 49.
- 50.
- 51.
- 52.
现有网络模型的使用
安装scipy
卸载了
pip uninstall scipy
pip install scipy
下载数据集ImageNet,数据集太大了
- 加载VGG模型
- pretrained=False
# 文档:https://arxiv.org/abs/1409.1556
# 官方地址:https://pytorch.org/vision/stable/models.html#classification
# 常用 VGG16 或 VGG19
# 需要安装scipy模块:pip install scipy
import torchvision.datasets

# train_data = torchvision.datasets.ImageNet("../19. dataset_image_net", split="train", download=True,
#                                            transform=torchvision.transforms.ToTensor())
# 由于ImageNet的训练数据集不被公开访问了,所以不能这样下载了(该数据集有140多G,太大了)

vgg16_false = torchvision.models.vgg16(pretrained=False)   # 加载网络模型,不会下载(等同于前面我们写的Model()网络架构) 参数是默认的参数
# vgg16_true = torchvision.models.vgg16(pretrained=True)   # 会从网上下载网络模型,参数是已经被训练好的参数
print(vgg16_false)- 1.
- 2.
- 3.
- 4.
- 5.
- 6.
- 7.
- 8.
- 9.
- 10.
- 11.
- 12.
- 13.
- pretrained=True
# 文档:https://arxiv.org/abs/1409.1556
# 官方地址:https://pytorch.org/vision/stable/models.html#classification
# 常用 VGG16 或 VGG19
# 需要安装scipy模块:pip install scipy
import torchvision.datasets

# train_data = torchvision.datasets.ImageNet("../19. dataset", split="train", download=True,
#                                            transform=torchvision.transforms.ToTensor())
# 由于ImageNet的训练数据集不被公开访问了,所以不能这样下载了(该数据集有140多G,太大了)

# vgg16_false = torchvision.models.vgg16(pretrained=False)   # 加载网络模型,不会下载(等同于前面我们写的Model()网络架构) 参数是默认的参数
vgg16_true = torchvision.models.vgg16(pretrained=True)   # 会从网上下载网络模型,参数是已经被训练好的参数
# Downloading: "https://download.pytorch.org/models/vgg16-397923af.pth" to C:\Users\lv/.cache\torch\hub\checkpoints\vgg16-397923af.pth

# print(vgg16_false)
print(vgg16_true)- 1.
- 2.
- 3.
- 4.
- 5.
- 6.
- 7.
- 8.
- 9.
- 10.
- 11.
- 12.
- 13.
- 14.
- 15.
- 16.
运行结果,从运行结果中可以看出,最后的结果可以看出,也是分类的模型,
D:\Anaconda\envs\pytorch\python.exe "C:/Users/lv/Desktop/Pytorch/1. Pytorch的使用(第一次)/src/19. VGG模型_pretrained(现有网络模型的使用).py"
Downloading: "https://download.pytorch.org/models/vgg16-397923af.pth" to C:\Users\lv/.cache\torch\hub\checkpoints\vgg16-397923af.pth
100.0%
VGG(
  (features): Sequential(
    (0): Conv2d(3, 64, kernel_size=(3, 3), stride=(1, 1), padding=(1, 1))
    (1): ReLU(inplace=True)
    (2): Conv2d(64, 64, kernel_size=(3, 3), stride=(1, 1), padding=(1, 1))
    (3): ReLU(inplace=True)
    (4): MaxPool2d(kernel_size=2, stride=2, padding=0, dilation=1, ceil_mode=False)
    (5): Conv2d(64, 128, kernel_size=(3, 3), stride=(1, 1), padding=(1, 1))
    (6): ReLU(inplace=True)
    (7): Conv2d(128, 128, kernel_size=(3, 3), stride=(1, 1), padding=(1, 1))
    (8): ReLU(inplace=True)
    (9): MaxPool2d(kernel_size=2, stride=2, padding=0, dilation=1, ceil_mode=False)
    (10): Conv2d(128, 256, kernel_size=(3, 3), stride=(1, 1), padding=(1, 1))
    (11): ReLU(inplace=True)
    (12): Conv2d(256, 256, kernel_size=(3, 3), stride=(1, 1), padding=(1, 1))
    (13): ReLU(inplace=True)
    (14): Conv2d(256, 256, kernel_size=(3, 3), stride=(1, 1), padding=(1, 1))
    (15): ReLU(inplace=True)
    (16): MaxPool2d(kernel_size=2, stride=2, padding=0, dilation=1, ceil_mode=False)
    (17): Conv2d(256, 512, kernel_size=(3, 3), stride=(1, 1), padding=(1, 1))
    (18): ReLU(inplace=True)
    (19): Conv2d(512, 512, kernel_size=(3, 3), stride=(1, 1), padding=(1, 1))
    (20): ReLU(inplace=True)
    (21): Conv2d(512, 512, kernel_size=(3, 3), stride=(1, 1), padding=(1, 1))
    (22): ReLU(inplace=True)
    (23): MaxPool2d(kernel_size=2, stride=2, padding=0, dilation=1, ceil_mode=False)
    (24): Conv2d(512, 512, kernel_size=(3, 3), stride=(1, 1), padding=(1, 1))
    (25): ReLU(inplace=True)
    (26): Conv2d(512, 512, kernel_size=(3, 3), stride=(1, 1), padding=(1, 1))
    (27): ReLU(inplace=True)
    (28): Conv2d(512, 512, kernel_size=(3, 3), stride=(1, 1), padding=(1, 1))
    (29): ReLU(inplace=True)
    (30): MaxPool2d(kernel_size=2, stride=2, padding=0, dilation=1, ceil_mode=False)
  )
  (avgpool): AdaptiveAvgPool2d(output_size=(7, 7))
  (classifier): Sequential(
    (0): Linear(in_features=25088, out_features=4096, bias=True)
    (1): ReLU(inplace=True)
    (2): Dropout(p=0.5, inplace=False)
    (3): Linear(in_features=4096, out_features=4096, bias=True)
    (4): ReLU(inplace=True)
    (5): Dropout(p=0.5, inplace=False)
    (6): Linear(in_features=4096, out_features=1000, bias=True)
  )
)

Process finished with exit code 0- 1.
- 2.
- 3.
- 4.
- 5.
- 6.
- 7.
- 8.
- 9.
- 10.
- 11.
- 12.
- 13.
- 14.
- 15.
- 16.
- 17.
- 18.
- 19.
- 20.
- 21.
- 22.
- 23.
- 24.
- 25.
- 26.
- 27.
- 28.
- 29.
- 30.
- 31.
- 32.
- 33.
- 34.
- 35.
- 36.
- 37.
- 38.
- 39.
- 40.
- 41.
- 42.
- 43.
- 44.
- 45.
- 46.
- 47.
- 48.
- 49.
- 50.
一般情况使用vgg16作为一个前置的网络结构,在vgg16后面加一些网络特征,去实现一个功能。
2. 修改VGG网络模型
# 文档:https://arxiv.org/abs/1409.1556
# 官方地址:https://pytorch.org/vision/stable/models.html#classification
# 常用 VGG16 或 VGG19
# 需要安装scipy模块:pip install scipy
import torchvision.datasets
from torch import nn

# train_data = torchvision.datasets.ImageNet("../19. dataset", split="train", download=True,
#                                            transform=torchvision.transforms.ToTensor())
# 由于ImageNet的训练数据集不被公开访问了,所以不能这样下载了(该数据集有140多G,太大了)

vgg16_false = torchvision.models.vgg16(pretrained=False)   # 加载网络模型,不会下载(等同于前面我们写的Model()网络架构) 参数是默认的参数
vgg16_true = torchvision.models.vgg16(pretrained=True)   # 会从网上下载网络模型,参数是已经被训练好的参数
# Downloading: "https://download.pytorch.org/models/vgg16-397923af.pth" to C:\Users\lv/.cache\torch\hub\checkpoints\vgg16-397923af.pth

# print(vgg16_false)
# print(vgg16_true)

train_data = torchvision.datasets.CIFAR10("../19. dataset", train=True, transform=torchvision.transforms.ToTensor(), download=True)
# 添加操作:
vgg16_true.add_module('add_linear1', nn.Linear(1000, 10))   # 添加一个线性层(添加在最后面)
# print(vgg16_true)
vgg16_true.classifier.add_module("add_linear2", nn.Linear(1000, 10))  # 添加到classifier里面
print(vgg16_true)

print(vgg16_false)
# 修改操作:
vgg16_false.classifier[6] = nn.Linear(in_features=4096, out_features=10)
print(vgg16_false)- 1.
- 2.
- 3.
- 4.
- 5.
- 6.
- 7.
- 8.
- 9.
- 10.
- 11.
- 12.
- 13.
- 14.
- 15.
- 16.
- 17.
- 18.
- 19.
- 20.
- 21.
- 22.
- 23.
- 24.
- 25.
- 26.
- 27.
- 28.
- 29.
运行结果
D:\Anaconda\envs\pytorch\python.exe "C:/Users/lv/Desktop/Pytorch/1. Pytorch的使用(第一次)/src/19. VGG模型_pretrained(现有网络模型的使用).py"
Files already downloaded and verified
VGG(
  (features): Sequential(
    (0): Conv2d(3, 64, kernel_size=(3, 3), stride=(1, 1), padding=(1, 1))
    (1): ReLU(inplace=True)
    (2): Conv2d(64, 64, kernel_size=(3, 3), stride=(1, 1), padding=(1, 1))
    (3): ReLU(inplace=True)
    (4): MaxPool2d(kernel_size=2, stride=2, padding=0, dilation=1, ceil_mode=False)
    (5): Conv2d(64, 128, kernel_size=(3, 3), stride=(1, 1), padding=(1, 1))
    (6): ReLU(inplace=True)
    (7): Conv2d(128, 128, kernel_size=(3, 3), stride=(1, 1), padding=(1, 1))
    (8): ReLU(inplace=True)
    (9): MaxPool2d(kernel_size=2, stride=2, padding=0, dilation=1, ceil_mode=False)
    (10): Conv2d(128, 256, kernel_size=(3, 3), stride=(1, 1), padding=(1, 1))
    (11): ReLU(inplace=True)
    (12): Conv2d(256, 256, kernel_size=(3, 3), stride=(1, 1), padding=(1, 1))
    (13): ReLU(inplace=True)
    (14): Conv2d(256, 256, kernel_size=(3, 3), stride=(1, 1), padding=(1, 1))
    (15): ReLU(inplace=True)
    (16): MaxPool2d(kernel_size=2, stride=2, padding=0, dilation=1, ceil_mode=False)
    (17): Conv2d(256, 512, kernel_size=(3, 3), stride=(1, 1), padding=(1, 1))
    (18): ReLU(inplace=True)
    (19): Conv2d(512, 512, kernel_size=(3, 3), stride=(1, 1), padding=(1, 1))
    (20): ReLU(inplace=True)
    (21): Conv2d(512, 512, kernel_size=(3, 3), stride=(1, 1), padding=(1, 1))
    (22): ReLU(inplace=True)
    (23): MaxPool2d(kernel_size=2, stride=2, padding=0, dilation=1, ceil_mode=False)
    (24): Conv2d(512, 512, kernel_size=(3, 3), stride=(1, 1), padding=(1, 1))
    (25): ReLU(inplace=True)
    (26): Conv2d(512, 512, kernel_size=(3, 3), stride=(1, 1), padding=(1, 1))
    (27): ReLU(inplace=True)
    (28): Conv2d(512, 512, kernel_size=(3, 3), stride=(1, 1), padding=(1, 1))
    (29): ReLU(inplace=True)
    (30): MaxPool2d(kernel_size=2, stride=2, padding=0, dilation=1, ceil_mode=False)
  )
  (avgpool): AdaptiveAvgPool2d(output_size=(7, 7))
  (classifier): Sequential(
    (0): Linear(in_features=25088, out_features=4096, bias=True)
    (1): ReLU(inplace=True)
    (2): Dropout(p=0.5, inplace=False)
    (3): Linear(in_features=4096, out_features=4096, bias=True)
    (4): ReLU(inplace=True)
    (5): Dropout(p=0.5, inplace=False)
    (6): Linear(in_features=4096, out_features=1000, bias=True)
    (add_linear2): Linear(in_features=1000, out_features=10, bias=True)
  )
  (add_linear1): Linear(in_features=1000, out_features=10, bias=True)
)
VGG(
  (features): Sequential(
    (0): Conv2d(3, 64, kernel_size=(3, 3), stride=(1, 1), padding=(1, 1))
    (1): ReLU(inplace=True)
    (2): Conv2d(64, 64, kernel_size=(3, 3), stride=(1, 1), padding=(1, 1))
    (3): ReLU(inplace=True)
    (4): MaxPool2d(kernel_size=2, stride=2, padding=0, dilation=1, ceil_mode=False)
    (5): Conv2d(64, 128, kernel_size=(3, 3), stride=(1, 1), padding=(1, 1))
    (6): ReLU(inplace=True)
    (7): Conv2d(128, 128, kernel_size=(3, 3), stride=(1, 1), padding=(1, 1))
    (8): ReLU(inplace=True)
    (9): MaxPool2d(kernel_size=2, stride=2, padding=0, dilation=1, ceil_mode=False)
    (10): Conv2d(128, 256, kernel_size=(3, 3), stride=(1, 1), padding=(1, 1))
    (11): ReLU(inplace=True)
    (12): Conv2d(256, 256, kernel_size=(3, 3), stride=(1, 1), padding=(1, 1))
    (13): ReLU(inplace=True)
    (14): Conv2d(256, 256, kernel_size=(3, 3), stride=(1, 1), padding=(1, 1))
    (15): ReLU(inplace=True)
    (16): MaxPool2d(kernel_size=2, stride=2, padding=0, dilation=1, ceil_mode=False)
    (17): Conv2d(256, 512, kernel_size=(3, 3), stride=(1, 1), padding=(1, 1))
    (18): ReLU(inplace=True)
    (19): Conv2d(512, 512, kernel_size=(3, 3), stride=(1, 1), padding=(1, 1))
    (20): ReLU(inplace=True)
    (21): Conv2d(512, 512, kernel_size=(3, 3), stride=(1, 1), padding=(1, 1))
    (22): ReLU(inplace=True)
    (23): MaxPool2d(kernel_size=2, stride=2, padding=0, dilation=1, ceil_mode=False)
    (24): Conv2d(512, 512, kernel_size=(3, 3), stride=(1, 1), padding=(1, 1))
    (25): ReLU(inplace=True)
    (26): Conv2d(512, 512, kernel_size=(3, 3), stride=(1, 1), padding=(1, 1))
    (27): ReLU(inplace=True)
    (28): Conv2d(512, 512, kernel_size=(3, 3), stride=(1, 1), padding=(1, 1))
    (29): ReLU(inplace=True)
    (30): MaxPool2d(kernel_size=2, stride=2, padding=0, dilation=1, ceil_mode=False)
  )
  (avgpool): AdaptiveAvgPool2d(output_size=(7, 7))
  (classifier): Sequential(
    (0): Linear(in_features=25088, out_features=4096, bias=True)
    (1): ReLU(inplace=True)
    (2): Dropout(p=0.5, inplace=False)
    (3): Linear(in_features=4096, out_features=4096, bias=True)
    (4): ReLU(inplace=True)
    (5): Dropout(p=0.5, inplace=False)
    (6): Linear(in_features=4096, out_features=1000, bias=True)
  )
)
VGG(
  (features): Sequential(
    (0): Conv2d(3, 64, kernel_size=(3, 3), stride=(1, 1), padding=(1, 1))
    (1): ReLU(inplace=True)
    (2): Conv2d(64, 64, kernel_size=(3, 3), stride=(1, 1), padding=(1, 1))
    (3): ReLU(inplace=True)
    (4): MaxPool2d(kernel_size=2, stride=2, padding=0, dilation=1, ceil_mode=False)
    (5): Conv2d(64, 128, kernel_size=(3, 3), stride=(1, 1), padding=(1, 1))
    (6): ReLU(inplace=True)
    (7): Conv2d(128, 128, kernel_size=(3, 3), stride=(1, 1), padding=(1, 1))
    (8): ReLU(inplace=True)
    (9): MaxPool2d(kernel_size=2, stride=2, padding=0, dilation=1, ceil_mode=False)
    (10): Conv2d(128, 256, kernel_size=(3, 3), stride=(1, 1), padding=(1, 1))
    (11): ReLU(inplace=True)
    (12): Conv2d(256, 256, kernel_size=(3, 3), stride=(1, 1), padding=(1, 1))
    (13): ReLU(inplace=True)
    (14): Conv2d(256, 256, kernel_size=(3, 3), stride=(1, 1), padding=(1, 1))
    (15): ReLU(inplace=True)
    (16): MaxPool2d(kernel_size=2, stride=2, padding=0, dilation=1, ceil_mode=False)
    (17): Conv2d(256, 512, kernel_size=(3, 3), stride=(1, 1), padding=(1, 1))
    (18): ReLU(inplace=True)
    (19): Conv2d(512, 512, kernel_size=(3, 3), stride=(1, 1), padding=(1, 1))
    (20): ReLU(inplace=True)
    (21): Conv2d(512, 512, kernel_size=(3, 3), stride=(1, 1), padding=(1, 1))
    (22): ReLU(inplace=True)
    (23): MaxPool2d(kernel_size=2, stride=2, padding=0, dilation=1, ceil_mode=False)
    (24): Conv2d(512, 512, kernel_size=(3, 3), stride=(1, 1), padding=(1, 1))
    (25): ReLU(inplace=True)
    (26): Conv2d(512, 512, kernel_size=(3, 3), stride=(1, 1), padding=(1, 1))
    (27): ReLU(inplace=True)
    (28): Conv2d(512, 512, kernel_size=(3, 3), stride=(1, 1), padding=(1, 1))
    (29): ReLU(inplace=True)
    (30): MaxPool2d(kernel_size=2, stride=2, padding=0, dilation=1, ceil_mode=False)
  )
  (avgpool): AdaptiveAvgPool2d(output_size=(7, 7))
  (classifier): Sequential(
    (0): Linear(in_features=25088, out_features=4096, bias=True)
    (1): ReLU(inplace=True)
    (2): Dropout(p=0.5, inplace=False)
    (3): Linear(in_features=4096, out_features=4096, bias=True)
    (4): ReLU(inplace=True)
    (5): Dropout(p=0.5, inplace=False)
    (6): Linear(in_features=4096, out_features=10, bias=True)
  )
)

Process finished with exit code 0- 1.
- 2.
- 3.
- 4.
- 5.
- 6.
- 7.
- 8.
- 9.
- 10.
- 11.
- 12.
- 13.
- 14.
- 15.
- 16.
- 17.
- 18.
- 19.
- 20.
- 21.
- 22.
- 23.
- 24.
- 25.
- 26.
- 27.
- 28.
- 29.
- 30.
- 31.
- 32.
- 33.
- 34.
- 35.
- 36.
- 37.
- 38.
- 39.
- 40.
- 41.
- 42.
- 43.
- 44.
- 45.
- 46.
- 47.
- 48.
- 49.
- 50.
- 51.
- 52.
- 53.
- 54.
- 55.
- 56.
- 57.
- 58.
- 59.
- 60.
- 61.
- 62.
- 63.
- 64.
- 65.
- 66.
- 67.
- 68.
- 69.
- 70.
- 71.
- 72.
- 73.
- 74.
- 75.
- 76.
- 77.
- 78.
- 79.
- 80.
- 81.
- 82.
- 83.
- 84.
- 85.
- 86.
- 87.
- 88.
- 89.
- 90.
- 91.
- 92.
- 93.
- 94.
- 95.
- 96.
- 97.
- 98.
- 99.
- 100.
- 101.
- 102.
- 103.
- 104.
- 105.
- 106.
- 107.
- 108.
- 109.
- 110.
- 111.
- 112.
- 113.
- 114.
- 115.
- 116.
- 117.
- 118.
- 119.
- 120.
- 121.
- 122.
- 123.
- 124.
- 125.
- 126.
- 127.
- 128.
- 129.
- 130.
- 131.
- 132.
- 133.
- 134.
- 135.
- 136.
- 137.
- 138.
- 139.
- 140.
- 141.
模型的保存
模型的加载
完整的模型训练套路-GPU训练
完整的模型验证套路
在看下github上
模型的保存,有两种方式
模型加载也有对应的两种方式
完整的模型验证套路


 6244
6244

 被折叠的 条评论
为什么被折叠?


