


参考 基于tensorflow的图像处理(一)TFRecord输入数据格式 - 云+社区 - 腾讯云
目录
2、tf.image.non_max_suppression
5、tf.compat.v1.image.draw_bounding_boxes
6、tf.image.resize_nearest_neighbor
一、函数列表
tensorflow提供了简单的图像处理函数,可以对图像进行预处理,可以尽量避免模型受到无关因素的影响。大部分图像识别问题中,通过图像预处理过程可以提高模型的准确率。封装在类tf.image中。tensorflow v1.8的链接为: docs/site/en/api_docs/python/tf/image at r1.8 · tensorflow/docs · GitHub
函数列表为:
- adjust_brightness(): 调整RGB或灰度图像的亮度。
- adjust_contrast(): 调整RGB或灰度图像的对比度。
- adjust_gamma(): 对输入图像执行伽玛校正。
- adjust_hue(): 调整RGB图像的色调。
- adjust_saturation(): 调整RGB图像的饱和度。
- central_crop(): 裁剪图像的中心区域。
- convert_image_dtype(): 将图像转换为dtype,如果需要可以缩放它的值。
- crop_and_resize(): 从输入的图像张量中提取作物并对其进行双线性调整(可能)。
- crop_to_bounding_box(): 将图像裁剪到指定的边框。
- decode_and_crop_jpeg(): 将图像裁剪到指定的边框。
- decode_bmp(): 将bmp编码图像的第一帧解码为uint8张量。
- decode_gif(): 将gif编码图像的第一帧解码为uint8张量。
- decode_image():
bmp、gif、jpeg的解码函数 - decode_jpeg(): 将jpeg编码的图像解码为uint8张量。
- decode_png(): 将png编码的图像解码为uint8或uint16张量。
- draw_bounding_boxes(): 在一批图像上绘制边框。
- encode_jpeg(): 在一幅图像中进行JPEG编码。
- encode_png(): 在一幅图像中进行PNG编码。
- extract_glimpse(): 从一个输入张量中提取一点点。
- extract_jpeg_shape(): 提取jpeg编码图像的形状信息。
- flip_left_right(): 水平翻转图像(从左到右)。
- flip_up_down(): 垂直翻转图片(上下颠倒)。
- grayscale_to_rgb(): 将一个或多个图像从灰度转换为RGB。
- hsv_to_rgb(): 将一个或多个图像从HSV转换为RGB。
- image_gradients(): 返回每个颜色通道的图像梯度(dy, dx)。
- is_jpeg(): 检查'内容'编码的JPEG图像。
- non_max_suppression(): 贪婪地选择按得分降序排列的边界框子集。
- pad_to_bounding_box(): 用0填充指定高度和宽度的图像。
- per_image_standardization(): 线性尺度图像具有零均值和单位范数。
- psnr(): 返回a和b之间的峰值信噪比。
- random_brightness(): 用一个随机因素调整图像的亮度。
- random_contrast(): 用随机因素调整图像的对比度。
- random_flip_left_right(): 随机水平翻转图像(从左到右)。
- random_flip_up_down(): 随机垂直翻转图像(上下颠倒)。
- random_hue(): 通过随机因素调整RGB图像的色调。
- random_saturation(): 通过随机因素调整RGB图像的饱和度。
- resize_area(): 使用面积插值调整图像的大小。
- resize_bicubic(): 使用双三次插值调整图像的大小。
- resize_bilinear(): 使用双线性插值调整图像的大小。
- resize_image_with_crop_or_pad(): 裁剪和/或将图像填充到目标宽度和高度。
- resize_images(): 使用指定的方法调整图像的大小。
- resize_nearest_neighbor(): 使用最近邻插值调整图像的大小。
- rgb_to_grayscale(): 将一个或多个图像从RGB转换为灰度。
- rgb_to_hsv(): 将一个或多个图像从RGB转换为HSV。
- rgb_to_yiq(): 将一个或多个图像从RGB转换为YIQ。
- rgb_to_yuv(): 将一个或多个图像从RGB转换为YUV。
- rot90(): 逆时针旋转图像90度。
- sample_distorted_bounding_box(): 为图像生成一个随机扭曲的边框。
- sobel_edges(): 返回一个包含索贝尔边映射的张量。
- ssim(): 计算img1和img2之间的SSIM索引。
- ssim_multiscale(): 计算img1和img2之间的MS-SSIM。
- total_variation(): 计算并返回一个或多个图像的总变化量。
- transpose_image(): 通过交换高度和宽度维度来转置图像。
- yiq_to_rgb(): 将一个或多个图像从YIQ转换为RGB。
- yuv_to_rgb(): 将一个或多个图像从YUV转换为RGB。
二、tensorflow图像处理函数
1、图像编码处理
一张RGB彩色模型的图像可以看成一个三维矩阵,矩阵中的每一个数表示了图像上不同的位置,不同颜色的亮度。然而图像在存储时并不是直接记录这些矩阵中的数字,而是记录经过压缩编码之后的结果。所以要将一张图片还原成一个三维矩阵,需要解码过程。tensorflow提供了jpeg和png格式图像的编码/解码的函数。以下代码示范了如何使用tensorflow中对jpeg格式图像进行编码/解码。
# matplotlib.pyplot是一个python的画图工具。下面的代码将使用这个工具
# 来可视化经过tensorflow处理的图像。
import matplotlib.pyplot as plt
import tensorflow as tf

# 读取图像的原始数据
image_raw_data = tf.gfile.FastGFile("/path/to/picture", 'r').read()

with tf.Session() as sess:
   # 对图像进行jpeg的格式解码从而得到图像对应的三维矩阵。tensorflow还提供了
   # tf.image.decode_png 函数对png格式的图像进行解码。解码之后的结果为一个
   # 张量,在使用它的取值之前需要明确调用运行的过程。
   img_data = tf.image.decode_jpeg(image_raw_data)

   print img_data.eval()
   # 输出解码之后的三维矩阵,上面这一行代码将输出以下内容。
   '''
   [[[165 160 138]
    ...,
    [105 140 50]
   [[166 161 139]
   ...,
   [106 139 48]]
   ...,
   [207 200 181]
   ...,
   [106 81 50]]]
 '''


 # 使用pyplot工具可视化得到的图像。
 plt.imshow(img_data.eval())
 plt.show()


 # 将表示一张图像的三维矩阵重新按照jpeg格式编码并存入文件中。打开这张图片,
 # 可以得到和原始图像一样的图像。
 encoded_image = tf.image.encode_jpeg(img_data)
 with tf.gfile.GFile("/path/to/output", "wb") as f:
    f.write(encode_image.eval())
2、图像大小调整
一般来说,网络上获取的图像大小是不固定,但神经网络输入节点的个数是固定的,所以在将图像的像素作为输入提供给神经网路之前,需要先将图像的大小统一。这就是图像大小调整需要完成的任务。图像大小调整有两种方式,第一种是通过算法使得新的图像尽量保存原始图像上的所有信息。tensorflow提供了4种不同的方法,并且将它们封装到了tf.image.resize_images函数。以下代码示范了如何使用这个函数。
# 加载原始图像,定义会话等过程和图像编码处理中代码一致,
# 假设img_data是已经解码的图像。
...
# 首先将图片数据转化为实数类型。这一步将0-255的像素值转化为 0.0-1.0 范围内的实数,
# 大多数图像处理API支持整数和实数类型的输入,如果输入是整数类型,这些API会
# 在内部将输入转化为实数后处理,再将输出转化为整数。如果有多个处理步骤,在整数和
# 实数之间的反复转化将导致精度损失,因此推进在图像处理前将其转化为实数类型。
# 下面的样例子将略去这一步骤,假设img_data是经过类型转化的图像

img_data = tf.image.convert_image_dtype(img_data, dtype=tf.float32)


# 通过tf.image.resize_images函数调整图像的大小。这个函数第一个参数为原始图像,
# 第二个和第三个参数为调整后图像的大小,method参数给出了调整图像大小的算法。
# 注意,如果输入数据时unit8格式,那么输出将是0-255内的实数,不方便后续处理。
resized = tf.image.resize_images(img_data, [300, 300], method=0)

# 通过pyplot可视化过程和图像编码处理中给出的代码一致
下表给出了tf.image.resize_images函数的method参数取值对应的图像大小调整算法。
| Method取值 | 图像大小调整算法 |
| 0 | 双线性插值(Bilinear interpolation) |
| 1 | 最邻近发(Nearest nighbor interpolation) |
| 2 | 双三次插值(Bicubic interpolation) |
| 3 | 面积插值法(Area interpolation) |
不同算法调整出来的结果会有细微差别,但不会相差太远。除了将整张图像信息完整保存,tensorflow还提供了API对图像进行剪裁或者填充。以下代码展示了通过tf.image.resize_image_with_crop_or_pad函数来调整图像大小的功能。
# 通过tf.image.resize_image_with_crop_or_pad函数调整图像的大小。这个函数的
# 第一个参数为原始图像,后面两个参数是调整后的目标图像大小。如果原始图像的尺寸大于目标
# 图像,那么这个函数会自动截取原始图像中的部分。如果目标图像
# 大于原始图像,这个函数会自动在原始图像的四周填充全0背景。因为原
# 始图像的大小为1797*2673,所以下面的第一个命令会自动剪裁,而第二个命令会自动填充。

croped = tf.image.resize_image_crop_or_pad(img_data, 1000, 1000)
padded = tf.image.resize_image_crop_or_pad(img_data, 3000, 3000)
tensorflow还支持通过比例调整图像大小,以下代码给出了一个样例。
# 通过tf.image.central_crop函数可以按比例剪裁图像。这个函数的第一个参数为原始图
# 像,第二个为调整比例,这个比例需要时一个(0,1]的实数。
central_cropped = tf.image.central_crop(img_data, 0.5)
上面介绍的图像剪切函数都是截取或者填充图像中间的部分。tensorflow也提供了tf.image.crop_to_bounding_box函数和tf.image.pad_to_bounding_box函数来剪切或者填充给定区域的图像。这两个函数都要求给出的尺寸满足一定的要求,否则程序会报错。比如在使用tf.image.crop_to_bounding_box函数时,tensorflow要求提供的图像尺寸要大于目标尺寸,也就是要求原始图像能够剪切目标图像的大小。
3、图像翻转
tensorflow提供了一些函数来支持对图像的翻转。以下代码实现了将图像上下翻转、左右翻转以及沿对角线翻转的功能。
# 将图像上下翻转
flipped = tf.image.flip_up_down(img_data)
# 将图像左右翻转
flipped = tf.image.flip_left_right(img_data)
# 将图像沿对角线
transposed = tf.image.transpose_image(img_data)
在很多图像识别问题中,图像的翻转不应该影响识别的结果。于是在训练图像识别的神经网络模型时,可以随机地翻转训练图像,这样训练得到的模型可以识别不同角度的实体。比如假设在训练模型中所有的猫头都是向右的,那么训练出来的模型就无法很好地识别猫头向左的猫。虽然这个问题可以通过收集更多的训练数据来解决,但是通过随机翻转识别训练图像的方式可以在零成本的情况下很大程度地缓解该问题。所以随机翻转训练图像时一种很常用的图像预处理方式。tensorflow提供了方便的API完成随机图像翻转的过程。
# 以50%概率上下翻转
flipped = tf.image.random_flip_up_down(img_data)
# 以50%概率左右翻转图像
flipped = tf.image.random_flip_left_right(img_data)
4、图像色彩调整
和图像翻转类似,调整图像的亮度、对比度、饱和度和色相在很多图像识别应用中都不会影响识别的结果。所以在训练神经网络模型时,可以随机调整训练图像的这些属性,从而使得到的模型尽可能小地受到无关因素的影响。tensorflow提供了调整这些色彩相关属性的API。以下代码显示了如何修改图像的亮度。
# 将图像的亮度-0.5
adjusted = tf.image.adjust_brightness(img_data, -0.5)
# 色彩调整的API可能导致像素的实数超出0.0-1.0的范围,因此在输出最终图像前需要
# 将其值截断在0.0-1.0范围区间,否则不仅图像无法正常可视化,以此为输入的神经网络
# 的训练质量也可能受到影响。
# 如果对图像进行多项处理操作,那么这一截断过程应在所有处理完成后进行。举例而言,
# 假如对图像进行多项处理操作,那么这一截断过程应当在所有处理完成后进行。举例而言。
# 假如对图像一次提高亮度和减少对比度,那么第二个操作可能将第一个操作生成的部分
# 过亮的像素回到不超过1.0的范围内,因此在第一个操作后不应该立即截断。
# 下面的样例假设截断操作在最终可视化图像前进行。
adjusted = tf.clip_by_value(adjusted, 0.0, 1.0)

# 将图像的亮度+0.5
adjuested = tf.image.adjusted_brightness(img_data, 0.5)
# 在(-max_delta, max_delta)的范围随机调整图像的亮度。
adjusted = tf.image.random_brightness(image, max_delta)
以下代码显示了如何调整图像的对比度。
# 将图像的对比度减少到0.5倍
adjusted = tf.image.adjust_contrast(img_data, 0.5)
# 将图像的对比度增加5倍
adjusted = tf.image.adjust_contrast(img_data, 5)
# 在[lower, upper]的范围随机调整图的对比度
adjusted = tf.image.random_contrast(image, lower, upper)
以下代码显示了如何调整图像的色相。
# 下面4条命令分别将色相加0.1, 0.3, 0.6和0.9
adjusted = tf.image.adjust_hue(img_data, 0.1)
adjusted = tf.image.adjust_hue(img_data, 0.3)
adjusted = tf.image.adjust_hue(img_data, 0.6)
adjusted = tf.image.adjust_hue(img_data, 0.9)
# 在[-max_delta, max_delta]的范围内随机调整图像的色相。max_delta的取值在[0, 0.5]之间
adjusted = tf.image.random_hue(image, max_delta)
以下代码显示了如何调整图像的饱和度。
# 将图像的饱和度-5
adjusted = tf.image.adjust_saturation(img_data, -5)
# 将图像的饱和度+5
adjusted = tf.image.adjust_saturation(img_data, +5)
# 在[lower, upper]的范围内随机调整图像的饱和度
adjusted = tf.images.random_satutation(image, lower, upper)
除了调整图像的亮度、对比度、饱和度和色相,tensorflow还提供API来完成图像标准化的操作。这个操作就是将图像上的亮度均值变为0,方差变为1.以下代码实现了这个功能。
# 将代表一张图像的三维矩阵中的数字均值变为0,方差变为1
adjusted = tf.image.pet_standerdization(img_data)
5、处理框标准
在很多图像识别任务的数据集中,图像中需要关注的物体通常会被标注框圈出来。tensorflow提供了一些工具来处理标注框。以下代码展示了如何通过tf.image.draw_bounding_boxes函数加入标注框。
# 将图像缩小一些,这样可视化能让标注框更加清楚。
img_data = tf.image.resize_images(img_data, [180, 26], method=1)
# tf.image.draw_bounding_boxes函数要求图像矩阵中的数字为实数,所以需要先将
# 图像转化为实数类型。tf.images.draw_bounding_boxes函数图像的输入是一个
# batch的数据,也就是多张图像组成的四维矩阵,所以需要将解码之后的图像矩阵加一维。
batched = tf.expand_dims(
          tf.images.convert_image_dtype(img_data, tf.float32), 0)
# 给出每一张图像的所有标注框。一个标注框有4个数字,分别代表[ymin, xmin, ymax, xmax]
# 注意这里给出的数字都是图像的相对位置。比如在180*267的图像中,
# [0.35, 0.47, 0.5, 0.56]代表了从(63, 125)到(90, 150)的图像。
boxes = tf.constant([[[0.05, 0.05, 0.9, 0.7], [0.35, 0.47, 0.5, 0.56]]])
result = tf.image.draw_bounding_boxes(batched, boxes)
和随机翻转图像、随机调整颜色类似,随机截取图像上有信息含量的部分也是一个提高模型健壮性(robustness)的一种方式。这样可以使训练得到的模型不受被识别物体大小的影响。以下程序中展示了如何通过tf.image.sample_distored_bounding_box函数来完成截取图像的过程。
boxes = tf.constant([[[0.05, 0.05, 0.9, 0.7],[0.35, 0.47, 0.5, 0.56]]])
# 可以通过提供标注框的方式来告诉随机截取图像的算法哪些部分是“有信息量”的
# min_object_covered=0.4 表示截取部分至少包含某个标注框40%的内容。
begin, size, bbox_for_draw = tf.image.sample_distorted_bounding_box(
   tf.shape(img_data), bounding_boxes=boxes,
   min_object_covered=0.4)
# 通过标注框可视化随机截取得到的图像。
batched = tf.expand_dims(
    tf.images.covert_image_dtype(img_data, tf.float32), 0)
image_with_box = tf.image.draw_bounding_boxes(batched, bbox_for_draw)
# 截取随机出来的图像。因为算法带有随机成分,所以
# 每次得到的结果会有所不同
distorted_image = tf.slice(img_data, begin, size)
三、图像预处理完整样例
在解决真实的图像识别问题时,一般同时使用多种处理方法。这节将给出一个完整的样例程序展示如何将不同的图像处理函数结合成一个完成了从图像片段截取,到图像大小调整再到图像翻转及色彩调整的整个图像预处理过程。
import tensorflow as tf
import numpy as np
from matplotlib import pyplot as plt
# 给定一张图像,随机调整图像的色彩。因为调整亮度、对比度、饱和度和色相的顺序会影
# 响最后得到的结果,所以可以定义多种不同的顺序。具体使用哪一种顺序可以在训练
# 数据预处理时随机地选择一种。这样可以进一步降低无关因素对模型的影响。
def distort_color(image, color_ordering=0):
if color_ordering == 0:
image = tf.image.random_brightness(image, max_delta=32. / 255.)
image = tf.image.random_saturation(image, lower=0.5, upper=1.5)
image = tf.image.random_hue(image, max_delta=0.2)
image = tf.image.random_contrast(image, lower=0.5, upper=1.5)
elif color_ordering == 1:
image = tf.image.random_saturation(image, lower=0.5, upper=1.5)
image = tf.image.random_brightness(image, max_delta=32. / 255.)
image = tf.image.random_contrast(image, lower=0.5, upper=1.5)
image = tf.image.random_hue(image, max_delta=0.2)
elif color_ordering == 2:
# 还可以定义其他的排列,但在这里就不再一一列出。
...
return tf.clip_by_value(image, 0.0, 1.0)
# 给定一张解码后的图像、目标图像的尺寸以及图像上的标注框,此函数可以对给出的图像进行预
# 处理。这个函数的输入图像时图像识别问题中原始的训练图像,而输出则是神经网络模型的输入
# 层。注意这里只处理模型的训练数据,对于预测的数据,一般不需要随机变换的步骤。
def preprocess_for_train(image, height, width, bbox):
# 如果没有提供标注框,则认为整个图像就是需要关注的部分。
if bbox is None:
bbox = tf.constant([0.0, 0.0, 1.0, 1.0], dtype=tf.float32, shape=[1, 1, 4])
# 转换图像张量的类型。
if image.dtype != tf.float32:
image = tf.image.convert_image_dtype(image, dtype=tf.float32)
# 随机截取图像,减少需要关注的物体大小对图像识别算法的影响。
bbox_begin, bbox_size, _ = tf.image.sample_distorted_bounding_box(
tf.shape(image), bounding_boxes=bbox)
distorted_image = tf.slice(image, bbox_begin, bbox_size)
# 将随机截取的图像调整为神经网络输入层的大小。大小调整的算法是随机选择的。
distorted_image = tf.image.resize_images(
distorted_image, [height, width], method=np.random.randint(2))
# 随机左右翻转图像。
distorted_image = tf.image.random_flip_left_right(distorted_image)
# 使用一种随机的顺序调整图像色彩。
distorted_image = distort_color(distorted_image, np.random.randint(2))
return distorted_image
image_raw_data = tf.gfile.FastGFile("timg.jpeg", "rb").read()
with tf.Session() as sess:
img_data = tf.image.decode_jpeg(image_raw_data)
boxes = tf.constant([[[0.05, 0.05, 0.9, 0.7], [0.35, 0.47, 0.5, 0.56]]])
# 运行6次获得6种不同的图像
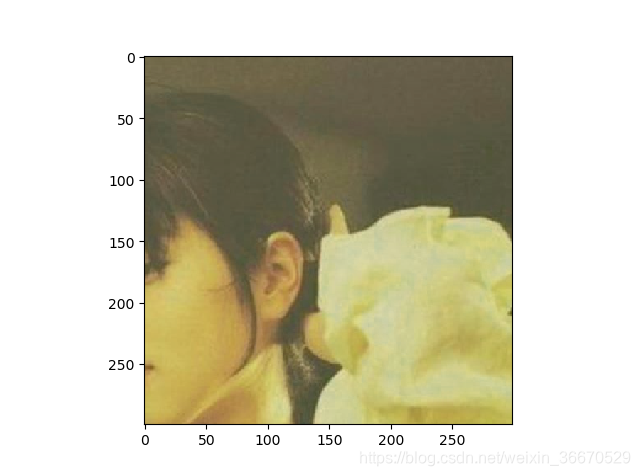
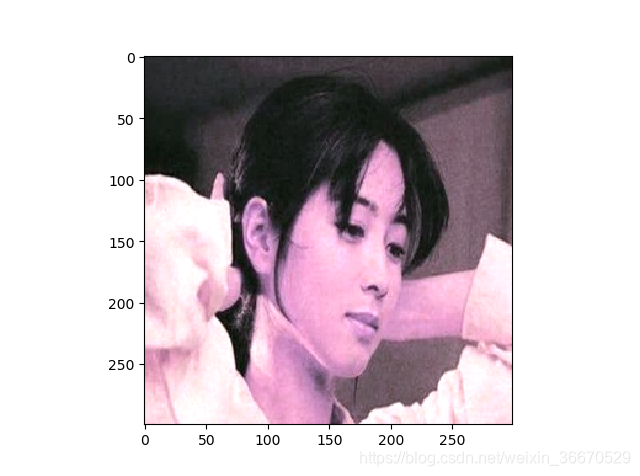
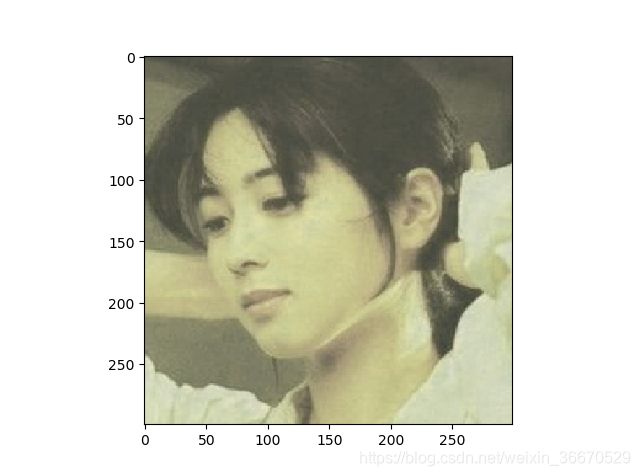
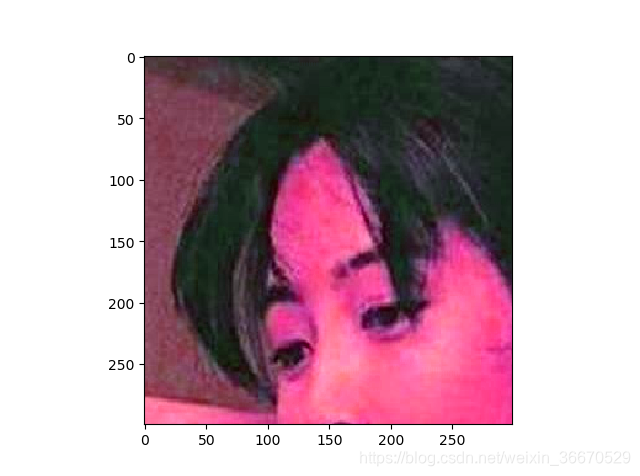
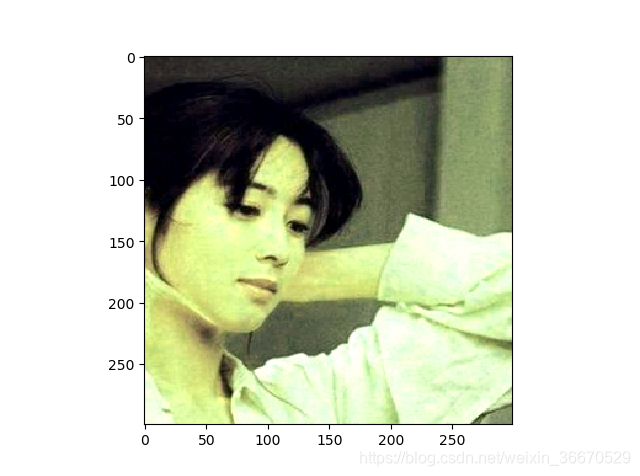
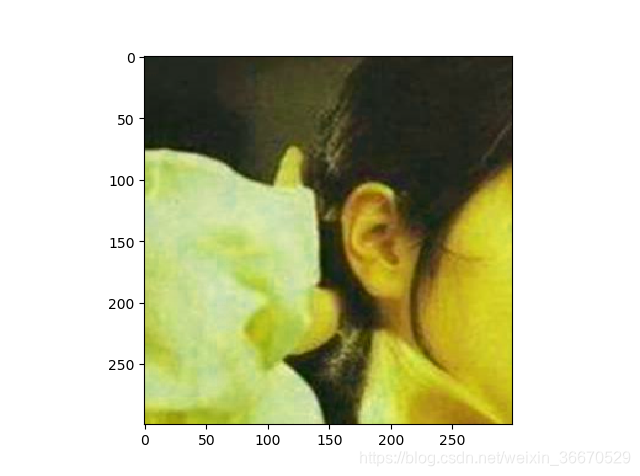
for i in range(6):
# 将图像的尺寸调整为299*299
result = preprocess_for_train(img_data, 299, 299, boxes)
plt.imshow(result.eval())
plt.show()运行结果为:
四、重要的API
1、tf.image.resize_bilinear
tf.image.resize_bilinear(
    images,
    size,
    align_corners=False,
    name=None
)
使用双线性插值调整图像的大小。输入图像可以是不同的类型,但是输出图像总是浮动的。
参数:
- images: 一个张量。必须是下列类型之一:int8、uint8、int16、uint16、int32、int64、bfloat16、half、float32、float64。4-D带形状[批次、高度、宽度、通道]。
- size: 一个包含2个元素的一维int32张量:new_height, new_width。图像的新大小。
- align_corners: 可选的bool。默认值为False。如果为真,则输入和输出张量的4个角像素的中心对齐,保留角像素处的值。默认值为false。
- name: 操作的名称(可选)。
返回值:
- 类型为float32的张量。
2、tf.image.non_max_suppression
tf.image.non_max_suppression(
    boxes,
    scores,
    max_output_size,
    iou_threshold=0.5,
    score_threshold=float('-inf'),
    name=None
)
贪婪地选择按得分降序排列的边界框子集。删除与先前选择的框具有高交叉-过度联合(IOU)重叠的框。边界框以[y1, x1, y2, x2]的形式提供,其中(y1, x1)和(y2, x2)为任意对角对角框角的坐标,坐标可以标准化(即,位于区间[0,1]或绝对区间。注意,这个算法不知道原点在坐标系中的什么位置。注意,这个算法对于坐标系的正交变换和平移是不变的;因此,坐标系统的平移或反射会导致算法选择相同的框。这个操作的输出是一组整数,索引到表示所选框的边界框的输入集合中。使用tf.gather operation可以获得所选索引对应的边界框坐标。例如:elected_indices = tf.image.non_max_suppression( boxes, scores, max_output_size, iou_threshold) selected_boxes = tf.gather(boxes, selected_indices)
参数:
- box: 形状的二维浮点张量[num_boxes, 4]。
scores: 形状[num_boxes]的一维浮点张量,表示每个盒子(每行盒子)对应的单个分数。- max_output_size: 一个标量整数张量,表示要通过非max抑制选择的最大框数。
- iou_threshold: 一个浮点数,表示判断框是否与IOU重叠过多的阈值。
- score_threshold: 一个浮点数,表示根据分数决定何时删除框的阈值。
- name: 操作的名称(可选)。
返回值:
- selected_indices:形状[M]的一维整数张量,表示从box张量中选择的指标,其中M <= max_output_size。
3、tf.image.crop_and_resize
tf.image.crop_and_resize(
    image,
    boxes,
    box_ind,
    crop_size,
    method='bilinear',
    extrapolation_value=0,
    name=None
)
从输入图像张量中提取作物并调整它们的大小。从输入图像张量中提取crop,并使用双线性抽样或最近邻抽样(可能具有长宽比变化)将其调整为crop_size指定的公共输出大小。这比crop_to_bounding_box op更通用,crop_to_bounding_box op从输入图像中提取固定大小的切片,并且不允许调整大小或更改长宽比。
返回一个张量,其中包含从输入图像中定义在框中的边界框位置的位置的crop。裁剪后的框都被调整大小(使用双线性插值或最近邻插值)为固定大小= [crop_height, crop_width]。结果是一个4-D张量[num_boxes, crop_height, crop_width, depth]。调整大小是角对齐的。特别是,如果box =[[0,0,1,1]],该方法将给出与使用tf.image.resize_bilinear()或tf.image.resize_nearest_neighbor()(取决于方法参数)相同的结果,且align_corners=True。
参数:
image: 一个张量。必须是以下类型之一:uint8、uint16、int8、int16、int32、int64、half、float32、float64。形状的4-D张量[批量,图像高度,图像宽度,深度]。image_height和image_width都需要为正。- boxes: 类型为float32的张量。形状的二维张量[num_boxes, 4]。张量的第i行指定box_ind[i]图像中的一个框的坐标,并在规范化坐标[y1, x1, y2, x2]中指定。将y的一个归一化坐标值映射到y * (image_height - 1)处的图像坐标,从而将归一化图像高度的[0,1]区间映射到图像高度坐标中的[0,image_height - 1]。允许y1 > y2,在这种情况下,采样的crop是原始图像的上下翻转版本。宽度维度处理类似。允许使用[0,1]范围之外的规范化坐标,在这种情况下,使用外推_value来推断输入图像值。
box_ind:int32型张量。形状[num_boxes]的一维张量,int32值在[0,batch]中。box_ind[i]的值指定第i个框所引用的图像。- crop_size: int32类型的张量。一个包含两个元素的一维张量,大小= [crop_height, crop_width]。所有裁剪后的图像补丁都调整为这个大小。不保留图像内容的纵横比。crop_height和crop_width都需要为正。
method: 从“双线性”、“最近”中选择一个字符串。默认为“双线性”。指定用于调整大小的抽样方法的字符串。它可以是“双线性”或“最近的”,默认为“双线性”。目前支持两种抽样方法:双线性抽样和最近邻抽样。extrapolation_value:一个可选的浮点数。默认值为0。适用时用于外推的值。- name: 操作的名称(可选)。
返回值:
- 类型为float32的张量。
4、tf.image.flip_left_right()
输出沿宽度维翻转的图像内容。
参数:
- image:[批次,高度,宽度,通道]形状的4-D张量或[高度,宽度,通道]形状的3-D张量
返回值:
- 与图象类型和形状相同的张量
可能产生的异常值:
ValueError: if the shape ofimagenot supported.
5、tf.compat.v1.image.draw_bounding_boxes
Draw bounding boxes on a batch of images.
tf.compat.v1.image.draw_bounding_boxes(
    images,
    boxes,
    name=None,
    colors=None
)
Outputs a copy of images but draws on top of the pixels zero or more bounding boxes specified by the locations in boxes. The coordinates of the each bounding box in boxes are encoded as [y_min, x_min, y_max, x_max]. The bounding box coordinates are floats in [0.0, 1.0] relative to the width and height of the underlying image.For example, if an image is 100 x 200 pixels (height x width) and the bounding box is [0.1, 0.2, 0.5, 0.9], the upper-left and bottom-right coordinates of the bounding box will be (40, 10) to (180, 50) (in (x,y) coordinates).Parts of the bounding box may fall outside the image.
Args:
images: ATensor. Must be one of the following types:float32,half. 4-D with shape[batch, height, width, depth]. A batch of images.boxes: ATensorof typefloat32. 3-D with shape[batch, num_bounding_boxes, 4]containing bounding boxes.name: A name for the operation (optional).
Returns:
- A
Tensor. Has the same type asimages.
6、tf.image.resize_nearest_neighbor
tf.image.resize_nearest_neighbor(
    images,
    size,
    align_corners=False,
    name=None
)
Defined in generated file: tensorflow/python/ops/gen_image_ops.py.
See the guide: Images > Resizing
Resize images to size using nearest neighbor interpolation.
Args:
images: ATensor. Must be one of the following types:int8,uint8,int16,uint16,int32,int64,half,float32,float64. 4-D with shape[batch, height, width, channels].size: A 1-D int32 Tensor of 2 elements:new_height, new_width. The new size for the images.align_corners: An optionalbool. Defaults toFalse. If true, the centers of the 4 corner pixels of the input and output tensors are aligned, preserving the values at the corner pixels. Defaults to false.name: A name for the operation (optional).
Returns:
- A
Tensor. Has the same type asimages.
7、tf.image.resize_images
Resize images to size using the specified method.
Aliases:
tf.image.resize_images(
    images,
    size,
    method=ResizeMethodV1.BILINEAR,
    align_corners=False,
    preserve_aspect_ratio=False,
    name=None
)
Resized images will be distorted if their original aspect ratio is not the same as size. To avoid distortions see tf.compat.v1.image.resize_image_with_pad.
method can be one of:
- ResizeMethod.BILINEAR: Bilinear interpolation.
- ResizeMethod.NEAREST_NEIGHBOR: Nearest neighbor interpolation.
- ResizeMethod.BICUBIC: Bicubic interpolation.
- ResizeMethod.AREA: Area interpolation.
The return value has the same type as images if method is ResizeMethod.NEAREST_NEIGHBOR. It will also have the same type as images if the size of images can be statically determined to be the same as size, because images is returned in this case. Otherwise, the return value has type float32.
Args:
images: 4-D Tensor of shape[batch, height, width, channels]or 3-D Tensor of shape[height, width, channels].size: A 1-D int32 Tensor of 2 elements:new_height, new_width. The new size for the images.method: ResizeMethod. Defaults to ResizeMethod.BILINEAR.align_corners: bool. If True, the centers of the 4 corner pixels of the input and output tensors are aligned, preserving the values at the corner pixels. Defaults toFalse.preserve_aspect_ratio: Whether to preserve the aspect ratio. If this is set, thenimageswill be resized to a size that fits insizewhile preserving the aspect ratio of the original image. Scales up the image ifsizeis bigger than the current size of theimage. Defaults to False.name: A name for this operation (optional).
Raises:
ValueError: if the shape ofimagesis incompatible with the shape arguments to this functionValueError: ifsizehas invalid shape or type.ValueError: if an unsupported resize method is specified.
Returns:
- If
imageswas 4-D, a 4-D float Tensor of shape[batch, new_height, new_width, channels]. Ifimageswas 3-D, a 3-D float Tensor of shape[new_height, new_width, channels].


 460
460

 被折叠的 条评论
为什么被折叠?
被折叠的 条评论
为什么被折叠?
 到【灌水乐园】发言


