


deep_ocr_recognition_training_workflow.hdev
*深度学习OCR识别训练工作过程:
-
这个例子是用来表征如何用自定义数据去训练识别一个深度学习的OCR模型
*请注意,Halcon操作参考手册包含了有用的额外信息:
*Halcon操作参考手册 -> OCR -> 深度OCR
准备
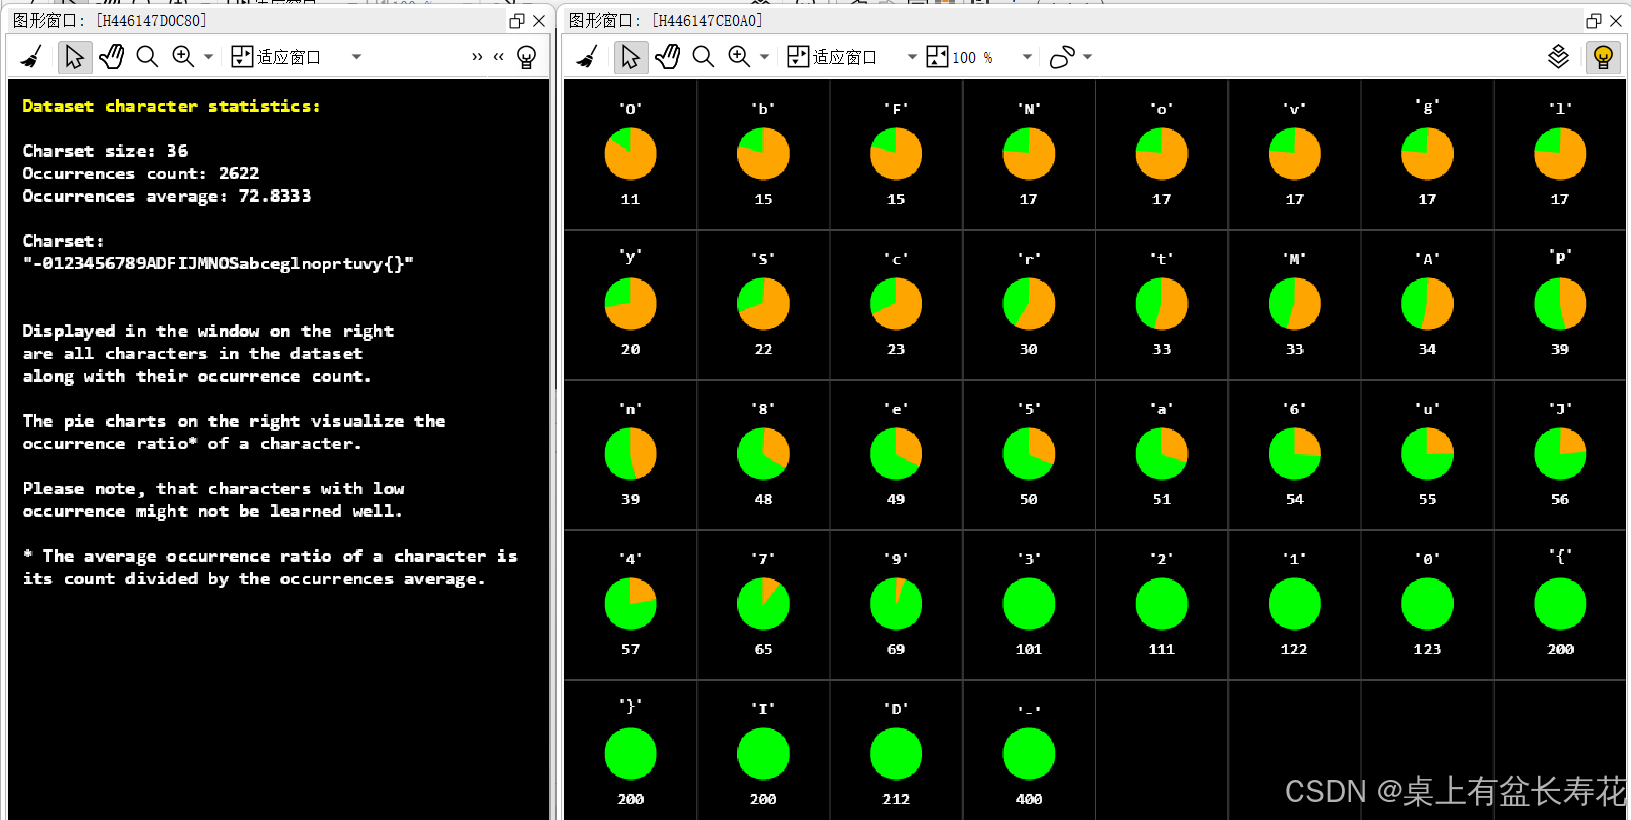
显示几个样本信息:
显示统计信息:
preprocess_dl_dataset
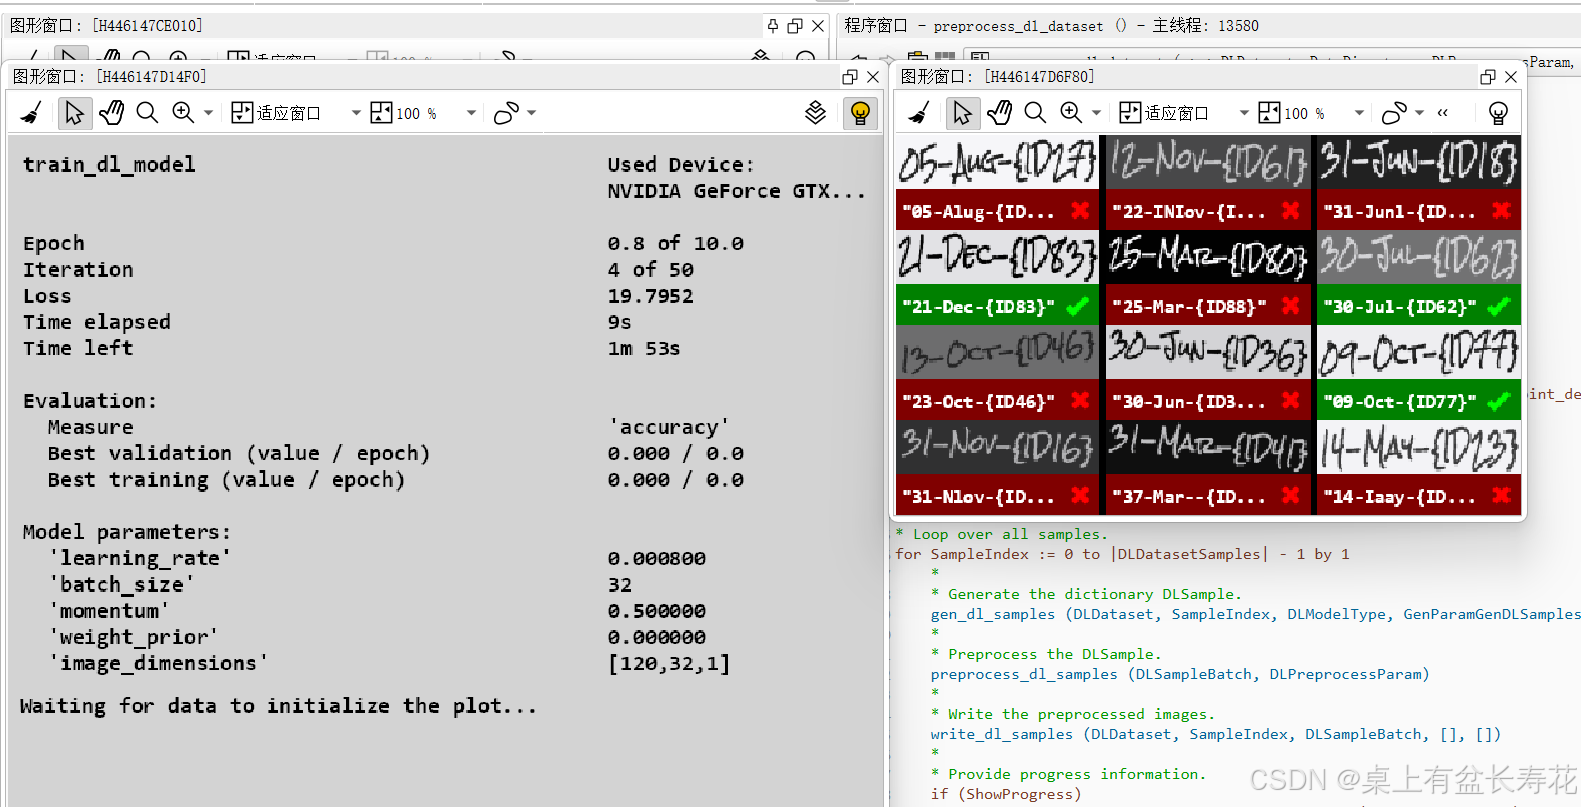
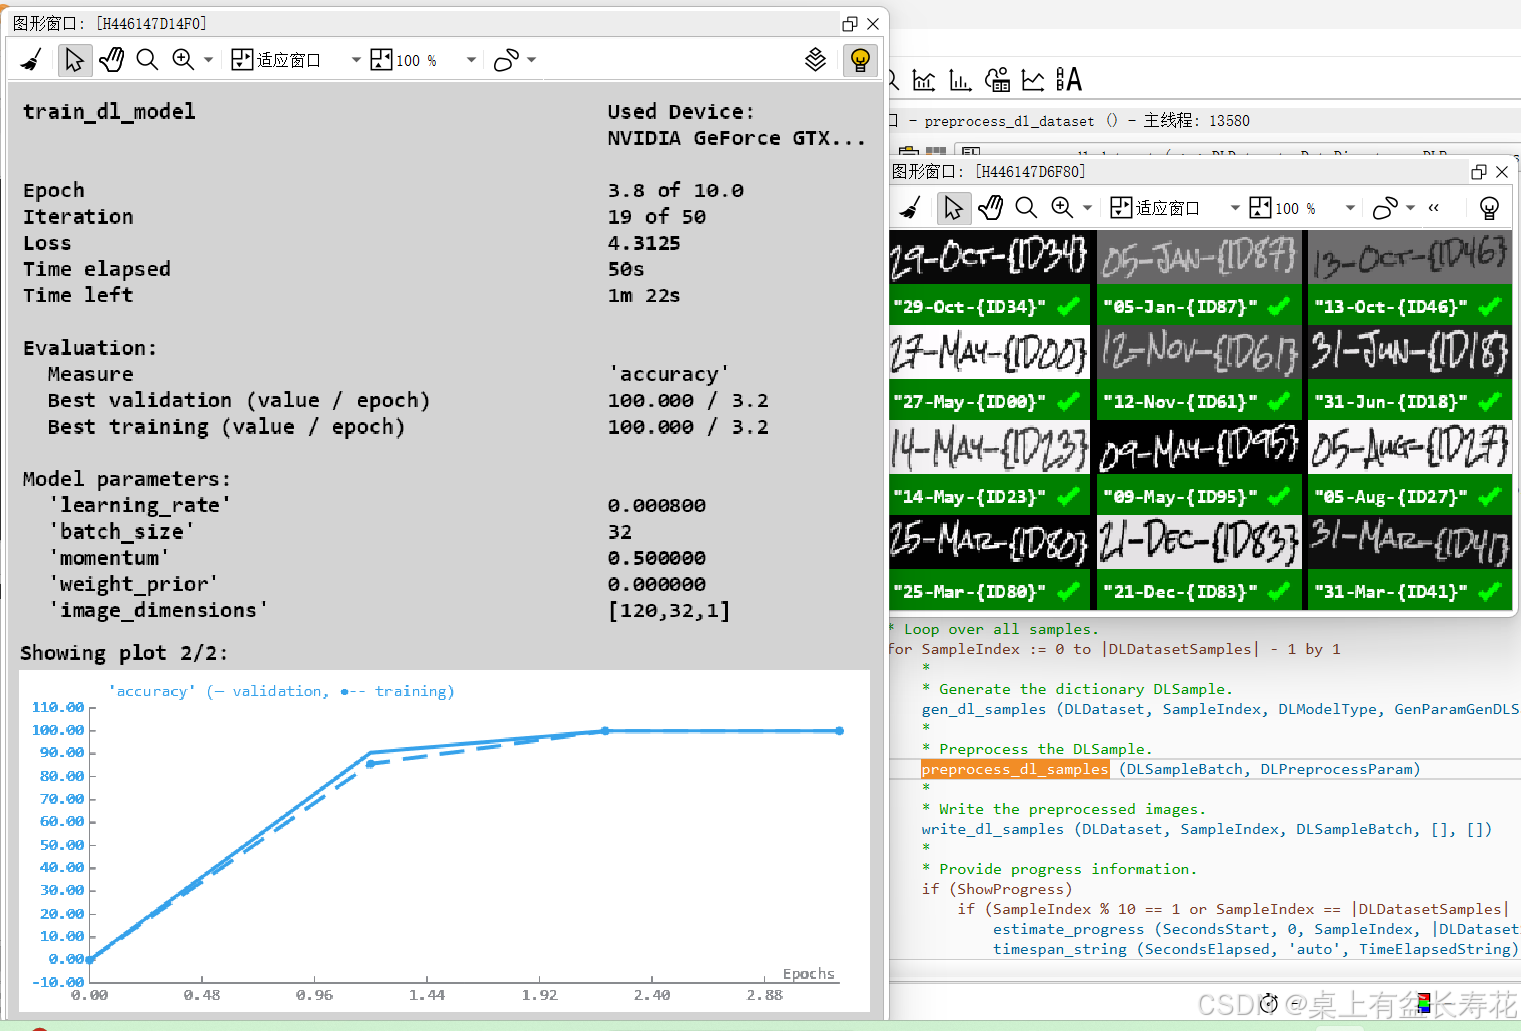
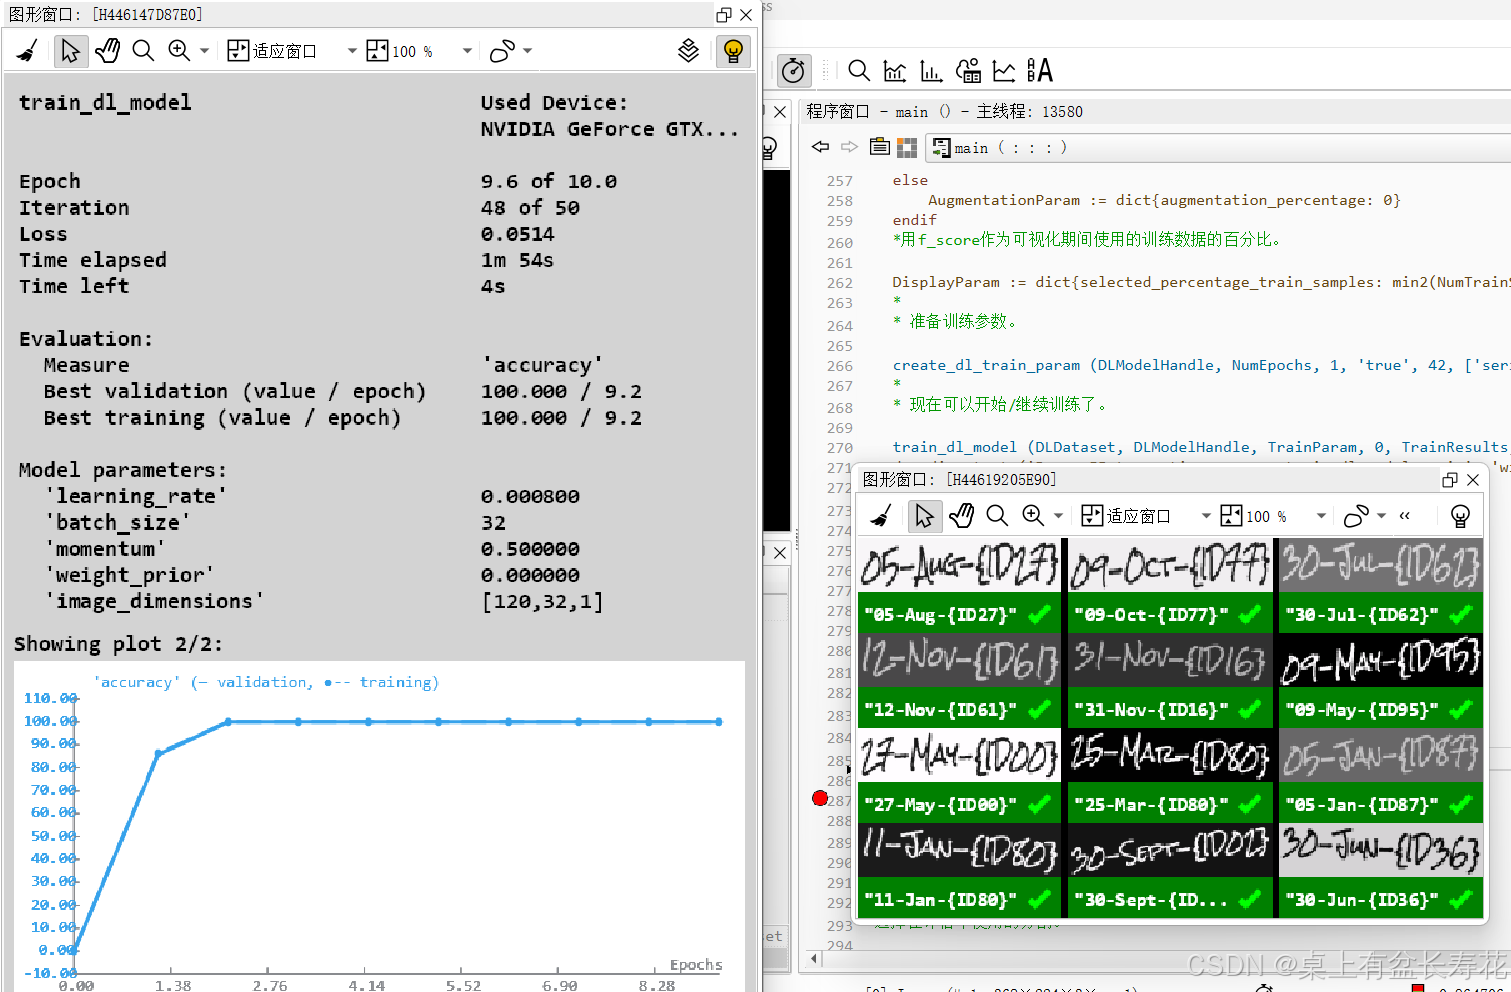
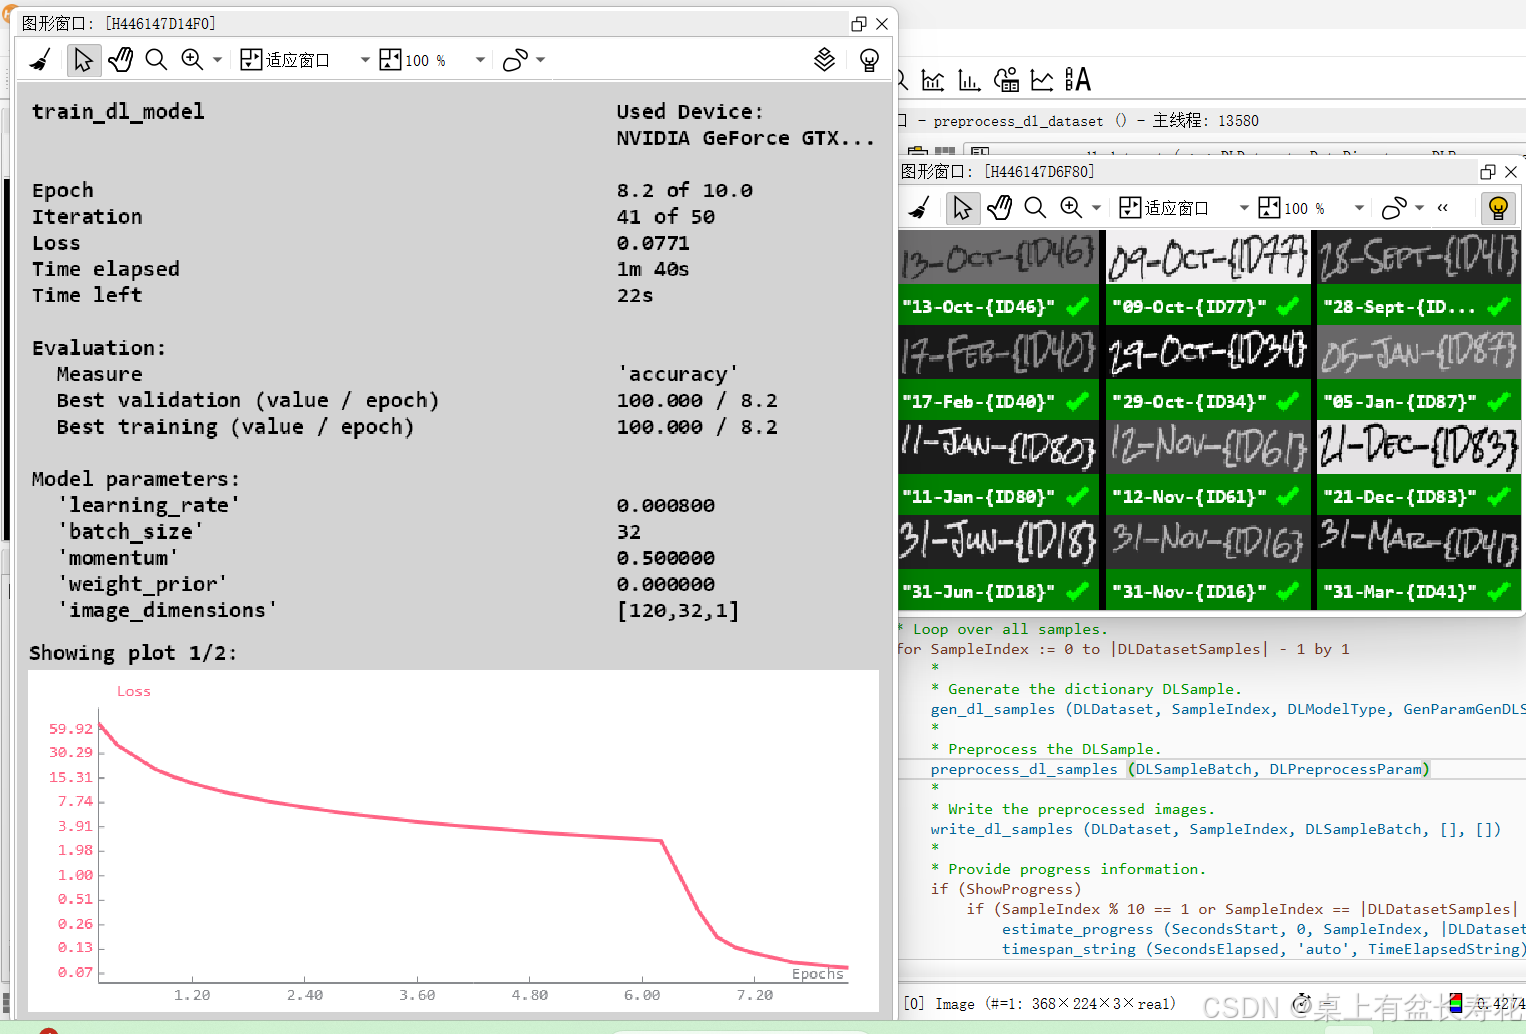
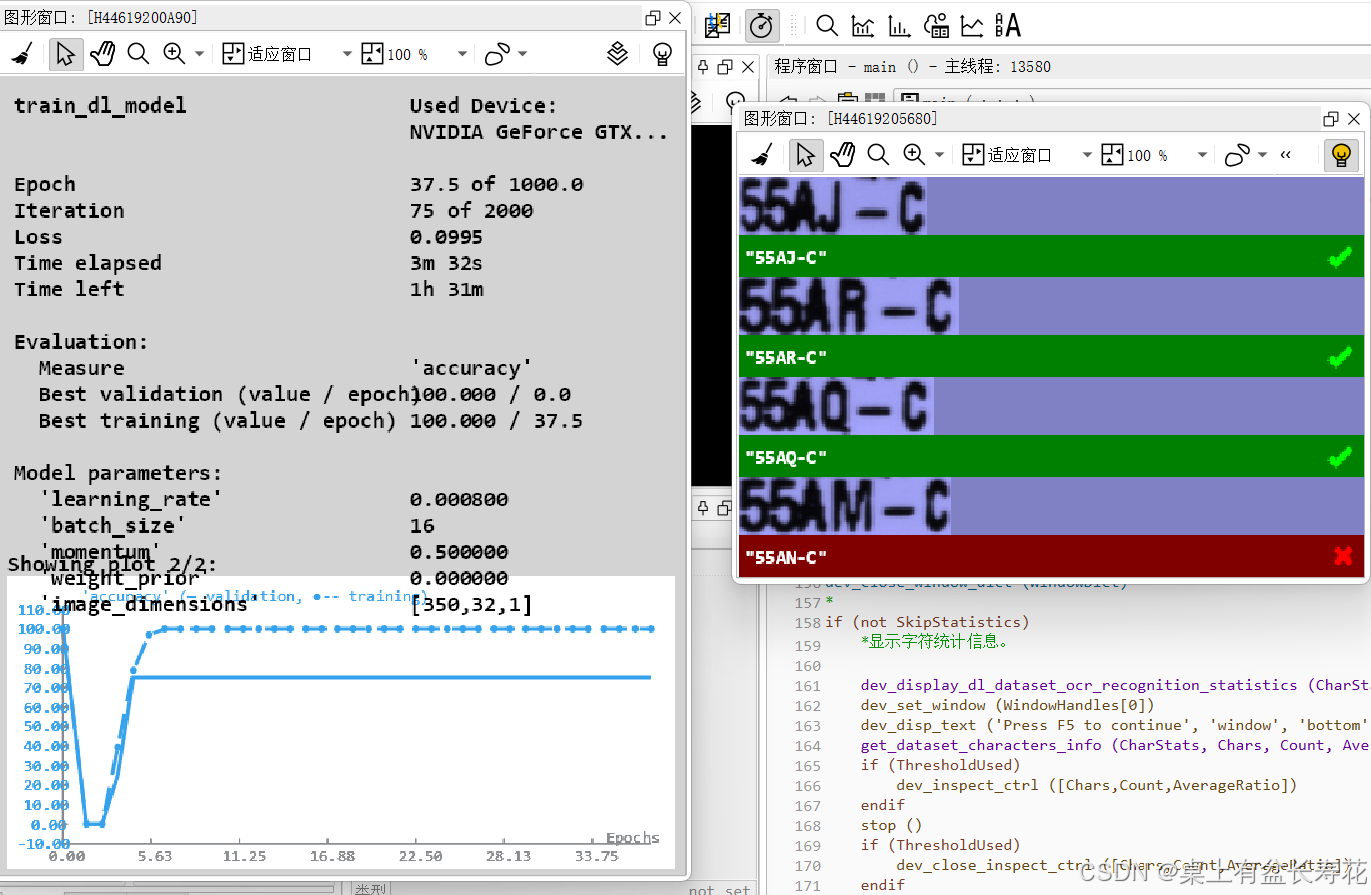
训练

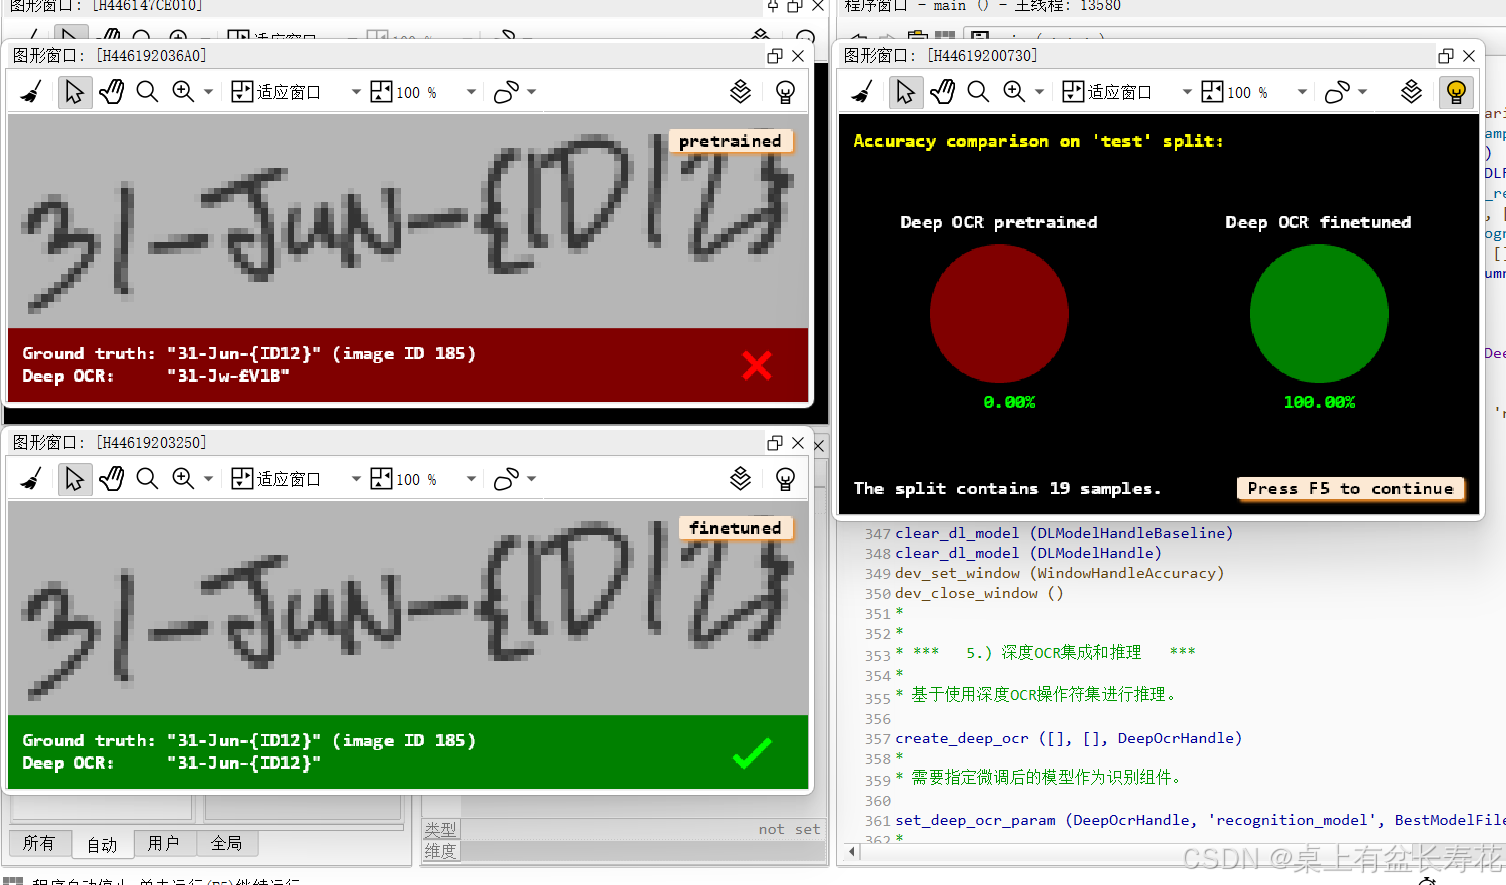
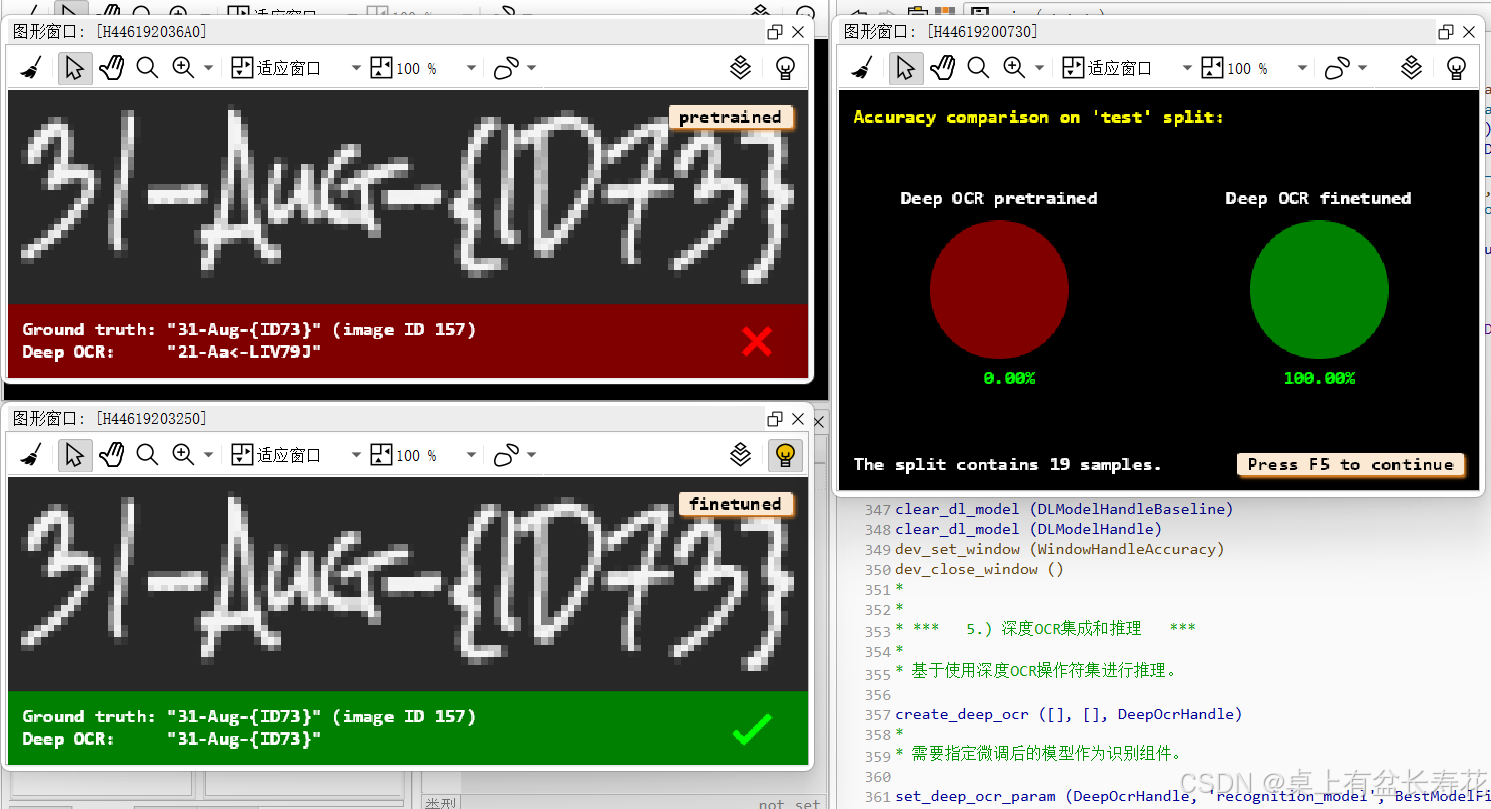
比较微调模型和基线模型
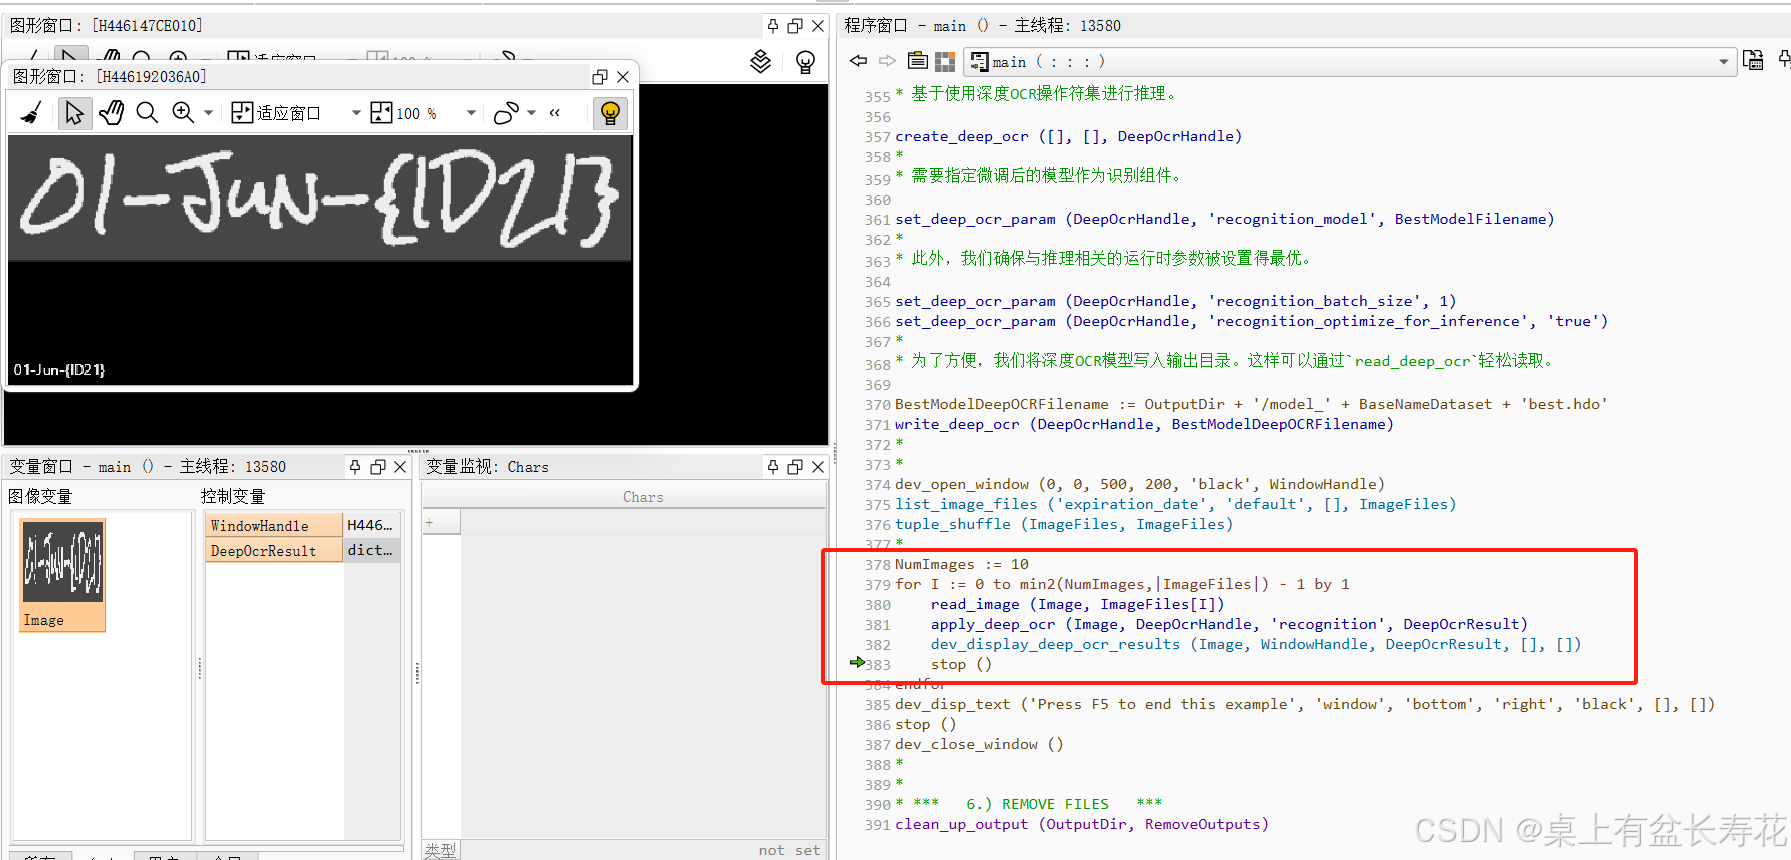
深度OCR集成和推理
如何自己使用????
可以自己用的:
首先,需要一个hdict文件
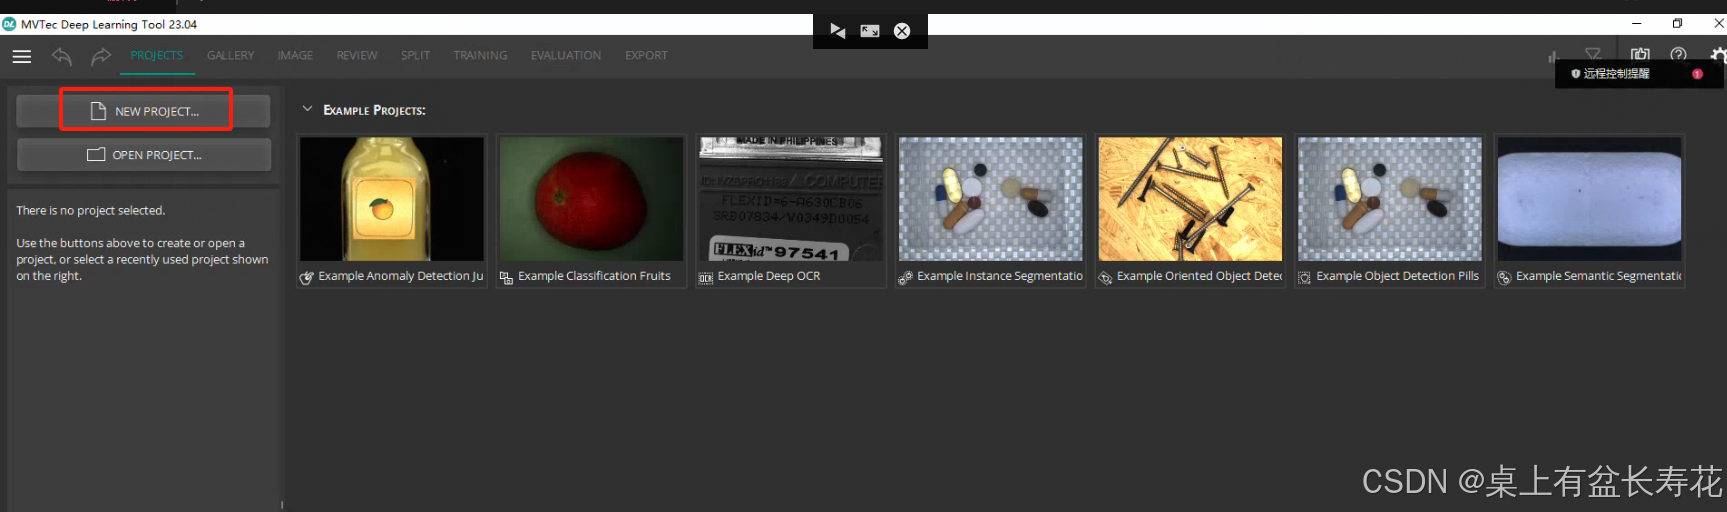
打标软件是MVTec Deep Learning Tool (DLT),可以从MVTec官网免费下载。
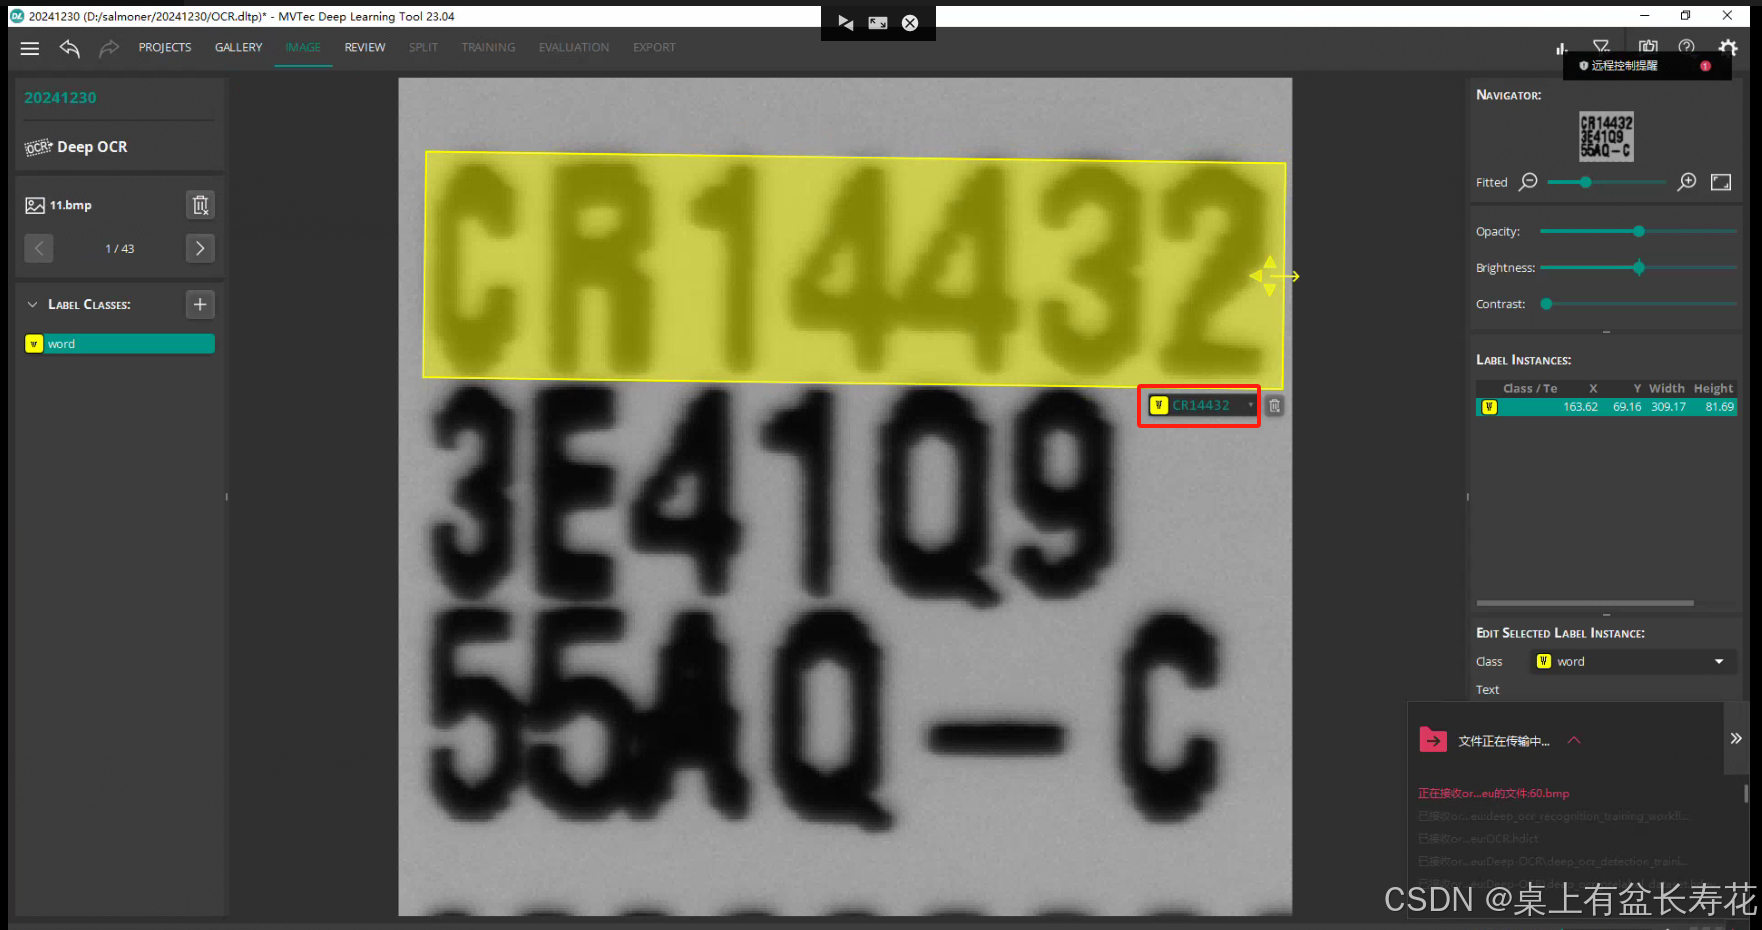
打标软件使用过程:
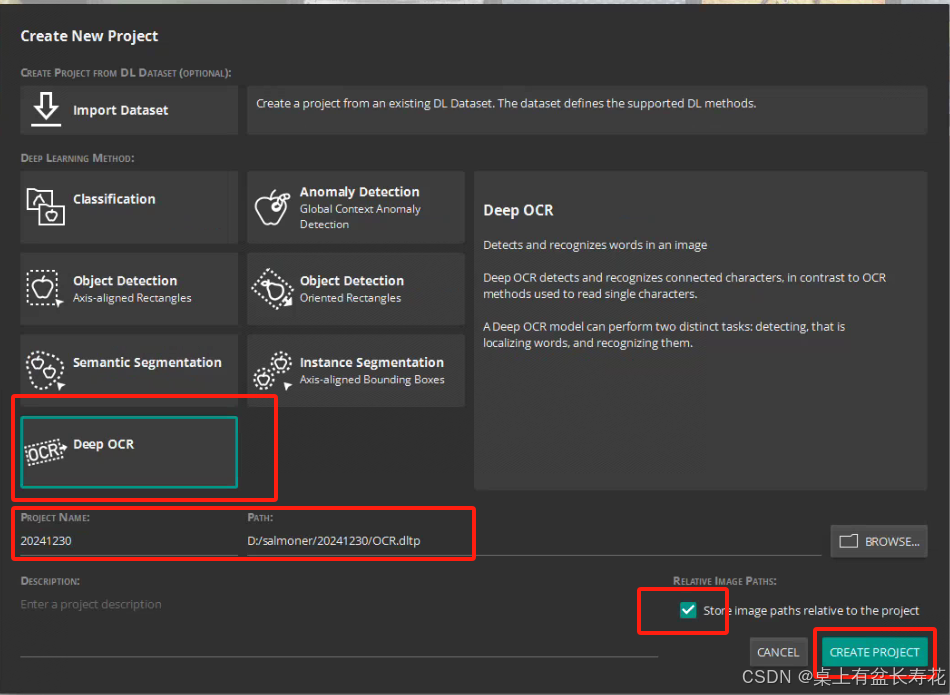
调整语言设置,新建项目选择deepocr。
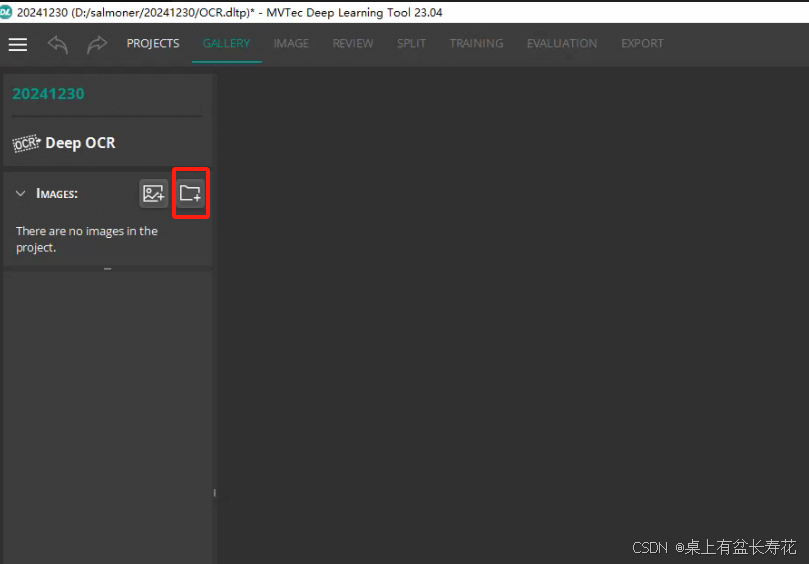
添加图像,点击“图像”,切换到打标流程。
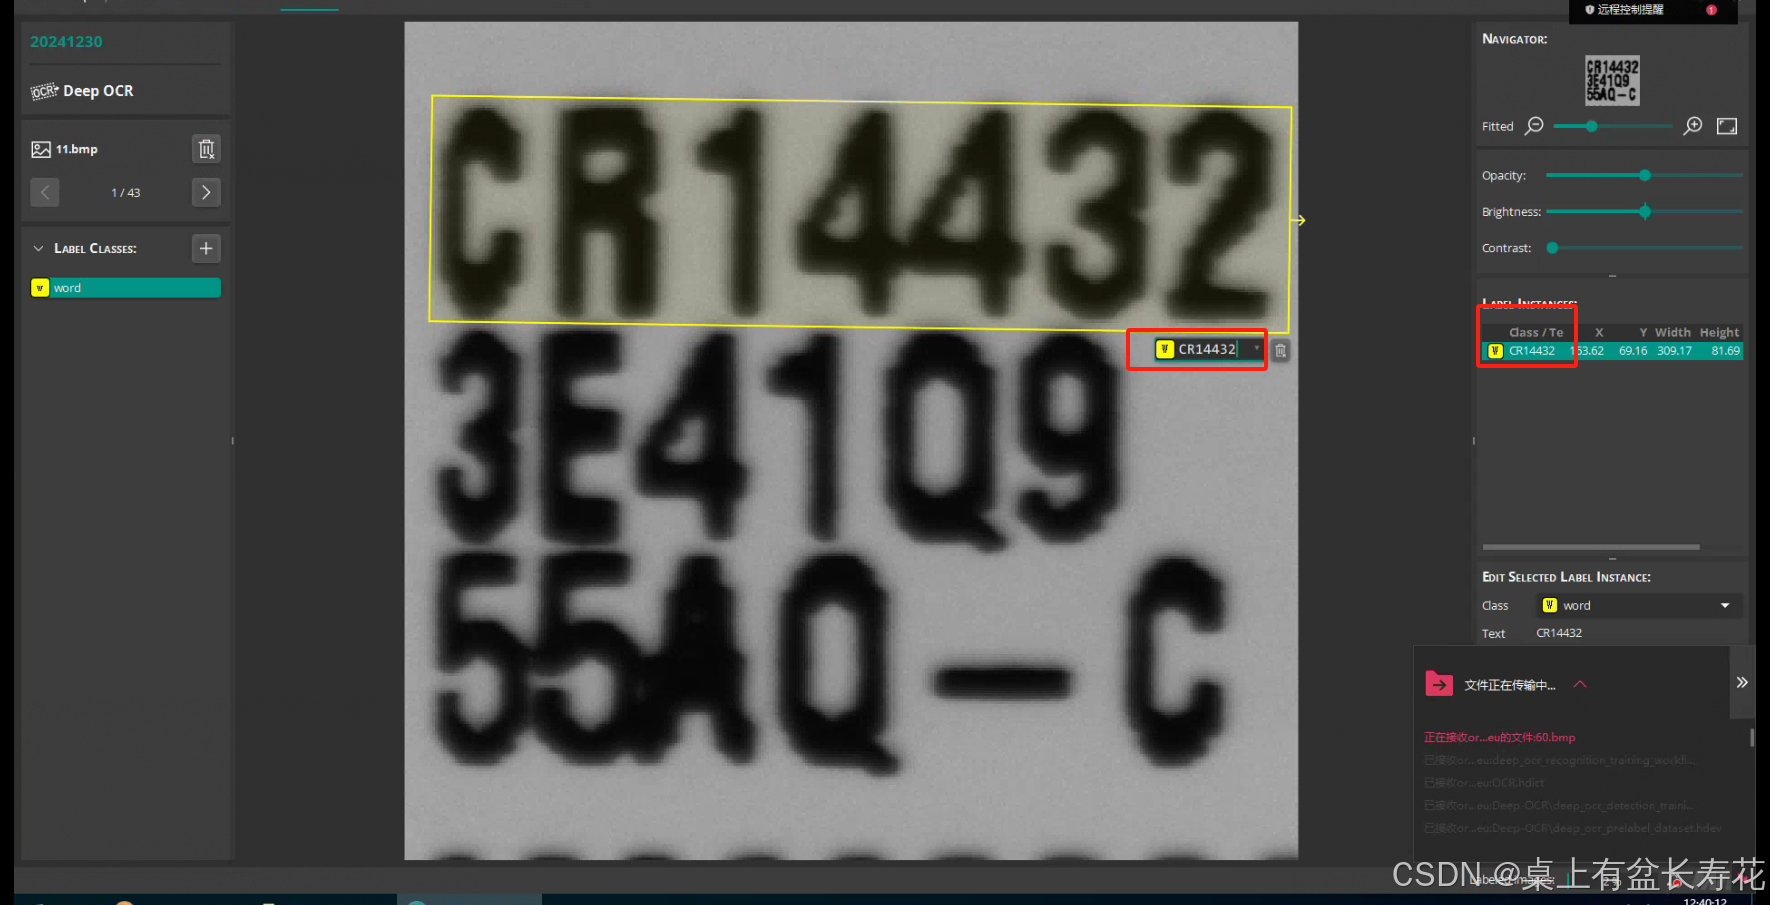
使用鼠标拉出框选区域,软件会自动识别结果,根据实际情况调整结果。
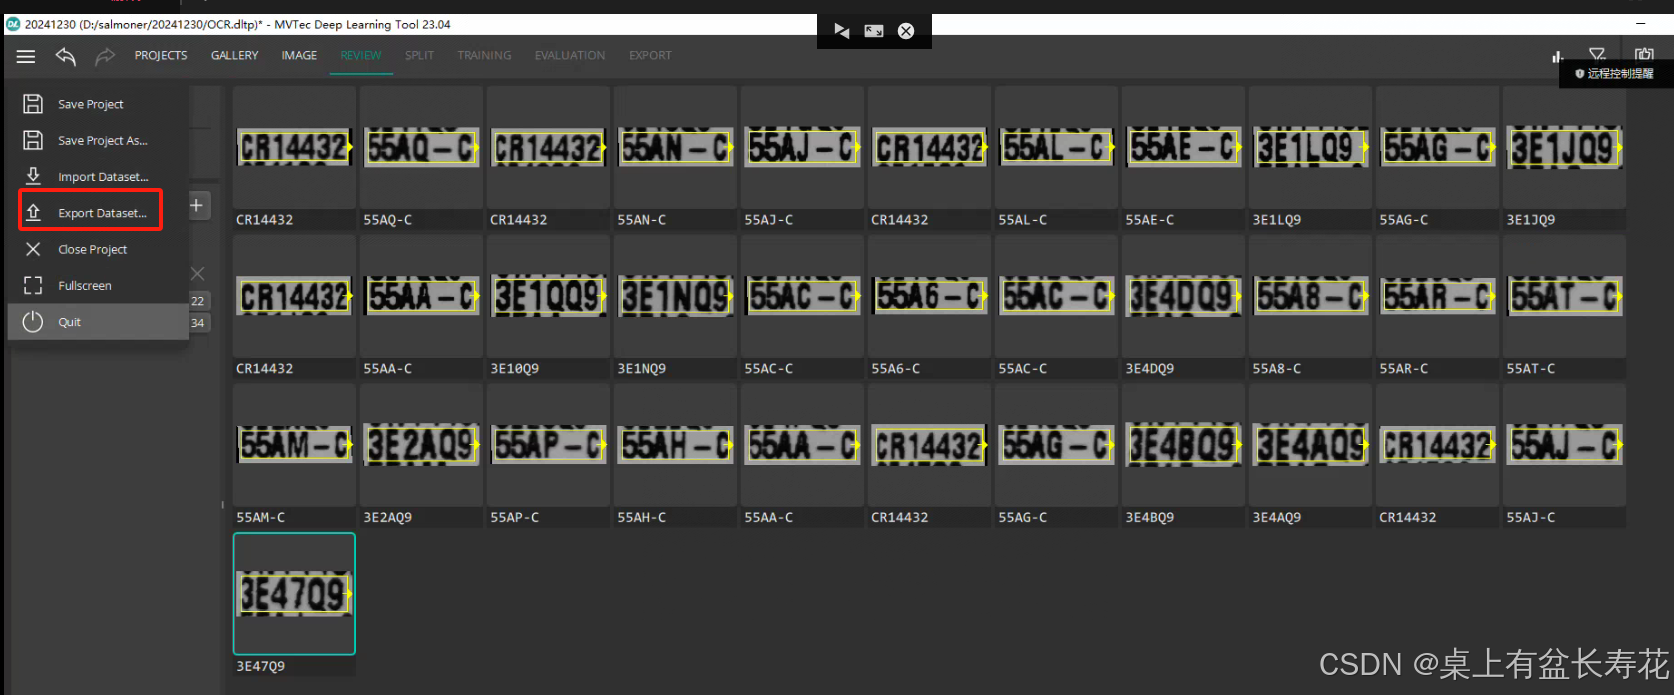
完成所有图片的打标后,导出数据集。
此处数据集名称是:OCR
将最开始的数据集名称替换;根据所需图像尺寸,以及批次大小,迭代周期等更改所需参数。
然后执行即可。
创建数据集:
文件夹拿入图
标注:
鼠标左键长按,右拖动,松开,下拖动,框就出来了,
然后,双击,字符出来,在字符处点击一下,有字符即可。因为都识别的是OK字符,也不需要新进类型。直接一直标注即可。如果有其他异常之类,可以新建类型。这里没有,只用的word。
标完检查一下

没问题就导出。
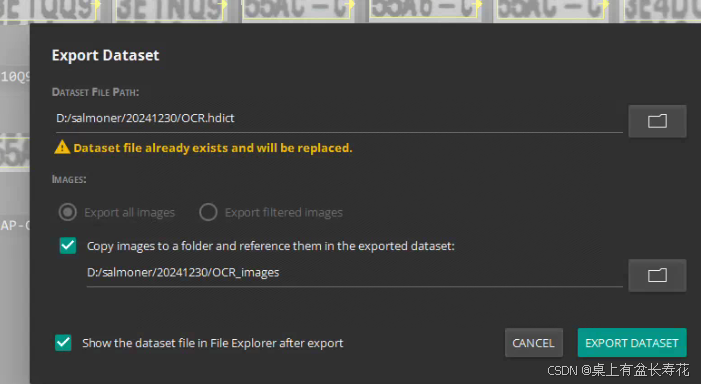
例外:如果有字符集,可以直接用导入的方式导入即可。
但是需要选择图片路径。按照创建字符集时候的图像路径选择即可。要注意是否之前路径中的图不存在,不存在应该在检查时删掉无效图。

然后找到上面例程:更改字符集,以及相关参数。
因为自己标注失误,很多Q和0无法区分。所以最后训练的微调结果反倒不如基线模型。
所以最后直接使用自带的模型:
具体方式:

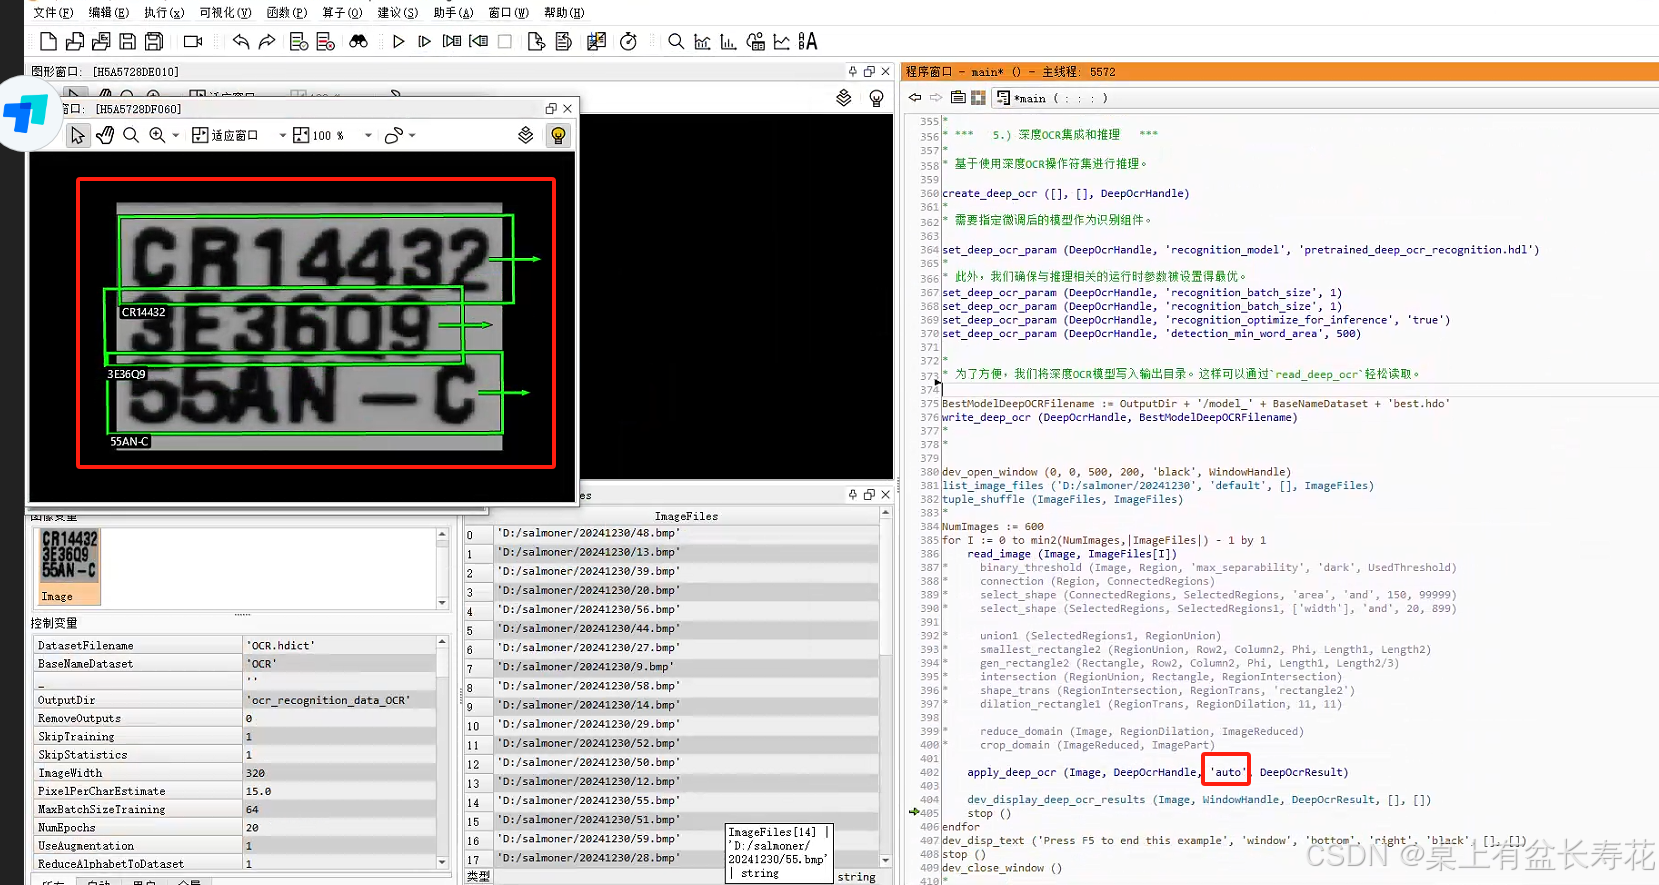
以下直接使用halcon自带的深度学习模型:可以单独使用,以后不用每次都训练,只要自带库识别的是对的。也就是字符还可以,不是差到离谱,不用训练,直接拿来用即可。问题?是否可以一次识别多行,这里目前是识别一行。可以,看下图,见后文。但是需要过滤筛选。
多行一起识别的结果:

只一行识别:
```cpp
*
* ***   5.) 深度OCR集成和推理   ***
*
* 基于使用深度OCR操作符集进行推理。

create_deep_ocr ([], [], DeepOcrHandle)
*
* 需要指定微调后的模型作为识别组件。

set_deep_ocr_param (DeepOcrHandle, 'recognition_model', 'pretrained_deep_ocr_recognition.hdl')
*
* 此外,我们确保与推理相关的运行时参数被设置得最优。

set_deep_ocr_param (DeepOcrHandle, 'recognition_batch_size', 1)
set_deep_ocr_param (DeepOcrHandle, 'recognition_optimize_for_inference', 'true')
*
* 为了方便,我们将深度OCR模型写入输出目录。这样可以通过`read_deep_ocr`轻松读取。

BestModelDeepOCRFilename := OutputDir + '/model_' + BaseNameDataset + 'best.hdo'
write_deep_ocr (DeepOcrHandle, BestModelDeepOCRFilename)
*
*

dev_open_window (0, 0, 500, 200, 'black', WindowHandle)
list_image_files ('D:/salmoner/20241230', 'default', [], ImageFiles)
tuple_shuffle (ImageFiles, ImageFiles)
*
NumImages := 600
for I := 0 to min2(NumImages,|ImageFiles|) - 1 by 1
    read_image (Image, ImageFiles[I])
    *//下面这一段是用来选中中间一行
    binary_threshold (Image, Region, 'max_separability', 'dark', UsedThreshold)
    connection (Region, ConnectedRegions)
    select_shape (ConnectedRegions, SelectedRegions, 'area', 'and', 150, 99999)
    select_shape (SelectedRegions, SelectedRegions1, ['width'], 'and', 20, 899)

    union1 (SelectedRegions1, RegionUnion)
    smallest_rectangle2 (RegionUnion, Row2, Column2, Phi, Length1, Length2)
    gen_rectangle2 (Rectangle, Row2, Column2, Phi, Length1, Length2/3)
    intersection (RegionUnion, Rectangle, RegionIntersection)
    shape_trans (RegionIntersection, RegionTrans, 'rectangle2')
    dilation_rectangle1 (RegionTrans, RegionDilation, 11, 11)

    reduce_domain (Image, RegionDilation, ImageReduced)
    crop_domain (ImageReduced, ImagePart)
   *//识别
    apply_deep_ocr (ImagePart, DeepOcrHandle, 'recognition', DeepOcrResult)
    dev_display_deep_ocr_results (Image, WindowHandle, DeepOcrResult, [], [])
    stop ()
endfor
dev_disp_text ('Press F5 to end this example', 'window', 'bottom', 'right', 'black', [], [])
stop ()
dev_close_window ()
如果需要进行多行一起识别:

多行一起识别的结果:

```cpp

```cpp
*
* ***   5.) 深度OCR集成和推理   ***
*
* 基于使用深度OCR操作符集进行推理。

create_deep_ocr ([], [], DeepOcrHandle)
*
* 需要指定微调后的模型作为识别组件。

set_deep_ocr_param (DeepOcrHandle, 'recognition_model', 'pretrained_deep_ocr_recognition.hdl')
*
* 此外,我们确保与推理相关的运行时参数被设置得最优。
set_deep_ocr_param (DeepOcrHandle, 'recognition_batch_size', 1)
set_deep_ocr_param (DeepOcrHandle, 'recognition_batch_size', 1)
set_deep_ocr_param (DeepOcrHandle, 'recognition_optimize_for_inference', 'true')
set_deep_ocr_param (DeepOcrHandle, 'detection_min_word_area', 500)

*
* 为了方便,我们将深度OCR模型写入输出目录。这样可以通过`read_deep_ocr`轻松读取。

BestModelDeepOCRFilename := OutputDir + '/model_' + BaseNameDataset + 'best.hdo'
write_deep_ocr (DeepOcrHandle, BestModelDeepOCRFilename)
*
*

dev_open_window (0, 0, 500, 200, 'black', WindowHandle)
list_image_files ('D:/salmoner/20241230', 'default', [], ImageFiles)
tuple_shuffle (ImageFiles, ImageFiles)
*
NumImages := 600
for I := 0 to min2(NumImages,|ImageFiles|) - 1 by 1
    read_image (Image, ImageFiles[I])
*     binary_threshold (Image, Region, 'max_separability', 'dark', UsedThreshold)
*     connection (Region, ConnectedRegions)
*     select_shape (ConnectedRegions, SelectedRegions, 'area', 'and', 150, 99999)
*     select_shape (SelectedRegions, SelectedRegions1, ['width'], 'and', 20, 899)

*     union1 (SelectedRegions1, RegionUnion)
*     smallest_rectangle2 (RegionUnion, Row2, Column2, Phi, Length1, Length2)
*     gen_rectangle2 (Rectangle, Row2, Column2, Phi, Length1, Length2/3)
*     intersection (RegionUnion, Rectangle, RegionIntersection)
*     shape_trans (RegionIntersection, RegionTrans, 'rectangle2')
*     dilation_rectangle1 (RegionTrans, RegionDilation, 11, 11)

*     reduce_domain (Image, RegionDilation, ImageReduced)
*     crop_domain (ImageReduced, ImagePart)

    apply_deep_ocr (Image, DeepOcrHandle, 'auto', DeepOcrResult)

    dev_display_deep_ocr_results (Image, WindowHandle, DeepOcrResult, [], [])
    stop ()
endfor
dev_disp_text ('Press F5 to end this example', 'window', 'bottom', 'right', 'black', [], [])
stop ()
以下是整个例程的程序:包括数据集准备和训练评估比较以及推演使用
```cpp
```cpp
*
dev_close_window ()
dev_update_off ()
*
*
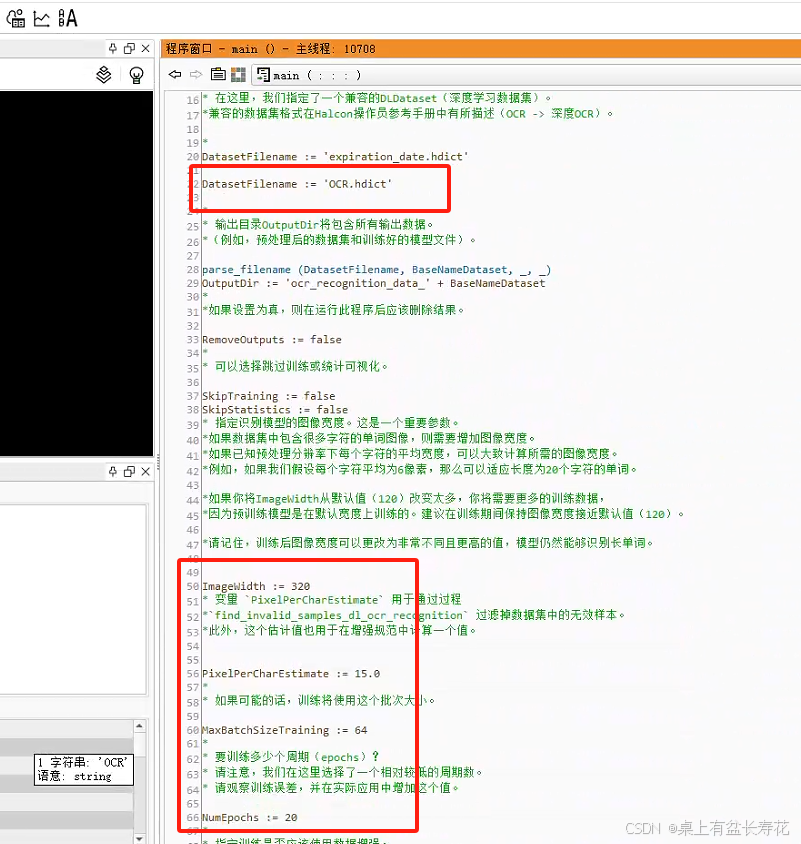
* *** 0) 设置参数 ***
* 在这里,我们指定了一个兼容的DLDataset(深度学习数据集)。
*兼容的数据集格式在Halcon操作员参考手册中有所描述(OCR -> 深度OCR)。
*
DatasetFilename := 'expiration_date.hdict'
*
* 输出目录OutputDir将包含所有输出数据。
*(例如,预处理后的数据集和训练好的模型文件)。
parse_filename (DatasetFilename, BaseNameDataset, _, _)
OutputDir := 'ocr_recognition_data_' + BaseNameDataset
*
*如果设置为真,则在运行此程序后应该删除结果。
RemoveOutputs := false
*
* 可以选择跳过训练或统计可视化。
SkipTraining := false
SkipStatistics := false
* 指定识别模型的图像宽度。这是一个重要参数。
*如果数据集中包含很多字符的单词图像,则需要增加图像宽度。
*如果已知预处理分辨率下每个字符的平均宽度,可以大致计算所需的图像宽度。
*例如,如果我们假设每个字符平均为6像素,那么可以适应长度为20个字符的单词。
*如果你将ImageWidth从默认值(120)改变太多,你将需要更多的训练数据,
*因为预训练模型是在默认宽度上训练的。建议在训练期间保持图像宽度接近默认值(120)。
*请记住,训练后图像宽度可以更改为非常不同且更高的值,模型仍然能够识别长单词。
ImageWidth := 120
* 变量 `PixelPerCharEstimate` 用于通过过程
*`find_invalid_samples_dl_ocr_recognition` 过滤掉数据集中的无效样本。
*此外,这个估计值也用于在增强规范中计算一个值。
PixelPerCharEstimate := 6.0
*
* 如果可能的话,训练将使用这个批次大小。
MaxBatchSizeTraining := 32
*
* 要训练多少个周期(epochs)?
* 请注意,我们在这里选择了一个相对较低的周期数。
* 请观察训练误差,并在实际应用中增加这个值。
NumEpochs := 10
*
* 指定训练是否应该使用数据增强。
UseAugmentation := true
*
* 将模型的字母表调整以适应给定的数据集。
ReduceAlphabetToDataset := true
*
*指定要使用的深度学习设备运行时。
*训练仅支持在GPU上进行。
DeviceRuntime := 'gpu'
*
* 数据集的分割是随机进行的。
* 这些参数决定了分割的百分比。
SplitPercentageTrain := 80
SplitPercentageValidation := 10
*
*指定是否应该覆盖预处理过的数据。
*- 'auto':将决定是否需要重新计算数据。
*- 'true':总是预处理数据。
*- 'false':如果数据已存在,则不预处理数据(而是引发错误)。
OverwritePreprocessing := 'auto'
*
*
* *** 1.) 准备 ***
set_system ('seed_rand', 42)
*
* 准备输出路径。
OutputDirPreprocessing := OutputDir + '/dlsample_files'
BestModelFilename := OutputDir + '/model_' + BaseNameDataset + 'best.hdl'
*
file_exists (OutputDir, FileExists)
if (not FileExists)
make_dir (OutputDir)
endif
*
* 读取一个OCR识别数据集。
read_dl_dataset_ocr_recognition (DatasetFilename, [], [], DLDataset)
*
* 从数据集中生成字符统计信息。
gen_dl_dataset_ocr_recognition_statistics (DLDataset, CharStats)
*
*读取OCR识别模型。
read_dl_model ('pretrained_deep_ocr_recognition.hdl', DLModelHandle)
*
* 将图像宽度调整到期望的宽度。
set_dl_model_param (DLModelHandle, 'image_width', ImageWidth)
*
* 如果请求,我们将模型的字母表缩减到给定数据集中的字符集。
if (ReduceAlphabetToDataset)
set_dl_model_param (DLModelHandle, 'alphabet', CharStats.charset)
endif
*
* 在数据集中查找无效样本。
InvalidGenericParam := dict{pixel_per_char_estimate: PixelPerCharEstimate}
find_invalid_samples_dl_ocr_recognition (DLDataset.samples, DLModelHandle, InvalidGenericParam, InvalidSamplesIndices, InvalidSamplesReasons)
*可视化数据集中的无效样本(如果有的话)。
dev_display_dl_invalid_samples (DLDataset, DLModelHandle, InvalidSamplesIndices, InvalidSamplesReasons)
*
* 将数据集缩减到有效的样本。
tuple_remove (DLDataset.samples, InvalidSamplesIndices, DLDataset.samples)
if (|InvalidSamplesIndices| > 0)
* 由于样本已被移除,因此需要重新计算数据集中的字符统计信息。
gen_dl_dataset_ocr_recognition_statistics (DLDataset, CharStats)
endif
*
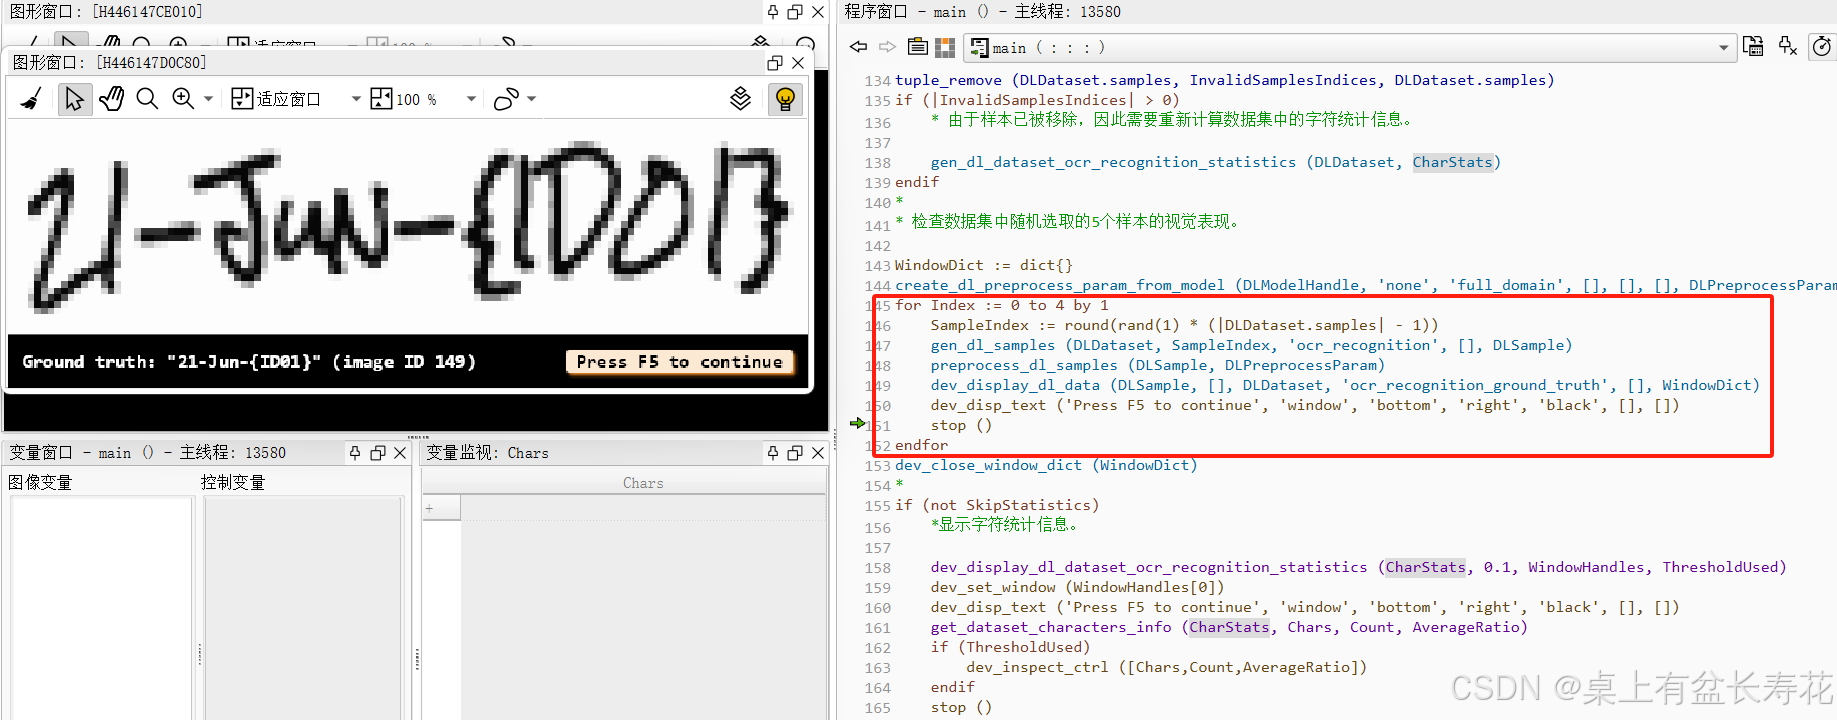
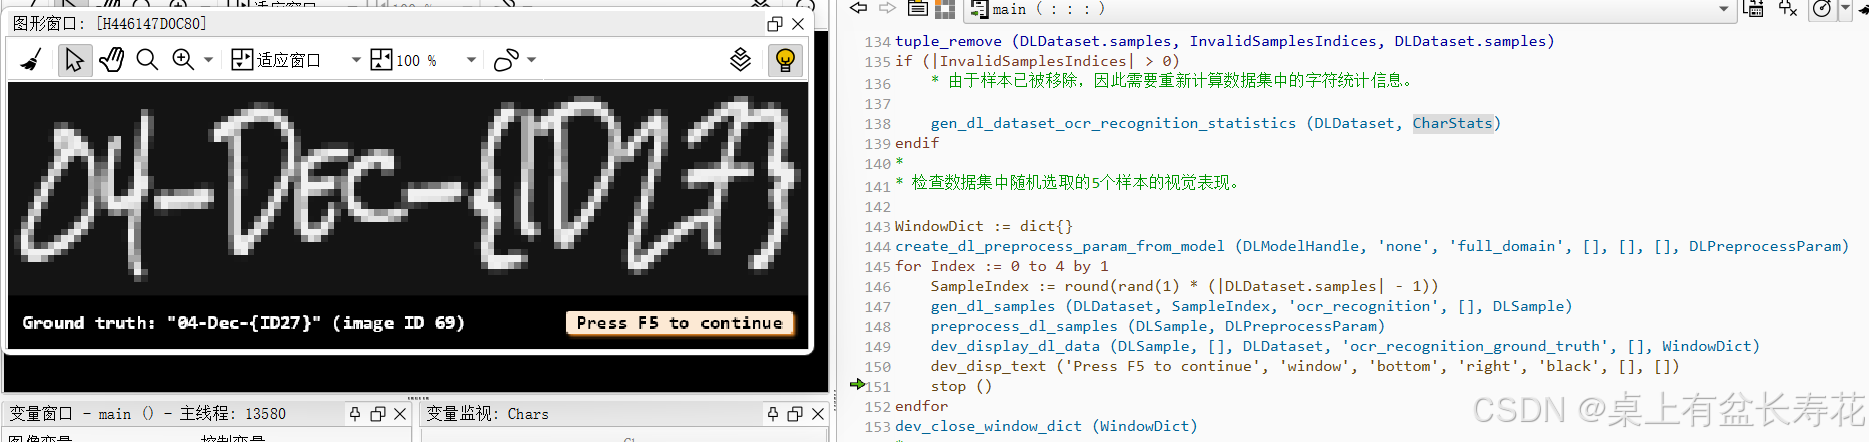
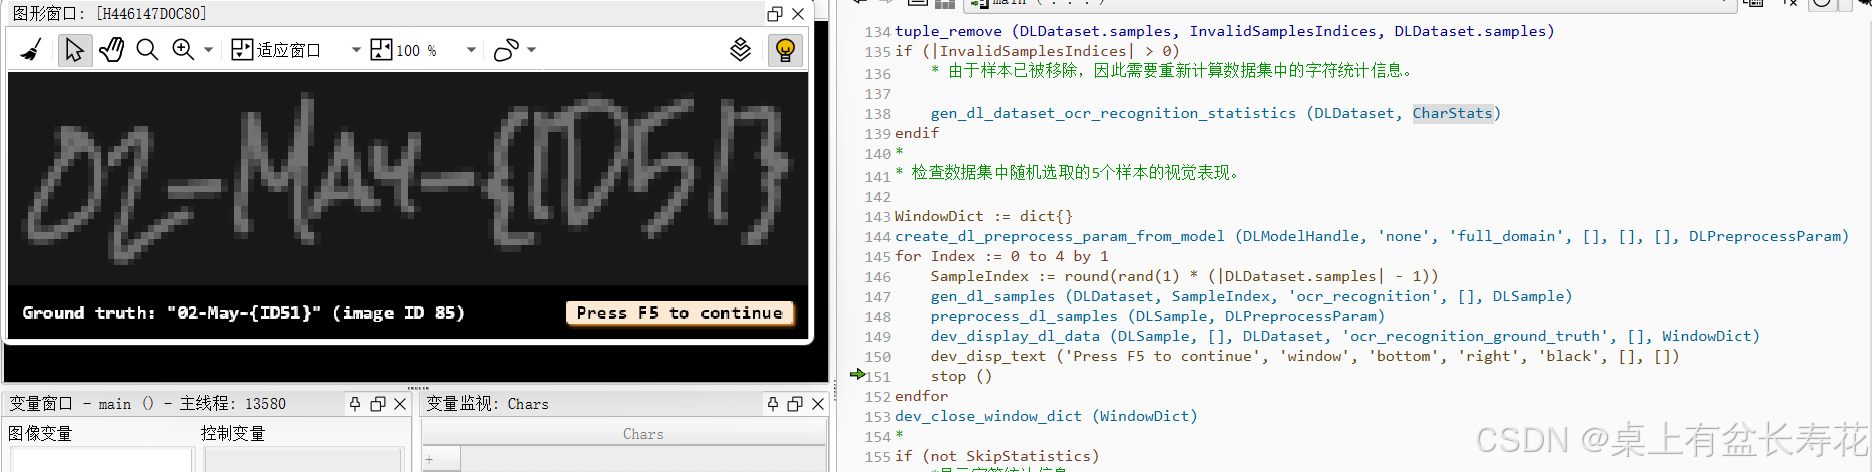
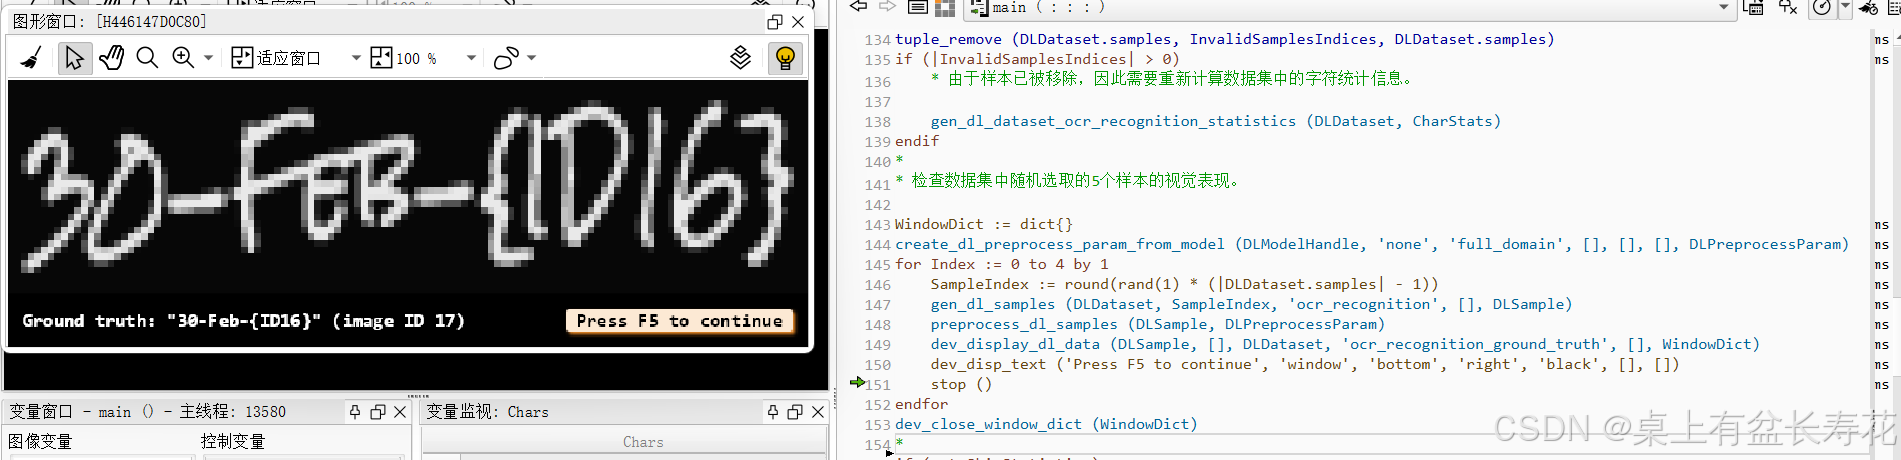
* 检查数据集中随机选取的5个样本的视觉表现。
WindowDict := dict{}
create_dl_preprocess_param_from_model (DLModelHandle, 'none', 'full_domain', [], [], [], DLPreprocessParam)
for Index := 0 to 4 by 1
SampleIndex := round(rand(1) * (|DLDataset.samples| - 1))
gen_dl_samples (DLDataset, SampleIndex, 'ocr_recognition', [], DLSample)
preprocess_dl_samples (DLSample, DLPreprocessParam)
dev_display_dl_data (DLSample, [], DLDataset, 'ocr_recognition_ground_truth', [], WindowDict)
dev_disp_text ('Press F5 to continue', 'window', 'bottom', 'right', 'black', [], [])
stop ()
endfor
dev_close_window_dict (WindowDict)
*
if (not SkipStatistics)
*显示字符统计信息。
dev_display_dl_dataset_ocr_recognition_statistics (CharStats, 0.1, WindowHandles, ThresholdUsed)
dev_set_window (WindowHandles[0])
dev_disp_text ('Press F5 to continue', 'window', 'bottom', 'right', 'black', [], [])
get_dataset_characters_info (CharStats, Chars, Count, AverageRatio)
if (ThresholdUsed)
dev_inspect_ctrl ([Chars,Count,AverageRatio])
endif
stop ()
if (ThresholdUsed)
dev_close_inspect_ctrl ([Chars,Count,AverageRatio])
endif
for W := |WindowHandles| - 1 to 0 by -1
dev_set_window (WindowHandles[W])
dev_close_window ()
endfor
endif
*
*
* 对数据集应用随机分割。
split_dl_dataset (DLDataset, SplitPercentageTrain, SplitPercentageValidation, [])
*
*
* 预处理DLDataset中的数据。
*
* 基于识别模型创建预处理参数。
if (UseAugmentation)
GenParamPreprocessing := dict{augmentation: 'true'}
else
GenParamPreprocessing := dict{augmentation: 'false'}
endif
create_dl_preprocess_param_from_model (DLModelHandle, 'none', 'full_domain', [], [], GenParamPreprocessing, DLPreprocessParam)
*
* 仅当预处理参数或数据集发生变化时,才会覆盖现有的预处理数据。
preprocess_dl_dataset (DLDataset, OutputDirPreprocessing, DLPreprocessParam, dict{overwrite_files: OverwritePreprocessing}, DLDatasetFileName)
*
*
* 确定要使用的深度学习设备。
query_available_dl_devices (gen_tuple_const(|DeviceRuntime|,'runtime'), DeviceRuntime, DLDeviceHandles)
if (|DLDeviceHandles| == 0)
throw ('No supported device found to continue this example.')
endif
*
* 选择第一个深度学习设备
DLDevice := DLDeviceHandles[0]
set_dl_model_param (DLModelHandle, 'device', DLDevice)
get_dl_model_param (DLModelHandle, 'batch_size', BatchSizeTrain)
*
*
if (not SkipTraining)
* *** 2.) 训练 ***
*
* 将批次大小调整以适应所选择的GPU设备。
get_dl_device_param (DLDevice, 'type', DeviceType)
if (DeviceType == 'gpu')
set_dl_model_param_max_gpu_batch_size (DLModelHandle, MaxBatchSizeTraining)
else
set_dl_model_param (DLModelHandle, 'batch_size', MaxBatchSizeTraining)
endif
get_dl_model_param (DLModelHandle, 'batch_size', BatchSizeTrain)
*
* 有关参数的信息,请参见`set_dl_model_param()`和`get_dl_model_param()`的文档。
set_dl_model_param (DLModelHandle, 'learning_rate', 0.0008)
*
* 由于OCR识别模型是一个预训练模型,并且它包含预训练的批量归一化层,
*我们需要调整这些层的动量,以确保对新的训练数据有良好的适应性。
*
* 这是通过指定一个动量来实现的,这意味着批量归一化统计数据(运行均值和标准差)大致
*依赖于上一个完整周期的迭代。
find_dl_samples (DLDataset.samples, 'split', 'train', 'match', SampleIndicesTrain)
NumTrainSamples := |SampleIndicesTrain|
IterationsPerEpoch := floor(real(NumTrainSamples) / real(BatchSizeTrain))
BatchNormMomentum := 1 - 1 / IterationsPerEpoch
set_dl_model_param (DLModelHandle, 'batchnorm_momentum', BatchNormMomentum)
*
* 指定一个序列化策略。
SerializationStrategy := dict{['type']: 'best'}
parse_filename (BestModelFilename, BaseName, Extension, Directory)
SerializationStrategy.basename := Directory + BaseName
*
* 准备数据增强参数。
if (UseAugmentation)
AugmentationParam := dict{augmentation_percentage: 100}
* 随机地从单词图像的x和y方向移除像素。
*这模拟了单词定位不准确的情况。
RemovePixelMaxX := int(ceil(PixelPerCharEstimate * 0.5))
RemovePixelMaxY := 7
AugmentationParam.remove_pixel := [RemovePixelMaxX,RemovePixelMaxY]
*随机变化亮度。请注意,预处理后的单词图像的范围是[-1.0, 1.0]。
AugmentationParam.brightness_variation := 0.1
else
AugmentationParam := dict{augmentation_percentage: 0}
endif
*用f_score作为可视化期间使用的训练数据的百分比。
DisplayParam := dict{selected_percentage_train_samples: min2(NumTrainSamples,300.0) / NumTrainSamples * 100}
*
* 准备训练参数。
create_dl_train_param (DLModelHandle, NumEpochs, 1, 'true', 42, ['serialize', 'augment', 'display', 'evaluate_before_train'], [SerializationStrategy,AugmentationParam,DisplayParam,'true'], TrainParam)
*
* 现在可以开始/继续训练了。
train_dl_model (DLDataset, DLModelHandle, TrainParam, 0, TrainResults, TrainInfos, EvaluationInfos)
dev_disp_text ('Press F5 to continue or run train_dl_model again', 'window', 'bottom', 'left', 'black', [], [])
stop ()
* 我们清除训练模型,因为我们想要读取在训练过程中保存的最佳模型。
clear_dl_model (DLModelHandle)
dev_close_window ()
dev_close_window ()
endif
*
*
* *** 3.) 评估 ***
*
* 我们评估基线模型,即预训练模型,以及微调后的模型。
*默认情况下,我们建议使用与训练期间相同的图像宽度。
*不过,在推理过程中,可以增加或减少图像宽度。
ImageWidthEvaluation := ImageWidth
*
* 如果可能的话,评估将使用较大的批次大小。
BatchSizeEval := BatchSizeTrain
*
* 选择在评估中使用的分割。
EvaluationSplit := 'test'
*
*在评估过程中显示进度。
GenParamEval := dict{show_progress: true}
*
* 首先评估基线模型。
read_dl_model ('pretrained_deep_ocr_recognition.hdl', DLModelHandleBaseline)
evaluate_ocr_recognition (DLModelHandleBaseline, DLDevice, ImageWidthEvaluation, BatchSizeEval, DLDataset, EvaluationSplit, GenParamEval, EvaluationResultBaseline, AccuracyBaseline)
*
* 评估微调后的模型。
read_dl_model (BestModelFilename, DLModelHandle)
evaluate_ocr_recognition (DLModelHandle, DLDevice, ImageWidthEvaluation, BatchSizeEval, DLDataset, EvaluationSplit, GenParamEval, EvaluationResultFinetuning, AccuracyFinetuning)
*
*
* *** 4.)比较微调模型和基线模型 ***
*
* 我们可以在这部分减少批次大小,因为只会处理单个样本。
set_dl_model_param (DLModelHandle, 'batch_size', 1)
set_dl_model_param (DLModelHandleBaseline, 'batch_size', 1)
*
find_dl_samples (DLDataset.samples, 'split', EvaluationSplit, 'match', SampleIndices)
*
WindowDict1 := dict{}
WindowDict2 := dict{}
WindowHandleAccuracy := []
tuple_shuffle (SampleIndices, SampleIndices)
NumSamplesComparison := 10
for IndexInference := 0 to min2(|SampleIndices| - 1,NumSamplesComparison - 1) by 1
read_dl_samples (DLDataset, SampleIndices[IndexInference], DLSampleInference)
apply_dl_model (DLModelHandle, DLSampleInference, [], DLResult)
apply_dl_model (DLModelHandleBaseline, DLSampleInference, [], DLResultOrig)
dev_display_dl_data (DLSampleInference, DLResultOrig, [], 'ocr_recognition_both', [], WindowDict1)
dev_disp_text ('pretrained', 'window', 'top', 'right', 'black', [], [])
dev_display_dl_data (DLSampleInference, DLResult, [], 'ocr_recognition_both', [], WindowDict2)
dev_disp_text ('finetuned', 'window', 'top', 'right', 'black', [], [])
get_window_extents (WindowDict2.ocr_recognition_both, Row, Column, Width, Height)
dev_set_window (WindowDict2.ocr_recognition_both)
dev_set_window_extents (int(Height + 80), 0, Width, Height)
if (|WindowHandleAccuracy| == 0)
dev_display_accuracy_comparison (['Deep OCR pretrained', 'Deep OCR finetuned'], [AccuracyBaseline,AccuracyFinetuning], Column + Width + 26, EvaluationSplit, |SampleIndices|, WindowHandleAccuracy)
dev_set_window (WindowHandleAccuracy)
dev_set_window_extents (-1, Width + 25, -1, -1)
dev_disp_text ('Press F5 to continue', 'window', 'bottom', 'right', 'black', [], [])
endif
stop ()
endfor
dev_close_window_dict (WindowDict1)
dev_close_window_dict (WindowDict2)
clear_dl_model (DLModelHandleBaseline)
clear_dl_model (DLModelHandle)
dev_set_window (WindowHandleAccuracy)
dev_close_window ()
*
*
* *** 5.) 深度OCR集成和推理 ***
*
* 基于使用深度OCR操作符集进行推理。
create_deep_ocr ([], [], DeepOcrHandle)
*
* 需要指定微调后的模型作为识别组件。
set_deep_ocr_param (DeepOcrHandle, 'recognition_model', BestModelFilename)
*
* 此外,我们确保与推理相关的运行时参数被设置得最优。
set_deep_ocr_param (DeepOcrHandle, 'recognition_batch_size', 1)
set_deep_ocr_param (DeepOcrHandle, 'recognition_optimize_for_inference', 'true')
*
* 为了方便,我们将深度OCR模型写入输出目录。这样可以通过`read_deep_ocr`轻松读取。
BestModelDeepOCRFilename := OutputDir + '/model_' + BaseNameDataset + 'best.hdo'
write_deep_ocr (DeepOcrHandle, BestModelDeepOCRFilename)
*
*
dev_open_window (0, 0, 500, 200, 'black', WindowHandle)
list_image_files ('expiration_date', 'default', [], ImageFiles)
tuple_shuffle (ImageFiles, ImageFiles)
*
NumImages := 10
for I := 0 to min2(NumImages,|ImageFiles|) - 1 by 1
read_image (Image, ImageFiles[I])
apply_deep_ocr (Image, DeepOcrHandle, 'recognition', DeepOcrResult)
dev_display_deep_ocr_results (Image, WindowHandle, DeepOcrResult, [], [])
stop ()
endfor
dev_disp_text ('Press F5 to end this example', 'window', 'bottom', 'right', 'black', [], [])
stop ()
dev_close_window ()
*
*
* *** 6.) 删除所有文件 ***
clean_up_output (OutputDir, RemoveOutputs)


 2837
2837

 被折叠的 条评论
为什么被折叠?
被折叠的 条评论
为什么被折叠?
 到【灌水乐园】发言


