


转载请注明出处:https://blog.csdn.net/weixin_38285131/article/details/88097771
最近在做街景图象色彩校正方面的工作,对于过暗,过曝光,以及背光等现象,用过一些gamma校正以及其他的方法,最终选择基于Retinex原理的方法对这几种现象都有一定的增强效果。
Retinex理论基于一下假设:
1.真实世界是无颜色的,我们所感知的颜色是光与物质的相互作用的结果。我们见到的水是无色的,但是水膜—肥皂膜却是显现五彩缤纷,那是薄膜表面光干涉的结果。
2.每一颜色区域由给定波长的红、绿、蓝三原色构成的;
3.三原色决定了每个单位区域的颜色。
Retinex理论的基础理论是物体的颜色是由物体对长波(红色)、中波(绿色)、短波(蓝色)光线的反射能力来决定的,而不是由反射光强度的绝对值来决定的,物体的色彩不受光照非均匀性的影响,具有一致性,即retinex是以色感一致性(颜色恒常性)为基础的。不同于传统的线性、非线性的只能增强图像某一类特征的方法,Retinex可以在动态范围压缩、边缘增强和颜色恒常三个方面达到平衡,因此可以对各种不同类型的图像进行自适应的增强。
40多年来,研究人员模仿人类视觉系统发展了Retinex算法,从单尺度Retinex算法,MSR改进成多尺度加权平均的MSR算法,再发展成彩色恢复多尺度MSRCR算法和色彩增益加权的AutoMSRCR算法。
主要算法公式介绍可以参考如下博客:
https://blog.csdn.net/ajianyingxiaoqinghan/article/details/71435098
我再对这几种方法稍稍总结一下:
一丶单尺度的Retinex——SSR
可以理解为图像分解,一幅图像S(x,y)可以分为他的光照图象 I(x,y)和反射图像R(x,y),反射图象是根据物体本身的反射特性,所以基本不会发生变化,光照图像是根据环境明暗来决定的。
只看公式的话感觉一下就看懵逼了,我感觉就三个步骤:
1)将图像进行log变换
2)然后将log图像进行高斯模糊
3)利用原图和模糊之后的log图像做差分
二丶多尺度的Retinex——MSR
通俗解释:就是再多个单尺度Retinex做平均,区别是在第二步高斯模糊是选择的sigma是不同的
原始图像进行三次SSR
高斯模糊选择15,80,200作为高斯模糊sigma参数
对三次的SSR结果做平均即为MSR图像
三丶彩色恢复多尺度Retinex——MSRCR,MSRCP等
对多尺度MSR结果做了色彩平衡,归一化,增益和偏差线性加权
四丶参数说明
{
“sigma_list”: [15, 80, 200],多尺度高斯模糊sigma值
“G” : 5.0,增益
“b” : 25.0,偏差
“alpha” : 125.0,
“beta” : 46.0,
“low_clip” : 0.01,
“high_clip” : 0.99
}
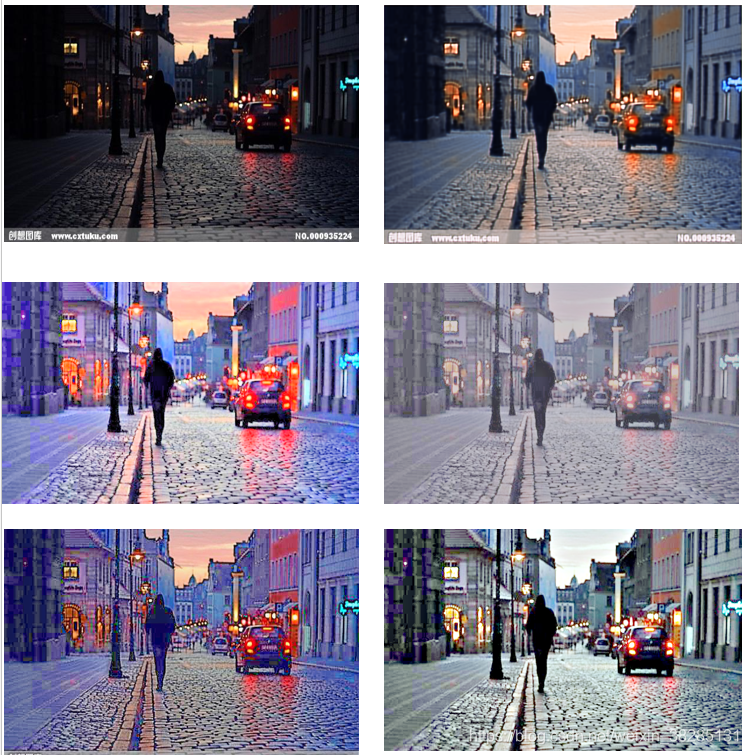
五丶图像增强结果:

六丶代码
import numpy as np
import cv2

def singleScaleRetinex(img, sigma):

    retinex = np.log10(img) - np.log10(cv2.GaussianBlur(img, (0, 0), sigma))

    return retinex

def multiScaleRetinex(img, sigma_list):

    retinex = np.zeros_like(img)
    for sigma in sigma_list:
        retinex += singleScaleRetinex(img, sigma)

    retinex = retinex / len(sigma_list)

    return retinex

def colorRestoration(img, alpha, beta):

    img_sum = np.sum(img, axis=2, keepdims=True)

    color_restoration = beta * (np.log10(alpha * img) - np.log10(img_sum))

    return color_restoration

def simplestColorBalance(img, low_clip, high_clip):

    total = img.shape[0] * img.shape[1]
    for i in range(img.shape[2]):
        unique, counts = np.unique(img[:, :, i], return_counts=True)
        current = 0
        for u, c in zip(unique, counts):
            if float(current) / total < low_clip:
                low_val = u
            if float(current) / total < high_clip:
                high_val = u
            current += c

        img[:, :, i] = np.maximum(np.minimum(img[:, :, i], high_val), low_val)

    return img

def MSRCR(img, sigma_list, G, b, alpha, beta, low_clip, high_clip):

    img = np.float64(img) + 1.0

    img_retinex = multiScaleRetinex(img, sigma_list)

    img_color = colorRestoration(img, alpha, beta)
    img_msrcr = G * (img_retinex * img_color + b)

    for i in range(img_msrcr.shape[2]):
        img_msrcr[:, :, i] = (img_msrcr[:, :, i] - np.min(img_msrcr[:, :, i])) / \
                             (np.max(img_msrcr[:, :, i]) - np.min(img_msrcr[:, :, i])) * \
                             255

    img_msrcr = np.uint8(np.minimum(np.maximum(img_msrcr, 0), 255))
    img_msrcr = simplestColorBalance(img_msrcr, low_clip, high_clip)

    return img_msrcr

def automatedMSRCR(img, sigma_list):

    img = np.float64(img) + 1.0

    img_retinex = multiScaleRetinex(img, sigma_list)

    for i in range(img_retinex.shape[2]):
        unique, count = np.unique(np.int32(img_retinex[:, :, i] * 100), return_counts=True)
        for u, c in zip(unique, count):
            if u == 0:
                zero_count = c
                break

        low_val = unique[0] / 100.0
        high_val = unique[-1] / 100.0
        for u, c in zip(unique, count):
            if u < 0 and c < zero_count * 0.1:
                low_val = u / 100.0
            if u > 0 and c < zero_count * 0.1:
                high_val = u / 100.0
                break

        img_retinex[:, :, i] = np.maximum(np.minimum(img_retinex[:, :, i], high_val), low_val)

        img_retinex[:, :, i] = (img_retinex[:, :, i] - np.min(img_retinex[:, :, i])) / \
                               (np.max(img_retinex[:, :, i]) - np.min(img_retinex[:, :, i])) \
                               * 255

    img_retinex = np.uint8(img_retinex)

    return img_retinex

def MSRCP(img, sigma_list, low_clip, high_clip):

    img = np.float64(img) + 1.0

    intensity = np.sum(img, axis=2) / img.shape[2]

    retinex = multiScaleRetinex(intensity, sigma_list)

    intensity = np.expand_dims(intensity, 2)
    retinex = np.expand_dims(retinex, 2)

    intensity1 = simplestColorBalance(retinex, low_clip, high_clip)

    intensity1 = (intensity1 - np.min(intensity1)) / \
                 (np.max(intensity1) - np.min(intensity1)) * \
                 255.0 + 1.0

    img_msrcp = np.zeros_like(img)

    for y in range(img_msrcp.shape[0]):
        for x in range(img_msrcp.shape[1]):
            B = np.max(img[y, x])
            A = np.minimum(256.0 / B, intensity1[y, x, 0] / intensity[y, x, 0])
            img_msrcp[y, x, 0] = A * img[y, x, 0]
            img_msrcp[y, x, 1] = A * img[y, x, 1]
            img_msrcp[y, x, 2] = A * img[y, x, 2]

    img_msrcp = np.uint8(img_msrcp - 1.0)

    return img_msrcp
import sys
import os

import cv2
import json

import retinex

data_path = 'data'
img_list = os.listdir(data_path)
if len(img_list) == 0:
    print( 'Data directory is empty.')
    exit()

with open('config.json', 'r') as f:
    config = json.load(f)

for img_name in img_list:
    if img_name == '.gitkeep':
        continue

    img = cv2.imread(os.path.join(data_path, img_name))

    print('msrcr processing......')
    img_msrcr = retinex.MSRCR(
        img,
        config['sigma_list'],
        config['G'],
        config['b'],
        config['alpha'],
        config['beta'],
        config['low_clip'],
        config['high_clip']
    )
    cv2.imshow('MSRCR retinex', img_msrcr)
    cv2.imwrite("MSRCR_retinex.tif",img_msrcr);


    print('amsrcr processing......')
    img_amsrcr = retinex.automatedMSRCR(
        img,
        config['sigma_list']
    )
    cv2.imshow('autoMSRCR retinex', img_amsrcr)
    cv2.imwrite('AutomatedMSRCR_retinex.tif', img_amsrcr)


    print('msrcp processing......')
    img_msrcp = retinex.MSRCP(
        img,
        config['sigma_list'],
        config['low_clip'],
        config['high_clip']
    )

    shape = img.shape
    cv2.imshow('Image', img)

    cv2.imshow('MSRCP', img_msrcp)
    cv2.imwrite('MSRCP.tif', img_msrcp)
    cv2.waitKey()


 1141
1141


 被折叠的 条评论
为什么被折叠?
被折叠的 条评论
为什么被折叠?
 到【灌水乐园】发言


