


一直觉得自己写的不是技术,而是情怀,一个个的教程是自己这一路走来的痕迹。靠专业技能的成功是最具可复制性的,希望我的这条路能让你们少走弯路,希望我能帮你们抹去知识的蒙尘,希望我能帮你们理清知识的脉络,希望未来技术之巅上有你们也有我。
View+X+Y+Width+Height(自定义约束)下载链接
注意:
1,必须先设置宽高,再设置上下左右的位置
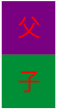
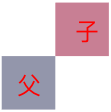
填写父view的关系
self.viewA = [[UIView alloc] init];
self.viewA.addTo(self.view).bgColor(@"random");

self.viewB = [[UIView alloc] init];
self.viewB.addTo(self.view).bgColor(@"random");

self.viewA.ocWidth = 50;
self.viewA.ocHeight = 50;
self.viewA.ocLeft = 150;
self.viewA.ocTop = 150;

self.viewB.ocWidth = 50;
self.viewB.ocHeight = 50;
self.viewB.ocLeft = self.viewA.ocLeft;
self.viewB.ocTop = self.viewA.ocTop;
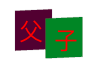
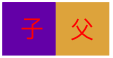
self.viewA.ocWidth = 50;
self.viewA.ocHeight = 50;
self.viewA.ocLeft = 150;
self.viewA.ocTop = 150;

self.viewB.ocWidth = 50;
self.viewB.ocHeight = 50;
self.viewB.ocLeft = self.viewA.ocRight;
self.viewB.ocTop = self.viewA.ocTop;
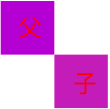
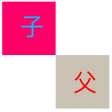
self.viewA.ocWidth = 50;
self.viewA.ocHeight = 50;
self.viewA.ocLeft = 150;
self.viewA.ocTop = 150;

self.viewB.ocWidth = 50;
self.viewB.ocHeight = 50;
self.viewB.ocLeft = self.viewA.ocRight;
self.viewB.ocTop = self.viewA.ocBottom;
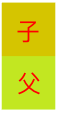
self.viewA.ocWidth = 50;
self.viewA.ocHeight = 50;
self.viewA.ocLeft = 150;
self.viewA.ocTop = 150;

self.viewB.ocWidth = 50;
self.viewB.ocHeight = 50;
self.viewB.ocLeft = self.viewA.ocLeft;
self.viewB.ocTop = self.viewA.ocBottom;
self.viewA.ocWidth = 50;
self.viewA.ocHeight = 50;
self.viewA.ocLeft = 150;
self.viewA.ocTop = 150;

self.viewB.ocWidth = 50;
self.viewB.ocHeight = 50;
self.viewB.ocRight = self.view.bounds.size.width - self.viewA.ocLeft;
self.viewB.ocTop = self.viewA.ocBottom;

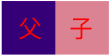
self.viewA.ocWidth = 50;
self.viewA.ocHeight = 50;
self.viewA.ocLeft = 150;
self.viewA.ocTop = 150;

self.viewB.ocWidth = 50;
self.viewB.ocHeight = 50;
self.viewB.ocRight = self.view.bounds.size.width - self.viewA.ocLeft;
self.viewB.ocTop = self.viewA.ocTop;
self.viewA.ocWidth = 50;
self.viewA.ocHeight = 50;
self.viewA.ocLeft = 150;
self.viewA.ocTop = 150;

self.viewB.ocWidth = 50;
self.viewB.ocHeight = 50;
self.viewB.ocRight = self.view.bounds.size.width - self.viewA.ocLeft;
self.viewB.ocBottom = self.view.bounds.size.height - self.viewA.ocTop;
self.viewA.ocWidth = 50;
self.viewA.ocHeight = 50;
self.viewA.ocLeft = 150;
self.viewA.ocTop = 150;

self.viewB.ocWidth = 50;
self.viewB.ocHeight = 50;
self.viewB.ocLeft = self.viewA.ocLeft;
self.viewB.ocBottom = self.view.bounds.size.height - self.viewA.ocTop;
self.viewA.ocWidth = 50;
self.viewA.ocHeight = 50;
self.viewA.ocLeft = 150;
self.viewA.ocTop = 150;

self.viewB.ocWidth = 50;
self.viewB.ocHeight = 50;
self.viewB.ocLeft = self.viewA.ocRight;
self.viewB.ocBottom = self.view.bounds.size.height - self.viewA.ocTop;
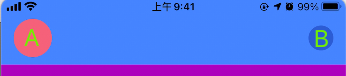
B的centerY等于A的centerY , B靠右边15
    self.headerView = [[UIView alloc] initWithFrame:CGRectMake(0, 0, Phone_Width, HeaderView)];
    self.headerView.addTo(self.view).bgColor([Color theme]);

    self.brandImg = [UIImageView new];
    self.brandImg.addTo(self.headerView).bgColor([Color randomColor]).xywh(15,statusHeight+5,46,46).borderRadius(23);

    self.headerBtn = [UIButton new];
    self.headerBtn.addTo(self.headerView).bgColor([Color randomColor]).borderRadius(15);
    self.headerBtn.ocWidth = 30;
    self.headerBtn.ocHeight = 30;
    self.headerBtn.ocCenterY = self.brandImg.ocCenterY;
    self.headerBtn.ocRight = 15;


 329
329


 被折叠的 条评论
为什么被折叠?
被折叠的 条评论
为什么被折叠?
 到【灌水乐园】发言


