


使用人工智能将结构检测带入 21 世纪!
问题陈述
虽然新技术几乎改变了我们生活的方方面面,但建筑领域似乎正在努力迎头赶上。目前,建筑物的结构状况仍主要由人工检查。简单来说,即使现在需要检查结构是否有任何损坏,工程师也会手动检查所有表面并拍摄一堆照片,同时记录任何裂缝的位置。然后需要在办公室再花几个小时来整理所有照片和笔记,试图从中做出有意义的报告。显然,这是一个费力、昂贵且主观的过程。最重要的是,由于结构的某些部分存在访问限制且难以到达,因此会引起安全问题。举个例子,金门大桥需要定期检查。换句话说,直到最近,还会有受过专门训练的人爬过这座风景如画的建筑,检查它的每一个位置。
幸运的是,可以部署无人驾驶飞机(例如无人机)来拍照,但仍然需要一个人花费数小时和数小时来检查拍摄的每张照片是否有损坏迹象。
这就是我们想要彻底改变检查过程的工作。更具体地说,深度学习通过训练我们的模型能够代替人类完成检测结构照片裂缝的繁琐任务。
根据照片进行裂纹检测分为三个步骤:
图像被分成多个 patches,每个 patch 被分配一个 crack 或 non-crack 标签
在任何检测到的裂纹周围绘制一个矩形
每个图像都标有裂纹或非裂纹
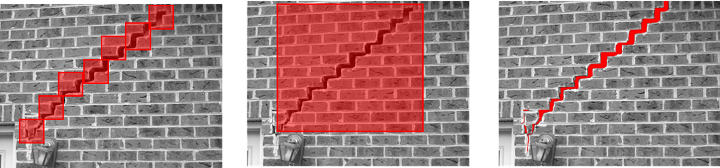
使用图像块分类(左)、边界框回归(中)和像素分割(右)进行裂缝检测(Dais 等人,2021 年)
虽然用于裂缝检测的深度学习方法已针对混凝土表面或沥青进行了广泛研究,但在基于视觉的评估方面以及专门用于砖砌体表面缺陷检测方面的研究很少。我们工作的重点是检测砖石表面照片上的裂缝,包括补丁和像素级别。
数据集准备
训练深度学习模型最重要的部分是数据;模型的准确性在很大程度上取决于数据的质量和数量。真实世界的表现越好,模型在真实结构上“工作”的机会就越高。毫无疑问,与混凝土或沥青相比,砖石表面的均匀度较低,噪音也明显较大。此外,没有可用的砖石表面裂缝照片数据集。为了解决数据不足的问题,我在网上查找了相关的照片,同时我拿着相机把格罗宁根市中心的所有裂缝都拍了下来!
已开发的深度学习方法的一个普遍缺陷是,它们在单调背景上进行测试时取得了显著的效果,但在复杂背景的图像上进行测试时,它们的准确性会严重下降。窗户、门、装饰品、标签、灯、电缆、植被等物体在裂缝检测过程中可以被表征为噪声,网络需要学习消除它们以准确检测裂缝。因此,在拍照时也有意包括了这些物体。
因此,根据包含复杂背景的砖石结构照片准备了一个广泛的数据集,现在我们已准备好进行下一步:训练深度学习模型。
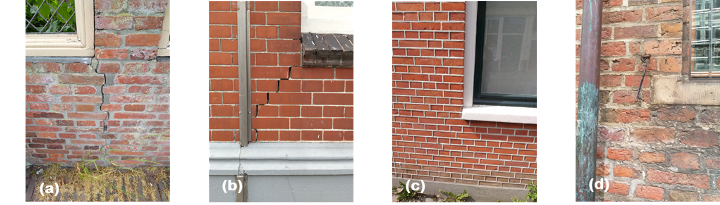
有裂缝和无裂缝的结构图像(Dais 等人,2021 年)
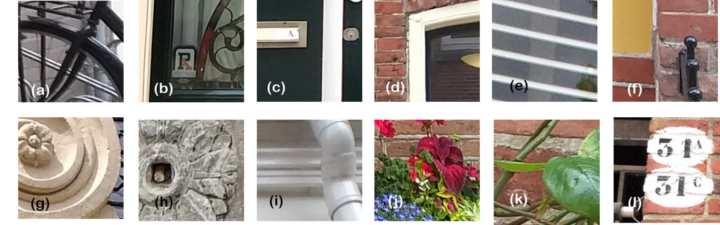
可以在结构立面上找到的物体(Dais 等人,2021 年)
训练模型
关于裂纹检测,本文检查了使用不同CNN将砖石表面图像分类为裂纹和非裂纹的基于 ImageNet 预训练模型效果。考虑的网络是:VGG16、MobileNet、MobileNetV2、InceptionV3、DenseNet121、DenseNet169、ResNet34 和 ResNet50。最好的结果是使用 MobileNet 的预训练模型,MobileNet 是一种轻量级网络,注定要在计算有限的平台上运行。特别注意的是,经过预训练的 MobileNet 获得了 95.3% 的准确率,而当不使用预训练模型时,准确率下降到 89.0%。
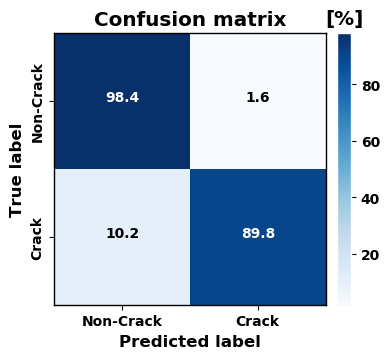
使用 MobileNet 获得的混淆矩阵(Dais 等人,2021 年)
对于裂缝分割 U-net 和特征金字塔网络(FPN),一种通用的金字塔表示,并将其与不同的 CNN 相结合,一起作为训练的主干网络。
U-net-MobileNet(U-Net as base-model with MobileNet as backbone)和 FPN-InceptionV3(FPN as base-model with InceptionV3 as backbone)获得了最高的 F1 分数,即 79.6%。未加载预训练的 U-net 和 U-net-MobileNet 的获得了相似的 F1 分数,分别为 75.7% 和 75.4%。因此,使用预训练网络作为主干网络可将 F1 分数提高约 4%。同样,迁移学习似乎可以解决我们很大问题!
用于裂纹分割的数据集的特点是存在严重的类别不平衡,即背景类占据照片的最大部分,而裂纹只存在于有限的像素。由于这种不平衡,如果不采取特殊措施,网络在预测背景类别时往往会变得过于自信,这可能导致裂缝的错误分类和大量的假阴性。为了克服这个问题,研究了不同的损失函数。加权交叉熵损失函数允许网络通过增加正错误成本的权重来关注正类,其表现优于其他函数。

原始图像、ground truth 和使用 U-net-MobileNet 的预测(Dais 等人,2021)
Code
import os


folder = {}
# Use this to easily run the code in different directories/devices
folder['initial'] = 'C:/Users/jimar/Dimitris/python/'
# The path where the repository is stored
folder['main'] = folder['initial'] + 'crack_detection_CNN_masonry/'


# if folder['main'] == '', then the current working directory will be used
if folder['main'] == '':
    folder['main'] = os.getcwd()


import sys
sys.path.append(folder['main'])


from config_class import Config


cnf = Config(folder['main'])
args = cnf.set_repository()


# Set some parameters
IMAGE_DIMS = cnf.IMAGE_DIMS
BS = cnf.BS
epochs = cnf.epochs
INIT_LR = cnf.INIT_LR
N_FILTERS = cnf.N_FILTERS
info = cnf.info
mode = cnf.mode


# When using DeepCrack, eager execution needs to be enabled
if args["model"] == 'DeepCrack':
    import tensorflow as tf
    tf.enable_eager_execution()


from subroutines.HDF5 import HDF5DatasetGeneratorMask


#%%

if mode == 'train':


    from keras.preprocessing.image import ImageDataGenerator
    from keras.callbacks import ModelCheckpoint
    from keras.callbacks import CSVLogger

    from subroutines.callbacks import EpochCheckpoint
    from subroutines.callbacks import TrainingMonitor
    from subroutines.visualize_model import visualize_model

    #%%
    # Prepare model for training
    #

    # Define metrics
    from metrics_class import Metrics
    metrics = Metrics(args).define_Metrics()

    # Define loss
    from loss_class import Loss
    loss = Loss(args).define_Loss()

    # Define optimizer
    from optimizer_class import Optimizer
    opt = Optimizer(args, INIT_LR).define_Optimizer()

    # Define Network and compile model
    from network_class import Network
    model = Network(args, IMAGE_DIMS, N_FILTERS, BS, INIT_LR, opt, loss, metrics).define_Network()


    # Visualize model
    try:
        visualize_model(model, args['architecture'], args['summary'])
    except:
        from subroutines.visualize_model import visualize_model_tf
        visualize_model_tf(model, args['architecture'], args['summary'])

    #%%

    # Data augmentation for training and validation sets
    if args['aug'] == True:
        aug = ImageDataGenerator(rotation_range=20, zoom_range=0.15,
            width_shift_range=0.2, height_shift_range=0.2, shear_range=0.15,
            horizontal_flip=True, fill_mode='nearest')
    else:
        aug = None

    # Load data generators
    trainGen = HDF5DatasetGeneratorMask(args['TRAIN_HDF5'], BS, aug=aug, shuffle=False, binarize=args['binarize'])
    valGen = HDF5DatasetGeneratorMask(args['VAL_HDF5'], BS, aug=aug, shuffle=False, binarize=args['binarize'])


    #%%

    # Callback that streams epoch results to a CSV file
    # https://keras.io/api/callbacks/csv_logger/
    csv_logger = CSVLogger(args['CSV_PATH'], append=True, separator=';')

    # serialize model to JSON
    try:
        model_json = model.to_json()
        with open(args['model_json'], 'w') as json_file:
            json_file.write(model_json)
    except:
        pass


    # Define whether the whole model or the weights only will be saved from the ModelCheckpoint
    # Refer to the documentation of ModelCheckpoint for extra details
    # https://keras.io/api/callbacks/model_checkpoint/

    temp = '{}_{}'.format(info, args['counter']) + "_epoch_{epoch}_" + \
            args['metric_to_plot'] + "_{val_" + args['metric_to_plot'] +":.3f}.h5"

    if args['save_model_weights'] == 'model':
        ModelCheckpoint_file = args["checkpoints"] + temp
        save_weights_only = False

    elif args['save_model_weights'] == 'weights':
        ModelCheckpoint_file = args['weights'] + temp
        save_weights_only = True

    epoch_checkpoint = EpochCheckpoint(args['checkpoints'], args['weights'], args['save_model_weights'],
                        every=args['every'], startAt=args['start_epoch'], info=info, counter=args['counter'])

    training_monitor = TrainingMonitor(args['FIG_PATH'], jsonPath=args['JSON_PATH'],
                                       startAt=args['start_epoch'], metric=args['metric_to_plot'])

    model_checkpoint = ModelCheckpoint(ModelCheckpoint_file, monitor='val_{}'.format(args['metric_to_plot']),
                                      verbose=1, save_best_only=True, mode='max', save_weights_only=save_weights_only)

    # Construct the set of callbacks
    callbacks = [csv_logger,
                 epoch_checkpoint,
                 training_monitor,
                 model_checkpoint]

    #%%
    # Train the network
    #

    H = model.fit_generator(
        trainGen.generator(),
        steps_per_epoch=trainGen.numImages // BS,
        validation_data=valGen.generator(),
        validation_steps=valGen.numImages // BS,
        epochs=epochs,
        max_queue_size=BS * 2,
        callbacks=callbacks, verbose=1)


#%%


elif mode == 'evaluate':


    # load pretrained model/weights
    from evaluate_class import LoadModel
    model = LoadModel(args, IMAGE_DIMS, BS).load_pretrained_model()


    # Do not use data augmentation when evaluating model: aug=None
    evalGen = HDF5DatasetGeneratorMask(args['EVAL_HDF5'], BS, aug=None, shuffle=False, binarize=args['binarize'])

    # Use the pretrained model to fenerate predictions for the input samples from a data generator
    predictions = model.predict_generator(evalGen.generator(),
                                          steps=evalGen.numImages // BS+1, max_queue_size=BS * 2, verbose=1)


    # Define folder where predictions will be stored
    predictions_folder = '{}{}/'.format(args['predictions'], args['pretrained_filename'])
    # Create folder where predictions will be stored
    cnf.check_folder_exists(predictions_folder)

    # Visualize  predictions
    # Create a plot with original image, ground truth and prediction
    # Show the metrics for the prediction
    # Output will be stored in a subfolder of the predictions folder (args['predictions_subfolder'])
    from subroutines.visualize_predictions import Visualize_Predictions
    Visualize_Predictions(args, predictions)
结论
通过我们的研究,我们展示了建筑行业的现代化,特别是检查过程的现代化是可行的。当然,这些新技术有着无限的可能性,只有通过进一步的研究才能揭示出来。
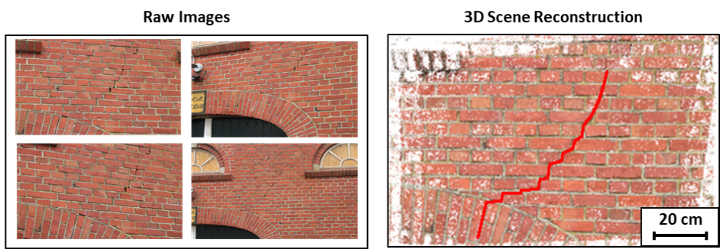
使用 3D 场景重建进行裂缝检测
· END ·
HAPPY LIFE


 7151
7151

 被折叠的 条评论
为什么被折叠?
被折叠的 条评论
为什么被折叠?
 到【灌水乐园】发言


