


点击下方卡片,关注“小白玩转Python”公众号
介绍
在大型语言模型(LLMs)兴起之前,边缘 AI 是一个热门话题,这得益于其在设备上直接运行机器学习模型的显著能力。这并不是说这个话题已经失去了相关性;事实上,许多科技巨头现在正将注意力转向在移动平台上部署 LLMs。
虽然我们今天不会讨论生成性 AI,但我们将重新审视经典的计算机视觉任务——目标检测。这篇博客提供了一个全面的教程,介绍如何将 Ultralytics 的最新 YOLOv10 目标检测模型转换和量化为 LiteRT(前称 TensorFlow Lite)格式,在生成的 LiteRT 模型上运行推理,并将其部署在 Android 上进行实时检测。
如果你有目标检测和在设备上部署模型的经验,你可能想知道为什么 MobileNet SSD 或 EfficientDet Lite 不是最佳选择。原因如下:
为什么选择 YOLOv10 而不是其他?
虽然 MobileNet SSD 和 EfficientDet Lite 表现良好,但它们在检测较小物体时存在困难。然而,YOLOv10 可以快速有效地检测到较小的物体。
在我们开始之前,让我们简要了解一下 YOLOv10 模型以及 LiteRT 是什么。
YOLOv10
作为 YOLO 模型家族的高级版本,YOLOv10 是实时目标检测任务的最新首选。其增强的架构和训练技术使其特别适合边缘部署。
 YOLOv10 模型变体
在所有变体中,纳米版本(YOLOv10-N)最适合移动部署,因为它能够在资源受限的环境中运行。在此处了解更多关于 YOLOv10 的信息。
注意:我们将使用在 COCO 数据集上训练过的预训练 YOLOv10-N 模型。
LiteRT
LiteRT,前称 TensorFlow Lite,是 Google 的高性能设备上 AI 运行时。它允许你轻松地将 TensorFlow、PyTorch 和 JAX 模型转换并以 TFLite 格式运行。现在你已经有了概览,让我们深入编码部分。这是我们项目的流程:
 流程:在 Android 上将 YOLOv10-N 转换为 LiteRT
步骤 1:模型转换
几年前,将 YOLO 模型转换为 TF Lite 是相当具有挑战性的,因为模型的复杂步骤和显著的架构差异。然而,现在情况已不再如此,因为 Ultralytics 现在为你处理了所有的繁重工作。通过克隆此仓库开始获取全部代码:https://github.com/NSTiwari/YOLOv10-LiteRT-Android
# Install Ultralytics.
!pip install ultralytics


# Load the YOLOv10n model.
model = YOLO("yolov10n.pt")


# Export the model to LiteRT (TF Lite) format.
model.export(format="tflite")
export() 函数接受以下参数:
format:模型的输出格式,如 tflite、onnx、tfjs、openvino、torchscript 等。
imgsz:模型输入的期望图像大小(高度、宽度)。默认为 640 x 640。
int8:启用模型的 INT8 量化以加快推理速度。默认设置为 false。
你可以根据用例调整许多其他参数,但上面提到的参数现在应该足够好了。在仅仅两行代码中,你可以完全将 YOLO PyTorch 模型转换为 LiteRT 格式。以下是转换过程的背景:PyTorch → ONNX 图 → TensorFlow SavedModel → LiteRT。
步骤 2:解释 LiteRT 模型
Google AI Edge 提供了模型探索器,这是一个类似于 Netron 的模型可视化工具,提供对模型图和架构的详细洞察。
# Install Model Explorer.
!pip install ai-edge-model-explorer


LITE_RT_EXPORT_PATH = "yolov10n_saved_model/" # @param {type : 'string'}
LITE_RT_MODEL = "yolov10n_float16.tflite" # @param {type : 'string'}


LITE_RT_MODEL_PATH = LITE_RT_EXPORT_PATH + LITE_RT_MODEL


# Load the LiteRT model in Model Explorer.
model_explorer.visualize(LITE_RT_MODEL_PATH)
在模型探索器上可视化的 yolov10_float16.tflite
如果你查看输出张量,你会看到只有一个节点(Identity),形状为 [1, 300, 6],与 MobileNet SSD 模型不同,后者通常有四个输出张量。你也可以使用 AI Edge LiteRT 库来解释模型。
# Install Google AI Edge LiteRT
!pip install ai-edge-litert


# Load the TF Lite model.
interpreter = Interpreter(model_path = LITE_RT_MODEL_PATH)
interpreter.allocate_tensors()


# Get input and output details.
input_details = interpreter.get_input_details()
output_details = interpreter.get_output_details()


print(f"Model input size: {input_size}")
print(f"Output tensor shape: {output_details[0]['shape']}")
模型输入大小为 640,输出张量形状 [1, 300, 6] 表示批次大小(1)、每张图片的最大检测数量(300)以及值 [xmin, ymin, xmax, ymax, score, class]。
步骤 3:推理转换后的 LiteRT 模型
现在是推理时间。现在我们已经解释了模型的架构,我们可以继续在 Python 上使用 OpenCV 进行推理。
注意:导出的 LiteRT 模型的结果需要后处理,包括归一化边界框坐标并将类 ID 映射到相应的标签。
在 Colab 笔记本中,我包含了一些实用函数来处理所有必需的后处理步骤。
def detect(input_data, is_video_frame=False):
    input_size = input_details[0]['shape'][1]


    if is_video_frame:
        original_height, original_width = input_data.shape[:2]
        image = cv2.cvtColor(input_data, cv2.COLOR_BGR2RGB)
        image = cv2.resize(image, (input_size, input_size))
        image = image / 255.0
    else:
        image, (original_height, original_width) = load_image(input_data, input_size)


    interpreter.set_tensor(input_details[0]['index'], np.expand_dims(image, axis=0).astype(np.float32))
    interpreter.invoke()


    output_data = [interpreter.get_tensor(detail['index']) for detail in output_details]
    return output_data, (original_height, original_width)


# Postprocess the output.
def postprocess_output(output_data, original_dims, labels, confidence_threshold):
  output_tensor = output_data[0]
  detections = []
  original_height, original_width = original_dims


  for i in range(output_tensor.shape[1]):
    box = output_tensor[0, i, :4]
    confidence = output_tensor[0, i, 4]
    class_id = int(output_tensor[0, i, 5])


    if confidence > confidence_threshold:
      x_min = int(box[0] * original_width)
      y_min = int(box[1] * original_height)
      x_max = int(box[2] * original_width)
      y_max = int(box[3] * original_height)


      label_name = labels.get(str(class_id), "Unknown")


      detections.append({
          "box": [y_min, x_min, y_max, x_max],
          "score": confidence,
          "class": class_id,
          "label": label_name
      })


  return detections
Colab 笔记本支持对图像和视频进行推理。以下是我获得的一些结果。
 在图像上的推理
 在图像上的推理
 在视频上的推理
令人印象深刻的是,转换后的 LiteRT 模型在量化后仍然表现出色,有效地检测到即使是很小的物体。现在,我们准备将模型部署在 Android 上进行设备上推理。
步骤 4:在 Android 上部署模型
在步骤 1 中,我们克隆了仓库来运行 Colab 笔记本,其中也包括了一个示例 Android 应用。笔记本中的最后一步让你可以下载 LiteRT 模型。下载后,将其复制到 Android 应用的 assets 文件夹中。默认文件名为 yolov10n_float16.tflite。如果你使用不同的文件名,请确保相应地更新 Constants.kt 文件中的第 4 行。
// Change this with your TF Lite model name.
const val MODEL_PATH = "yolov10n_float16.tflite"
Detector.kt 文件包含执行推理的逻辑,以及提取检测到的对象的边界框、置信度得分和标签。
// Detects the objects.
class Detector(
    private val context: Context,
    private val modelPath: String,
    private val labelPath: String?,
    private val detectorListener: DetectorListener,
    private val message: (String) -> Unit
) {
    private var interpreter: Interpreter
    private var labels = mutableListOf<String>()


    private var tensorWidth = 0
    private var tensorHeight = 0
    private var numChannel = 0
    private var numElements = 0


    private val imageProcessor = ImageProcessor.Builder()
        .add(NormalizeOp(INPUT_MEAN, INPUT_STANDARD_DEVIATION))
        .add(CastOp(INPUT_IMAGE_TYPE))
        .build()


    init {
        val options = Interpreter.Options().apply{
            this.setNumThreads(4)
        }


        val model = FileUtil.loadMappedFile(context, modelPath)
        interpreter = Interpreter(model, options)


        labels.addAll(extractNamesFromMetadata(model))
        if (labels.isEmpty()) {
            if (labelPath == null) {
                message("Model not contains metadata, provide LABELS_PATH in Constants.kt")
                labels.addAll(MetaData.TEMP_CLASSES)
            } else {
                labels.addAll(extractNamesFromLabelFile(context, labelPath))
            }
        }


        labels.forEach(::println)


        val inputShape = interpreter.getInputTensor(0)?.shape()
        val outputShape = interpreter.getOutputTensor(0)?.shape()


        if (inputShape != null) {
            tensorWidth = inputShape[1]
            tensorHeight = inputShape[2]


            // If in case input shape is in format of [1, 3, ..., ...]
            if (inputShape[1] == 3) {
                tensorWidth = inputShape[2]
                tensorHeight = inputShape[3]
            }
        }


        if (outputShape != null) {
            numElements = outputShape[1]
            numChannel = outputShape[2]
        }
    }


// Extracts bounding box, label, confidence.
private fun bestBox(array: FloatArray) : List<BoundingBox> {
    val boundingBoxes = mutableListOf<BoundingBox>()
    for (r in 0 until numElements) {
        val cnf = array[r * numChannel + 4]
        if (cnf > CONFIDENCE_THRESHOLD) {
            val x1 = array[r * numChannel]
            val y1 = array[r * numChannel + 1]
            val x2 = array[r * numChannel + 2]
            val y2 = array[r * numChannel + 3]
            val cls = array[r * numChannel + 5].toInt()
            val clsName = labels[cls]
            boundingBoxes.add(
                BoundingBox(
                    x1 = x1, y1 = y1, x2 = x2, y2 = y2,
                    cnf = cnf, cls = cls, clsName = clsName
                )
            )
        }
    }
    return boundingBoxes
}
之后,OverlayView.kt 归一化边界框坐标并将它们叠加在摄像头流上以可视化结果。
class OverlayView(context: Context?, attrs: AttributeSet?) : View(context, attrs) {


    private var results = listOf<BoundingBox>()
    private val boxPaint = Paint()
    private val textBackgroundPaint = Paint()
    private val textPaint = Paint()


    private var bounds = Rect()
    private val colorMap = mutableMapOf<String, Int>()


    init {
        initPaints()
    }


    fun clear() {
        results = listOf()
        textPaint.reset()
        textBackgroundPaint.reset()
        boxPaint.reset()
        invalidate()
        initPaints()
    }


    private fun initPaints() {
        textBackgroundPaint.color = Color.WHITE
        textBackgroundPaint.style = Paint.Style.FILL
        textBackgroundPaint.textSize = 42f


        textPaint.color = Color.WHITE
        textPaint.style = Paint.Style.FILL
        textPaint.textSize = 42f
    }


    override fun draw(canvas: Canvas) {
        super.draw(canvas)


        results.forEach { boundingBox ->
            // Get or create a color for this label
            val color = getColorForLabel(boundingBox.clsName)
            boxPaint.color = color
            boxPaint.strokeWidth = 8F
            boxPaint.style = Paint.Style.STROKE


            val left = boundingBox.x1 * width
            val top = boundingBox.y1 * height
            val right = boundingBox.x2 * width
            val bottom = boundingBox.y2 * height


            canvas.drawRoundRect(left, top, right, bottom, 16f, 16f, boxPaint)


            val drawableText = "${boundingBox.clsName} ${Math.round(boundingBox.cnf * 100.0) / 100.0}"


            textBackgroundPaint.getTextBounds(drawableText, 0, drawableText.length, bounds)
            val textWidth = bounds.width()
            val textHeight = bounds.height()


            val textBackgroundRect = RectF(
                left,
                top,
                left + textWidth + BOUNDING_RECT_TEXT_PADDING,
                top + textHeight + BOUNDING_RECT_TEXT_PADDING
            )
            textBackgroundPaint.color = color // Set background color same as bounding box
            canvas.drawRoundRect(textBackgroundRect, 8f, 8f, textBackgroundPaint)


            canvas.drawText(drawableText, left, top + textHeight, textPaint)
        }
    }


    private fun getColorForLabel(label: String): Int {
        return colorMap.getOrPut(label) {
            // Generate a random color or you can use a predefined set of colors
            Color.rgb((0..255).random(), (0..255).random(), (0..255).random())
        }
    }


    fun setResults(boundingBoxes: List<BoundingBox>) {
        results = boundingBoxes
        invalidate()
    }


    companion object {
        private const val BOUNDING_RECT_TEXT_PADDING = 8
    }
}
最后,在 Android Studio 中打开项目,构建它,然后将手机连接起来安装应用。这是 Android 上的最终输出。推理时间接近 300 毫秒。
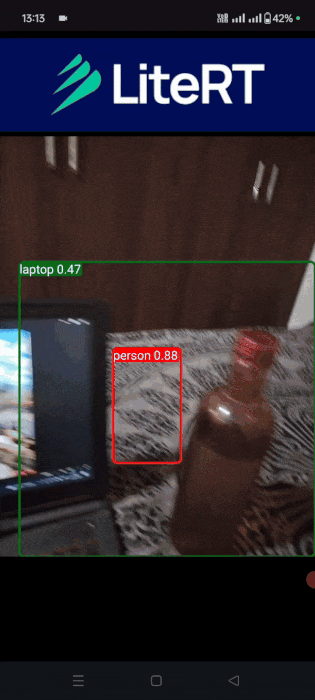
Android 上的实时目标检测
· END ·
🌟 想要变身计算机视觉小能手?快来「小白玩转Python」公众号!
回复“Python视觉实战项目”,解锁31个超有趣的视觉项目大礼包!🎁

本文仅供学习交流使用,如有侵权请联系作者删除


 3万+
3万+

 被折叠的 条评论
为什么被折叠?
被折叠的 条评论
为什么被折叠?
 到【灌水乐园】发言


