


本文介绍了如何将 Envoy Gateway 作为 Istio 服务网格中的入口网关集成,增强应用的安全性和可访问性。
阅读原文请转到:https://jimmysong.io/blog/envoy-gateway-integration-istio-mesh/
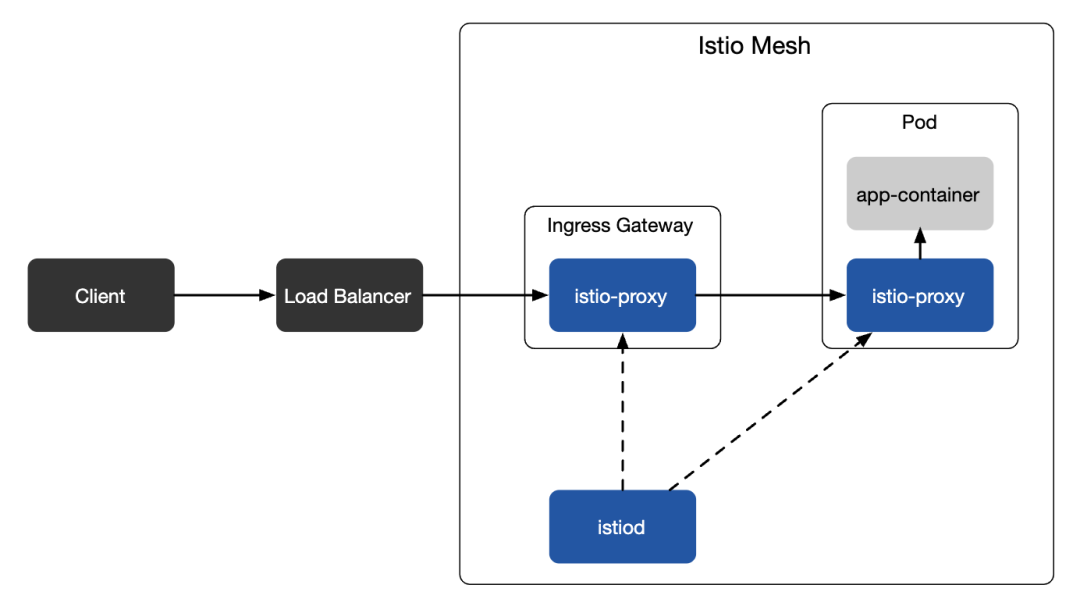
Istio 提供了对入口网关的强大而灵活的支持,利用 Envoy 代理在其 sidecar 模式下运行。尽管 Istio 专注于管理集群内服务之间的通信,Envoy Gateway 旨在将应用程序暴露给外部世界,处理用户请求,并支持高级功能,如 OIDC 单点登录。通过结合 Istio 服务网格的功能和 Envoy Gateway 的高级网关功能,可以增强整体应用程序的可访问性和安全性。
下图显示了 Istio 网格中入口网关的流量路径。
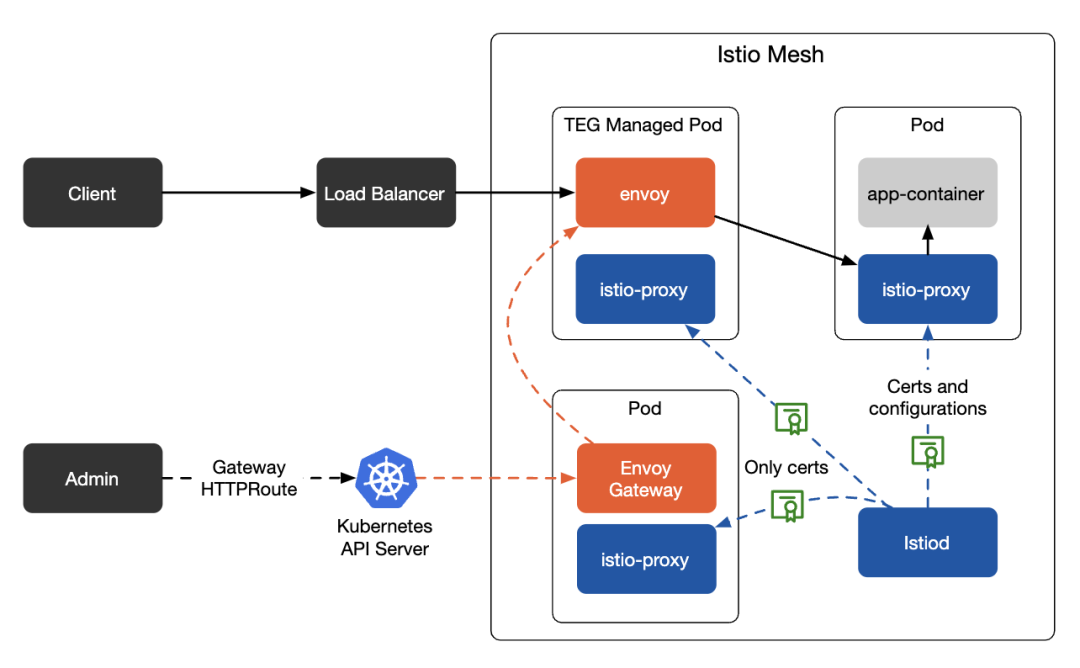
下一个图表显示了在引入 Envoy Gateway 后,流量如何从 Istio 网格的边缘流入内部网络。
准备 Envoy Gateway 与 Istio 之间的互操作性
要将 Envoy Gateway 用作 Istio 的入口网关,请考虑以下关键点:
• 在 Istio 安装期间避免启用入口网关。我们将手动安装并配置 Envoy Gateway 作为入口网关。
• 由于 Istio 和 Envoy Gateway 都使用 Envoy 作为代理,确保 Istio 将 Envoy sidecar 注入到 Envoy Gateway 的网关 Pod 中,以允许与 Istio 的数据平面安全通信。
• 配置由 Envoy Gateway 创建的 Envoy 代理的路由类型为
Service而不是Endpoint,以确保正确路由。
按照 快速启动文档 安装 Envoy Gateway。标记 Envoy Gateway 的命名空间以确保数据平面获得 Istio sidecar 注入:
kubectl label namespace envoy-gateway-system --overwrite=true istio-injection=enabled配置 Envoy Gateway 的 sidecar 以不拦截进入网关的流量。注入的 sidecar 确保 Envoy Gateway 的组件及其创建的代理被包含在 Istio 网格中,并安装正确的证书以进行安全通信。
control-plane-tls.yaml
spec:
  ports:
  - port: 18000
    appProtocol: tls
应用补丁:
kubectl patch service -n envoy-gateway-system envoy-gateway --type strategic --patch-file control-plane-tls.yaml配置 Envoy Gateway 不拦截入站流量:
teg-sidecars-no-inbound.yaml
apiVersion: gateway.envoyproxy.io/v1alpha1
kind: EnvoyProxy
metadata:
  name: data-plane-sidecars
  namespace: envoy-gateway-system
spec:
  provider:
    type: Kubernetes
    kubernetes:
      envoyDeployment:
        pod:
          annotations:
            traffic.sidecar.istio.io/includeInboundPorts: ""
  routingType: Service
应用配置:
kubectl apply -f teg-sidecars-no-inbound.yaml修改 GatewayClass 配置以将 sidecar 配置应用于 Envoy Gateway 数据平面中的所有 EnvoyProxy:
gtwcls-use-envoyproxy.yaml
spec:
  parametersRef:
    group: gateway.envoyproxy.io
    kind: EnvoyProxy
    namespace: envoy-gateway-system
    name: data-plane-sidecars
应用补丁:
kubectl patch gatewayclass teg --patch-file gtwcls-use-envoyproxy.yaml --type merge安装 Istio
使用 minimal 配置文件部署 Istio 以避免部署入口网关:
istioctl install --set profile=minimal -y重启 Envoy Gateway 控制平面
在 Istio 的 sidecar 注入准备好后,重启所有 Envoy Gateway 控制平面的 pod:
for d in envoy-gateway envoy-ratelimit teg-envoy-gateway teg-redis;
    do kubectl rollout restart deployment -n envoy-gateway-system $d;
done
部署测试应用程序
在安装 Istio 后部署测试应用程序,以确保它们也接收到 sidecar 注入:
kubectl create namespace httpbin
kubectl label namespace httpbin --overwrite=true istio-injection=enabled
kubectl apply -n httpbin -f https://raw.githubusercontent.com/istio/istio/master/samples/httpbin/httpbin.yaml
配置 Envoy Gateway
现在配置 Envoy Gateway 以处理边缘流量:
apps-gateway.yaml
apiVersion: gateway.networking.k8s.io/v1
kind: Gateway
metadata:
  name: apps
  namespace: httpbin
spec:
  gatewayClassName: teg
  listeners:
  - name: http
    protocol: HTTP
    port: 80
应用配置:
kubectl apply -f apps-gateway.yaml部署应用网关,包括以下容器:
•
istio-init:由 Istio 注入以修改 pod iptables。•
envoy:由 Envoy Gateway 控制,充当入口网关。•
istio-proxy:由 Istio 注入,负责与内部集群 pod 的通信。•
shutdown-manager:由 Envoy Gateway 控制,负责 pod 生命周期管理。
创建一个 HTTP 路由:
httpbin-route.yaml
apiVersion: gateway.networking.k8s.io/v1
kind: HTTPRoute
metadata:
  name: httpbin
  namespace: httpbin
spec:
  parentRefs:
  - group: gateway.networking.k8s.io
    kind: Gateway
    name: apps
  hostnames:
  - "www.example.com"
  rules:
  - matches:
    - path:
        type: PathPrefix
        value: /httpbin/
    filters:
    - type: URLRewrite
      urlRewrite:
        hostname: httpbin.httpbin.svc.cluster.local
        path:
          type: ReplacePrefixMatch
          replacePrefixMatch: /
    backendRefs:
    - kind: Service
      name: httpbin
      port: 8000
应用路由配置:
kubectl apply -f httpbin-route.yaml发送测试请求
获取网关的负载平衡器 IP 地址并发送测试请求:
export GATEWAY_URL=$(kubectl get svc -n envoy-gateway-system -l gateway.envoyproxy.io/owning-gateway-name=apps -o jsonpath='{.items[0].status.loadBalancer.ingress[0].ip}')
curl -v -H Host:www.example.com http://$GATEWAY_URL/httpbin/get
你应该能看到来自 httpbin 服务的正确响应:
*   Trying 34.41.0.90:80...
* Connected to 34.41.0.90 (34.41.0.90) port 80
> GET /httpbin/get HTTP/1.1
> Host:www.example.com
> User-Agent: curl/8.7.1
> Accept: */*
>
* Request completely sent off
< HTTP/1.1 200 OK
< server: envoy
< date: Wed, 31 Jul 2024 08:21:58 GMT
< content-type: application/json
< content-length: 282
< access-control-allow-origin: *
< access-control-allow-credentials: true
< x-envoy-upstream-service-time: 11
<
{
  "args": {},
  "headers": {
    "Accept": "*/*",
    "Host": "www.example.com",
    "User-Agent": "curl/8.7.1",
    "X-Envoy-Attempt-Count": "1",
    "X-Envoy-External-Address": "123.120.227.173"
  },
  "origin": "123.120.227.173",
  "url": "http://www.example.com/get"
}
* Connection #0 to host 34.41.0.90 left intact
启用严格 mTLS
通过应用以下配置启用严格 mTLS:
strict-mtls.yaml
apiVersion: security.istio.io/v1beta1
kind: PeerAuthentication
metadata:
  name: "default"
  namespace: "istio-system"
spec:
  mtls:
    mode: STRICT
应用配置:
kubectl apply -f strict-mtls.yaml为网关启用 TLS
创建服务签名的根证书和私钥:
mkdir example_certs
openssl req -x509 -sha256 -nodes -days 365 -newkey rsa:2048 -subj '/O=example Inc./CN=example.com' -keyout example_certs/example.com.key -out example_certs/example.com.crt
为 www.example.com 创建证书和私钥:
openssl req -out example_certs/www.example.com.csr -newkey rsa:2048 -nodes -keyout example_certs/www.example.com.key -subj "/CN=www.example.com/O=www organization"
openssl x509 -req -sha256 -days 365 -CA example_certs/example.com.crt -CAkey example_certs/example.com.key -set_serial 0 -in example_certs/www.example.com.csr -out example_certs/www.example.com.crt
为入口网关创建一个密钥:
kubectl create -n httpbin secret tls httpbin-credential --key=example_certs/www.example.com.key --cert=example_certs/www.example.com.crt配置入口网关:
tls-apps-gateway.yaml
apiVersion: gateway.networking.k8s.io/v1
kind: Gateway
metadata:
  name: apps
  namespace: httpbin
spec:
  gatewayClassName: teg
  listeners:
  - name: https
    protocol: HTTPS
    port: 443
    tls:
      mode: Terminate
      certificateRefs:
      - name: httpbin-credential
应用配置:
kubectl apply -f tls-apps-gateway.yaml发送测试请求:
curl -v -H Host:www.example.com --resolve "www.example.com:443:$GATEWAY_URL" --cacert example_certs/example.com.crt "https://www.example.com:443/httpbin/get"你应该可以通过 HTTPS 在网格内访问 httpbin 服务。
结论
通过将 Envoy Gateway 集成为 Istio 服务网格中的入口网关,你可以利用两者的优势:Istio 的强大服务网格能力和 Envoy Gateway 的高级网关功能。这种设置增强了你的应用程序的安全性、可扩展性和灵活性,提供了无缝且安全的用户体验。通过仔细的配置和正确的工具,管理服务网格内外的流量变得更加高效和有效,确保你的应用程序始终可访问并且安全。
获取更多云原生社区资讯,加入微信群,请加入云原生社区,点击阅读原文了解更多。


 767
767

 被折叠的 条评论
为什么被折叠?
被折叠的 条评论
为什么被折叠?
 到【灌水乐园】发言


