


STM32学习笔记1——最简单的GPIO
前面的学习参照的是《STM32新手入门教程》
一、配置GPIO
LED局部原理图如下图所示:
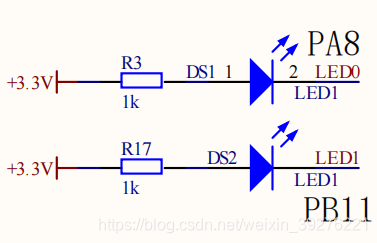
现在以配置LED0(PA8)这个引脚为例进行说明。
1.定义初始化结构体变量
GPIO_InitTypeDef GPIO_InitStrcture;
转到结构体的定义:
typedef struct
{
  uint16_t GPIO_Pin;             /*!< Specifies the GPIO pins to be configured.
                                      This parameter can be any value of @ref GPIO_pins_define */

  GPIOSpeed_TypeDef GPIO_Speed;  /*!< Specifies the speed for the selected pins.
                                      This parameter can be a value of @ref GPIOSpeed_TypeDef */

  GPIOMode_TypeDef GPIO_Mode;    /*!< Specifies the operating mode for the selected pins.
                                      This parameter can be a value of @ref GPIOMode_TypeDef */
}GPIO_InitTypeDef;
2.使能IO口时钟
//使能PA的外设时钟
RCC_APB2PeriphClockCmd(RCC_APB2Periph_GPIOA,ENABLE);
转到函数定义去学习,这个函数的第一个参数用于指定打开那一组IO口的时钟,第二个参数设置打开或者关闭使能。
3.配置IO口引脚
//配置PA口的引脚
GPIO_InitStrcture.GPIO_Pin=GPIO_Pin_8;
4.配置IO口输入输出模式
//配置为输出推挽模式
GPIO_InitStrcture.GPIO_Mode=GPIO_Mode_Out_PP;
5.配置IO口输出速度
//可选择10Mhz、20Mhz、50Mhz
GPIO_InitStrcture.GPIO_Speed=GPIO_Speed_50MHz;
6.初始化相应寄存器
//初始化A口相应寄存器
GPIO_Init(GPIOA,&GPIO_InitStrcture);
LED0和LED1两个引脚的配置
led.h
#ifndef __LED_H
#define __LED_H

#include "stm32f10x.h"

#define LED0_OFF  GPIO_SetBits(GPIOA,GPIO_Pin_8)
#define LED0_ON   GPIO_ResetBits(GPIOA,GPIO_Pin_8)
#define LED0_REV  GPIO_WriteBit(GPIOA,GPIO_Pin_8,(BitAction)(1-GPIO_ReadOutputDataBit(GPIOA,GPIO_Pin_8)))

#define LED1_OFF  GPIO_SetBits(GPIOB,GPIO_Pin_11)
#define LED1_ON   GPIO_ResetBits(GPIOB,GPIO_Pin_11)
#define LED1_REV  GPIO_WriteBit(GPIOB,GPIO_Pin_11,(BitAction)(1-GPIO_ReadOutputDataBit(GPIOB,GPIO_Pin_11)))


void LED_GPIO_Config(void);

#endif /*__LED_H */
led.c
#include "led.h"
#include "stm32f10x.h"

void LED_GPIO_Config(void)
{
	GPIO_InitTypeDef GPIO_InitStrcture;

	//set PA8
	RCC_APB2PeriphClockCmd(RCC_APB2Periph_GPIOA,ENABLE);//clk

	GPIO_InitStrcture.GPIO_Pin=GPIO_Pin_8;							//Pin
	GPIO_InitStrcture.GPIO_Speed=GPIO_Speed_50MHz;			//speed
	GPIO_InitStrcture.GPIO_Mode=GPIO_Mode_Out_PP;				//mode

	GPIO_Init(GPIOA,&GPIO_InitStrcture);								//init

	//set PB11
	RCC_APB2PeriphClockCmd(RCC_APB2Periph_GPIOB,ENABLE);//clk
	GPIO_InitStrcture.GPIO_Pin=GPIO_Pin_11;							//Pin
	GPIO_InitStrcture.GPIO_Speed=GPIO_Speed_50MHz;			//speed
	GPIO_InitStrcture.GPIO_Mode=GPIO_Mode_Out_PP;				//mode

	GPIO_Init(GPIOB,&GPIO_InitStrcture);								//init

}
二、按键输入控制LED的点亮
1.按键输入的配置
Key.h
#ifndef __KEY_H
#define __KEY_H


#define KEY1 GPIO_ReadInputDataBit(GPIOC,GPIO_Pin_1)
#define KEY2 GPIO_ReadInputDataBit(GPIOC,GPIO_Pin_13)
#define KEY3 GPIO_ReadInputDataBit(GPIOA,GPIO_Pin_0)

void Key_GPIO_Config(void);

unsigned char KEY_Scan(void);
unsigned char KEY1_Scan(void);
unsigned char KEY2_Scan(void);
unsigned char KEY3_Scan(void);

#endif /* __KEY_H */
Key.c
#include "stm32f10x.h"
#include "Key.h"
#include "delay.h"

void Key_GPIO_Config(void)
{
	GPIO_InitTypeDef GPIO_InitStructure;

	//PC
	RCC_APB2PeriphClockCmd(RCC_APB2Periph_GPIOC,ENABLE);

	GPIO_InitStructure.GPIO_Pin=GPIO_Pin_1|GPIO_Pin_13;
	GPIO_InitStructure.GPIO_Mode=GPIO_Mode_IPU;

	GPIO_Init(GPIOC,&GPIO_InitStructure);

	//PA
	RCC_APB2PeriphClockCmd(RCC_APB2Periph_GPIOA,ENABLE);

	GPIO_InitStructure.GPIO_Pin=GPIO_Pin_0;
	GPIO_InitStructure.GPIO_Mode=GPIO_Mode_IPD;

	GPIO_Init(GPIOA,&GPIO_InitStructure);
}


unsigned char KEY_Scan(void)
{
	unsigned char key_code;
	if(KEY1_Scan()==1) key_code=1;
	else if(KEY2_Scan()==1) key_code=2;
	else if(KEY3_Scan()==1) key_code=3;
	else key_code=0;
	return key_code;
}

unsigned char KEY1_Scan(void)
{
	static char key_up1=0;
	if(KEY1==0)
	{
		Delay(10000);
		if(KEY1==0)
		{
			key_up1=1;
		}
	}
	if(KEY1==1&&key_up1==1)
	{
		key_up1=0;
		return 1;
	}
	return 0;
}

unsigned char KEY2_Scan(void)
{
	static char key_up2=0;

	if(KEY2==0)
	{
		Delay(10000);
		if(KEY2==0)
		{
			key_up2=1;
		}
	}
	if(KEY2==1&&key_up2==1)
	{
		key_up2=0;
		return 1;
	}
	return 0;
}


unsigned char KEY3_Scan(void)
{
	static char key_up3=0;

	if(KEY3==0)
	{
		Delay(10000);
		if(KEY3==0)
		{
			key_up3=1;
		}
	}
	if(KEY3==1&&key_up3==1)
	{
		key_up3=0;
		return 1;
	}
	return 0;
}
2.实现功能
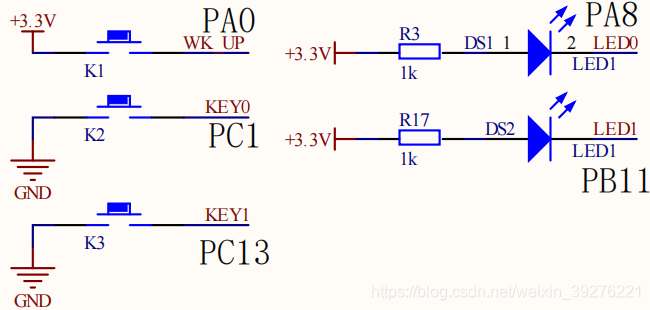
当WK UP按下,LED0、LED1同时取反;
当KEY0按下,LED0取反;
当KEY1按下,LED1取反。
主函数:
#include "stm32f10x.h"
#include "led.h"
#include "Key.h"


int main(void)
{
	unsigned char value=0;

	LED_GPIO_Config();

	Key_GPIO_Config();

	while(1)
	{
		value =KEY_Scan();

		if(value==1)
		{
			LED0_REV;
		}
		else if(value==2)
		{
			LED1_REV;
		}
		else if(value==3)
		{
			LED0_REV;
			LED1_REV;
		}
	}
}
学习心得
主要是通过训练熟悉STM32GPIO最简单的配置。看得懂代码在干什么,并且根据自己学习的板子去修改代码是近期最大的进步,继续努力。


 873
873


 被折叠的 条评论
为什么被折叠?
被折叠的 条评论
为什么被折叠?
 到【灌水乐园】发言


