


一、基本使用流程
1、定义HTTP API,用于描述请求
public interface GitHubService { @GET("users/{user}/repos") Call> listRepos(@Path("user") String user);}复制代码2、创建Retrofit并生成API的实现(注意:方法上面的注解表示请求的接口部分,返回类型是请求的返回值类型,方法的参数即是请求的参数)
// 1.Retrofit构建过程Retrofit retrofit = new Retrofit.Builder().baseUrl("https://api.github.com/").build();// 2.创建网络请求接口类实例过程GitHubService service = retrofit.create(GitHubService.class);复制代码3、调用API方法,生成Call,执行请求
// 3.生成并执行请求过程Call> repos = service.listRepos("octocat");repos.execute() or repos.enqueue()复制代码Retrofit的基本使用流程很简洁,但是简洁并不代表简单,Retrofit为了实现这种简洁的使用流程,内部使用了优秀的架构设计和大量的设计模式,在我分析过Retrofit最新版的源码和大量优秀的Retrofit源码分析文章后,我发现,要想真正理解Retrofit内部的核心源码流程和设计思想,首先,需要对这九大设计模式有一定的了解,如下:
1.Retrofit构建过程 建造者模式、工厂方法模式2.创建网络请求接口实例过程外观模式、代理模式、单例模式、策略模式、装饰模式(建造者模式)3.生成并执行请求过程适配器模式(代理模式、装饰模式)复制代码其次,需要对OKHttp源码有一定的了解,如果不了解的可以看看这篇Android主流三方库源码分析(一、深入理解OKHttp源码)。最后,让我们按以上流程去深入Retrofit源码内部,领悟它带给我们的设计之美。
二、Retrofit构建过程
1、Retrofit核心对象解析
首先Retrofit中有一个全局变量非常关键,在V2.5之前的版本,使用的是LinkedHashMap(),它是一个网络请求配置对象,是由网络请求接口中方法注解进行解析后得到的。
public final class Retrofit { // 网络请求配置对象,存储网络请求相关的配置,如网络请求的方法、数据转换器、网络请求适配器、网络请求工厂、基地址等 private final Map> serviceMethodCache = new ConcurrentHashMap<>();复制代码Retrofit使用了建造者模式通过内部类Builder类建立一个Retrofit实例,如下:
public static final class Builder { // 平台类型对象(Platform -> Android) private final Platform platform; // 网络请求工厂,默认使用OkHttpCall(工厂方法模式) private @Nullable okhttp3.Call.Factory callFactory; // 网络请求的url地址 private @Nullable HttpUrl baseUrl; // 数据转换器工厂的集合 private final List converterFactories = new ArrayList<>(); // 网络请求适配器工厂的集合,默认是ExecutorCallAdapterFactory private final List callAdapterFactories = new ArrayList<>(); // 回调方法执行器,在 Android 上默认是封装了 handler 的 MainThreadExecutor, 默认作用是:切换线程(子线程 -> 主线程) private @Nullable Executor callbackExecutor; // 一个开关,为true则会缓存创建的ServiceMethod private boolean validateEagerly;复制代码2、Builder内部构造
下面看看Builder内部构造做了什么。
public static final class Builder { ... Builder(Platform platform) { this.platform = platform; } public Builder() { this(Platform.get()); } ...}class Platform { private static final Platform PLATFORM = findPlatform(); static Platform get() { return PLATFORM; } private static Platform findPlatform() { try { // 使用JVM加载类的方式判断是否是Android平台 Class.forName("android.os.Build"); if (Build.VERSION.SDK_INT != 0) { return new Android(); } } catch (ClassNotFoundException ignored) { } try { // 同时支持Java平台 Class.forName("java.util.Optional"); return new Java8(); } catch (ClassNotFoundException ignored) { } return new Platform(); }static class Android extends Platform { ... @Override public Executor defaultCallbackExecutor() { //切换线程(子线程 -> 主线程) return new MainThreadExecutor(); } // 创建默认的网络请求适配器工厂,如果是Android7.0或Java8上,则使 // 用了并发包中的CompletableFuture保证了回调的同步 // 在Retrofit中提供了四种CallAdapterFactory(策略模式): // ExecutorCallAdapterFactory(默认)、GuavaCallAdapterFactory、 // va8CallAdapterFactory、RxJavaCallAdapterFactory @Override List extends CallAdapter.Factory> defaultCallAdapterFactories( @Nullable Executor callbackExecutor) { if (callbackExecutor == null) throw new AssertionError(); ExecutorCallAdapterFactory executorFactory = new ExecutorCallAdapterFactory(callbackExecutor); return Build.VERSION.SDK_INT >= 24 ? asList(CompletableFutureCallAdapterFactory.INSTANCE, executorFactory) : singletonList(executorFactory); } ... @Override List extends Converter.Factory> defaultConverterFactories() { return Build.VERSION.SDK_INT >= 24 ? singletonList(OptionalConverterFactory.INSTANCE) : Collections.emptyList(); } ... static class MainThreadExecutor implements Executor { // 获取Android 主线程的Handler private final Handler handler = new Handler(Looper.getMainLooper()); @Override public void execute(Runnable r) { // 在UI线程对网络请求返回数据处理 handler.post(r); } }}复制代码可以看到,在Builder内部构造时设置了默认Platform、callAdapterFactories和callbackExecutor。
3、添加baseUrl
很简单,就是将String类型的url转换为OkHttp的HttpUrl过程如下:
/** * Set the API base URL. * * @see #baseUrl(HttpUrl) */public Builder baseUrl(String baseUrl) { checkNotNull(baseUrl, "baseUrl == null"); return baseUrl(HttpUrl.get(baseUrl));}public Builder baseUrl(HttpUrl baseUrl) { checkNotNull(baseUrl, "baseUrl == null"); List pathSegments = baseUrl.pathSegments(); if (!"".equals(pathSegments.get(pathSegments.size() - 1))) { throw new IllegalArgumentException("baseUrl must end in /: " + baseUrl); } this.baseUrl = baseUrl; return this;}复制代码4、添加GsonConverterFactory
首先,看到GsonConverterFactory.creat()的源码。
public final class GsonConverterFactory extends Converter.Factory { public static GsonConverterFactory create() { return create(new Gson()); } public static GsonConverterFactory create(Gson gson) { if (gson == null) throw new NullPointerException("gson == null"); return new GsonConverterFactory(gson); } private final Gson gson; // 创建了一个含有Gson对象实例的GsonConverterFactory private GsonConverterFactory(Gson gson) { this.gson = gson; }复制代码然后,看看addConverterFactory()方法内部。
public Builder addConverterFactory(Converter.Factory factory) { converterFactories.add(checkNotNull(factory, "factory null")); return this;}复制代码可知,这一步是将一个含有Gson对象实例的GsonConverterFactory放入到了数据转换器工厂converterFactories里。
5、build过程
public Retrofit build() { if (baseUrl == null) { throw new IllegalStateException("Base URL required."); } okhttp3.Call.Factory callFactory = this.callFactory; if (callFactory == null) { // 默认使用okhttp callFactory = new OkHttpClient(); } Executor callbackExecutor = this.callbackExecutor; if (callbackExecutor == null) { // Android默认的callbackExecutor callbackExecutor = platform.defaultCallbackExecutor(); } // Make a defensive copy of the adapters and add the defaultCall adapter. List callAdapterFactories = new ArrayList<>(this.callAdapterFactories); // 添加默认适配器工厂在集合尾部 callAdapterFactories.addAll(platform.defaultCallAdapterFactorisca llbackExecutor)); // Make a defensive copy of the converters. List converterFactories = new ArrayList<>( 1 + this.converterFactories.size() + platform.defaultConverterFactoriesSize()); // Add the built-in converter factory first. This prevents overriding its behavior but also // ensures correct behavior when using converters thatconsumeall types. converterFactories.add(new BuiltInConverters()); converterFactories.addAll(this.converterFactories); converterFactories.addAll(platform.defaultConverterFactories(); return new Retrofit(callFactory, baseUrl, unmodifiableList(converterFactories), unmodifiableList(callAdapterFactories), callbackExecutor, validateEagerly);}复制代码可以看到,最终我们在Builder类中看到的6大核心对象都已经配置到Retrofit对象中了。
三、创建网络请求接口实例过程
retrofit.create()使用了外观模式和代理模式创建了网络请求的接口实例,我们分析下create方法。
public T create(final Class service) { Utils.validateServiceInterface(service); if (validateEagerly) { // 判断是否需要提前缓存ServiceMethod对象 eagerlyValidateMethods(service); } // 使用动态代理拿到请求接口所有注解配置后,创建网络请求接口实例 return (T) Proxy.newProxyInstance(service.getClassLoader(), new Class>[] { service }, new InvocationHandler() { private final Platform platform = Platform.get(); private final Object[] emptyArgs = new Object[0]; @Override public Object invoke(Object proxy, Method method, @Nullable Object[] args) throws Throwable { // If the method is a method from Object then defer to normal invocation. if (method.getDeclaringClass() == Object.class) { return method.invoke(this, args); } if (platform.isDefaultMethod(method)) { return platform.invokeDefaultMethod(method, service, proxy, args); } return loadServiceMethod(method).invoke(args != null ? args : emptyArgs); } }); }private void eagerlyValidateMethods(Class> service) { Platform platform = Platform.get(); for (Method method : service.getDeclaredMethods()) { if (!platform.isDefaultMethod(method)) { loadServiceMethod(method); } }}复制代码继续看看loadServiceMethod的内部流程
ServiceMethod> loadServiceMethod(Method method) { ServiceMethod> result = serviceMethodCache.get(method); if (result != null) return result; synchronized (serviceMethodCache) { result = serviceMethodCache.get(method); if (result == null) { // 解析注解配置得到了ServiceMethod result = ServiceMethod.parseAnnotations(this, method); // 可以看到,最终加入到ConcurrentHashMap缓存中 serviceMethodCache.put(method, result); } } return result;}abstract class ServiceMethod { static ServiceMethod parseAnnotations(Retrofit retrofit, Method method) { // 通过RequestFactory解析注解配置(工厂模式、内部使用了建造者模式) RequestFactory requestFactory = RequestFactory.parseAnnotations(retrofit, method); Type returnType = method.getGenericReturnType(); if (Utils.hasUnresolvableType(returnType)) { throw methodError(method, "Method return type must not include a type variable or wildcard: %s", returnType); } if (returnType == void.class) { throw methodError(method, "Service methods cannot return void."); } // 最终是通过HttpServiceMethod构建的请求方法 return HttpServiceMethod.parseAnnotations(retrofit, method, requestFactory); } abstract T invoke(Object[] args);}复制代码以下为请求构造核心流程
根据RequestFactory#Builder构造方法和parseAnnotations方法的源码,可知的它的作用就是用来解析注解配置的。
Builder(Retrofit retrofit, Method method) { this.retrofit = retrofit; this.method = method; // 获取网络请求接口方法里的注释 this.methodAnnotations = method.getAnnotations(); // 获取网络请求接口方法里的参数类型 this.parameterTypes = method.getGenericParameterTypes(); // 获取网络请求接口方法里的注解内容 this.parameterAnnotationsArray = method.getParameterAnnotations();}复制代码接着看HttpServiceMethod.parseAnnotations()的内部流程。
static HttpServiceMethod parseAnnotations( Retrofit retrofit, Method method, RequestFactory requestFactory) { //1.根据网络请求接口方法的返回值和注解类型, // 从Retrofit对象中获取对应的网络请求适配器 CallAdapter callAdapter = createCallAdapter(retrofit,method); // 得到响应类型 Type responseType = callAdapter.responseType(); ... //2.根据网络请求接口方法的返回值和注解类型从Retrofit对象中获取对应的数据转换器 ConverterresponseConverter = createResponseConverter(retrofit,method, responseType); okhttp3.Call.Factory callFactory = retrofit.callFactory; return newHttpServiceMethod<>(requestFactory, callFactory, callAdapter,responseConverter);}复制代码1.createCallAdapter(retrofit, method)
private static CallAdapter createCallAdapter( Retrofit retrofit, Method method) { // 获取网络请求接口里方法的返回值类型 Type returnType = method.getGenericReturnType(); // 获取网络请求接口接口里的注解 Annotation[] annotations = method.getAnnotations(); try { //noinspection unchecked return (CallAdapter) retrofit.callAdapter(returnType, annotations); } catch (RuntimeException e) { // Wide exception range because factories are user code. throw methodError(method, e, "Unable to create call adapter for %s", returnType); }}public CallAdapter, ?> callAdapter(Type returnType, Annotation[] annotations) { return nextCallAdapter(null, returnType, annotations);}public CallAdapter, ?> nextCallAdapter(@Nullable CallAdapter.Factory skipPast, Type returnType, Annotation[] annotations) { ... int start = callAdapterFactories.indexOf(skipPast) + 1; // 遍历 CallAdapter.Factory 集合寻找合适的工厂 for (int i = start, count = callAdapterFactories.size(); i adapter = callAdapterFactories.get(i).get(returnType, annotations, this); if (adapter != null) { return adapter; } }}复制代码2.createResponseConverter(Retrofit retrofit, Method method, Type responseType)
private static Converter createResponseConverter( Retrofit retrofit, Method method, Type responseType) { Annotation[] annotations = method.getAnnotations(); try { return retrofit.responseBodyConverter(responseType,annotations); } catch (RuntimeException e) { // Wide exception range because factories are user code. throw methodError(method, e, "Unable to create converter for%s", responseType); }}public Converter responseBodyConverter(Type type, Annotation[] annotations) { return nextResponseBodyConverter(null, type, annotations);}public Converter nextResponseBodyConverter( @Nullable Converter.Factory skipPast, Type type, Annotation[] annotations) {...int start = converterFactories.indexOf(skipPast) + 1;// 遍历 Converter.Factory 集合并寻找合适的工厂, 这里是GsonResponseBodyConverterfor (int i = start, count = converterFactories.size(); i < count; i++) { Converter converter = converterFactories.get(i).responseBodyConverter(type, annotations, this); if (converter != null) { //noinspection unchecked return (Converter) converter; }}复制代码最终,执行HttpServiceMethod的invoke方法
@Override ReturnT invoke(Object[] args) { return callAdapter.adapt( new OkHttpCall<>(requestFactory, args, callFactory, responseConverter));}复制代码最终在adapt中创建了一个ExecutorCallbackCall对象,它是一个装饰者,而在它内部真正去执行网络请求的还是OkHttpCall。
四、创建网络请求接口类实例并执行请求过程
1、service.listRepos()
1、Call> repos = service.listRepos("octocat");复制代码service对象是动态代理对象Proxy.newProxyInstance(),当调用getCall()时会被 它拦截,然后调用自身的InvocationHandler#invoke(),得到最终的Call对象。
2、同步执行流程 repos.execute()
@Override public Response execute() throws IOException { okhttp3.Call call; synchronized (this) { if (executed) throw new IllegalStateException("Already executed."); executed = true; if (creationFailure != null) { if (creationFailure instanceof IOException) { throw (IOException) creationFailure; } else if (creationFailure instanceof RuntimeException) { throw (RuntimeException) creationFailure; } else { throw (Error) creationFailure; } } call = rawCall; if (call == null) { try { // 创建一个OkHttp的Request对象请求 call = rawCall = createRawCall(); } catch (IOException | RuntimeException | Error e) { throwIfFatal(e); // Do not assign a fatal error to creationFailure. creationFailure = e; throw e; } } } if (canceled) { call.cancel(); } // 调用OkHttpCall的execute()发送网络请求(同步), // 并解析网络请求返回的数据 return parseResponse(call.execute());}private okhttp3.Call createRawCall() throws IOException { // 创建 一个okhttp3.Request okhttp3.Call call = callFactory.newCall(requestFactory.create(args)); if (call == null) { throw new NullPointerException("Call.Factory returned null."); } return call;}Response parseResponse(okhttp3.Response rawResponse) throws IOException { ResponseBody rawBody = rawResponse.body(); // Remove the body's source (the only stateful object) so we can pass the response along. rawResponse = rawResponse.newBuilder() .body(new NoContentResponseBody(rawBody.contentType(), rawBody.contentLength())) .build(); // 根据响应返回的状态码进行处理 int code = rawResponse.code(); if (code < 200 || code >= 300) { try { // Buffer the entire body to avoid future I/O. ResponseBody bufferedBody = Utils.buffer(rawBody); return Response.error(bufferedBody, rawResponse); } finally { rawBody.close(); } } if (code == 204 || code == 205) { rawBody.close(); return Response.success(null, rawResponse); } ExceptionCatchingResponseBody catchingBody = new ExceptionCatchingResponseBody(rawBody); try { // 将响应体转为Java对象 T body = responseConverter.convert(catchingBody); return Response.success(body, rawResponse); } catch (RuntimeException e) { // If the underlying source threw an exception, propagate that rather than indicating it was // a runtime exception. catchingBody.throwIfCaught(); throw e; }}复制代码3、异步请求流程 reponse.enqueque
@Override public void enqueue(final Callback callback) { // 使用静态代理 delegate进行异步请求 delegate.enqueue(new Callback() { @Override public void onResponse(Call call, finalResponseresponse) { // 线程切换,在主线程显示结果 callbackExecutor.execute(new Runnable() { @Override public void run() { if (delegate.isCanceled()) { callback.onFailure(ExecutorCallbackCall.this, newIOException("Canceled")); } else { callback.onResponse(ExecutorCallbackCall.this,respons); } } }); } @Override public void onFailure(Call call, final Throwable t) { callbackExecutor.execute(new Runnable() { @Override public void run() { callback.onFailure(ExecutorCallbackCall.this, t); } }); } });}复制代码看看 delegate.enqueue 内部流程。
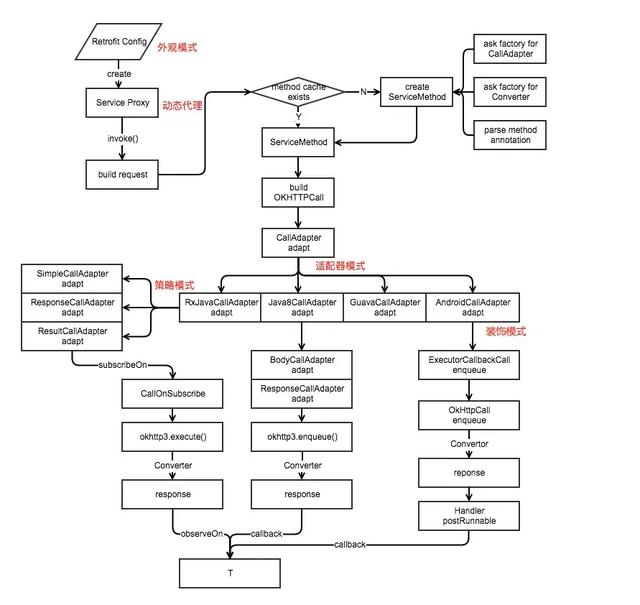
@Override public void enqueue(final Callback callback) { okhttp3.Call call; Throwable failure; synchronized (this) { if (executed) throw new IllegalStateException("Already executed."); executed = true; call = rawCall; failure = creationFailure; if (call == null && failure == null) { try { // 创建OkHttp的Request对象,再封装成OkHttp.call // 方法同发送同步请求,此处上面已分析 call = rawCall = createRawCall(); } catch (Throwable t) { failure = creationFailure = t; } }@Override public void enqueue(final Callback callback) { checkNotNull(callback, "callback == null"); okhttp3.Call call; Throwable failure; ... call.enqueue(new okhttp3.Callback() { @Override public void onResponse(okhttp3.Call call, okhttp3.Response rawResponse) { Response response; try { // 此处上面已分析 response = parseResponse(rawResponse); } catch (Throwable e) { throwIfFatal(e); callFailure(e); return; } try { callback.onResponse(OkHttpCall.this, response); } catch (Throwable t) { t.printStackTrace(); } } @Override public void onFailure(okhttp3.Call call, IOException e) { callFailure(e); } private void callFailure(Throwable e) { try { callback.onFailure(OkHttpCall.this, e); } catch (Throwable t) { t.printStackTrace(); } } });}复制代码如果你看到这里的话,恭喜你,你已经对Retrofit已经有一个比较深入的了解了,但是,笔者还是要建议大家自己主动配合着Retrofit最新版的源码一步步去彻底地认识它,只有这样,你才能看到它真实的内心,最后附上一张Stay的Retrofit源码流程图,要注意的是,这是V2.5之前版本的流程,但是,在看完上面的源码分析后,我们知道,主体流程是没有变化的。
五、总结
从本质上来说,Retrofit虽然只是一个RESTful 的HTTP 网络请求框架的封装库。但是,它内部通过 大量的设计模式 封装了 OkHttp,让使用者感到它非常简洁、易懂。它内部主要是用动态代理的方式,动态将网络请求接口的注解解析成HTTP请求,最后执行请求的过程。好了,至此,我们的Android主流三方库源码分析的网络库分析部分已经完毕。接下来,将为大家带来最流行的图片加载框架Glide的源码分析,敬请期待~
六、学习笔记分享
为了方便大家更深入的学习Android相关源码已经第三框架。我整理了一份《Android相关源码解析》和《设计思想解读开源框架》,有需要的伙伴可以点赞+关注后,私信我领取!

Android相关源码解读目录
Android相关源码解读部分解析内容
开源框架解读目录及部分解析内容


 1万+
1万+


 被折叠的 条评论
为什么被折叠?
被折叠的 条评论
为什么被折叠?
 到【灌水乐园】发言


