


之前写了一篇文章,讲述了使用 vscode + c/c++ 插件开发调试 STM32 的使用方法。
刘洋:使用 VSCode 打造 STM32 开发环境zhuanlan.zhihu.com里面的步骤有些复杂,而现在有更方便的开发的插件 cortex-debug,配合食用体验更佳。
菜单
原材料:
Visual Studio Code - Code Editing. Redefinedcode.visualstudio.com

!注意:gcc-arm-none-eabi 不要下最新版的,链接生成功能有问题!!!,请下载 7-2018-q2-update 版本。用 STM32CUBEMX 生成代码和 makefile ,添加你自己的工程源码,并编译生成可执行文件,在此不细述该过程。
C/C++ 设置
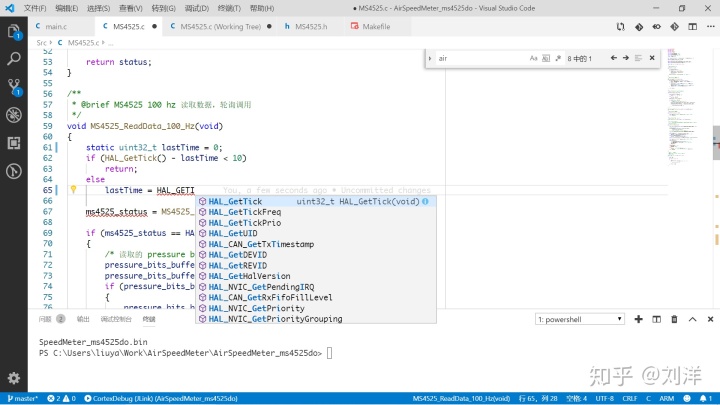
为了更好的体验 VScode 的语义补全和提示,需要一些设置 c_cpp_properties.json ,参考如下:
{
    "configurations": [
        {
            "name": "ARM",
            "intelliSenseMode": "gcc-x64",
             // 注意下面这个指定好 gcc-arm 编译器后,c/c++ 插件会智能分析,不会按照桌面平台进行语义分析,一定要指明
             // 后面的编译参数可以从 makefile 里抄
            "compilerPath": "arm-none-eabi-gcc.exe -mcpu=cortex-m3 -mthumb -Wall -fdata-sections -ffunction-sections",
            "defines": [
                "STM32F103xB",
                "USE_HAL_DRIVER"
            ],
            "includePath": [
                // 工程代码的头文件路径
                "./Inc",
                "./Drivers/STM32F1xx_HAL_Driver/Inc",
                "./Drivers/STM32F1xx_HAL_Driver/Inc/Legacy",
                "./Drivers/CMSIS/Device/ST/STM32F1xx/Include",
                "./Drivers/CMSIS/Include",
                // gcc 自己 std_lib 的路径
                "C:/Users/liuya/MyApp/gcc-arm/lib/gcc/arm-none-eabi/7.3.1/include",
                "C:/Users/liuya/MyApp/gcc-arm/lib/gcc/arm-none-eabi/7.3.1/include-fixed",
                "C:/Users/liuya/MyApp/gcc-arm/arm-none-eabi/include"
            ],
            "cStandard": "c11",
            "cppStandard": "c++14",
            "forcedInclude": [
                // 不同系列的芯片选择不同的
                "./Drivers/STM32F1XX_HAL_Driver/Inc/stm32f1xx_hal.h"
            ]
        }
    ],
    "version": 4
}
如果用的不是 HAL 库也没关系,修改一些对应的设置 STD 库也照样可行。
当然在此还有一个第三方的杀器,clangd LSP 插件,喜欢 clangd 的可以尝试使用它替代 c/c++ 插件。
vscode-clangd - Visual Studio Marketplacemarketplace.visualstudio.comclangd 需要在项目根目录下提供 compile_flags.txt 文件,里面写好你的编译参数,它就可以对项目进行解析提供语义补全和错误提示,一个例子可以参考如下,注意其中 --target 参数很必要,根据自己的芯片类型调整对应得设置
-Wall
-Wextra
--target=arm-none-eabi
-x
c
-std=c11
-DUSE_STDPERIPH_DRIVER
-DSTM32F103xB
-mcpu=cortex-m3
-mthumb
-I./Inc
-I./Drivers/STM32F1xx_HAL_Driver/Inc
-I./Drivers/STM32F1xx_HAL_Driver/Inc/Legacy
-I./Drivers/CMSIS/Device/ST/STM32F1xx/Include
-I./Drivers/CMSIS/Include
-isystem
C:/Users/liuya/MyApp/gcc-arm/lib/gcc/arm-none-eabi/8.2.1/include
-isystem
C:/Users/liuya/MyApp/gcc-arm/lib/gcc/arm-none-eabi/8.2.1/include-fixed
-isystem
C:/Users/liuya/MyApp/gcc-arm/arm-none-eabi/include
至此你得代码补全、跳转、错误提示等基本完美
cortex-debug 设置
你需要安装 SEGGER 的 JLINK 驱动软件,然后点击 VSCODE 的调试按钮,添加一个调试配置 launch.json,参考下面的例子,注意你需要选择正确的 device,executable
{
    // 使用 IntelliSense 了解相关属性。
    // 悬停以查看现有属性的描述。
    // 欲了解更多信息,请访问: https://go.microsoft.com/fwlink/?linkid=830387
    "version": "0.2.0",
    "configurations": [
        {
            "name": "CortexDebug (JLink)",
            "type": "cortex-debug",
            "request": "launch",
            "servertype": "jlink",
            "cwd": "${workspaceRoot}",
            "executable": "./build/AirSpeedMeter_ms4525do.elf",
            "device": "STM32F103C8",
            "interface": "swd",
            "ipAddress": null,
            "serialNumber": null
        }
    ]
}
在 setting.jason 中告诉 cortex-debug ,jlinkgdbserver 的路径
"cortex-debug.JLinkGDBServerPath": " Path to LinkGDBServerCL",可以安装一下芯片支持包,它会根据不同的芯片提供寄存器和外设查看功能
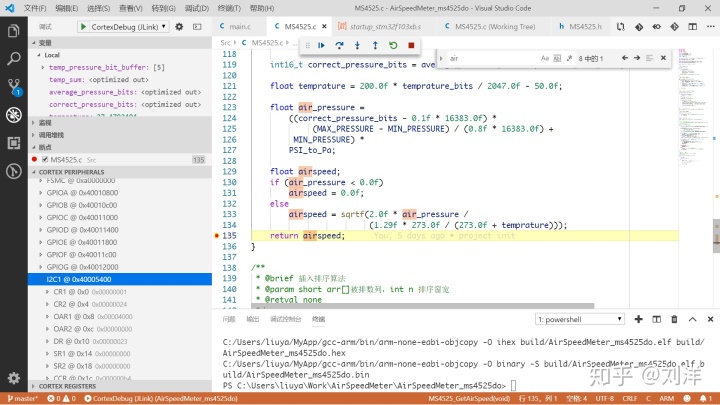
Cortex-Debug: Device Support Pack - STM32F1marketplace.visualstudio.com愉快的开始调试吧


 3106
3106

 被折叠的 条评论
为什么被折叠?
被折叠的 条评论
为什么被折叠?
 到【灌水乐园】发言


