


 本文介绍了在人脸识别项目中进行人脸对齐的重要性,并使用OpenCV的仿射变换方法进行人脸对齐的实践。通过检测器获取人脸外接矩形,然后利用FaceAligner对齐人脸,详细解释了对齐过程中的旋转和平移计算。实验结果显示,该方法能有效对齐人脸。
在人脸识别项目中,如果图片中人脸的方向各不一样且相差很大,这样会影响人脸识别的准确率。所以在实际人脸检测项目中,在人脸识别的前一步往往会先进行人脸对齐。人脸对齐可以看作是数据normalization的一种形式。正如我们可以在训练机器学习模型之前通过对一组特征向量进行零中心化或缩放到单位范数来normalization一样,在训练人脸识别模型之前我们往往会先对齐数据集中的人脸。
对齐人脸有很多种方法,今天我们尝试使用OpenCV中的仿射变换来人脸对齐。
使用OpenCV进行人脸对齐
主函数代码
# USAGE
# python align_faces.py --shape-predictor shape_predictor_68_face_landmarks.dat --image images/example_01.jpg

# import the necessary packages
from imutils.face_utils import FaceAligner
from imutils.face_utils import rect_to_bb
import argparse
import imutils
import dlib
import cv2

# construct the argument parser and parse the arguments
ap = argparse.ArgumentParser()
ap.add_argument("-p", "--shape-predictor", required=True,
	help="path to facial landmark predictor")
ap.add_argument("-i", "--image", required=True,
	help="path to input image")
args = vars(ap.parse_args())

# initialize dlib's face detector (HOG-based) and then create
# the facial landmark predictor and the face aligner
detector = dlib.get_frontal_face_detector()
predictor = dlib.shape_predictor(args["shape_predictor"])
fa = FaceAligner(predictor, desiredFaceWidth=256)

# load the input image, resize it, and convert it to grayscale
image = cv2.imread(args["image"])
image = imutils.resize(image, width=800)
gray = cv2.cvtColor(image, cv2.COLOR_BGR2GRAY)

# show the original input image and detect faces in the grayscale
# image
cv2.imshow("Input", image)
rects = detector(gray, 2)

# loop over the face detections
for rect in rects:
	# extract the ROI of the *original* face, then align the face
	# using facial landmarks
	(x, y, w, h) = rect_to_bb(rect)
	faceOrig = imutils.resize(image[y:y + h, x:x + w], width=256)
	faceAligned = fa.align(image, gray, rect)

	import uuid
	f = str(uuid.uuid4())
	cv2.imwrite("foo/" + f + ".png", faceAligned)

	# display the output images
	cv2.imshow("Original", faceOrig)
	cv2.imshow("Aligned", faceAligned)
	cv2.waitKey(0)
dlib.get_frontal_face_detector是dlib预训练好的的人脸检测器,可以检测到图片中人脸的外接矩形,dlib.shape_predictor是人脸的面部标志检测模型,详细介绍和应用可以参看:
小糊糊:使用dlib进行睡意检测zhuanlan.zhihu.com
上面的代码对输入图片检测人脸后,再使用FaceAligner中的align方法来对齐检测到的人脸,然后再将对齐的人脸可视化,然后存入foo文件夹中。
人脸对齐算法主要是由FaceAligner类实现的,FaceAligner的代码如下:
# import the necessary packages
from .helpers import FACIAL_LANDMARKS_68_IDXS
from .helpers import FACIAL_LANDMARKS_5_IDXS
from .helpers import shape_to_np
import numpy as np
import cv2

class FaceAligner:
	def __init__(self, predictor, desiredLeftEye=(0.35, 0.35),
		desiredFaceWidth=256, desiredFaceHeight=None):
		# store the facial landmark predictor, desired output left
		# eye position, and desired output face width + height
		self.predictor = predictor
		self.desiredLeftEye = desiredLeftEye
		self.desiredFaceWidth = desiredFaceWidth
		self.desiredFaceHeight = desiredFaceHeight

		# if the desired face height is None, set it to be the
		# desired face width (normal behavior)
		if self.desiredFaceHeight is None:
			self.desiredFaceHeight = self.desiredFaceWidth

	def align(self, image, gray, rect):
		# convert the landmark (x, y)-coordinates to a NumPy array
		shape = self.predictor(gray, rect)
		shape = shape_to_np(shape)

		#simple hack ;)
		if (len(shape)==68):
			# extract the left and right eye (x, y)-coordinates
			(lStart, lEnd) = FACIAL_LANDMARKS_68_IDXS["left_eye"]
			(rStart, rEnd) = FACIAL_LANDMARKS_68_IDXS["right_eye"]
		else:
			(lStart, lEnd) = FACIAL_LANDMARKS_5_IDXS["left_eye"]
			(rStart, rEnd) = FACIAL_LANDMARKS_5_IDXS["right_eye"]

		leftEyePts = shape[lStart:lEnd]
		rightEyePts = shape[rStart:rEnd]

		# compute the center of mass for each eye
		leftEyeCenter = leftEyePts.mean(axis=0).astype("int")
		rightEyeCenter = rightEyePts.mean(axis=0).astype("int")

		# compute the angle between the eye centroids
		dY = rightEyeCenter[1] - leftEyeCenter[1]
		dX = rightEyeCenter[0] - leftEyeCenter[0]
		angle = np.degrees(np.arctan2(dY, dX)) - 180

		# compute the desired right eye x-coordinate based on the
		# desired x-coordinate of the left eye
		desiredRightEyeX = 1.0 - self.desiredLeftEye[0]

		# determine the scale of the new resulting image by taking
		# the ratio of the distance between eyes in the *current*
		# image to the ratio of distance between eyes in the
		# *desired* image
		dist = np.sqrt((dX ** 2) + (dY ** 2))
		desiredDist = (desiredRightEyeX - self.desiredLeftEye[0])
		desiredDist *= self.desiredFaceWidth
		scale = desiredDist / dist

		# compute center (x, y)-coordinates (i.e., the median point)
		# between the two eyes in the input image
		eyesCenter = ((leftEyeCenter[0] + rightEyeCenter[0]) // 2,
			(leftEyeCenter[1] + rightEyeCenter[1]) // 2)

		# grab the rotation matrix for rotating and scaling the face
		M = cv2.getRotationMatrix2D(eyesCenter, angle, scale)

		# update the translation component of the matrix
		tX = self.desiredFaceWidth * 0.5
		tY = self.desiredFaceHeight * self.desiredLeftEye[1]
		M[0, 2] += (tX - eyesCenter[0])
		M[1, 2] += (tY - eyesCenter[1])

		# apply the affine transformation
		(w, h) = (self.desiredFaceWidth, self.desiredFaceHeight)
		output = cv2.warpAffine(image, M, (w, h),
			flags=cv2.INTER_CUBIC)

		# return the aligned face
		return output
align函数首先提取原脸中眼睛的位置,计算每只眼睛的中心,然后计算眼睛中心连线与水平线的夹角angle ,然后计算对齐后目标图像中左右眼坐标(默认左眼中心距离图像左边界0.35图像宽度),从而可以得到对齐后图像需要缩放的比例scale (默认对齐后图像宽为256),然后计算原图中两眼连线中心坐标,以此中心为旋转中心,angle 为旋转角,scale 为缩放尺度计算出旋转矩阵M。由于图像旋转我们要将对齐后的人脸输出到256X256的图像里,所以要将对齐后的人脸图像的眉心平移到新图像256X256的合适位置,将此平移量加到矩阵M里面。最后使用新的变换矩阵来进行仿射变换。
关于仿射变换和矩阵旋转原理可以参看:
小糊糊:正确的实现图像旋转zhuanlan.zhihu.com
结果展示
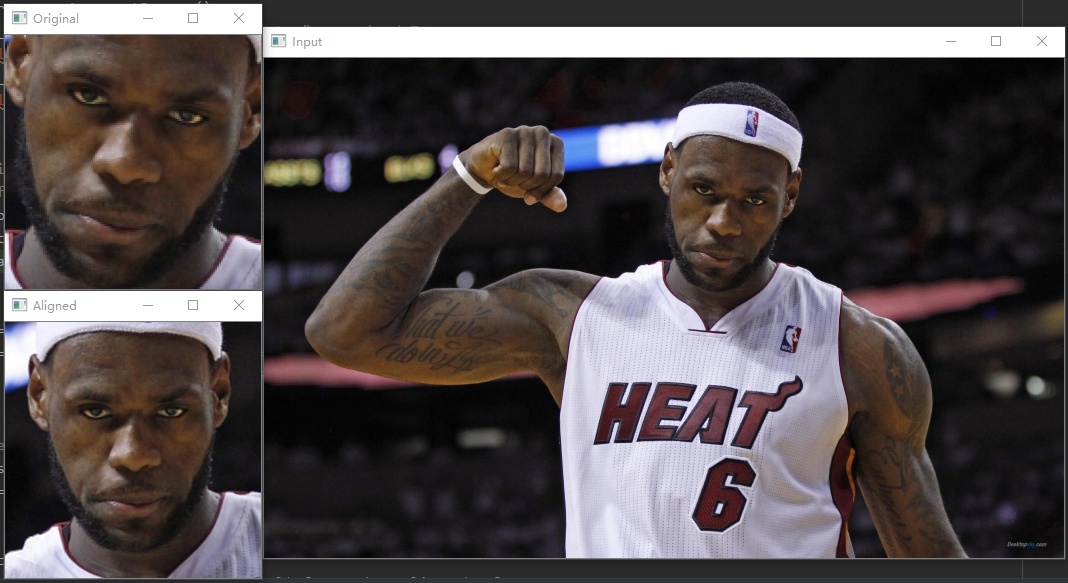
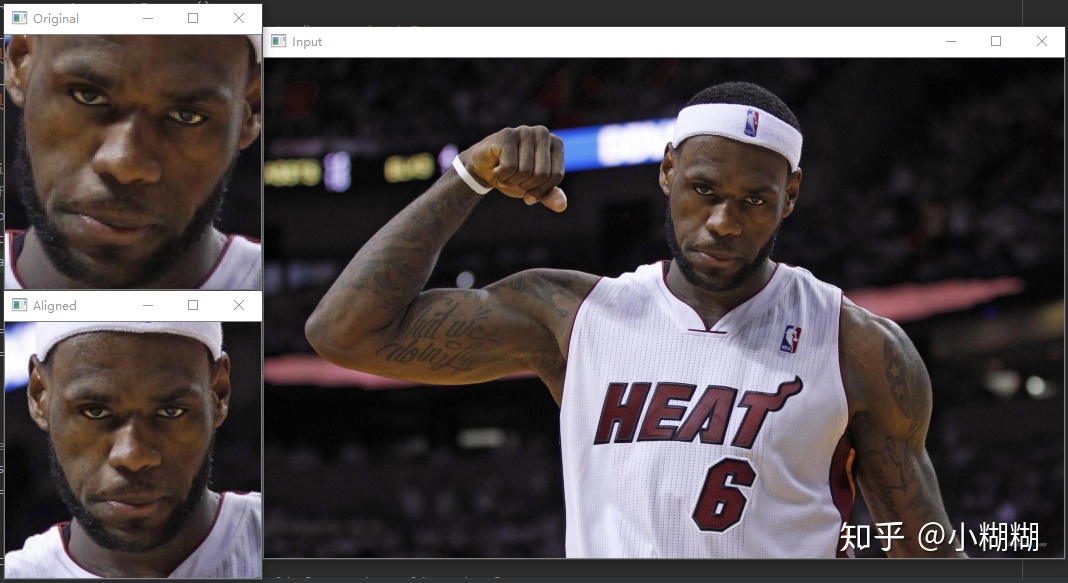
拿一张老詹热火时期的图测试一下,命令行运行:
python align_faces.py --shape-predictor shape_predictor_68_face_landmarks.dat --image images/example_01.jpg结果如下,可以看到很好的对齐了老詹的脸。


 2644
2644

 被折叠的 条评论
为什么被折叠?
被折叠的 条评论
为什么被折叠?
 到【灌水乐园】发言


