


今天带大家动手写一个简单的js二维地图引擎,由于篇幅所限,本文只实现加载瓦片的功能,后续文章将逐步实现加载marker、矢量数据、矢量瓦片,事件交互等功能,希望大家持续关注。目前优秀的引擎有很多,如openlayer,arcgis,leaflet等,文章的目的不是为了超越,而是以精简的代码实现其核心功能、阐述其基本原理。因为几乎所有的二维地图引擎的实现思路是一致的,我始终认为,学习的核心是学习思路和原理,要想从容潇洒地面对多变的业务,那么正是本文的实用性和价值性。
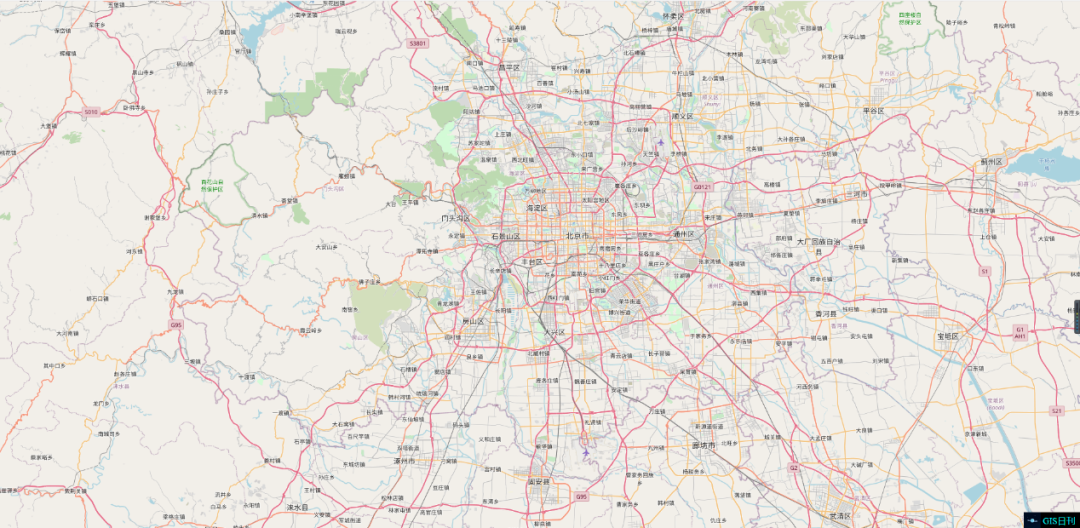 第11级效果
 往期阅读推荐
栅格瓦片坐标计算
当前地图范围内瓦片坐标解析看图学习坐标系
往期阅读推荐
栅格瓦片坐标计算
当前地图范围内瓦片坐标解析看图学习坐标系

一、点/二维向量类:Point
class Point{ constructor(x, y) { this.x = x; this.y = y; } add(dx, dy) { return new Point( this.x + dx, this.y + dy ); } sub(dx, dy) { return new Point( this.x - dx, this.y - dy ); } multiply(mx, my) { return new Point( this.x * mx, this.y * my ); } divide(dx, dy) { if (0 == dx || 0 == dy) { throw "除数不能为0"; } return new Point( this.x / dx, this.y / dy ); } remainder(rx, ry) { return new Point( this.x % rx, this.y % ry ); } round(num) { this.x = Math.round(this.x, num); this.y = Math.round(this.y, num); return this; } ceil() { this.x = Math.ceil(this.x); this.y = Math.ceil(this.y); return this; } floor() { this.x = Math.floor(this.x); this.y = Math.floor(this.y); return this; } toString() { return `x:${this.x},y:${this.y}`; }}二、经纬度类:LonLat
class LonLat{ constructor(lon, lat) { this.lon = lon; this.lat = lat; }}三、包围盒类:BBox
class BBox{ constructor(options, top, right, buttom) { if(typeof options === "object") { this.left = options.left; this.top = options.top; this.right = options.right; this.buttom = options.buttom; }else { this.left = options; this.top = top; this.right = right; this.buttom = buttom; } } toBBox(leftTop, rightButtom) { return new BBox({ left: leftTop.x, top: leftTop.y, right: rightButtom.x, buttom: rightButtom.y }); }}四、Wgs84转web墨卡托投影类:Project
//wgs84->epsg:3857const R = 6378137;const MAX_LATITUDE= 85.0511287798;class Project{ project (lonlat) { let d = Math.PI / 180, max = MAX_LATITUDE, lat = Math.max(Math.min(max, lonlat.lat), -max), sin = Math.sin(lat * d); return new Point( R * lonlat.lon * d, R * Math.log((1 + sin) / (1 - sin)) / 2); } unproject (point) { var d = 180 / Math.PI; return new LonLat( point.x * d / R, (2 * Math.atan(Math.exp(point.y / R)) - (Math.PI / 2)) * d); } bounds() { var d = R * Math.PI; return new BBox().toBBox( new Point(-d, d), new Point(d, -d) ); }}五、地图类:Map
class Map { //构造方法 constructor(options) { options = Object.assign({id: "map", center: new LonLat(0, 0), zoom: 0}, options) this.id = options.id; this.container = document.querySelector(`#${this.id}`); this.container.className = "map-container"; this.center = options.center; this.zoom = options.zoom; this.resolutions = options.resolutions || [ 156543.03392804103, 78271.516964020513, 39135.758482010257, 19567.879241005128, 9783.9396205025641, 4891.9698102512821, 2445.984905125641, 1222.9924525628205, 611.49622628141026, 305.74811314070513, 152.87405657035256, 76.437028285176282, 38.218514142588141, 19.109257071294071, 9.5546285356470353, 4.7773142678235176, 2.3886571339117588, 1.1943285669558794, 0.59716428347793971,0.29858214173896985, 0.14929107086948493,0.074645535434742463,0.037322767717371232 ]; this.tileLayer = {}; this.mapPane = document.createElement("div"); this.mapPane.className = "map-pane"; this.container.appendChild(this.mapPane); this.mapTilePane = document.createElement("div"); this.mapTilePane.className = "map-tile-pane"; this.mapPane.appendChild(this.mapTilePane); this.des = document.createElement("div"); this.container.appendChild(this.des); this.des.className = "map-des"; this.des.innerHTML = "GIS日刊"; this.size = new Point( this.container.clientWidth, this.container.clientHeight ); this.padding = 2; this.project = new Project(); } setCenter(centerLonLat, zoom) { this.center = centerLonLat; this.zoom = zoom; } addTileLayer(options) { let tile = this.tileLayer[options.id] = new Tile(options); tile.onAdd(this); }}六、瓦片类:Tile
class Tile{ constructor(options) { options = Object.assign({tileSize: 256, dpi: 96}, options); this.tileSize = options.tileSize; this.dpi = options.dpi; this.origin = new Point(-20037508.342789244, 20037508.342789244); this.url = options.url; } onAdd(map) { this.map = map; this.tiles = []; this.render(); } render() { let map = this.map, zoom = map.zoom, center = map.center, resolutions = map.resolutions, resolution = resolutions[zoom], mapSize = map.size, padding = map.padding, project = map.project, tileSize = this.tileSize; //1 计算中心瓦片坐标 let centerMeter = project.project(center); let meterPerTile = tileSize * resolution; let centerOffset = new Point(centerMeter.x - this.origin.x, this.origin.y - centerMeter.y); let centerTileCoords = centerOffset.divide(meterPerTile, meterPerTile).floor(); //2 计算中心瓦片左上角屏幕坐标和地图中心点像素差 let tileOffset = centerOffset.remainder(meterPerTile, meterPerTile).divide(resolution, resolution); //3 计算瓦片行列数 let tileCount = mapSize.divide(tileSize, tileSize).add(padding * 2, padding * 2).ceil(); let halfTileCount = tileCount.divide(2, 2); //4 计算瓦片屏幕坐标 for(let i = 0, xLen = tileCount.x; i < xLen; i++) { for(let j = 0; j < tileCount.y; j++) { let coords = centerTileCoords.sub(halfTileCount.x, halfTileCount.y).add(i, j).floor(); let img = new Image(); img.src = this.url.replace("{z}", zoom).replace("{x}", coords.x).replace("{y}", coords.y); img.className = "map-tile"; map.mapTilePane.appendChild(img); let tilePx = coords.sub(centerTileCoords.x, centerTileCoords.y).multiply(tileSize, tileSize); let centerTilePx = mapSize.divide(2, 2).sub(tileOffset.x, tileOffset.y); let leftTop = tilePx.add(centerTilePx.x, centerTilePx.y); img.style.left = `${leftTop.x}px`; img.style.top = `${leftTop.y}px`; } } }}那么,见证奇迹的时刻到了,一起来看看效果吧
let map = new Map({ center: new LonLat( 116.3, 39.85 ), zoom: 10});map.addTileLayer({ id: "tile", url: https://c.tile.openstreetmap.org/{z}/{x}/{y}.png"});


 8837
8837

 被折叠的 条评论
为什么被折叠?
被折叠的 条评论
为什么被折叠?
 到【灌水乐园】发言


