


本文主要介绍Flutter布局中的Flow、Table、Wrap控件,详细介绍了其布局行为以及使用场景,并对源码进行了分析。
1.1 简介
Flow按照解释的那样,是一个实现流式布局算法的控件。流式布局在大前端是很常见的布局方式,但是一般使用Flow很少,因为其过于复杂,很多场景下都会去使用Wrap。
1.2 布局行为
Flow官方介绍是一个对child尺寸以及位置调整非常高效的控件,主要是得益于其FlowDelegate。另外Flow在用转换矩阵(transformation matrices)对child进行位置调整的时候进行了优化。
Flow以及其child的一些约束都会受到FlowDelegate的控制,例如重写FlowDelegate中的geiSize,可以设置Flow的尺寸,重写其getConstraintsForChild方法,可以设置每个child的布局约束条件。
Flow之所以高效,是因为其在定位过后,如果使用FlowDelegate中的paintChildren改变child的尺寸或者位置,只是重绘,并没有实际调整其位置。
1.3 继承关系
Object > Diagnosticable > DiagnosticableTree > Widget > RenderObjectWidget > MultiChildRenderObjectWidget > Flow1.4 示例代码
const width = 80.0;const height = 60.0;Flow( delegate: TestFlowDelegate(margin: EdgeInsets.fromLTRB(10.0, 10.0, 10.0, 10.0)), children: [ new Container(width: width, height: height, color: Colors.yellow,), new Container(width: width, height: height, color: Colors.green,), new Container(width: width, height: height, color: Colors.red,), new Container(width: width, height: height, color: Colors.black,), new Container(width: width, height: height, color: Colors.blue,), new Container(width: width, height: height, color: Colors.lightGreenAccent,), ],)class TestFlowDelegate extends FlowDelegate { EdgeInsets margin = EdgeInsets.zero; TestFlowDelegate({this.margin}); @override void paintChildren(FlowPaintingContext context) { var x = margin.left; var y = margin.top; for (int i = 0; i < context.childCount; i++) { var w = context.getChildSize(i).width + x + margin.right; if (w < context.size.width) { context.paintChild(i, transform: new Matrix4.translationValues( x, y, 0.0)); x = w + margin.left; } else { x = margin.left; y += context.getChildSize(i).height + margin.top + margin.bottom; context.paintChild(i, transform: new Matrix4.translationValues( x, y, 0.0)); x += context.getChildSize(i).width + margin.left + margin.right; } } } @override bool shouldRepaint(FlowDelegate oldDelegate) { return oldDelegate != this; }}样例其实并不复杂,FlowDelegate需要自己实现child的绘制,其实大多数时候就是位置的摆放。上面例子中,对每个child按照给定的margin值,进行排列,如果超出一行,则在下一行进行布局。
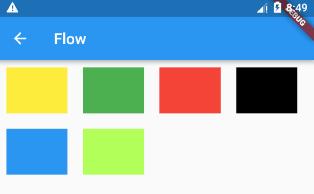
另外,对这个例子多做一个说明,对于上述child宽度的变化,这个例子是没问题的,如果每个child的高度不同,则需要对代码进行调整,具体的调整是换行的时候,需要根据上一行的最大高度来确定下一行的起始y坐标。
1.5 源码解析
构造函数如下:
Flow({ Key key, @required this.delegate, List children = const [],})1.5.1 属性解析
delegate:影响Flow具体布局的FlowDelegate。
其中FlowDelegate包含如下几个方法:
- getConstraintsForChild: 设置每个child的布局约束条件,会覆盖已有的;
- getSize:设置Flow的尺寸;
- paintChildren:child的绘制控制代码,可以调整尺寸位置,写起来比较的繁琐;
- shouldRepaint:是否需要重绘;
- shouldRelayout:是否需要重新布局。
其中,我们平时使用的时候,一般会使用到paintChildren以及shouldRepaint两个方法。
1.5.2 源码
我们先来看一下Flow的布局代码
Size _getSize(BoxConstraints constraints) { assert(constraints.debugAssertIsValid()); return constraints.constrain(_delegate.getSize(constraints));}@overridevoid performLayout() { size = _getSize(constraints); int i = 0; _randomAccessChildren.clear(); RenderBox child = firstChild; while (child != null) { _randomAccessChildren.add(child); final BoxConstraints innerConstraints = _delegate.getConstraintsForChild(i, constraints); child.layout(innerConstraints, parentUsesSize: true); final FlowParentData childParentData = child.parentData; childParentData.offset & 最低0.47元/天 解锁文章


 1635
1635


 被折叠的 条评论
为什么被折叠?
被折叠的 条评论
为什么被折叠?
 到【灌水乐园】发言


