


想了解更多好玩的人工智能应用,请关注公众号“机器AI学习 数据AI挖掘”,”智能应用"菜单中包括:颜值检测、植物花卉识别、文字识别、人脸美妆等有趣的智能应用。。

1. 配置
1.1 环境要求
2. 环境安装
2.1 torch 和 torchvision
2.2 cocoapi (pycocotools)
2.3 下载安装detectron2
3. 测试detectron2
1. 配置
| 基本配置 | 版本号 |
|---|---|
| CPU | Intel® Core™ i5-8400 CPU @ 2.80GHz × 6 |
| GPU | GeForce RTX 2070 SUPER/PCIe/SSE2 |
| OS | Ubuntu18.04 |
| python | 3.6.9 |
| gcc | 5.5 |
| g++ | 5.5 |
| cuda | 10.0 |
| pytorch | 1.5 |
1.1 环境要求
根据官网的提示, 环境有以下的几个要求:
Python ≥ 3.6
PyTorch ≥ 1.4
torchvision that matches the PyTorch installation.
pycocotools.
OpenCV, optional, needed by demo and visualization
2. 环境安装
2.1 torch 和 torchvision
pip install --pre torch torchvision -f https://download.pytorch.org/whl/nightly/cu100/torch_nightly.html
因为我的cuda版本是10.0, 所以选择这个下载, 去 https://pytorch.org/ 下载适合自己的版本.
2.2 cocoapi (pycocotools)
pip install cython
git clone https://github.com/cocodataset/cocoapi.git
cd cocoapi/PythonAPI
python setup.py build_ext install
2.3 下载安装detectron2
git clone https://github.com/facebookresearch/detectron2.git
cd detectron2
python -m pip install -e .
3. 测试detectron2
在detectron2/demo文件夹下
python demo.py --config-file ../configs/COCO-InstanceSegmentation/mask_rcnn_R_50_FPN_3x.yaml --input 11.jpg --opts MODEL.WEIGHTS detectron2://COCO-InstanceSegmentation/mask_rcnn_R_50_FPN_3x/137849600/model_final_f10217.pkl
自动下载的预训练权重放在 .torch/fvcore_cache/detectron2/COCO-InstanceSegmentation/下
如果网速过慢, 可以网页上下载之后放在本地, 指定固定的路径.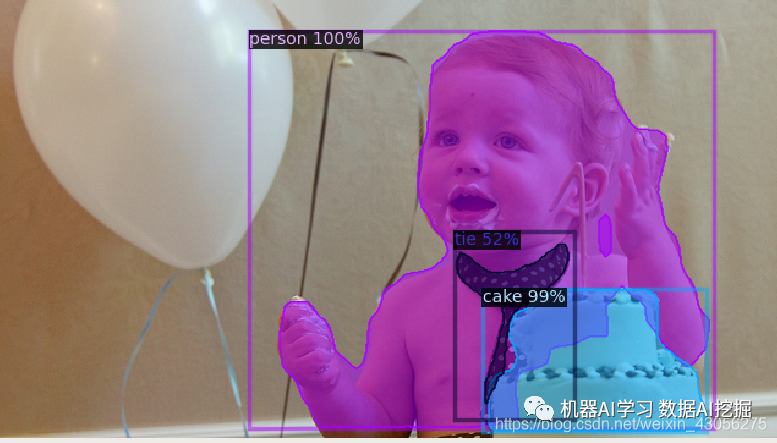
接下来开始制作自己的数据集并且完成目标检测和关键点检测的训练, ,见我的下一个博客
detectron2训练自己的数据实现目标检测和关键点检测(二) 制作转换自己的数据集
参考:
https://github.com/facebookresearch/detectron2/blob/master/INSTALL.md
https://www.cnblogs.com/jiajiewu/p/12822267.html
https://blog.csdn.net/linghu8812/article/details/105701408
https://www.aiuai.cn/aifarm1288.html


 6298
6298


 被折叠的 条评论
为什么被折叠?
被折叠的 条评论
为什么被折叠?
 到【灌水乐园】发言


