


首先安装 第三方插件
前期准备
准备好开发的IDE,首选Visual Studio2017版本,新建项目,或是在你原有的项目上进行扩展。注意:项目的.NET Framework版本最低为4.6
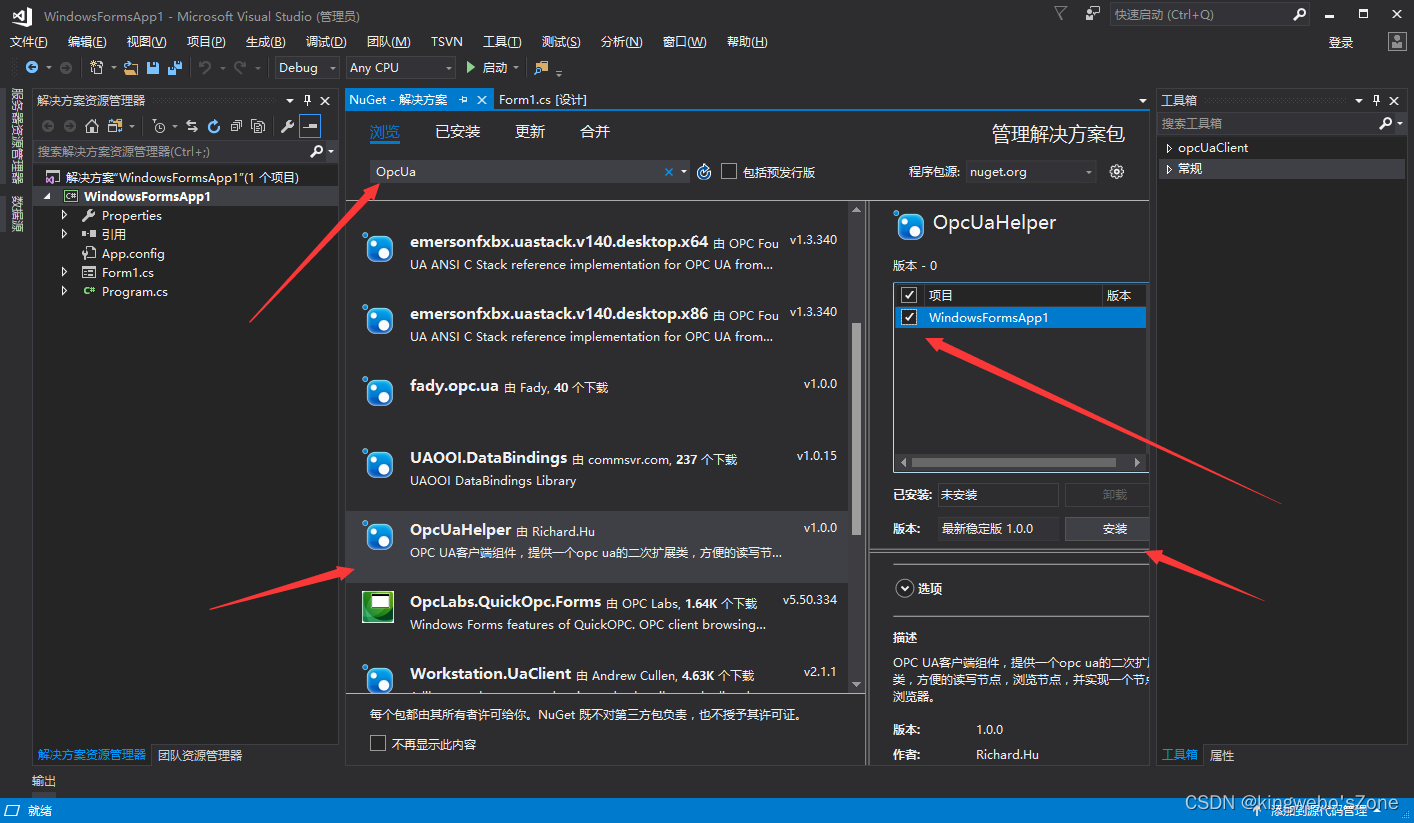
然后在窗体的界面新增引用:
using OpcUaHelper;
接下就可以愉快码代码了。
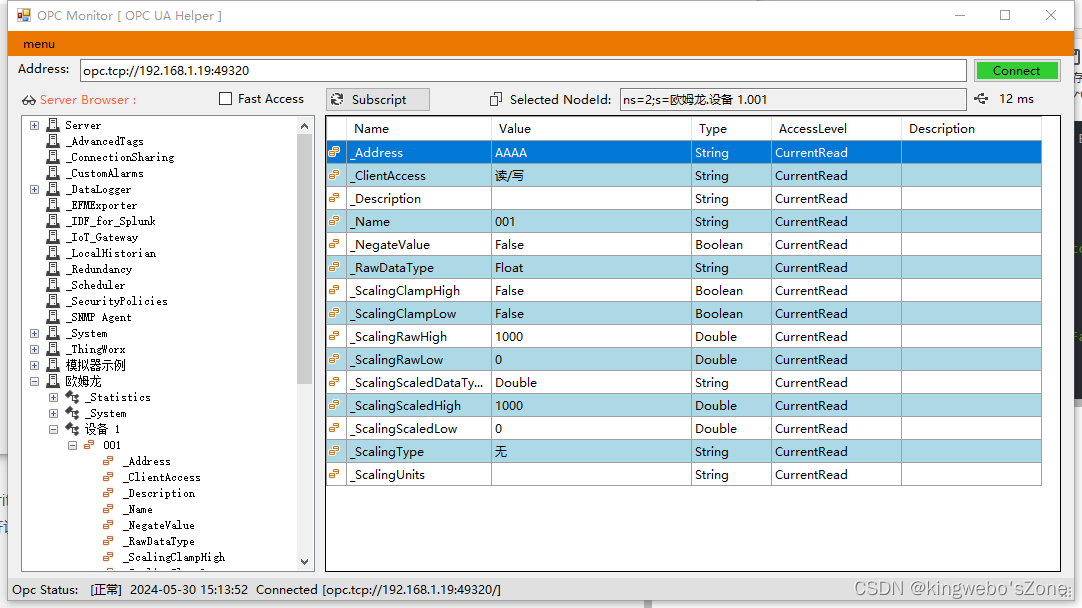
FromBrowseServer
使用此窗口服务可以查看服务器的节点状态。
OpcUaHelper.Forms.FormBrowseServer formBrowseServer = new Forms.FormBrowseServer( );
formBrowseServer.ShowDialog( );
当然你可以固定住这个地址,传入地址即可,此处为示例:
 OpcUaHelper.Forms.FormBrowseServer formBrowseServer = new Forms.FormBrowseServer( "opc.tcp://127.0.0.1:62541/SharpNodeSettings/OpcUaServer" );
 formBrowseServer.ShowDialog( );
OPC UA Client
实例化操作
OpcUaClient m_OpcUaClient = new OpcUaClient();
m_OpcUaClient.UserIdentity = new UserIdentity( new AnonymousIdentityToken( ) );//匿名链接
m_OpcUaClient.UserIdentity = new UserIdentity( "user", "password" );///用户密码链接

X509Certificate2 certificate = new X509Certificate2( "[证书的路径]", "[密钥]",X509KeyStorageFlags.MachineKeySet | X509KeyStorageFlags.Exportable );//证书链接
  m_OpcUaClient.UserIdentity = new UserIdentity( certificate );
正式开始连接服务器,连接操作必须放在Try中,异步执行 使用 ClientUtils.HandleException( “Connected Failed”, ex );抓取对应错误信息
private async void button1_Click( object sender, EventArgs e )
{
    // connect to server, this is a sample
    try
    {
        await m_OpcUaClient.ConnectServer( "opc.tcp://127.0.0.1:62541/SharpNodeSettings/OpcUaServer" );
    }
    catch (Exception ex)
    {
        ClientUtils.HandleException( "Connected Failed", ex );
    }
}
Read/Write Node 读写点位操作
节点字符设为 :
ns=2;s=欧姆龙.设备 1.001
类型为int16,使用下面方法读取
try
{
    short value = m_OpcUaClient.ReadNode<short>( "ns=2;s=欧姆龙.设备 1.001" );
}
catch(Exception ex)
{
    ClientUtils.HandleException( this.Text, ex );
}
异步读取
try
{
    short value = await m_OpcUaClient.ReadNodeAsync<short>( "ns=2;s=欧姆龙.设备 1.001" );
}
catch (Exception ex)
{
    ClientUtils.HandleException( this.Text, ex );
}
写入节点
try
{
    m_OpcUaClient.WriteNode( "ns=2;s=欧姆龙.设备 1.001", (short)123 );
}
catch (Exception ex)
{
    ClientUtils.HandleException( this.Text, ex );
}
批量读取(类型一致)
try
{
    // 如果你批量读取的值的类型都是一样的,比如float,那么有简便的方式
    List<string> tags = new List<string>( );
    tags.Add( "ns=2;s=欧姆龙.设备 1.001" );
    tags.Add( "ns=2;s=欧姆龙.设备 1.002" );

    // 按照顺序定义的值
    List<float> values = m_OpcUaClient.ReadNodes<float>( tags.ToArray() );

}
catch (Exception ex)
{
    ClientUtils.HandleException( this.Text, ex );
}
批量读取(类型不一致)
try
{
    // 添加所有的读取的节点,此处的示例是类型不一致的情况
    List<NodeId> nodeIds = new List<NodeId>( );
    nodeIds.Add( new NodeId( "ns=2;s=欧姆龙.设备 1.001" ) );
    nodeIds.Add( new NodeId( "ns=2;s=欧姆龙.设备 1.002" ) );
    nodeIds.Add( new NodeId( "ns=2;s=欧姆龙.设备 1.003" ) );
    nodeIds.Add( new NodeId( "ns=2;s=欧姆龙.设备 1.004" ) );
    nodeIds.Add( new NodeId( "ns=2;s=欧姆龙.设备 1.005" ) );
    nodeIds.Add( new NodeId( "ns=2;s=欧姆龙.设备 1.006" ) );
    nodeIds.Add( new NodeId( "ns=2;s=欧姆龙.设备 1.007" ) );

    // dataValues按顺序定义的值,每个值里面需要重新判断类型
    List<DataValue> dataValues = m_OpcUaClient.ReadNodes( nodeIds.ToArray() );//datavalue 可以通过


}
catch (Exception ex)
{
    ClientUtils.HandleException( this.Text, ex );
}
批量写入
try
{
    // 此处演示写入一个short,2个float类型的数据批量写入操作
    bool success = m_OpcUaClient.WriteNodes( new string[] {
        "ns=2;s=欧姆龙.设备 1.001",
        "ns=2;s=欧姆龙.设备 1.002",
        "ns=2;s=欧姆龙.设备 1.003"},
        new object[] {
            (short)1234,
            123.456f,
            123f
        } );
    if (success)
    {
        // 写入成功
    }
    else
    {
        // 写入失败,一个失败即为失败
    }
}
catch (Exception ex)
{
    ClientUtils.HandleException( this.Text, ex );
}
读取Attrubute
try
{
    OpcNodeAttribute[] nodeAttributes = m_OpcUaClient.ReadNoteAttributes( "ns=2;s=欧姆龙.设备 1.001" );
    foreach (var item in nodeAttributes)
    {
        Console.Write( string.Format( "{0,-30}", item.Name ) );
        Console.Write( string.Format( "{0,-20}", item.Type ) );
        Console.Write( string.Format( "{0,-20}", item.StatusCode ) );
        Console.WriteLine( string.Format( "{0,20}", item.Value ) );
    }

    // 输出如下
    //  Name                          Type                StatusCode                         Vlaue

    //  NodeClass                     Int32               Good                                   2
    //  BrowseName                    QualifiedName       Good                              2:温度
    //  DisplayName                   LocalizedText       Good                                温度
    //  Description                   LocalizedText       Good
    //  WriteMask                     UInt32              Good                                  96
    //  UserWriteMask                 UInt32              Good                                  96
    //  Value                         Int16               Good                              -11980
    //  DataType                      NodeId              Good                                 i=4
    //  ValueRank                     Int32               Good                                  -1
    //  ArrayDimensions               Null                Good
    //  AccessLevel                   Byte                Good                                   3
    //  UserAccessLevel               Byte                Good                                   3
    //  MinimumSamplingInterval       Double              Good                                   0
    //  Historizing                   Boolean             Good                               False
}
catch (Exception ex)
{
    ClientUtils.HandleException( this.Text, ex );
}
读取Reference
try
{
    ReferenceDescription[] references = m_OpcUaClient.BrowseNodeReference( "ns=2;s=Devices/分厂一/车间二/ModbusTcp客户端" );
    foreach (var item in references)
    {
        Console.Write( string.Format( "{0,-30}", item.NodeClass ) );
        Console.Write( string.Format( "{0,-30}", item.BrowseName ) );
        Console.Write( string.Format( "{0,-20}", item.DisplayName ) );
        Console.WriteLine( string.Format( "{0,-20}", item.NodeId.ToString( ) ) );
    }

    ;
    // 输出如下
    //  NodeClass                     BrowseName                      DisplayName           NodeId

    //  Variable                      2:温度                          温度                  ns=2;s=Devices/分厂一/车间二/ModbusTcp客户端/温度
    //  Variable                      2:风俗                          风俗                  ns=2;s=Devices/分厂一/车间二/ModbusTcp客户端/风俗
    //  Variable                      2:转速                          转速                  ns=2;s=Devices/分厂一/车间二/ModbusTcp客户端/转速
    //  Variable                      2:机器人关节                    机器人关节            ns=2;s=Devices/分厂一/车间二/ModbusTcp客户端/机器人关节
    //  Variable                      2:cvsdf                         cvsdf                 ns=2;s=Devices/分厂一/车间二/ModbusTcp客户端/cvsdf
    //  Variable                      2:条码                          条码                  ns=2;s=Devices/分厂一/车间二/ModbusTcp客户端/条码
    //  Variable                      2:开关量                        开关量                ns=2;s=Devices/分厂一/车间二/ModbusTcp客户端/开关量
}
catch (Exception ex)
{
    ClientUtils.HandleException( this.Text, ex );
}
订阅(单节点订阅)
m_OpcUaClient.AddSubscription( "A", "ns=2;s=Devices/分厂一/车间二/ModbusTcp客户端/温度", SubCallback );
关键字A是自定义的(以此标记来确定是哪个寄存器发生了变化),方便回调判断或是取消订阅用的,方法SubCallback是一个回调方法:
private void SubCallback(string key, MonitoredItem monitoredItem, MonitoredItemNotificationEventArgs args )
{
    if (InvokeRequired)
    {
        Invoke( new Action<string, MonitoredItem, MonitoredItemNotificationEventArgs>( SubCallback ), key, monitoredItem, args );
        return;
    }

    if (key == "A")
    {
        // 如果有多个的订阅值都关联了当前的方法,可以通过key和monitoredItem来区分
        MonitoredItemNotification notification = args.NotificationValue as MonitoredItemNotification;
        if (notification != null)
        {
            textBox3.Text = notification.Value.WrappedValue.Value.ToString( ); //获取变化的值
        }
    }
}
取消订阅代码如下:
m_OpcUaClient.RemoveSubscription( "A" );
订阅(批量订阅)
此处举例批量订阅3个点节点,按顺序在 textBox5 , textBox9 , textBox10 文本框按照顺序进行显示,此处比上面的操作需要麻烦一点, 需要缓存下批量订阅的节点信息
// 缓存的批量订阅的节点
private string[] MonitorNodeTags = null;

private void button5_Click( object sender, EventArgs e )
{
    // 多个节点的订阅
    MonitorNodeTags = new string[]
    {
        textBox6.Text,
        textBox7.Text,
        textBox8.Text,
    };
    m_OpcUaClient.AddSubscription( "B", MonitorNodeTags, SubCallback );
}
修改上述的事件回调方法如下多判断几个值的操作:
private void SubCallback(string key, MonitoredItem monitoredItem, MonitoredItemNotificationEventArgs args )
{
    if (InvokeRequired)
    {
        Invoke( new Action<string, MonitoredItem, MonitoredItemNotificationEventArgs>( SubCallback ), key, monitoredItem, args );
        return;
    }

    if (key == "A")
    {
        // 如果有多个的订阅值都关联了当前的方法,可以通过key和monitoredItem来区分
        MonitoredItemNotification notification = args.NotificationValue as MonitoredItemNotification;
        if (notification != null)
        {
            textBox3.Text = notification.Value.WrappedValue.Value.ToString( );
        }
    }
    else if(key == "B")
    {
        // 需要区分出来每个不同的节点信息
        MonitoredItemNotification notification = args.NotificationValue as MonitoredItemNotification;
        if (monitoredItem.StartNodeId.ToString( ) == MonitorNodeTags[0])
        {
            textBox5.Text = notification.Value.WrappedValue.Value.ToString( );
        }
        else if (monitoredItem.StartNodeId.ToString( ) == MonitorNodeTags[1])
        {
            textBox9.Text = notification.Value.WrappedValue.Value.ToString( );
        }
        else if (monitoredItem.StartNodeId.ToString( ) == MonitorNodeTags[2])
        {
            textBox10.Text = notification.Value.WrappedValue.Value.ToString( );
        }
    }
}
参考地址:
https://www.cnblogs.com/davisdabing/p/17841183.html


 1130
1130

 被折叠的 条评论
为什么被折叠?
被折叠的 条评论
为什么被折叠?
 到【灌水乐园】发言


