


Pytorch Note
文章目录
cuda & cudnn
-
cuda
a general purpose parallel computing platform and programming model that leverages the parallel compute engine in NVIDIA GPUs to solve many complex computational problems in a more efficient way than on a CPU
-
cudnn
CUDA Deep Neural Network library的简称,是NVIDIA打造的针对深度神经网络的加速库,是一个用于深层神经网络的GPU加速库。如果你要用GPU训练模型,cuDNN不是必须的,但是一般会采用这个加速库。
训练train
主要语句:
if cuda:
    model.cuda()
model.train()    #把模型的状态设置为训练状态,主要针对Dropout层
optimizer = torch.optim.SGD((model.parameters(), lr=lr, momentum=momentum))
for epoch in range(epochs):
    for batch_idx, (data, target) in enumerate(train_loader):
        if cuda:
            data, target = data.cuda(), target.cuda()
        output = model(data)   #对data做前向过程,得到输出
        loss = loss(model, output, target)#计算output和target之间的损失
        loss.backward()        #反向过程,计算损失关于各参数的梯度
        optimizer.step()       #利用计算得到的梯度对参数进行更新
随机种子seed
在训练开始时,参数的初始化是随机的,为了让每次的结果一致,我们需要设置随机种子
torch.manual_seed(args.seed)           #为CPU设置随机种子
if cuda:
    torch.cuda.manual_seed(seed)       #为当前GPU设置随机种子
    torch.cuda.manual_seed_all(seed)   #为所有GPU设置随机种子
卷积函数
nn.Conv2d(in_channels, out_channels, kernel_size, stride=1, padding=0, dilation=1, groups=1, bias=True)
功能:对多输入平面的输入信号进行二维卷积
输入信号的形式为 ( N , C i n , H , W ) (N, C_{in},H, W) (N,Cin,H,W), N N N表示batch size, C i n C_{in} Cin表示channel的个数, H H H, W W W分别表示特征图的高和宽。
-
stride(步长):控制cross-correlation的步长,可设为1个int型数或(int, int)型的tuple。
-
padding(补0):控制zero-padding的数目。
-
Q1: padding是卷积之后还是卷积之前还是卷积之后实现的?
padding是在卷积之前补0,如果愿意的话,可以通过使用torch.nn.Functional.pad来补非0的内容。Q2:padding补0的默认策略是什么?
四周都补!如果pad输入是一个tuple的话,则第一个参数表示高度上面的padding,第2个参数表示宽度上面的
-
-
dilation(扩张):控制kernel点(卷积核点)的间距; 也被称为 "à trous"算法.
-
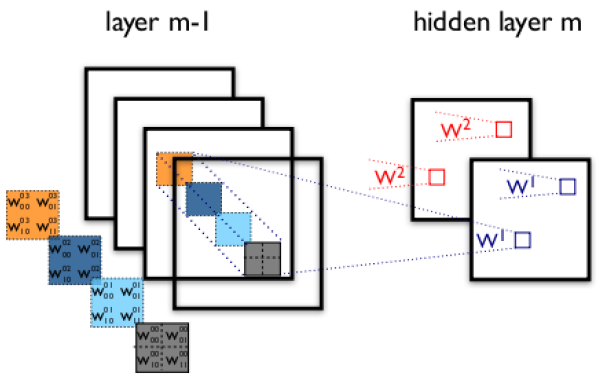
groups(卷积核个数):这个比较好理解,通常来说,卷积个数唯一,但是对某些情况,可以设置范围在1 —— in_channels中数目的卷积核:
-
[外链图片转存失败,源站可能有防盗链机制,建议将图片保存下来直接上传(img-8h6IfwhQ-1615453554689)(Pytorch Note.assets/20190402212647109.png)]
![[公式]](Pytorch%20Note.assets/equation.svg)
GPU的使用
参考链接:[ 单机并行训练](https://zhuanlan.zhihu.com/p/71566775 "知乎)
-
GPU检查
torch.cuda.is_available()  # 判断GPU是否可用
torch.cuda.device_count()  # GPU可用数量
torch.cuda.get_device_name(0)   # 返回 gpu 名字,设备索引默认从 0 开始
torch.cuda.current_device()     # 返回当前设备索引
可以使用 .cuda(<显卡号数>) 来将数据存储在指定的显卡中。
单GPU
- 数据迁移
指定设备对象
# 通过字符串
device = torch.device('cpu')
device = torch.device('cuda:1')  # 注意格式,指定类型及编号
device = torch.device('cuda')    # 默认为当前设备

  #还可以通过设备类型加上编号,来创建 device 对象:
device = torch.device('cuda', 0)
device = torch.device('cpu', 0)
法一:
device=torch.device("cuda:0" if torch.cuda.is_available() else "cpu")
model=model.to(device)
x=x.to(device)
y=y.to(device)
法二:
model=model.cuda()
x=x.cuda()
- 模型迁移
对于模型而言,我们可以将其看做是一种类似于Variable的容器。我们对它进行 .cuda() 处理,是将其中的参数放到显存上去(因为实际使用的时候也是通过这些参数做运算)。
 # 创建一个输入维度为2,输出维度为2的单层神经网络
 linear = torch.nn.Linear(2, 2)
 linear_cuda = linear.cuda()
多GPU
-
Class原型
torch.nn.DataParallel(module, device_ids=None, output_device=None, dim=0)
```
-
参数
- module :要进行并行的
module。这里隐含了一点 ,即网络中的某一层也是可以进行数据并行的,但是一般不会这么使用。 - device_ids :
CUDA列表,可以为torch.device类型,也可以是编号组成的int列表。默认使用全部 GPU - output_device : 某一
GPU编号或torch.device。指定输出的GPU,默认为第一个,即device_ids[0]
- module :要进行并行的
-
返回值
要进行并行的模型
-
基本使用方式
-
例一
net = torch.nn.DataParallel(model, device_ids=[0, 1, 2]) output = net(input_var) # input_var can be on any device, including CP -
例二
import torch.nn as nn
device_ids = [0,1,2,3]

model = model.cuda(device_ids[1])  # 单GPU使用,指定GPU
model = nn.DataParallel(model,device_ids=[1,2,3])    # 选后三个GPU
model = nn.DataParallel(model, device_ids=device_ids)  # 使用全部GPU
model = nn.DataParallel(model)  # 使用全部GPU

optimizer = optim.SGD(model.parameters(), lr=learning_rate, momentum=0.9, weight_decay=0.001)
optimizer = nn.DataParallel(optimizer, device_ids=device_ids)

optimizer.module.step()
-
-
加载多GPU预训练模型
model = ft_net()
pretained_model = torch.load(’./model/all/8_model.pkl’)
pretained_dict = pretained_model.module.state_dict()
model = ft_net()
model.load_state_dict(pretained_dict)
```
取数据GPU->CPU
if(use_gpu):
    loss = loss.cpu()
    acc = acc.cpu()
输出数据去cuda,转为numpy
correct_prediction = sum(torch.max(output, 1)[1].data.squeeze() == torch.max(b_y, 1)[1].data.squeeze())
if(cuda_gpu):
    correct_prediction = correct_prediction.cpu().numpy()   #.cpu将cuda转为tensor类型,.numpy将tensor转为numpy类型
else:
    correct_prediction = correct_prediction.numpy()
torch中parameters
import torch
import torch.nn as nn
import torch.nn.functional as F

class Net(nn.Module):

    def __init__(self):
        super(Net, self).__init__()
        # 1 input image channel, 6 output channels, 5x5 square convolution
        # kernel
        self.conv1 = nn.Conv2d(1, 6, 5)
        self.conv2 = nn.Conv2d(6, 16, 5)
        # an affine operation: y = Wx + b
        self.fc1 = nn.Linear(16 * 5 * 5, 120)
        self.fc2 = nn.Linear(120, 84)
        self.fc3 = nn.Linear(84, 10)

    def forward(self, x):
        # Max pooling over a (2, 2) window
        x = F.max_pool2d(F.relu(self.conv1(x)), (2, 2))
        # If the size is a square you can only specify a single number
        x = F.max_pool2d(F.relu(self.conv2(x)), 2)
        x = x.view(-1, self.num_flat_features(x))
        x = F.relu(self.fc1(x))
        x = F.relu(self.fc2(x))
        x = self.fc3(x)
        return x

    def num_flat_features(self, x):
        size = x.size()[1:]  # all dimensions except the batch dimension
        num_features = 1
        for s in size:
            num_features *= s
        return num_features


net = Net()
print(net)
>>>
Net(
  (conv1): Conv2d(1, 6, kernel_size=(5, 5), stride=(1, 1))
  (conv2): Conv2d(6, 16, kernel_size=(5, 5), stride=(1, 1))
  (fc1): Linear(in_features=400, out_features=120, bias=True)
  (fc2): Linear(in_features=120, out_features=84, bias=True)
  (fc3): Linear(in_features=84, out_features=10, bias=True)
)


for name, param in net.named_parameters():
	print(name,param.requires_grad)
>>>
conv1.weight True
conv1.bias True
conv2.weight True
conv2.bias True
fc1.weight True
fc1.bias True
fc2.weight True
fc2.bias True
fc3.weight True
fc3.bias True

params = list(net.parameters())
print(len(params))
>>>
10

for i in range(len(params)):
    print(params[i].size())
>>>
torch.Size([6, 1, 5, 5])
torch.Size([6])
torch.Size([16, 6, 5, 5])
torch.Size([16])
torch.Size([120, 400])
torch.Size([120])
torch.Size([84, 120])
torch.Size([84])
torch.Size([10, 84])
torch.Size([10])
torch.nn中为class用来保存需要保存的参数weight,bias等,torch.nn.functional中为函数,用来计算一些数据,这些数据不需要保存,只需要计算得到,因此torch中有torch.nn.conv2d()和torch.nn.functional.conv2d()
模型保存与加载
参考链接:[ Pytorch 保存模型与加载模型](https://zhuanlan.zhihu.com/p/38056115 "知乎)
简单的保存与加载方法:
# 保存整个网络
torch.save(net, PATH)
# 保存网络中的参数, 速度快,占空间少
torch.save(net.state_dict(),PATH)
#--------------------------------------------------
#针对上面一般的保存方法,加载的方法分别是:
model_dict=torch.load(PATH)
model_dict=model.load_state_dict(torch.load(PATH))
实验中往往需要保存更多的信息,比如优化器的参数,那么可以采取下面的方法保存:
torch.save({'epoch': epochID + 1,
            'state_dict': model.state_dict(),
            'best_loss': lossMIN,
            'optimizer': optimizer.state_dict(),
            'alpha': loss.alpha,
            'gamma': loss.gamma
           },
           checkpoint_path + '/m-' + launchTimestamp +
                      '-' + str("%.4f" % lossMIN) + '.pth.tar'
          )
以上包含的信息有,epochID, state_dict, min loss, optimizer, 自定义损失函数的两个参数;格式以字典的格式存储。
加载的方式:
def load_checkpoint(model, checkpoint_PATH, optimizer):
    if checkpoint != None:
        model_CKPT = torch.load(checkpoint_PATH)
        model.load_state_dict(model_CKPT['state_dict'])
        print('loading checkpoint!')
        optimizer.load_state_dict(model_CKPT['optimizer'])
    return model, optimizer
其他的参数可以通过以字典的方式获得。
如果修改了一部分网络,比如加了一些,删除一些,等等,那么需要过滤这些参数,加载方式:
def load_checkpoint(model, checkpoint, optimizer, loadOptimizer):
    if checkpoint != 'No':
        print("loading checkpoint...")
        model_dict = model.state_dict()
        modelCheckpoint = torch.load(checkpoint)
        pretrained_dict = modelCheckpoint['state_dict']
        # 过滤操作
        new_dict = {k: v for k, v in pretrained_dict.items() if k in model_dict.keys()}
        model_dict.update(new_dict)
        # 打印出来,更新了多少的参数
        print('Total : {}, update: {}'.format(len(pretrained_dict), len(new_dict)))
        model.load_state_dict(model_dict)
        print("loaded finished!")
        # 如果不需要更新优化器那么设置为false
        if loadOptimizer == True:
            optimizer.load_state_dict(modelCheckpoint['optimizer'])
            print('loaded! optimizer')
        else:
            print('not loaded optimizer')
    else:
        print('No checkpoint is included')
    return model, optimizer
1)添加下面一句话到模型中
for p in self.parameters():
    p.requires_grad = False
比如加载了resnet预训练模型之后,在resenet的基础上连接了新的模快,resenet模块那部分可以先暂时冻结不更新,只更新其他部分的参数,那么可以在下面加入上面那句话
class RESNET_MF(nn.Module):
    def __init__(self, model, pretrained):
        super(RESNET_MF, self).__init__()
        self.resnet = model(pretrained)
        for p in self.parameters():
            p.requires_grad = False
        self.f = SpectralNorm(nn.Conv2d(2048, 512, 1))
        self.g = SpectralNorm(nn.Conv2d(2048, 512, 1))
        self.h = SpectralNorm(nn.Conv2d(2048, 2048, 1))
        ...
同时在优化器中添加:filter(lambda p: p.requires_grad, model.parameters())
optimizer = optim.Adam(filter(lambda p: p.requires_grad, model.parameters()), lr=0.001, betas=(0.9, 0.999),
                               eps=1e-08, weight_decay=1e-5)
- 参数保存在有序的字典中,那么可以通过查找参数的名字对应的id值,进行冻结
查找的代码:
    model_dict = torch.load('net.pth.tar').state_dict()
    dict_name = list(model_dict)
    for i, p in enumerate(dict_name):
        print(i, p)
保存一下这个文件,可以看到大致是这个样子的:
0 gamma
1 resnet.conv1.weight
2 resnet.bn1.weight
3 resnet.bn1.bias
4 resnet.bn1.running_mean
5 resnet.bn1.running_var
6 resnet.layer1.0.conv1.weight
7 resnet.layer1.0.bn1.weight
8 resnet.layer1.0.bn1.bias
9 resnet.layer1.0.bn1.running_mean
....
同样在模型中添加这样的代码:
for i,p in enumerate(net.parameters()):
    if i < 165:
        p.requires_grad = False
在优化器中添加上面的那句话可以实现参数的屏蔽


 2210
2210


 被折叠的 条评论
为什么被折叠?
被折叠的 条评论
为什么被折叠?
 到【灌水乐园】发言


