


Kotlin 的基本特性就先写到这里,我们这个系列的定位是基础,也就是能用就好,够用就好,我们不会举太多的例子,但是这些都是最经常用到的特性。
从这节开始就是Kotlin和android 进行结合,使用Kotlin进行安卓应用的开发了。
安卓的开发从布局开始。

安卓的界面编写也是使用xml进行布局的,一般如果熟悉了html界面的布局,那么很容易就能够理解安卓有关的布局了,这里介绍两个比较重要的布局方式:线性布局(LinearLayout)和相对布局(RelativeLayout)。
新建的功能布局,一般是一个界面对应一个xml文件,main界面的xml在activity_main.xml 中。
线性布局 LinearLayout
根据名字我们就很清楚,线性布局的意思了,相当于html中的div层,两种布局方向:
vertical 下的布局方式:
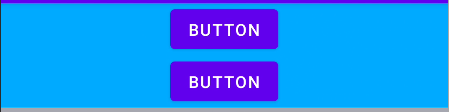
horizontal 下的布局方式:

vertical 布局代码:
<LinearLayout
    android:layout_width="match_parent"
    android:layout_height="wrap_content"
    android:orientation="vertical"
    android:background="#00aaff" >

    <Button
        android:id = "@+id/btn1"
        android:layout_width="wrap_content"
        android:layout_height="wrap_content"
        android:layout_gravity="center"
        android:text="Button" />

    <Button
        android:id = "@+id/btn2"
        android:layout_width="wrap_content"
        android:layout_height="wrap_content"
        android:layout_gravity="center"
        android:text="Button" />


</LinearLayout>
horizontal 下的布局代码:
    <LinearLayout
        android:layout_width="match_parent"
        android:layout_height="wrap_content"
        android:orientation="horizontal"
        android:background="#A6A7AF" >

        <Button
            android:id = "@+id/btn3"
            android:layout_width="wrap_content"
            android:layout_height="wrap_content"
            android:layout_weight="1"
            android:layout_marginLeft="10dp"
            android:layout_marginRight="10dp"
            android:text="Button" />

        <Button
            android:id = "@+id/btn4"
            android:layout_width="wrap_content"
            android:layout_height="wrap_content"
            android:layout_weight="1"
            android:layout_marginLeft="10dp"
            android:layout_marginRight="10dp"
            android:text="Button" />


    </LinearLayout>
有几个属性需要熟悉一下:
- wrap_content 为按照控件内容的大小进行调整
- layout_marginLeft 为控件左边的偏移,其他的一次类推
- layout_gravity 可以用来进行控件居中显示
- layout_weight 控件在horizontal模式下占到的比率
相对布局 RelativeLayout
相对布局 主要两种相当模式,一种是父控件,一种是相对兄弟控件。
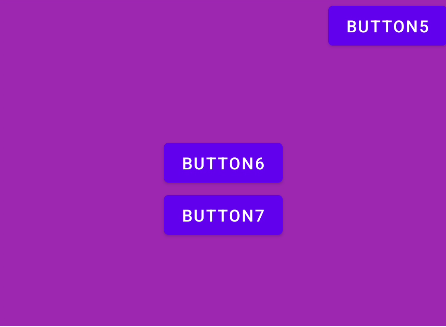
布局代码如下:
    <RelativeLayout
        android:layout_width="match_parent"
        android:layout_height="300dp"

        android:background="#9C27B0" >

        <Button
            android:id = "@+id/btn5"
            android:layout_width="wrap_content"
            android:layout_height="wrap_content"
            android:layout_alignParentTop="true"
            android:layout_alignParentRight="true"
            android:text="Button5" />


        <Button
            android:id = "@+id/btn6"
            android:layout_width="wrap_content"
            android:layout_height="wrap_content"

            android:layout_centerHorizontal="true"
            android:layout_centerVertical="true"
            android:text="Button6" />


        <Button
            android:id = "@+id/btn7"
            android:layout_width="wrap_content"
            android:layout_height="wrap_content"

            android:layout_centerHorizontal="true"
            android:layout_centerVertical="true"

            android:layout_below="@+id/btn6"

            android:text="Button7" />


    </RelativeLayout>
几个重要的布局:
- layout_alignParentxxxx 相对于父类的情况
- layout_to 相对于兄弟的情况
项目在github的地址在这里。
小结
布局的方式比较多,但是这两个种布局方式是最重要的,也可以这么说掌握了这两种以后,其他的就可以依次类推,只要知道里面的属性基本上就容易上手了。


 1207
1207


 被折叠的 条评论
为什么被折叠?
被折叠的 条评论
为什么被折叠?
 到【灌水乐园】发言


