配置选项:基于Windows系统,用VScode+minGW64+cmake+Libtorch(不可行,因为pytorch官网下载的Libtorch是基于MSVC编译的,他与minGW64不兼容),非常感谢这篇博文,减少了绕行时间:基于Windows系统,用VScode+minGW64+cmake+Libtorch开发
解决方法:基于Windows系统,使用VS 2022+Libtorch(首选,后边详述该方法)
步骤一:libtorch下载(DEBUG版本)
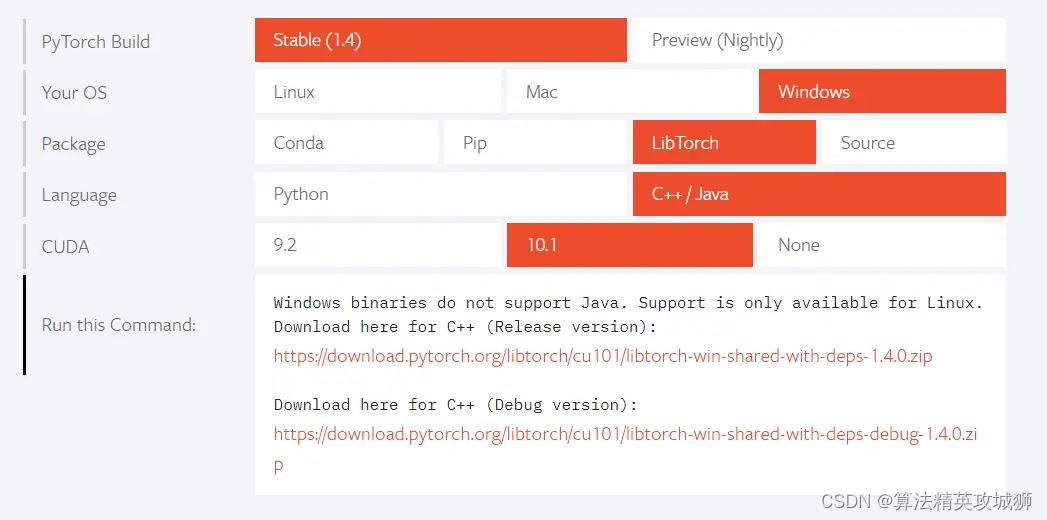
前往libtorch官网https://pytorch.org/get-started/locally/,选择对应版本的libtorch进行下载
解压完成后,放入D盘或者其他位置,记录其路径即可:
步骤二:VS2022+libtorch环境配置 [项目] -> [属性]
新建console(控制台)项目,在项目中进行如下配置:
1. 配置include目录: [C/C++]-> [常规]->[附加包含目录]
[你的libtorch目录]\include
[你的libtorch目录]\include\torch\csrc\api\include
2. 配置C++语言标准:[C/C++]-> [语言]
C++语言标准:ISO C++17标准(/std:c++17)
3. 配置linker(链接器):[链接器] -> [常规] -> [附加库目录],添加如下一行:
[你的libtorch目录]\lib\*.lib
4. 配置运行环境:[调试] -> [环境]
PATH=[你的libtorch目录]\lib; %PATH%
测试代码1如下(更多案例可查询网站PyTorch C++ API — PyTorch main documentation):
#include<torch/torch.h>
#include<torch/script.h>
#include<iostream>
using namespace std;
int main()
{
torch::Tensor output;
std::cout << "cuda is_available: " << torch::cuda::is_available() << std::endl;
torch::DeviceType device = at::kCPU;
if (torch::cuda::is_available())
device = at::kCUDA;
output = torch::eye(3).to(device); //randn({ 3,3 })
std::cout << output << std::endl;
return 0;
}
运行结果:
cuda is_available: 0
1 0 0
0 1 0
0 0 1
[ CPUFloatType{3,3} ]
测试代码2:
#include <torch/torch.h>
#include <iostream>
int main() {
// 使用arange构造一个一维向量,再用reshape变换到5x5的矩阵
torch::Tensor foo = torch::arange(25).reshape({ 5, 5 });
// 计算矩阵的迹
torch::Tensor bar = torch::einsum("ii", foo);
// 输出矩阵和对应的迹
std::cout << "==> matrix is:\n " << foo << std::endl;
std::cout << "==> trace of it is:\n " << bar << std::endl;
}
运行结果:
==> matrix is:
0 1 2 3 4
5 6 7 8 9
10 11 12 13 14
15 16 17 18 19
20 21 22 23 24
[ CPULongType{5,5} ]
==> trace of it is:
60
[ CPULongType{} ]
参考资料: