


安装 GIT 等基础工具(此命令可避免安装 XCode 开发工具)
xcode-select --install
安装 Oh My Zsh,详情可查看 https://ohmyz.sh/ 安装完成后会提醒使用 zsh 作为默认 shell,选择是,然后可以根据说明文档自行修改主题,安装插件等。
sh -c "$(curl -fsSL https://raw.githubusercontent.com/ohmyzsh/ohmyzsh/master/tools/install.sh)"
安装 nvm (nodejs 版本管理工具) https://github.com/nvm-sh/nvm
前提是新机,没安装过node的!如果安装过可以先卸载了!!!
curl -o- https://raw.githubusercontent.com/nvm-sh/nvm/v0.38.0/install.sh | bash
将 nvm 命令和命令补全注入到环境变量中,下面四行需要一起复制
echo '
export NVM_DIR="$HOME/.nvm"
[ -s "$NVM_DIR/nvm.sh" ] && \. "$NVM_DIR/nvm.sh"  # This loads nvm
[ -s "$NVM_DIR/bash_completion" ] && \. "$NVM_DIR/bash_completion"  # This loads nvm bash_completion' >> $HOME/.zshrc
使用 nvm 安装最新 LTS 版 nodejs
nvm install --lts
全局指定 npm 镜像源为 registry.npm.taobao.org,以后所有看到使用 mnpm 命令的文档,都可以用 npm 代替。
npm config set registry https://registry.npm.taobao.org
安装 yarn (推荐使用 yarn 代替 npm 进行依赖管理)
npm install -g yarn
将 yarn 的全局安装包的可执行命令加入到环境变量中
echo 'PATH="$HOME/.yarn/bin:$PATH"' >> $HOME/.zshrc
安装 Homebrew,使用清华大学镜像,详情可参考 https://mirrors.tuna.tsinghua.edu.cn/help/homebrew/
第一步,安装 Homebrew
git clone --depth=1 https://mirrors.tuna.tsinghua.edu.cn/git/homebrew/install.git brew-install
sh brew-install/install.sh
rm -rf brew-install
第二步,设置环境变量(第一步之后会有提示的)
export HOMEBREW_BREW_GIT_REMOTE="https://mirrors.tuna.tsinghua.edu.cn/git/homebrew/brew.git"
export HOMEBREW_CORE_GIT_REMOTE="https://mirrors.tuna.tsinghua.edu.cn/git/homebrew/homebrew-core.git"
export HOMEBREW_BOTTLE_DOMAIN="https://mirrors.tuna.tsinghua.edu.cn/homebrew-bottles"
第三步,将 Homebrew 的更新地址变更为清华大学镜像,上一步安装完会有一些提示
git -C "$(brew --repo)" remote set-url origin https://mirrors.tuna.tsinghua.edu.cn/git/homebrew/brew.git
git -C "$(brew --repo homebrew/core)" remote set-url origin https://mirrors.tuna.tsinghua.edu.cn/git/homebrew/homebrew-core.git
git -C "$(brew --repo homebrew/cask)" remote set-url origin https://mirrors.tuna.tsinghua.edu.cn/git/homebrew/homebrew-cask.git
git -C "$(brew --repo homebrew/cask-fonts)" remote set-url origin https://mirrors.tuna.tsinghua.edu.cn/git/homebrew/homebrew-cask-fonts.git
git -C "$(brew --repo homebrew/cask-drivers)" remote set-url origin https://mirrors.tuna.tsinghua.edu.cn/git/homebrew/homebrew-cask-drivers.git
git -C "$(brew --repo homebrew/cask-versions)" remote set-url origin https://mirrors.tuna.tsinghua.edu.cn/git/homebrew/homebrew-cask-versions.git
安装 Visual Studio Code,在 https://code.visualstudio.com 中下载
解压文件后将 Visual Studio Code.app 拖入应用程序中。
echo "需要手动安装 Visual Studio Code"
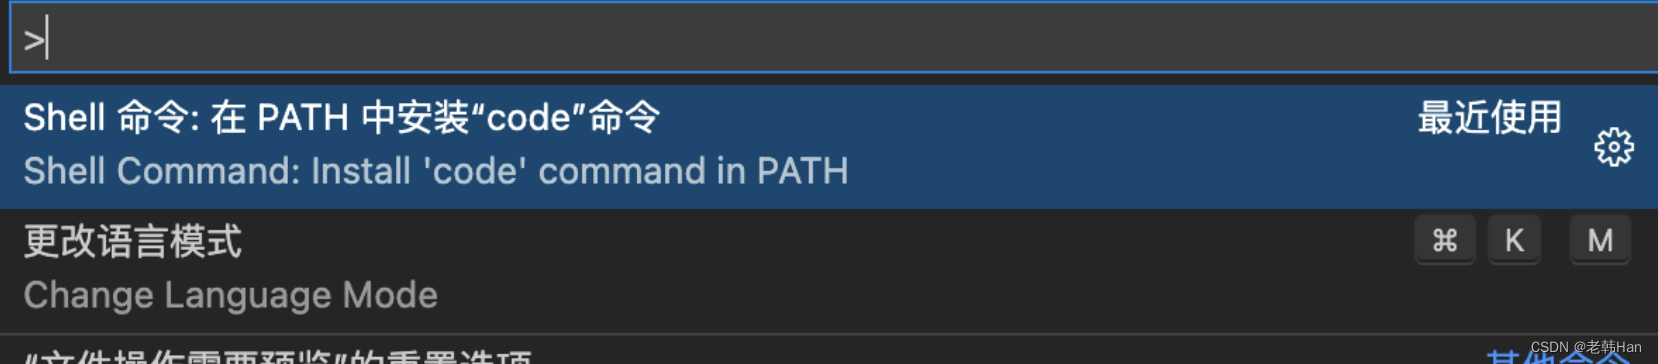
执行完安装 Visual Studio Code 后,将 code 命令加入到环境变量中(这么做是为了可以直接通过命令行打开项目目录或文件)code + 文件名即可打开文件
-
打开VScode 使用command+shift+p 搜索shell,点击第一个安装code
-
软连接
ln -s /usr/local/bin/code -> /Applications/Visual\ Studio\ Code.app/Contents/Resources/app/bin/code
写在最后
此时node、 npm、 nvm 、brew、yarn都有了,这些基本都是前端需要的基础包,新的mac机可以无脑跟着安装。
如果安装期间遇到什么问题基本上百度也都能解决


 423
423


 被折叠的 条评论
为什么被折叠?
被折叠的 条评论
为什么被折叠?
 到【灌水乐园】发言


