


一、定义
1.定义
2. 环境安装
3. 案例
4. 可视化界面
5. 参考网址
6. 推理引擎 onnx Runtime 进行单张图片推理,本地部署
7. 推理引擎onnx Runtime 进行单张图片推理,调用摄像头获取画面
8. 推理引擎onnx Runtime 进行图片推理,调用摄像头获取画面
9. ModelInferBench 推理速度测试
二、实现
- 定义
模型pytorch\ keras\ tensorflow\ pp飞桨 等训练框架
onnx 标准化
nvidia\ intel\ 高通\ 升腾 等硬件。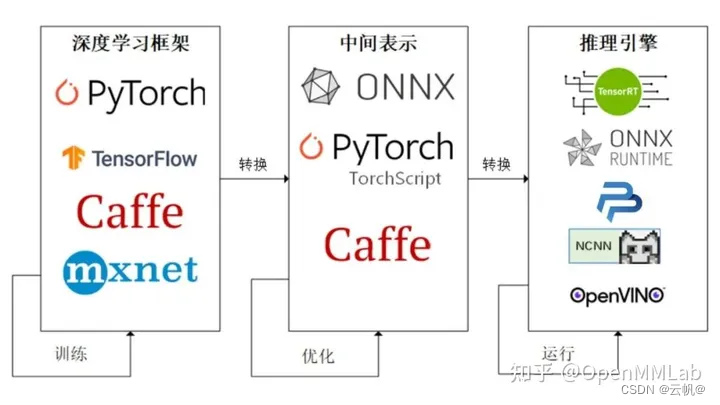
深度学习框架------->中间件--------->推理引擎(不同设备,选择的推理引擎不同),加速推理
推理引擎: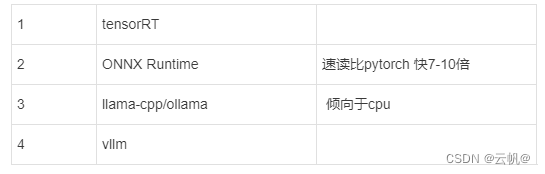
- 环境安装
onnx 算子 网址https://onnx.ai/onnx/operators/
pip install onnx -i https://pypi.tuna.tsinghua.edu.cn/simple
pip install onnxruntime -i https://pypi.tuna.tsinghua.edu.cn/simple
import onnx
print('ONNX 版本', onnx.__version__)
import onnxruntime as ort
print('ONNX Runtime 版本', ort.__version__)
- 案例
import torch
from torchvision import models

devices=torch.device("cuda:0" if torch.cuda.is_available() else "cpu")
model=models.resnet18(pretrained=True)
model=model.eval().to(devices)

x=torch.randn((1,3,256,256)).to(devices)
output=model(x)
print(output.shape)
#pytorch onnx 格式转换
with torch.no_grad():
    torch.onnx.export(model,
                      x,
                      "resnet18_imagenet.onnx",   #导出的onnx 名称
                      opset_version=11,            #算子版本          https://onnx.ai/onnx/operators/
                      input_names=["input"],       #输入tensor 名称,自己起的
                      output_names=["output"]      #输出tensor 名称, 自己起的
                      )

#验证是否成功
import onnx
onnx_model=onnx.load("resnet18_imagenet.onnx")
onnx.checker.check_model(onnx_model)
print("无报错,转换成功")
-
可视化界面
https://netron.app/ #浏览器打开
导入对应的onnx 文件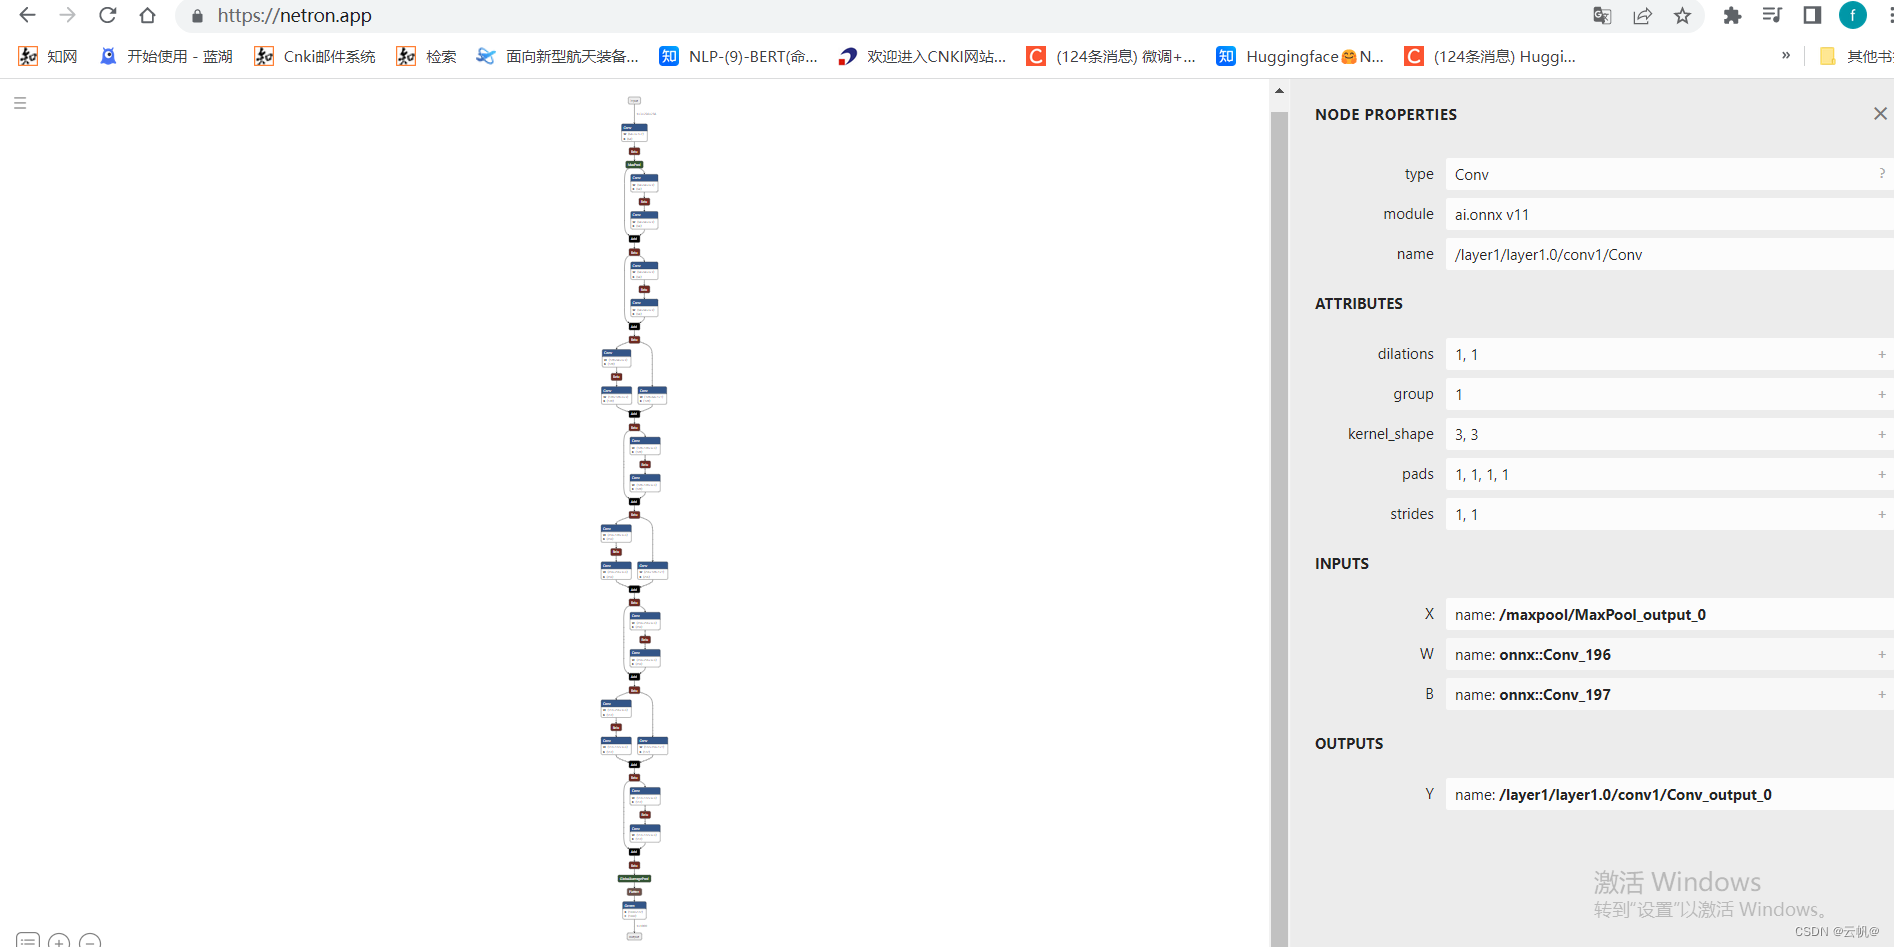
-
参考网址
https://github.com/TommyZihao/Train_Custom_Dataset/blob/main/%E5%9B%BE%E5%83%8F%E5%88%86%E7%B1%BB/7-ONNX%20Runtime%E5%9B%BE%E5%83%8F%E5%88%86%E7%B1%BB%E9%83%A8%E7%BD%B2/1-Pytorch%E5%9B%BE%E5%83%8F%E5%88%86%E7%B1%BB%E6%A8%A1%E5%9E%8B%E8%BD%ACONNX/%E3%80%90Z%E3%80%91%E6%89%A9%E5%B1%95%E9%98%85%E8%AF%BB.ipynb
https://zhuanlan.zhihu.com/p/498425043 -
推理引擎 onnx Runtime 进行单张图片推理,本地部署
import torch
import onnxruntime
import numpy as np
import torch.nn.functional as F
import pandas as pd

#onnxruntime 推理
ort_session=onnxruntime.InferenceSession("resnet18_imagenet.onnx")    #加载模型
x=torch.randn((1,3,256,256)).numpy()
ort_input={"input":x}
output=ort_session.run(["output"],ort_input)[0]   #推理
print(output.shape)

###########图像推理#########

from PIL import Image   #加载图片
img_pil=Image.open("banana1.jpg")
#img_pil.show()
#数据处理
from torchvision import transforms

test_transform=transforms.Compose([transforms.Resize(256),
                                     transforms.CenterCrop(256),
                                     transforms.ToTensor(),
                                     transforms.Normalize(
                                         mean=[0.485, 0.456, 0.406],
                                         std=[0.229, 0.224, 0.225])
                                    ])

input_img=test_transform(img_pil)
input_tensor=input_img.unsqueeze(0).numpy()

ort_input={"input":input_tensor}
pred_logits=ort_session.run(["output"],ort_input)[0]
pred_logits=torch.tensor(pred_logits)

pred_softmax=F.softmax(pred_logits,dim=1)

#解析,取前n个
n=3
topn=torch.topk(pred_softmax,n)
pred_ids=topn.indices.numpy()[0]
conf=topn.values.numpy()[0]
print(pred_ids,conf)

#将id与字典对应
df=pd.read_csv("imagenet_class_index.csv")
id_to_labels={}
for idx,row in df.iterrows():
    id_to_labels[row["ID"]]=row["class"]  #英文

for i in range(n):
    class_name=id_to_labels[pred_ids[i]]
    confidence=conf[i]*100
    print(class_name,confidence)
- 推理引擎onnx Runtime 进行单张图片推理,调用摄像头获取画面
import torch
import onnxruntime
import numpy as np
import torch.nn.functional as F
import pandas as pd
from PIL import Image,ImageFont,ImageDraw
from torchvision import transforms
import matplotlib.pyplot as plt
#font=ImageFont.truetype("SimHei",32)


ort_session = onnxruntime.InferenceSession('resnet18_imagenet.onnx')

# 测试集图像预处理-RCTN:缩放裁剪、转 Tensor、归一化
test_transform = transforms.Compose([transforms.Resize(256),
                                     transforms.CenterCrop(256),
                                     transforms.ToTensor(),
                                     transforms.Normalize(
                                         mean=[0.485, 0.456, 0.406],
                                         std=[0.229, 0.224, 0.225])
                                    ])


#调用摄像头   获取摄像头,传入0表示获取系统默认摄像头
import cv2
import time
cap=cv2.VideoCapture(1)
cap.open(0)    #打开摄像头
time.sleep(1)
success,img_bgr=cap.read()
cap.release()                   #关闭摄像头
cv2.destroyAllWindows()       #关闭图像接口
print(img_bgr.shape)

img_rgb = cv2.cvtColor(img_bgr, cv2.COLOR_BGR2RGB) # BGR转RGB
img_pil = Image.fromarray(img_rgb)
img_pil.show()

input_img=test_transform(img_pil)
input_tensor=input_img.unsqueeze(0).numpy()

#预测
ort_input={"input":input_tensor}
pred_logits=ort_session.run(["output"],ort_input)[0]
pred_logits=torch.tensor(pred_logits)
pred_softmax=F.softmax(pred_logits,dim=-1)

#topn 类别
n=5
topn=torch.topk(pred_softmax,k=n)
pred_ids=topn[1].cpu().detach().numpy().squeeze()
pred_conf=topn[0].cpu().detach().numpy().squeeze()

df=pd.read_csv("imagenet_class_index.csv")
id_to_labels={}
for idx,row in df.iterrows():
    id_to_labels[row["ID"]]=row["class"]  #英文

for i in range(n):
    class_name=id_to_labels[pred_ids[i]]
    confidence=pred_conf[i]*100
    print(class_name,confidence)

draw = ImageDraw.Draw(img_pil)
# 在图像上写字
for i in range(len(pred_conf)):
    pred_class = id_to_labels[pred_ids[i]]
    text = '{:<15} {:>.3f}'.format(pred_class, pred_conf[i])
    # 文字坐标,中文字符串,字体,rgba颜色
    draw.text((50, 100 + 50 * i), text, fill=(255, 0, 0, 1))
img = np.array(img_pil)  # PIL 转 array
plt.imshow(img)
plt.show()
- 推理引擎onnx Runtime 进行图片推理,调用摄像头获取画面
import torch
import onnxruntime
import numpy as np
import torch.nn.functional as F
import pandas as pd
from PIL import Image,ImageFont,ImageDraw
from torchvision import transforms
import matplotlib.pyplot as plt
import time
import cv2

#加载引擎
ort_session = onnxruntime.InferenceSession('resnet18_imagenet.onnx')

# 测试集图像预处理-RCTN:缩放裁剪、转 Tensor、归一化
test_transform = transforms.Compose([transforms.Resize(256),
                                     transforms.CenterCrop(256),
                                     transforms.ToTensor(),
                                     transforms.Normalize(
                                         mean=[0.485, 0.456, 0.406],
                                         std=[0.229, 0.224, 0.225])
                                    ])
#加载标签
df=pd.read_csv("imagenet_class_index.csv")
id_to_labels={}
for idx,row in df.iterrows():
    id_to_labels[row["ID"]]=row["class"]  #英文


def process_frame(img):
    '''
    输入摄像头拍摄画面bgr-array,输出图像分类预测结果bgr-array
    '''

    # 记录该帧开始处理的时间
    start_time = time.time()

    ## 画面转成 RGB 的 Pillow 格式
    img_rgb = cv2.cvtColor(img, cv2.COLOR_BGR2RGB)  # BGR转RGB
    img_pil = Image.fromarray(img_rgb)  # array 转 PIL

    ## 预处理
    input_img = test_transform(img_pil)  # 预处理
    input_tensor = input_img.unsqueeze(0).numpy()

    ## onnx runtime 预测
    ort_inputs = {'input': input_tensor}  # onnx runtime 输入
    pred_logits = ort_session.run(['output'], ort_inputs)[0]  # onnx runtime 输出
    pred_logits = torch.tensor(pred_logits)
    pred_softmax = F.softmax(pred_logits, dim=1)  # 对 logit 分数做 softmax 运算

    ## 解析top-n预测结果的类别和置信度
    n = 5
    top_n = torch.topk(pred_softmax, n)  # 取置信度最大的 n 个结果
    pred_ids = top_n[1].cpu().detach().numpy().squeeze()  # 解析出类别
    confs = top_n[0].cpu().detach().numpy().squeeze()  # 解析出置信度

    ## 在图像上写中文
    draw = ImageDraw.Draw(img_pil)
    for i in range(len(confs)):
        pred_class = id_to_labels[pred_ids[i]]
        text = '{:<15} {:>.3f}'.format(pred_class, confs[i])
        # 文字坐标,中文字符串,字体,rgba颜色
        draw.text((50, 100 + 50 * i), text, fill=(255, 0, 0, 1))
    img = np.array(img_pil)  # PIL 转 array
    img = cv2.cvtColor(img, cv2.COLOR_RGB2BGR)  # RGB转BGR

    # 记录该帧处理完毕的时间
    end_time = time.time()
    # 计算每秒处理图像帧数FPS
    FPS = 1 / (end_time - start_time)
    # 图片,添加的文字,左上角坐标,字体,字体大小,颜色,线宽,线型
    img = cv2.putText(img, 'FPS  ' + str(int(FPS)), (50, 80), cv2.FONT_HERSHEY_SIMPLEX, 2, (255, 0, 255), 4,
                      cv2.LINE_AA)
    return img


import cv2
import time

# 获取摄像头,传入0表示获取系统默认摄像头
cap = cv2.VideoCapture(1)

# 打开cap
cap.open(0)

# 无限循环,直到break被触发
while cap.isOpened():       #捕获每一帧图片
    # 获取画面
    success, frame = cap.read()
    if not success:
        print('Error')
        break

    ## !!!处理帧函数
    frame = process_frame(frame)

    # 展示处理后的三通道图像
    cv2.imshow('my_window', frame)

    if cv2.waitKey(1) in [ord('q'), 27]:  # 按键盘上的q或esc退出(在英文输入法下)
        break

# 关闭摄像头
cap.release()

# 关闭图像窗口
cv2.destroyAllWindows()
- ModelInferBench 推理速度测试
网址:https://github.com/zhangchaosd/ModelInferBench


 1474
1474


 被折叠的 条评论
为什么被折叠?
被折叠的 条评论
为什么被折叠?
 到【灌水乐园】发言


