


目录
3.2 检查是否能正确识别宝藏,发布target的图像和pose
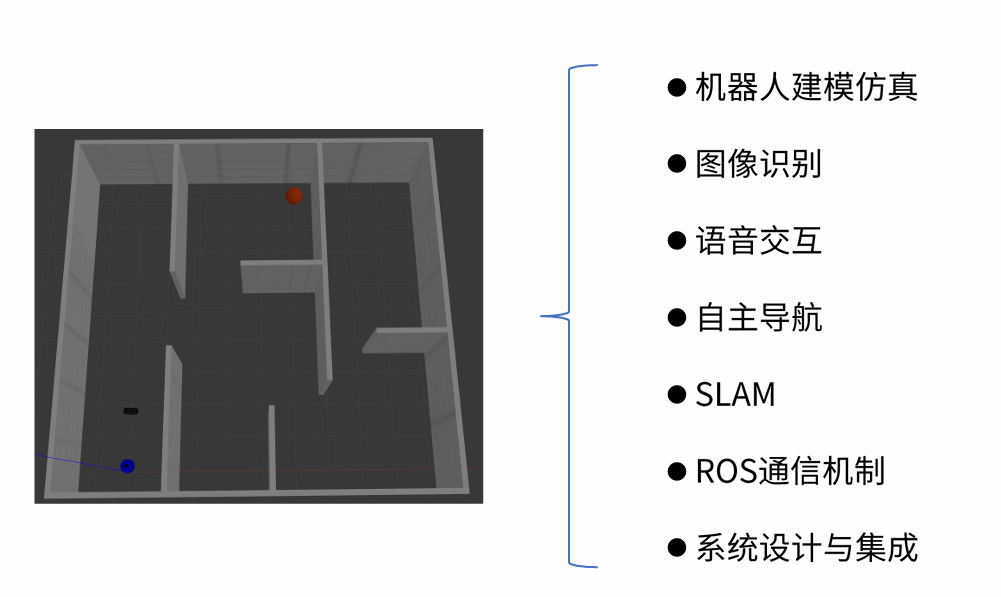
一、迷宫寻宝任务发布
这一章以设置游戏任务的方式对前面所有的重点内容进行回顾与应用练习,总任务和条件设置如下:

二、迷宫寻宝任务分析
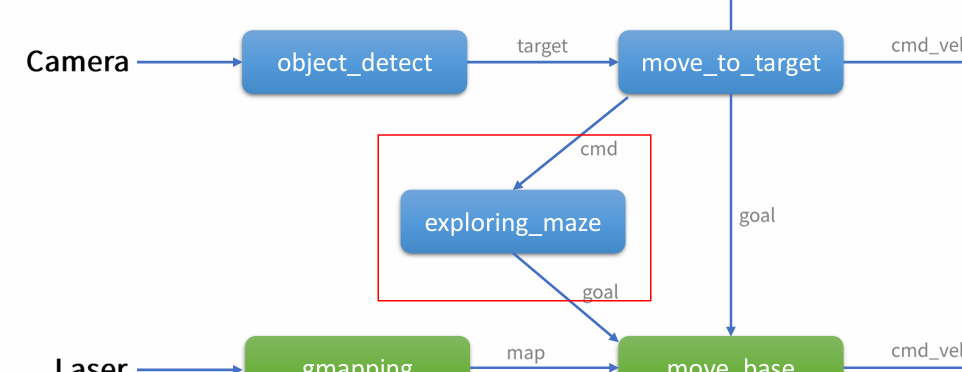
对任务break down, 需要用ROS实现如下功能:
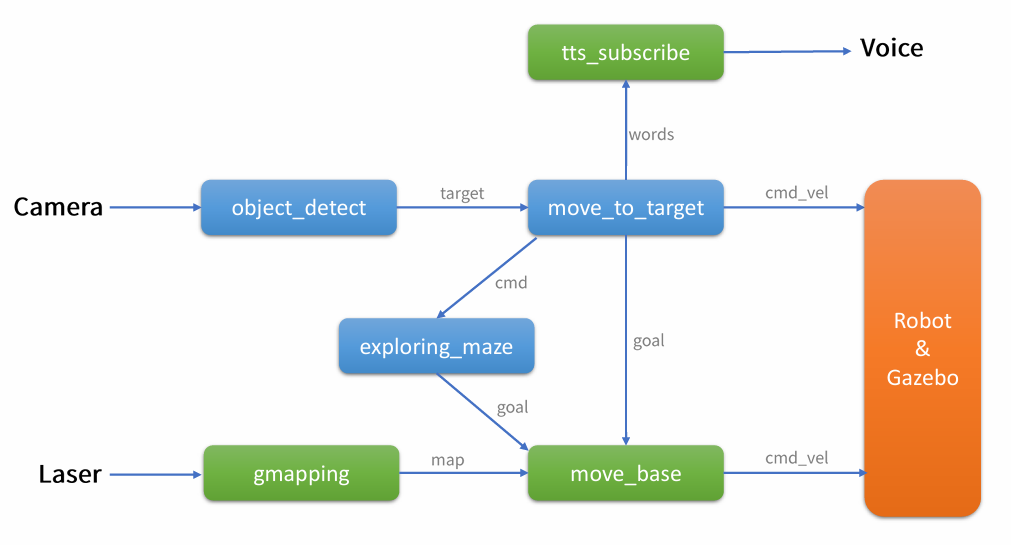
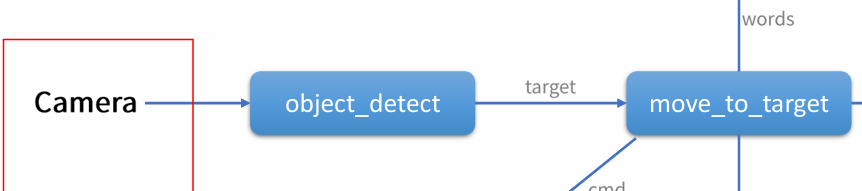
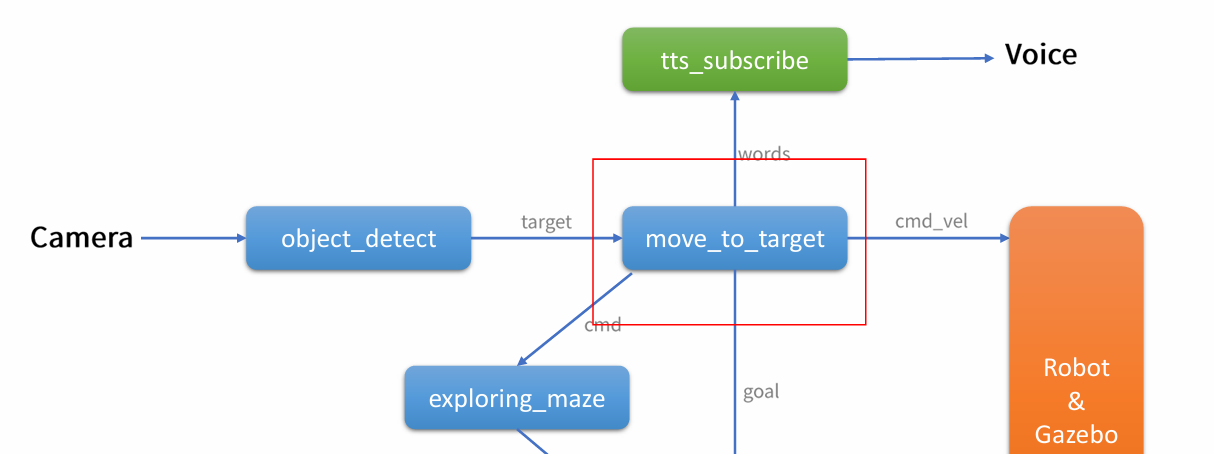
那么其实现框架如下(绿色的三个节点为ROS提供的节点):
- 通过雷达信息感知环境深度信息,用gmapping和move_base完成自主导航探索型的SLAM建图。move_base把速度指令给到机器人,使其在自主导航SLAM的过程中不断规划路径实现运动和避障。最后不断建图使机器人对熟悉该迷宫环境(一开始机器人并没有该地图的输入)
- 通过camera进行物体检测,用摄像头输入图像进行图像处理,查看宝藏target位置。然后机器人向target靠近(1m范围内),所以move_to_target是由target在图像中的位置来发出速度指令,使机器人靠近target.
- 在发现宝藏后,语音输出通过订阅字符串word中的信息,字符串转换为语音播报到达该宝藏点。同时发cmd给exploring_maze停止探索
- exploring_maze的作用是让建立目标点使机器人不断探索该地图,可随机建立,也可以自定义目标点,完成机器人探索的功能
三、迷宫寻宝任务实现
1.机器人建模
建模过程如代码中注释:
<?xml version="1.0"?>
<robot name="arm" xmlns:xacro="http://www.ros.org/wiki/xacro">

    <!-- include调用机器人底盘、camera、lidar等部件 -->
    <xacro:include filename="$(find mbot_description)/urdf/mbot_base_gazebo.xacro" />
    <xacro:include filename="$(find mbot_description)/urdf/sensors/camera_gazebo.xacro" />
    <xacro:include filename="$(find mbot_description)/urdf/sensors/lidar_gazebo.xacro" />

    <!-- 定义camera/支架/lidar的安装位置 -->
    <xacro:property name="camera_offset_x" value="0.17" />
    <xacro:property name="camera_offset_y" value="0" />
    <xacro:property name="camera_offset_z" value="0.10" />

    <xacro:property name="pillar_length" value="0.1" />
    <xacro:property name="pillar_radius" value="0.01" />
    <xacro:property name="pillar_mass"   value="0.1" />

    <xacro:property name="lidar_offset_x" value="0" />
    <xacro:property name="lidar_offset_y" value="0" />
    <xacro:property name="lidar_offset_z" value="0.07" />

    <!-- 建立Camera与底盘的joint,通过宏建立camera -->
    <joint name="camera_joint" type="fixed">
        <origin xyz="${camera_offset_x} ${camera_offset_y} ${camera_offset_z}" rpy="0 0 0" />
        <parent link="base_link"/>
        <child link="camera_link"/>
    </joint>

    <xacro:usb_camera prefix="camera"/>

  <!-- 建立支架link 圆柱体cylinder-->
    <link name="pillar_link">
        <visual>
            <origin xyz="0 0 0" rpy="0 0 0" />
            <geometry>
                <cylinder length="${pillar_length}" radius="${pillar_radius}"/>
            </geometry>
            <material name="gray" />
        </visual>
        <collision>
            <origin xyz="0 0 0" rpy="0 0 0" />
            <geometry>
                <cylinder length="${pillar_length}" radius="${pillar_radius}"/>
            </geometry>
        </collision>
        <xacro:cylinder_inertial_matrix  m="${pillar_mass}" r="${pillar_radius}" h="${pillar_length}" />
    </link>

	  <!-- 建立支架与base_link的joint-->
    <joint name="pillar_joint" type="fixed">
        <origin xyz="0 0 0.10" rpy="0 0 0" />
        <parent link="base_link"/>
        <child link="pillar_link"/>
    </joint>

    <!-- 建立lidar与底盘的fix joint,通过宏建立lidar -->
    <joint name="lidar_joint" type="fixed">
        <origin xyz="${lidar_offset_x} ${lidar_offset_y} ${lidar_offset_z}" rpy="0 0 0" />
        <parent link="pillar_link"/>
        <child link="laser_link"/>
    </joint>

    <xacro:rplidar prefix="laser"/>

    <!-- 通过宏建立底盘base_link -->
    <xacro:mbot_base_gazebo/>

</robot>
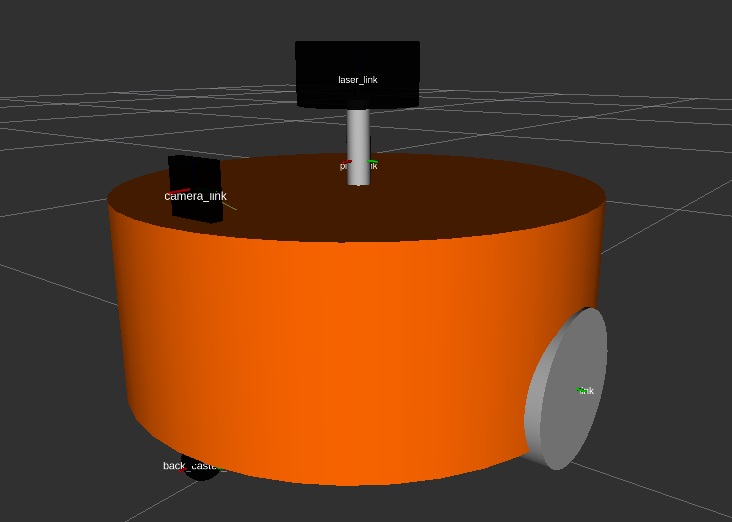
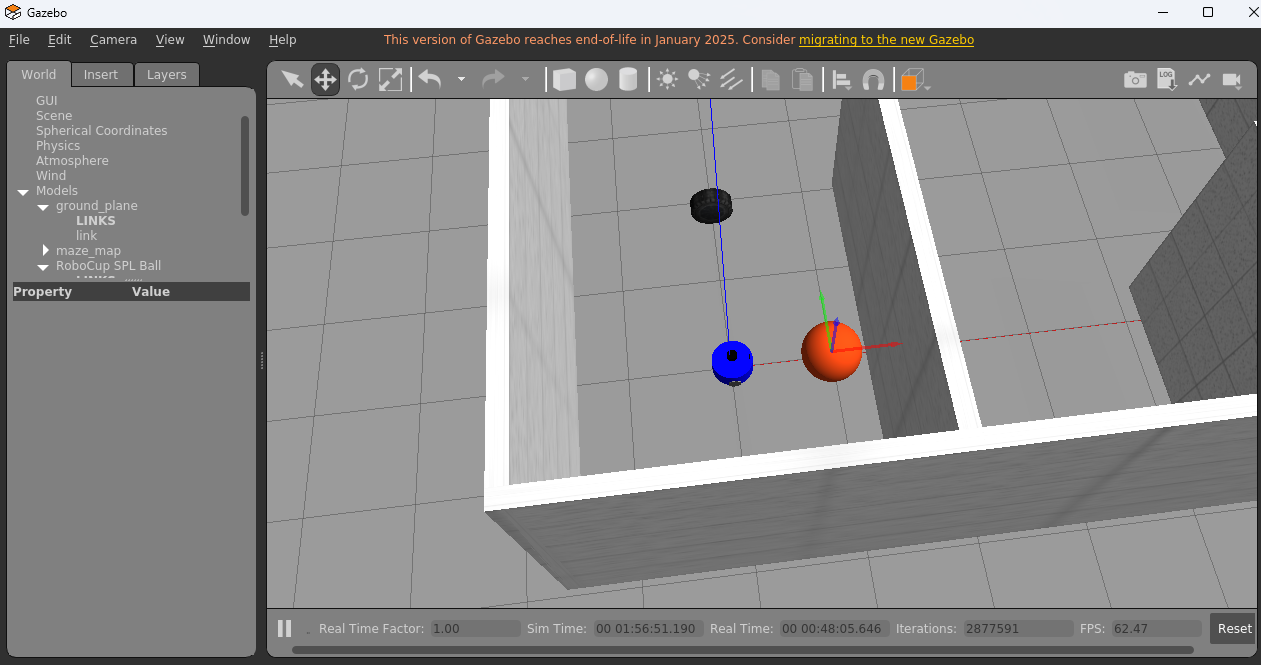
2. 启动仿真环境
用roslaunch查看仿真环境(该环境提前用build editor建好,insert了宝藏Robocup,然后创建.world文件保存,与机器人结合):
roslaunch mbot_gazebo mbot_maze_gazebo.launch 
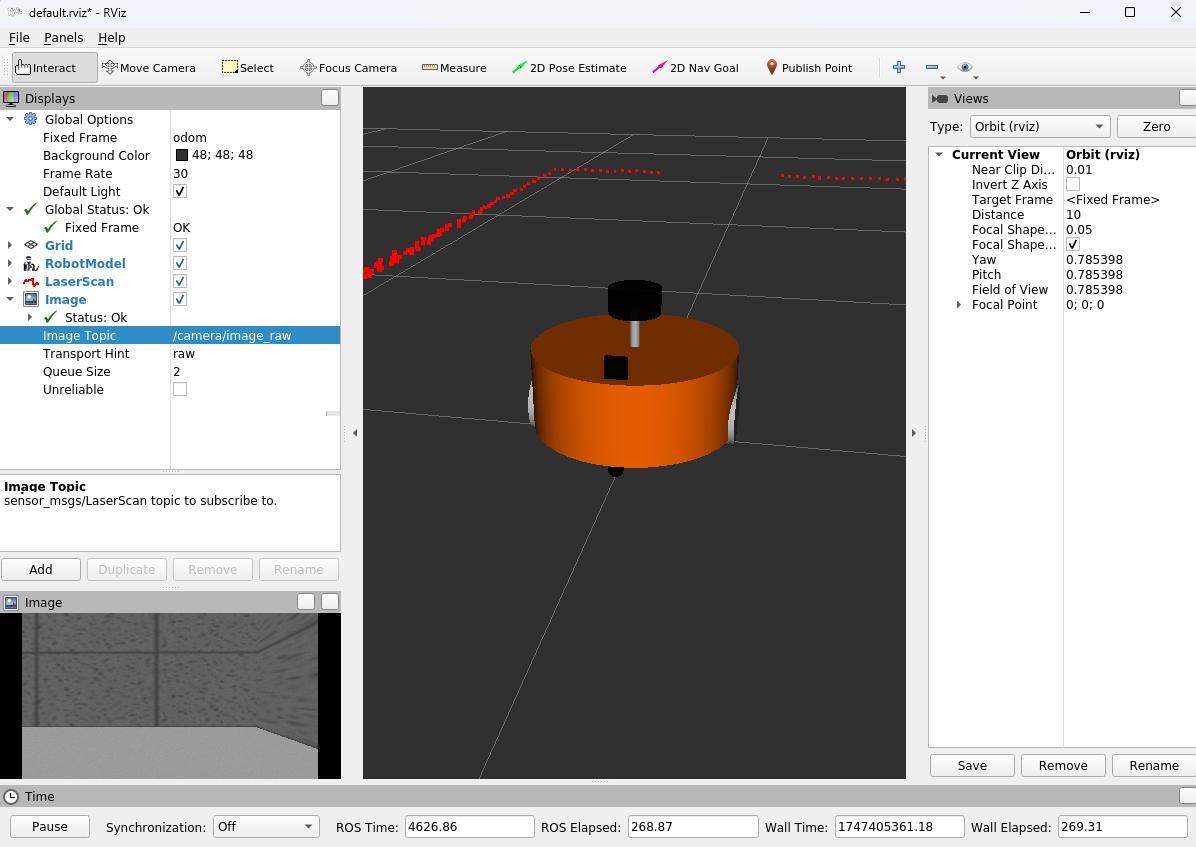
用rviz查看模型的camera和lidar是否在仿真环境中成功仿真
rosrun rviz rviz在rviz中设置Fixed Frame为odom, 依次通过Add -Robotmodel, -Laserscan(下拉添加topic-scan), -image(下拉添加topic-camera/image_raw),查看camera和lidar是否仿真成功
3. 宝藏识别object_detect
从框架图可以看出object_detect的输入是camera, 因次它应该订阅camera的话题,通过图像处理,把识别的结果通过target(这里发送了识别到的target图像和pose)发送出去。
3.1 object_detect.py文件代码解读
用到了opencv识别宝藏颜色为红色的方法来进行object_detect
#!/usr/bin/env python
# -*- coding: utf-8 -*-

import rospy
import cv2
from cv_bridge import CvBridge, CvBridgeError
from sensor_msgs.msg import Image
import numpy as np
from math import *
from geometry_msgs.msg import Pose

BLUE_LOW   = 0
BLUE_HIGH  = 20
GREEN_LOW  = 20
GREEN_HIGH = 60
RED_LOW    = 80
RED_HIGH   = 150

class image_converter:
    def __init__(self):
        # 创建cv_bridge,声明图像的发布者和订阅者
        ######################################请补充此处代码(开始)######################################################
        self.image_pub = rospy.Publisher("object_detect_image", Image, queue_size=1) # 发布检测到的图像话题,消息类型为Image
        self.target_pub = rospy.Publisher("object_detect_pose", Pose, queue_size=1) # 发布检测到target的位置话题,消息类型为Pose
        self.bridge = CvBridge() #调用CvBridge
        self.image_sub = rospy.Subscriber("/camera/image_raw", Image, self.callback) # 订阅camera发布的图像话题,消息类型为Image,一收到消息就callback回调函数

        ######################################请补充此处代码(结束)######################################################

    def callback(self,data):
        # 使用cv_bridge将ROS的图像数据转换成OpenCV的图像格式
        try:
            cv_image = self.bridge.imgmsg_to_cv2(data, "bgr8")
        except CvBridgeError as e:
            print (e)

        # define the list of boundaries in BGR 对颜色BGR值进行范围定义
        boundaries = [([BLUE_LOW, GREEN_LOW, RED_LOW], [BLUE_HIGH, GREEN_HIGH, RED_HIGH])]

        # loop over the boundaries
        # print(boundaries)
        for (lower, upper) in boundaries:
            # create NumPy arrays from the boundaries
            lower = np.array(lower, dtype = "uint8")
            upper = np.array(upper, dtype = "uint8")

        # find the colors within the specified boundaries and apply the mask
        mask = cv2.inRange(cv_image, lower, upper)
        output = cv2.bitwise_and(cv_image, cv_image, mask = mask)

        cvImg = cv2.cvtColor(output, 6) #cv2.COLOR_BGR2GRAY
        npImg = np.asarray( cvImg )
        thresh = cv2.threshold(npImg, 1, 255, cv2.THRESH_BINARY)[1]

        # find contours in the thresholded image 通过圈画出来红色的范围
        cnts, hierarchy = cv2.findContours(thresh, cv2.RETR_LIST, cv2.CHAIN_APPROX_SIMPLE)
        #cnts = cnts[0]

        # loop over the contours
        for c in cnts:
            # compute the center of the contour
            M = cv2.moments(c)

            if int(M["m00"]) not in range(20000, 250000):  # 通过红色区域的面积,在20000到250000之间认为其为宝藏,范围之外是杂波
                continue

            cX = int(M["m10"] / M["m00"])
            cY = int(M["m01"] / M["m00"]) # 图像像素点的中间值

            cv2.drawContours(cv_image, [c], -1, (0, 0, 255), 2)
            cv2.circle(cv_image, (cX, cY), 1, (0, 0, 255), -1)
            objPose = Pose()
            objPose.position.x = cX;
            objPose.position.y = cY;
            objPose.position.z = M["m00"];
            self.target_pub.publish(objPose) #发布了其中心点位置

        # 显示Opencv格式的图像
        # cv2.imshow("Image window", cv_image)
        # cv2.waitKey(3)

        # 再将opencv格式额数据转换成ros image格式的数据发布
        try:
            self.image_pub.publish(self.bridge.cv2_to_imgmsg(cv_image, "bgr8"))
        except CvBridgeError as e:
            print (e)

if __name__ == '__main__':
    try:
        # 初始化ros节点
        rospy.init_node("object_detect")
        rospy.loginfo("Starting detect object")
        image_converter()   # 调用该class实现目标识别
        rospy.spin()  # 等待摄像头信息输入
    except KeyboardInterrupt:
        rospy.loginfo("Shutting down object_detect node.")
        cv2.destroyAllWindows()
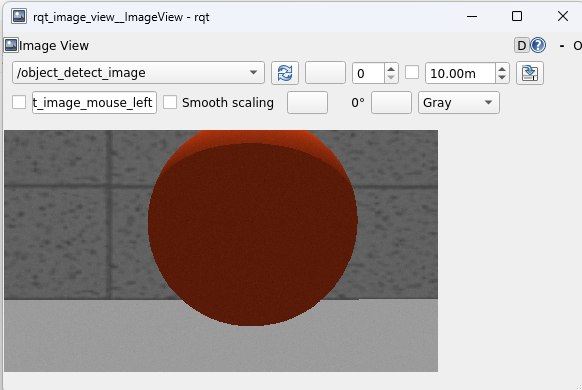
3.2 检查是否能正确识别宝藏,发布target的图像和pose
- 在仿真环境中直接拖动宝藏到机器人的视野范围, 然后新终端-rosrun该object_detect.py节点
- 新终端用rqt_image_view 查看图像话题是否已发出前述代码中的target图像话题:object_target_image
4. 视觉伺服
在3中,已经通过object_detect发布了object_detect_ pose表示target中心点的位置。可通过rostopic查看

move_to_target使机器人在识别宝藏后靠近宝藏,在1m范围内。订阅target pose,发布words语音交互,cmd_vel发运动指令靠近宝藏,goal后期回到初始位置,cmd自定义反馈给系统当前机器人的状态。
4.1 move_to_target.cpp代码解读
先看main()函数,再看回调函数
#include<math.h>

#include <ros/ros.h>
#include <geometry_msgs/Twist.h>
#include <geometry_msgs/Pose.h>
#include <std_msgs/Int8.h>
#include <std_msgs/String.h>

#define STATUS_EXPLORING    (0)
#define STATUS_CLOSE_TARGET (1)
#define STATUS_GO_HOME      (2)

#define GET_TARGET_SIZE     (90000)

ros::Publisher vel_pub;
ros::Publisher cmd_pub;
ros::Publisher voice_pub;

int status_flag = STATUS_EXPLORING;

// 接收到订阅的消息后,会进入消息回调函数
void poseCallback(const geometry_msgs::Pose::ConstPtr& msg)
{
    // 将接收到的消息打印出来
    ROS_INFO("Target pose: x:%0.6f, y:%0.6f, z:%0.6f", msg->position.x, msg->position.y, msg->position.z);

    /******************************请补充此处代码(开始)*******************************************/
    //停止机器人导航
    if (status_flag == STATUS_EXPLORING)
    {
        status_flag = STATUS_CLOSE_TARGET;
        std_msgs::Int8 cmd;
        cmd.data = STATUS_CLOSE_TARGET;
        cmd_pub.publish(cmd);

        std_msgs::String msg;
        msg.data = "发现宝藏,进发";
        voice_pub.publish(msg);
    }
    else if (status_flag == STATUS_CLOSE_TARGET && msg->position.z > GET_TARGET_SIZE)
    {
        status_flag = STATUS_GO_HOME;
        std_msgs::Int8 cmd;
        cmd.data = STATUS_GO_HOME;
        cmd_pub.publish(cmd);

        std_msgs::String msg;
        msg.data = "拿到宝藏,撤退";
        voice_pub.publish(msg);

    }

    else if (status_flag == STATUS_CLOSE_TARGET)
    {
        //初始化geometry_msgs::Twist类型的消息
        geometry_msgs::Twist vel_msg;
            vel_msg.linear.x = (100000 - msg->position.z) / 100000 * 0.3; // 线速度和角速度的计算方法是根据图像中心点与识别到的目标中心点的面积大小和像素距离计算的
        vel_msg.angular.z = (640 - msg->position.x) / 640 * 0.3;

        //发布消息
        vel_pub.publish(vel_msg);
        ROS_INFO("Publish velocity[%0.2f m/s, %0.2f rad/s]", vel_msg.linear.x, vel_msg.angular.z); // ROS_INFO在终端打印线速度,角速度
    }


    /******************************请补充此处代码(结束)*******************************************/
}

int main(int argc, char **argv)
{
	// ROS节点初始化
	ros::init(argc, argv, "move_to_target");

	// 创建节点句柄
	ros::NodeHandle n;

    // 创建一个Subscriber,订阅名为/object_detect_pose的topic,收到消息后注册回调函数poseCallback
    ros::Subscriber pose_sub = n.subscribe("/object_detect_pose", 10, poseCallback);
	// 创建一个Publisher,发布名为cmd_vel的topic,消息类型为geometry_msgs::Twist,队列长度10
	vel_pub = n.advertise<geometry_msgs::Twist>("/cmd_vel", 10);
	// 创建一个Publisher,发布名为exploring_cmd的topic,消息类型为std_msgs::Int8,队列长度10
	cmd_pub = n.advertise<std_msgs::Int8>("/exploring_cmd", 10);
    // 发布语音输出内容
    voice_pub = n.advertise<std_msgs::String>("voiceWords", 1000);

    // 循环等待回调函数
    ros::spin();

	return 0;
}
4.2 检查是否能发布cmd_vel/cmd/语音话题
可以用rostopic echo 查看话题内容是否发出
5. 导航/SLAM
exploring_maze.py订阅cmd命名-继续探索/回家/靠近宝藏,然后随机发布导航目标点,给gmapping+move_base进行建图和导航
5.1 exploring_maze.py代码解读
#!/usr/bin/env python
# -*- coding: utf-8 -*-

import roslib;
import rospy
import actionlib
import random
from actionlib_msgs.msg import *
from geometry_msgs.msg import Pose, PoseWithCovarianceStamped, Point, Quaternion, Twist
from move_base_msgs.msg import MoveBaseAction, MoveBaseGoal
from std_msgs.msg import Int8

STATUS_EXPLORING    = 0
STATUS_CLOSE_TARGET = 1
STATUS_GO_HOME      = 2

class ExploringMaze():
    def __init__(self):
        rospy.init_node('exploring_maze', anonymous=True)  #节点初始化
        rospy.on_shutdown(self.shutdown)

        # 在每个目标位置暂停的时间 (单位:s)
        self.rest_time = rospy.get_param("~rest_time", 0.5)

        # 发布控制机器人的消息,是给ctrl+c停下来让机器人0速度的指令的
        self.cmd_vel_pub = rospy.Publisher('cmd_vel', Twist, queue_size=5)

        # 创建一个Subscriber,订阅/exploring_cmd
        rospy.Subscriber("/exploring_cmd", Int8, self.cmdCallback)

        # 订阅move_base服务器的Action,来发go指令
        self.move_base = actionlib.SimpleActionClient("move_base", MoveBaseAction)

        rospy.loginfo("Waiting for move_base action server...")

        # 60s等待时间限制
        self.move_base.wait_for_server(rospy.Duration(60))
        rospy.loginfo("Connected to move base server")

        # 保存运行时间的变量
        start_time = rospy.Time.now()
        running_time = 0

        rospy.loginfo("Starting exploring maze")

        # 初始位置
        start_location = Pose(Point(0, 0, 0), Quaternion(0.000, 0.000, 0.709016873598, 0.705191515089))

        # 命令初值
        self.exploring_cmd = 0

        # 开始主循环,随机导航
        while not rospy.is_shutdown():
######################################请补充主循环中的代码(开始)######################################################
        #设定下一个随即目标点
            self.goal = MoveBaseGoal()
            self.goal.target_pose.pose = start_location
            self.goal.target_pose.header.frame_id = 'map'
            self.goal.target_pose.header.stamp = rospy.Time.now()

            if self.exploring_cmd is STATUS_EXPLORING:# cmd是没找到的话产生随机点作为导航目标点
                self.goal.target_pose.pose.position.x = random.randint(0,8)
                self.goal.target_pose.pose.position.y = random.randint(0,9)
            elif self.exploring_cmd is STATUS_CLOSE_TARGET:# cmd是找到的话就stoping robot继续等发回家cmd
                rospy.sleep(0.1)
                continue
            elif self.exploring_cmd is STATUS_GO_HOME:# cmd是回家的话就将原点作为导航目标点
                self.goal.target_pose.pose.position.x = 0
                self.goal.target_pose.pose.position.y = 0

        #打印让用户知道下一个位置
            rospy.loginfo("going to:" + str(self.goal.target_pose.pose))

        #向下一个位置出发
            self.move_base.send_goal(self.goal)

        # 五分钟时间限制
            finished_within_time = self.move_base.wait_for_result(rospy.Duration(300))

        # 查看是否成功到达
            if not finished_within_time:
                self.move_base.cancel_goal()
                rospy.loginfo("time out, sorry")

            else:
                state = self.move_base.get_state()
                if state == GoalStatus.SUCCEEDED:
                    rospy.loginfo("Goal succeeded!")
                else:
                    rospy.loginfo("Goal failed!")

        # 运行时间
            running_time = rospy.Time.now() - start_time
            running_time = running_time.secs/60.0

        #输出本次导航的所有信息
            rospy.loginfo("current_time:" + str(trunc(running_time,1)) + "min")

            if self.exploring_cmd is STATUS_GO_HOME:
                break
            else:
                rospy.sleep(self.rest_time)

######################################请补充主循环中的代码(结束)######################################################
        self.shutdown()

    def cmdCallback(self, msg):
        rospy.loginfo("Receive exploring cmd : %d", msg.data)
        self.exploring_cmd = msg.data

        if self.exploring_cmd is STATUS_CLOSE_TARGET:
            rospy.loginfo("Stopping the robot...")
            self.move_base.cancel_goal()

    def shutdown(self):
        rospy.loginfo("Stopping the robot...")
        self.move_base.cancel_goal()
        rospy.sleep(2)
        self.cmd_vel_pub.publish(Twist())
        rospy.sleep(1)

def trunc(f, n):
    slen = len('%.*f' % (n, f))
    return float(str(f)[:slen])

if __name__ == '__main__':
    try:
        ExploringMaze()  # 直接调用class
        rospy.spin()

    except rospy.ROSInterruptException:
        rospy.loginfo("Exploring maze finished.")
5.2 检查是否根据随机产生点来导航/SLAM
- 继续打开仿真环境和object_detect节点(按上述指令)
- 运行exploring_slam_demo节点来导航/SLAM,这个节点会订阅来自exploring_maze.py发出的goal.
roslaunch mbot_navigation exploring_slam_demo.launch 
- rosrun exploring_maze.py节点,接收上游的cmd命令,发goal给move_base.完成导航/SLAM的过程。
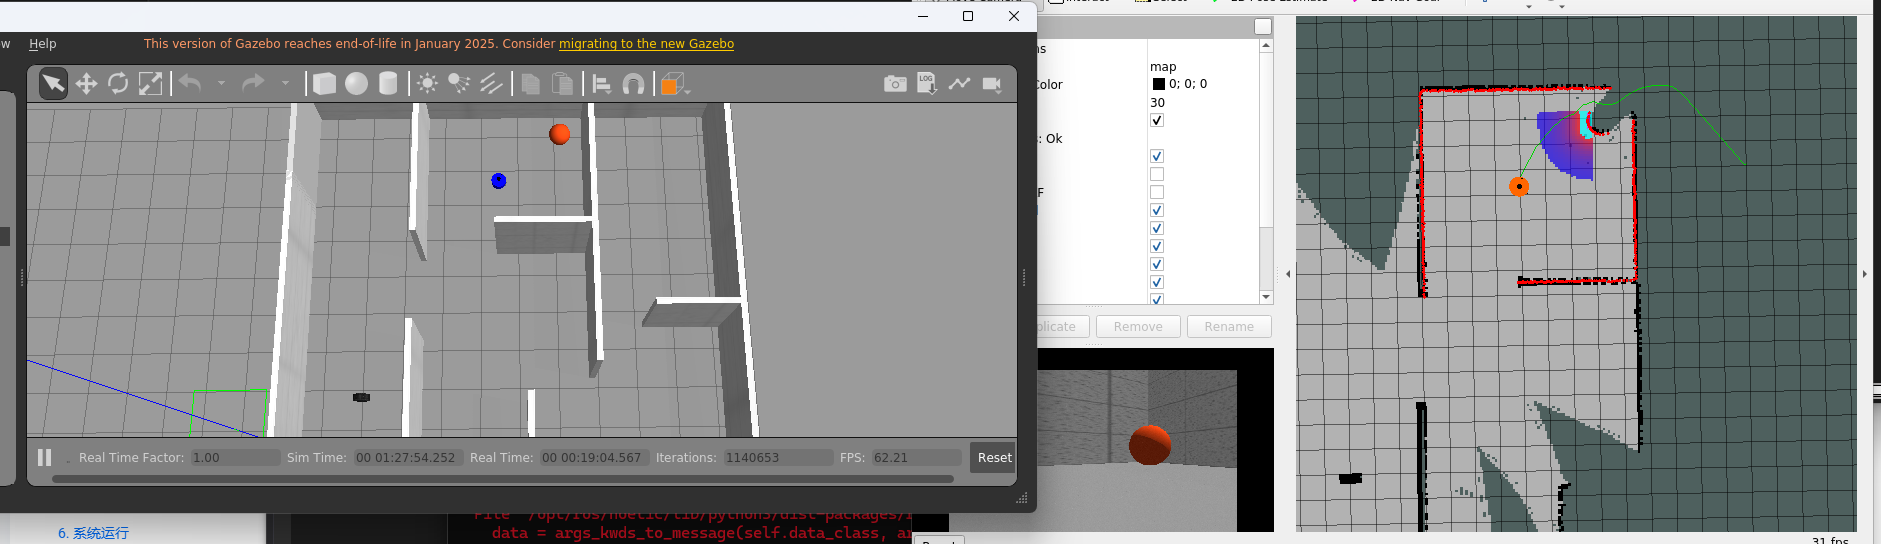
6. 系统运行
将5中节点用find_target.launch文件整合一下,包含:
- object_detect节点,完成宝藏识别任务
- move_to_target节点,完成捕获宝藏任务
- exploring_maze节点,完成发送目标导航点
- tts_subscribe节点,完成word转换为语音输出
<launch>

    <!--*******************请补充此处代码(开始)**************************** -->
    <node name="exploring_maze" pkg=" mbot_navigation" type="exploring_maze.py" output="screen"/>
	<node name="object_detect" pkg=" mbot_vision" type="object_detect.py" output="screen"/>
	<node name="move_to_target" pkg=" mbot_vision" type="move_to_target" output="screen"/>
	<node name="tts_subscribe" pkg=" mbot_voice" type="tts_subscribe" output="screen"/>

    <!--*******************请补充此处代码(结束)**************************** -->

</launch>
之后只需要在三个终端分别进行:
1. roslaunch启动仿真环境
2. roslaunch启动导航/SLAM模块
3. roslaunch启动find_target模块
四、思路复盘
通篇其实是围绕该框架进行搭积木,思路如下:
1. 建立带camera和lidar的机器人模型进行仿真,建模时使用调用宏的方法完成sensor等零部件创建,并且配置camera和lidar的仿真插件
2. 建立仿真环境
3. object_detect节点,订阅摄像头/camera/image_raw的话题,通过opencv识别宝藏颜色为红色的方式进行目标检测识别,发布object_detect_pose和object_detect_image的话题(图像仅显示使用)
4. move_to_target节点,完成了系统集成的中间工作。订阅名为obeject_detect_pose的话题,对state_flag三种状态进行判断,若exploring,发cmd_vel给机器人按线速度、角速度移动;若靠近宝藏,则发布exploring_cmd话题给exploring_maze节点,同时VoiceWords话题给到语音节点;若回家,则发布exploring_cmd话题给exploring_maze节点,同时VoiceWords话题给到语音节点。
5.exploring_maze节点,订阅move_to_target发出的exploring_cmd话题, 订阅move_base服务器的action, 根据exploring_cmd话题内容:若为exploring, 则产生随机点,发送该点pose为MoveBaseGoal使机器人朝该随机点导航SLAM; 若为靠近宝藏,则stop robot并等待发回家指令;若为回家,则将原点pose给MoveBaseGoal使机器人回到原点。
6. gmapping+move_base的导航/SLAM参考上一讲。订阅了laserscan的话题,以及MoveBaseGoal中的目标点pose,来进行自主导航SLAM.
最后ps:在运行py文件时可能需要sudo chmod +x /py文件路径/才能赋予该py脚本运行权,每一次代码的更改都需要重新赋予脚本运行权


 被折叠的 条评论
为什么被折叠?
被折叠的 条评论
为什么被折叠?
 到【灌水乐园】发言


