


LVGL之学习篇(一)
学习目的
-
LVGL简介
- LVGL本身是一个图形库,前身是litterVGL。其作者是来自匈牙利的Gabor Kiss-Vamosikisvegabor,LVGL用C语言编写,以实现最大的兼容性(与C++兼容),模拟器可在没有嵌入式硬件的PC上启动嵌入式GUI设计,同时LVGL作为一个图形库,它自带接近30多个小工具可以供开发者使用。这些强大的构建块按钮搭配上带有丝滑的动画以及做到平滑滚动的高级图形,同时兼备着不高配置要求以及开源属性,显著的优势使得LVGL流行。
-
相比较于老式的嵌入式UI界面设计方案,lvgl的优势在于:
- LVGL集成了占用小、多平台使用(64kB 闪存和8kB RAM足以满足简单用户界面)、移植简单、操作简单、开源免费等一系列特点;
- LVGL拥有30多个可以随时使用的小部件的同时,还可以自定义控件;
- UI风格类似手机移动端,更符合现在人的审美;
学习材料/工具
学习内容
lvgl-资料
-
LVGL官网链接:
-
LVGL源码
-
LVGL特性
- 丰富抢到的模块化图形组件:按钮 (buttons)、图表 (charts)、列表 (lists)、滑动条 (sliders)、图片 (images) 等;
- 高级的图形引擎:动画、抗锯齿、透明度、平滑滚动、图层混合等效果;
- 支持多种设备:触摸屏、键盘、编码器、按键等;
- 支持多显示设备;
- 不依赖特定的硬件平台,可以在任何显示屏上运行;
- 配置可裁剪(最低资源占用:64 kB Flash,16 kB RAM)
- 基于UTF-8的多语种支持,例如中文、日文、韩文、阿拉伯文等;
- 可以通过类CSS的方式来设计、布局图形界面(例如:Flexbox、Grid;
- 支持操作系统、外置内存、以及硬件加速(LVGL已内建支持STM32 DMA2D、SWM341 DMA2D、NXP PXP和VGLite;
- 即便仅有单缓冲区(frame buffer)的情况下,也可保证渲染如丝般顺滑;
- 全部由C编写完成,并支持C++调用;
- 支持Micropython编程,参见:LVGL API in Micropython;
- 支持模拟器仿真,可以无硬件依托进行开发;
- 丰富详实的例程;
- 详尽的文档以及API参考手册,可线上查阅或可下载为PDF格式
学习过程
lvgl-移植教程
- 源码下载
lvgl的源码这里就不必详细介绍,下载LVGL的源码,gitee会定期同步github,源码地址 - 目录结构介绍
LVGL Project包含了如下目录- demos:LVGL的demo应用,包含了stress压力测试,widgets测试等;
- docs:LVGL的官方说明文档Markdown;
- env_support:现目前支持的一些环境,包含cmake,cmsis-pack,rt-thread;
- examples:一些LVGL的使用示例;
- scripts:脚本
- LVGL的源码实现目录;
- LVGL的自测代码;
- 移植前注意事项
- 16、32或64位微控制器或处理器
- 建议使用>16MHz时钟速度
- 闪存/ROM:>64kB用于非常重要的组件(>建议使用180kB)
- RAM:
- 静态RAM使用量:~2kB,取决于使用的功能和对象类型
- 堆:2kB(>建议使用8kB)
- 动态数据(堆):>2kB(>如果使用多个对象,建议使用16kB),在lv_conf.h文件中配置LV_MEM_SIZE生效
- 显示缓存区:水平分辨率像素(推荐>10*10水平分辨率)
- MCU或外部显示控制器中的一个帧缓冲区
- C99或更新的编译器
- 在移植的时候,需要注意上面的部分内容,一方面对编译器的有要求(C99以上),另一方面是针对memory的要求;
- 有的移植手册说要Keil AC6编译器,注意这不是必要条件
- 开始移植
- 修改文件名
- 对接platform/chip部分
在源码目录下,进入lvgl/examples/porting目录:
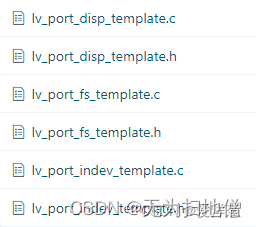
该目录下文件带有port字样主要用于特定平台/芯片的内容,其中disp的部分对接的是显示器部分,fs用于对接文件系统部分,index用于对接输入设备(触摸、键盘、鼠标)。注意:如果只做显示,那么对接lv_port_disp_template即可。 - 修改文件名
把lvgl/examples/porting目录下的文件进行修改成如下图所示:

注意:如果修改了目录下的文件名,之前.c文件中应用的(include).h文件的名字也需要同步更改。 - 修改LVGL配置文件
在lvgl源码目录中有一个lv_conf_template.h文件,存放在整个源码的一级目录下,打开该文件如下所示:
从文件注释看到,这里明确的告诉大家,首先需要将该文件改名(或者Copy)为lv_conf.h的文件;其次在宏定义中,将#if 0 改为 #if 1,即使能这个文件下面的内容,用于编译,因为在lvgl的核心代码中使用#include “lv_conf.h”,所以lv_conf_template.h文件改名为v_conf.h是必须的。/** * @file lv_conf.h * Configuration file for v8.3.0-dev */ /* * Copy this file as `lv_conf.h` * 1. simply next to the `lvgl` folder * 2. or any other places and * - define `LV_CONF_INCLUDE_SIMPLE` * - add the path as include path */ /* clang-format off */ #if 0 /*Set it to "1" to enable content*/
- 对接platform/chip部分
- 移植显示驱动
在之前改过名字的lv_port_disp.h文件中,定义LCD屏幕的尺寸:
在lv_conf.h中,修改lvgl有关屏幕尺寸的定义:#define ST7735S_WIDTH 128 #define ST7735S_HEIGHT 128
在lv_port_disp.c文件中,开始移植屏幕驱动:#define MY_DISP_HOR_RES 128 #define MY_DISP_VER_RES 128 #define LV_VER_RES_MAX 128
首先打开lv_port_disp.h文件中宏定义:
源文件lv_port_disp.c源码如下:/** * @file lv_port_disp_templ.c * */ /*Copy this file as "lv_port_disp.c" and set this value to "1" to enable content */ #if 1void lv_port_disp_init(void) { /*------------------------- * Initialize your display * -----------------------*/ disp_init(); /*----------------------------- * Create a buffer for drawing *----------------------------*/ /** * LVGL requires a buffer where it internally draws the widgets. * Later this buffer will passed to your display driver's `flush_cb` to copy its content to your display. * The buffer has to be greater than 1 display row * * There are 3 buffering configurations: * 1. Create ONE buffer: * LVGL will draw the display's content here and writes it to your display * * 2. Create TWO buffer: * LVGL will draw the display's content to a buffer and writes it your display. * You should use DMA to write the buffer's content to the display. * It will enable LVGL to draw the next part of the screen to the other buffer while * the data is being sent form the first buffer. It makes rendering and flushing parallel. * * 3. Double buffering * Set 2 screens sized buffers and set disp_drv.full_refresh = 1. * This way LVGL will always provide the whole rendered screen in `flush_cb` * and you only need to change the frame buffer's address. */ /* Example for 1) */ static lv_disp_draw_buf_t draw_buf_dsc_1; static lv_color_t buf_1[MY_DISP_HOR_RES * 10]; /*A buffer for 10 rows*/ lv_disp_draw_buf_init(&draw_buf_dsc_1, buf_1, NULL, MY_DISP_HOR_RES * 10); /*Initialize the display buffer*/ // /* Example for 2) */ // static lv_disp_draw_buf_t draw_buf_dsc_2; // static lv_color_t buf_2_1[MY_DISP_HOR_RES * 10]; /*A buffer for 10 rows*/ // static lv_color_t buf_2_2[MY_DISP_HOR_RES * 10]; /*An other buffer for 10 rows*/ // lv_disp_draw_buf_init(&draw_buf_dsc_2, buf_2_1, buf_2_2, MY_DISP_HOR_RES * 10); /*Initialize the display buffer*/ // /* Example for 3) also set disp_drv.full_refresh = 1 below*/ // static lv_disp_draw_buf_t draw_buf_dsc_3; // static lv_color_t buf_3_1[MY_DISP_HOR_RES * MY_DISP_VER_RES]; /*A screen sized buffer*/ // static lv_color_t buf_3_2[MY_DISP_HOR_RES * MY_DISP_VER_RES]; /*Another screen sized buffer*/ // lv_disp_draw_buf_init(&draw_buf_dsc_3, buf_3_1, buf_3_2, MY_DISP_VER_RES * LV_VER_RES_MAX); /*Initialize the display buffer*/ /*----------------------------------- * Register the display in LVGL *----------------------------------*/ static lv_disp_drv_t disp_drv; /*Descriptor of a display driver*/ lv_disp_drv_init(&disp_drv); /*Basic initialization*/ /*Set up the functions to access to your display*/ /*Set the resolution of the display*/ disp_drv.hor_res = ST7735S_WIDTH; disp_drv.ver_res = ST7735S_HEIGHT; /*Used to copy the buffer's content to the display*/ disp_drv.flush_cb = disp_flush; /*Set a display buffer*/ disp_drv.draw_buf = &draw_buf_dsc_1; /*Required for Example 3)*/ //disp_drv.full_refresh = 1 /* Fill a memory array with a color if you have GPU. * Note that, in lv_conf.h you can enable GPUs that has built-in support in LVGL. * But if you have a different GPU you can use with this callback.*/ //disp_drv.gpu_fill_cb = gpu_fill; /*Finally register the driver*/ lv_disp_drv_register(&disp_drv); }- 首先LVGL提供了一个叫做disp_init()的函数,默认情况下是空实现,移植的时候可以把屏幕的初始部分放在该函数内;
- 接着,调用lv_disp_draw_buf_init来进行绘制buffer的初始化,这里LVGL支持3种buffer选择,具体的介绍阅读LVGL官方文档介绍。
- 然后,初始化disp的宽高
disp_drv.hor_res = ST7735S_WIDTH; disp_drv.ver_res = ST7735S_HEIGHT; - 最后,对接底层和芯片平台相关的刷图接口:
这个接口需要我们自己根据触摸驱动芯片和LCD来实现的接口,它将像素数据通过触摸驱动芯片刷新指定的屏幕,具体的接口如下:disp_drv.flush_cb = disp_flush;
从该接口可看到,disp_flush函数参数传递的是:待绘制的区域的xy坐标和以及要绘制的颜色;开发者在此函数实现lvgl于外接显示器的对接。extern void LCD_DrawPoint(uint16_t x,uint16_t y,uint16_t color); /*Flush the content of the internal buffer the specific area on the display *You can use DMA or any hardware acceleration to do this operation in the background but *'lv_disp_flush_ready()' has to be called when finished.*/ static void disp_flush(lv_disp_drv_t * disp_drv, const lv_area_t * area, lv_color_t * color_p) { /*The most simple case (but also the slowest) to put all pixels to the screen one-by-one*/ int32_t x; int32_t y; for(y = area->y1; y <= area->y2; y++) { for(x = area->x1; x <= area->x2; x++) { /*Put a pixel to the display. For example:*/ /*put_px(x, y, *color_p)*/ // 画点函数,例如常见的一些屏用的是16位颜色,你把16位数据输出到屏幕即可 LCD_DrawPoint(x, y, color_p->full); color_p++; } } // LCD_Fill(area->x1, area->y1, area->x2, area->y2, *((uint16_t *)color_p)); /*IMPORTANT!!! *Inform the graphics library that you are ready with the flushing*/ lv_disp_flush_ready(disp_drv); }
- 配置LVGL
LVGL支持很多的配置,其配置文件选择都被罗列在lv_conf.h文件中,下面举例了几个需要配置:- 屏幕尺寸的配置
#if 1 /*Set it to "1" to enable content*/ #ifndef LV_CONF_H #define LV_CONF_H #include <stdint.h> // 屏幕尺寸需要配置 #define MY_DISP_HOR_RES 128 #define MY_DISP_VER_RES 128 #define LV_VER_RES_MAX 128 - 颜色相关配置
/*==================== COLOR SETTINGS 颜色相关的配置 *====================*/ // 颜色的配置,这里我们使用 RGB565。所以配置为 16 /*Color depth: 1 (1 byte per pixel), 8 (RGB332), 16 (RGB565), 32 (ARGB8888)*/ #define LV_COLOR_DEPTH 16 /*Swap the 2 bytes of RGB565 color. Useful if the display has an 8-bit interface (e.g. SPI)*/ #define LV_COLOR_16_SWAP 0 /*Enable more complex drawing routines to manage screens transparency. *Can be used if the UI is above another layer, e.g. an OSD menu or video player. *Requires `LV_COLOR_DEPTH = 32` colors and the screen's `bg_opa` should be set to non LV_OPA_COVER value*/ #define LV_COLOR_SCREEN_TRANSP 0 /* Adjust color mix functions rounding. GPUs might calculate color mix (blending) differently. * 0: round down, 64: round up from x.75, 128: round up from half, 192: round up from x.25, 254: round up */ #define LV_COLOR_MIX_ROUND_OFS (LV_COLOR_DEPTH == 32 ? 0: 128) /*Images pixels with this color will not be drawn if they are chroma keyed)*/ #define LV_COLOR_CHROMA_KEY lv_color_hex(0x00ff00) /*pure green*/ - 内存相关配置
内存相关的配置,为了如何使用动态内存分配/释放的策略;
如果打算自己写内存管理,那么需要定义LV_MEM_CUSTOM为1,否则使用LVGL基于TLSF的内存管理算法;#if 1 /*Set it to "1" to enable content*/ /*========================= MEMORY SETTINGS 内存相关的配置,如果没有定义 LV_MEM_CUSTOM,那么代表动态内存分配释放,使用 LVGL 那套内存管理算法 默认情况下 LVGL 使用 TLSF 内存管理算法,LV_MEM_SIZE 指定了 LVGL 管理的内存大小;这个需要配置 *=========================*/ /*1: use custom malloc/free, 0: use the built-in `lv_mem_alloc()` and `lv_mem_free()`*/ #define LV_MEM_CUSTOM 0 #if LV_MEM_CUSTOM == 0 /*Size of the memory available for `lv_mem_alloc()` in bytes (>= 2kB)*/ // 此内存用于 LVGL 的动态申请/释放内存,这里我们配置的 48KB 的全局数组给 LVGL 使用 #define LV_MEM_SIZE (48U * 1024U) /*[bytes]*/ /*Set an address for the memory pool instead of allocating it as a normal array. Can be in external SRAM too.*/ #define LV_MEM_ADR 0 /*0: unused*/ /*Instead of an address give a memory allocator that will be called to get a memory pool for LVGL. E.g. my_malloc*/ #if LV_MEM_ADR == 0 //#define LV_MEM_POOL_INCLUDE your_alloc_library /* Uncomment if using an external allocator*/ //#define LV_MEM_POOL_ALLOC your_alloc /* Uncomment if using an external allocator*/ #endif #else /*LV_MEM_CUSTOM*/ #define LV_MEM_CUSTOM_INCLUDE <stdlib.h> /*Header for the dynamic memory function*/ #define LV_MEM_CUSTOM_ALLOC malloc #define LV_MEM_CUSTOM_FREE free #define LV_MEM_CUSTOM_REALLOC realloc #endif /*LV_MEM_CUSTOM*/ /*Number of the intermediate memory buffer used during rendering and other internal processing mechanisms. *You will see an error log message if there wasn't enough buffers. */ // 用于渲染和 LVGL 内部处理机制的 buffer 个数,如果配置不够的话,LVGL 会打印 ERROR 信息 // 这个其实是一个 lv_mem_buf_arr_t[LV_MEM_BUF_MAX_NUM] 结构的数组个数; #define LV_MEM_BUF_MAX_NUM 16 /*Use the standard `memcpy` and `memset` instead of LVGL's own functions. (Might or might not be faster).*/ #define LV_MEMCPY_MEMSET_STD 0 - 底层的配置
底层的配置主要是配置两个方面:刷新显示时长,读取一次input的值进行处理。具体配置如下:/*==================== HAL SETTINGS HAL 层的配置 *====================*/ /*Default display refresh period. LVG will redraw changed areas with this period time*/ // 这个参数决定了多久处理一起屏幕刷新,默认情况是 30ms #define LV_DISP_DEF_REFR_PERIOD 30 /*[ms]*/ /*Input device read period in milliseconds*/ // 这个参数决定了多久处理一起input,默认情况是 30ms #define LV_INDEV_DEF_READ_PERIOD 30 /*[ms]*/ /*Use a custom tick source that tells the elapsed time in milliseconds. *It removes the need to manually update the tick with `lv_tick_inc()`)*/ #define LV_TICK_CUSTOM 0 #if LV_TICK_CUSTOM #define LV_TICK_CUSTOM_INCLUDE "Arduino.h" /*Header for the system time function*/ #define LV_TICK_CUSTOM_SYS_TIME_EXPR (millis()) /*Expression evaluating to current system time in ms*/ #endif /*LV_TICK_CUSTOM*/ /*Default Dot Per Inch. Used to initialize default sizes such as widgets sized, style paddings. *(Not so important, you can adjust it to modify default sizes and spaces)*/ /* * LV_DPI_DEF 注意这里,虽然LVGL的作者说这个没这么重要,但他会严重影响到LVGL的动画效果 * 你应该进行DPI的手动计算,例如128x128分辨率1.44英寸的屏幕,那么 DPI = ((√128*128) / 1.44) ≈ 89 */ #define LV_DPI_DEF 89 /*[px/inch]*/ - 日志
可以通过LV_USE_LOG设置为1来打开LVGL的日志打印功能,还可以通过LV_LOG_LEVENL来指定如下几种类型的日志等级:- TRACE
- INFO
- WARN
- ERROR
- USER
- NONE
并且,如果你已经适配好了printf函数,并在你的平台上可以通过printf能够打印串口数据,那么定义LV_LOG_PRINTF为1,来使用printf函数打印LVGL的日志;否则,就要通过调用lv_log_register_printf_cd来注册合适你的平台的串口打印日志接口。
- 其他(显示帧率等)
包含了帧率监控,内存监控等配置;/*------------- * Others *-----------*/ /*1: Show CPU usage and FPS count*/ #define LV_USE_PERF_MONITOR 1 #if LV_USE_PERF_MONITOR #define LV_USE_PERF_MONITOR_POS LV_ALIGN_BOTTOM_RIGHT #endif /*1: Show the used memory and the memory fragmentation * Requires LV_MEM_CUSTOM = 0*/ #define LV_USE_MEM_MONITOR 0 #if LV_USE_MEM_MONITOR #define LV_USE_MEM_MONITOR_POS LV_ALIGN_BOTTOM_LEFT #endif /*1: Draw random colored rectangles over the redrawn areas*/ #define LV_USE_REFR_DEBUG 0 /*Change the built in (v)snprintf functions*/ #define LV_SPRINTF_CUSTOM 0 #if LV_SPRINTF_CUSTOM #define LV_SPRINTF_INCLUDE <stdio.h> #define lv_snprintf snprintf #define lv_vsnprintf vsnprintf #else /*LV_SPRINTF_CUSTOM*/ #define LV_SPRINTF_USE_FLOAT 0 #endif /*LV_SPRINTF_CUSTOM*/ #define LV_USE_USER_DATA 1 /*Garbage Collector settings *Used if lvgl is bound to higher level language and the memory is managed by that language*/ #define LV_ENABLE_GC 0 #if LV_ENABLE_GC != 0 #define LV_GC_INCLUDE "gc.h" /*Include Garbage Collector related things*/ #endif /*LV_ENABLE_GC*/ - 编译属性
LVGL给很多变量和函数增加了编译的属性,比如支持MPU等,或者在你编译、链接时希望一些函数,或者数据被Layout到指定的地方(Linker),在或者编译器支持一些属性,那么就可以配置它们:/*===================== * COMPILER SETTINGS *====================*/ /*For big endian systems set to 1*/ #define LV_BIG_ENDIAN_SYSTEM 0 /*Define a custom attribute to `lv_tick_inc` function*/ #define LV_ATTRIBUTE_TICK_INC /*Define a custom attribute to `lv_timer_handler` function*/ #define LV_ATTRIBUTE_TIMER_HANDLER /*Define a custom attribute to `lv_disp_flush_ready` function*/ #define LV_ATTRIBUTE_FLUSH_READY /*Required alignment size for buffers*/ #define LV_ATTRIBUTE_MEM_ALIGN_SIZE 1 /*Will be added where memories needs to be aligned (with -Os data might not be aligned to boundary by default). * E.g. __attribute__((aligned(4)))*/ #define LV_ATTRIBUTE_MEM_ALIGN /*Attribute to mark large constant arrays for example font's bitmaps*/ #define LV_ATTRIBUTE_LARGE_CONST /*Compiler prefix for a big array declaration in RAM*/ #define LV_ATTRIBUTE_LARGE_RAM_ARRAY /*Place performance critical functions into a faster memory (e.g RAM)*/ #define LV_ATTRIBUTE_FAST_MEM /*Prefix variables that are used in GPU accelerated operations, often these need to be placed in RAM sections that are DMA accessible*/ #define LV_ATTRIBUTE_DMA /*Export integer constant to binding. This macro is used with constants in the form of LV_<CONST> that *should also appear on LVGL binding API such as Micropython.*/ #define LV_EXPORT_CONST_INT(int_value) struct _silence_gcc_warning /*The default value just prevents GCC warning*/ /*Extend the default -32k..32k coordinate range to -4M..4M by using int32_t for coordinates instead of int16_t*/ #define LV_USE_LARGE_COORD 0 - 裁剪组件
LVGL内建了很多组件,比如label,button,line,calendar,char,list等等,可按照自己的需求进行裁剪,默认情况下,所以的组件都被包含,也就是define为1:/*================== * WIDGET USAGE *================*/ /*Documentation of the widgets: https://docs.lvgl.io/latest/en/html/widgets/index.html*/ #define LV_USE_ARC 1 #define LV_USE_ANIMIMG 1 #define LV_USE_BAR 1 #define LV_USE_BTN 1 #define LV_USE_BTNMATRIX 1 #define LV_USE_CANVAS 1 #define LV_USE_CHECKBOX 1 #define LV_USE_DROPDOWN 1 /*Requires: lv_label*/ #define LV_USE_IMG 1 /*Requires: lv_label*/ #define LV_USE_LABEL 1 #if LV_USE_LABEL #define LV_LABEL_TEXT_SELECTION 1 /*Enable selecting text of the label*/ #define LV_LABEL_LONG_TXT_HINT 1 /*Store some extra info in labels to speed up drawing of very long texts*/ #endif #define LV_USE_LINE 1 #define LV_USE_ROLLER 1 /*Requires: lv_label*/ #if LV_USE_ROLLER #define LV_ROLLER_INF_PAGES 7 /*Number of extra "pages" when the roller is infinite*/ #endif #define LV_USE_SLIDER 1 /*Requires: lv_bar*/ #define LV_USE_SWITCH 1 #define LV_USE_TEXTAREA 1 /*Requires: lv_label*/ #if LV_USE_TEXTAREA != 0 #define LV_TEXTAREA_DEF_PWD_SHOW_TIME 1500 /*ms*/ #endif #define LV_USE_TABLE 1 /*================== * EXTRA COMPONENTS *==================*/ /*----------- * Widgets *----------*/ #define LV_USE_CALENDAR 1 #if LV_USE_CALENDAR #define LV_CALENDAR_WEEK_STARTS_MONDAY 0 #if LV_CALENDAR_WEEK_STARTS_MONDAY #define LV_CALENDAR_DEFAULT_DAY_NAMES {"Mo", "Tu", "We", "Th", "Fr", "Sa", "Su"} #else #define LV_CALENDAR_DEFAULT_DAY_NAMES {"Su", "Mo", "Tu", "We", "Th", "Fr", "Sa"} #endif #define LV_CALENDAR_DEFAULT_MONTH_NAMES {"January", "February", "March", "April", "May", "June", "July", "August", "September", "October", "November", "December"} #define LV_USE_CALENDAR_HEADER_ARROW 1 #define LV_USE_CALENDAR_HEADER_DROPDOWN 1 #endif /*LV_USE_CALENDAR*/ #define LV_USE_CHART 1 #define LV_USE_COLORWHEEL 1 #define LV_USE_IMGBTN 1 #define LV_USE_KEYBOARD 1 #define LV_USE_LED 1 #define LV_USE_LIST 1 #define LV_USE_MENU 1 #define LV_USE_METER 1 #define LV_USE_MSGBOX 1 #define LV_USE_SPINBOX 1 #define LV_USE_SPINNER 1 #define LV_USE_TABVIEW 1 #define LV_USE_TILEVIEW 1 #define LV_USE_WIN 1 #define LV_USE_SPAN 1 #if LV_USE_SPAN /*A line text can contain maximum num of span descriptor */ #define LV_SPAN_SNIPPET_STACK_SIZE 64 #endif - 开启/关闭Demo
移植完毕之后,可以把LVGL的demo加进来编译跑,在lv_conf.h中需要打开对应的宏,才可以编译并且跑demo:/*=================== * DEMO USAGE ====================*/ /*Show some widget. It might be required to increase `LV_MEM_SIZE` */ #define LV_USE_DEMO_WIDGETS 0 #if LV_USE_DEMO_WIDGETS #define LV_DEMO_WIDGETS_SLIDESHOW 0 #endif /*Demonstrate the usage of encoder and keyboard*/ #define LV_USE_DEMO_KEYPAD_AND_ENCODER 0 /*Benchmark your system*/ #define LV_USE_DEMO_BENCHMARK 1 /*Stress test for LVGL*/ #define LV_USE_DEMO_STRESS 0 /*Music player demo*/ #define LV_USE_DEMO_MUSIC 0 #if LV_USE_DEMO_MUSIC # define LV_DEMO_MUSIC_SQUARE 0 # define LV_DEMO_MUSIC_LANDSCAPE 0 # define LV_DEMO_MUSIC_ROUND 0 # define LV_DEMO_MUSIC_LARGE 0 # define LV_DEMO_MUSIC_AUTO_PLAY 0 #endif
- 屏幕尺寸的配置
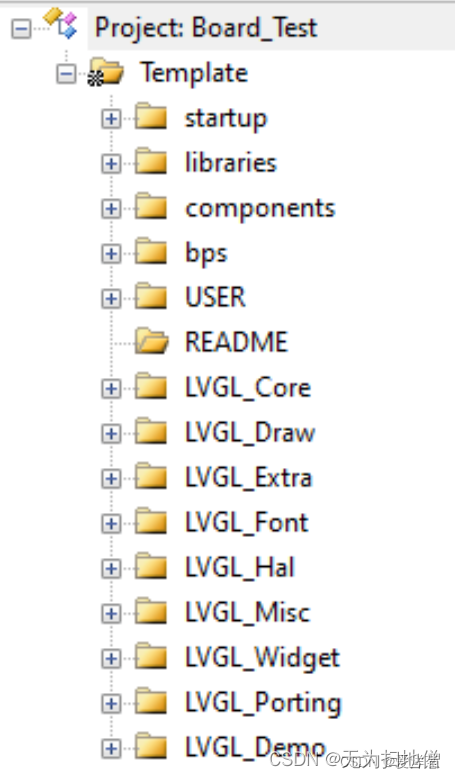
- 添加源码文件到工程
把下载的LVGL源码文件夹中的src目录,拷贝到自己的工程中,并加入编译,如下图所示:
- 添加适配心跳
LVGL的任务都是基于时间的,包含绘制,相应触摸等等;所以需要给它添加时间基准;
LVGL提供了一个lv_tick_inc的函数,我们需要在系统中周期性的调用,可以用硬件Timer或者SystemTick产生周期性时钟;
LVGL的周期性精度是ms级,如果你定义了一个1ms的Timer(或者SystemTick),当Timer(或者SystemTick)更新周期到之后,就调用lv_tick_inc(1);如果定义的是2ms的,那么就是调用lv_tick_inc(2),以此类推;
比如使用的是SystemTick,定义1ms的精度,所以在ISR中调用即可,如下所示:/** * @brief This function handles SysTick Handler. * @param None * @retval None */ void SysTick_Handler(void) { lv_tick_inc(1); } - 调用处理事务
LVGL是基于Timer的事务处理,但是LVGL的事务处理,是基于不断的调用它的回调函数Handler进行的,在回调函数Handler中,不断的比较某些任务是否超时,然后调用相关的处理函数;
所以我们需要定期的调用LVGL的处理事务的函数:lv_timer_handler();
在裸机上,在while(1)中调用:while(1) { lv_timer_handler(); LVGL_Delay(); } - LVGL初始化
移植到最后,在main函数中,调用LVGL的初始化:void LVGL_CentralButton(void) { lv_obj_t *btn = lv_btn_create(lv_scr_act()); lv_obj_align(btn, LV_ALIGN_CENTER, 0, 0); lv_obj_set_height(btn, 30); lv_obj_t *label; label = lv_label_create(btn); lv_obj_align(label, LV_ALIGN_CENTER, 0, 0); lv_label_set_text(label, "LVGL"); static lv_style_t style_btn; lv_style_init(&style_btn); lv_style_set_radius(&style_btn, 10); lv_style_set_border_color(&style_btn, lv_color_white()); lv_style_set_border_opa(&style_btn, LV_OPA_30); lv_obj_add_style(btn, &style_btn, LV_STATE_DEFAULT); } void LVGL_Init(void) { lv_init(); // lvgl初始化,如果这个没有初始化,那么下面的初始化会崩溃 lv_port_disp_init(); // 显示器初始化 // lv_port_indev_init(); // 输入设备初始化(如果没有实现就注释掉) // lv_port_fs_init(); // 文件系统设备初始化(如果没有实现就注释掉) } int main(void) { LogInit() BspLedInit(); LCD_ST7735S_Init(); LVGL_Init(); LVGL_CentralButton(); SystemTickInit(); while(1) { lv_timer_handler(); LVGL_Delay(); } } - 修改栈空间
根据LVGL的最低要求配置,我们需要修改合适的堆栈空间:Stack_Size EQU 0x000040000 AREA STACK, NOINIT, READWRITE, ALIGN=3 Stack_Mem SPACE Stack_Size __initial_sp Heap_Size EQU 0x00002000 AREA HEAP, NOINIT,READWRITE,ALIGN=3 __heap_base Heap_Mem SPACE Heap_Size __heap_limit PRESERVE8 THUMB
- 修改文件名
- 编译
在Keil中的Options->C/C++勾上C99 Mode;- 消除编译warning
当编译完成之后,发现报很多的 warning,可以在 Options->C/C++ 的 Misc Controls 中加入
即可屏蔽一些错误和警告。--diag_suppress=188 --diag_suppress=111 --diag_suppress=550
- 消除编译warning
lvgl-PC在线仿真
- 源码仓库获取
- 模拟平台
- 概况与总览->特性->模拟器仿真;
- 进入模拟器界面,选择“Select an IDE”中QT Creator,下载源码到本地电脑;
- 下载最新源码
- 解压文件
- 解压QT Creator 源码
- 把github下载的源代码解压到QT Creator 源码的lvgl目录下
- 用QT Creator 5.12.3打开工程并编译
学习结果
通过本篇文章的总结,初步对lvgl有了全新的认识。希望对其他开发者有用,谢谢!


 5117
5117


 被折叠的 条评论
为什么被折叠?
被折叠的 条评论
为什么被折叠?
 到【灌水乐园】发言


