


今日内容
- Feign
- Zuul网关
- SpringCloudConfig
- SpringCloudBus
第一章 Feign
在前面的学习中,我们使用了Ribbon的负载均衡功能,大大简化了远程调用时的代码:
String userStr = restTemplate.getForObject("http://user-service/findById/" + id, String.class);
如果就学到这里,你可能以后需要编写类似的大量重复代码,格式基本相同,无非参数不一样。有没有更优雅的方式,来对这些代码再次优化呢?
这就是我们接下来要学的Feign的功能了。
1.简介
有道词典的英文解释:
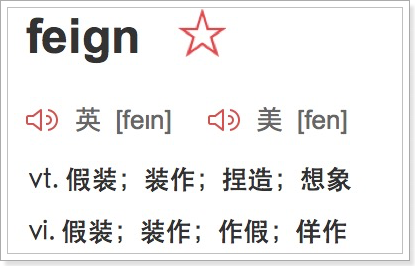
为什么叫伪装?
Feign可以把Rest的请求进行隐藏,伪装成类似SpringMVC的Controller一样。你不用再自己拼接url,拼接参数等等操作,一切都交给Feign去做。
项目主页:https://github.com/OpenFeign/feign
2.快速入门
2.1.导入依赖
<!--导入feign-->
<dependency>
    <groupId>org.springframework.cloud</groupId>
    <artifactId>spring-cloud-starter-openfeign</artifactId>
</dependency>
2.2.Feign的客户端
package cn.itcast.client;

import cn.itcast.pojo.User;
import org.springframework.cloud.openfeign.FeignClient;
import org.springframework.web.bind.annotation.GetMapping;
import org.springframework.web.bind.annotation.PathVariable;

/**
 * @description:
 * @author: mryhl
 * @date: Created in 2020/11/4 17:30
 * @FeignClient("user-service") // eureka注册中心服务名称
 */
@FeignClient("user-service")
public interface UserClient {

	@GetMapping("/findById/{id}")
	public User findById(@PathVariable("id") Integer id);

}
- 首先这是一个接口,Feign会通过动态代理,帮我们生成实现类。这点跟mybatis的mapper很像
@FeignClient,声明这是一个Feign客户端,同时通过value属性指定服务名称- 接口中的定义方法,完全采用SpringMVC的注解,Feign会根据注解帮我们生成URL,并访问获取结果
改造原来的调用逻辑,使用UserClient访问:
@RestController
@RequestMapping("consumer")
public class ConsumerController {

    @Autowired
    private UserClient userClient;

    @GetMapping("/findById/{id}")
    public User findById(@PathVariable("id") Integer id){

        User user = userClient.findById(id);
        return user;
    }
}
2.3.开启Feign功能
我们在启动类上,添加注解,开启Feign功能
package cn.itcast;

import org.springframework.boot.SpringApplication;
import org.springframework.boot.autoconfigure.SpringBootApplication;
import org.springframework.cloud.client.SpringCloudApplication;
import org.springframework.cloud.client.circuitbreaker.EnableCircuitBreaker;
import org.springframework.cloud.client.discovery.EnableDiscoveryClient;
import org.springframework.cloud.client.loadbalancer.LoadBalanced;
import org.springframework.cloud.openfeign.EnableFeignClients;
import org.springframework.context.annotation.Bean;
import org.springframework.web.client.RestTemplate;

/*@SpringBootApplication
@EnableDiscoveryClient
@EnableCircuitBreaker  //开启熔断器的使用*/
@SpringCloudApplication
@EnableFeignClients //开启feign远程调用服务
public class ConsumerApplication {
    public static void main(String[] args) {
        SpringApplication.run(ConsumerApplication.class,args);
    }

    @Bean
    @LoadBalanced  // 表明采用负载均衡策略
    public RestTemplate restTemplate(){
        return new RestTemplate();
    }
}
- 你会发现RestTemplate的注册被我删除了。Feign中已经自动集成了Ribbon负载均衡,因此我们不需要自己定义RestTemplate了
2.4.启动测试:
访问接口:

正常获取到了结果。
3.负载均衡
Feign中本身已经集成了Ribbon依赖和自动配置:

因此我们不需要额外引入依赖,也不需要再注册RestTemplate对象。
Fegin内置的ribbon默认设置了请求超时时长,默认是1000ms,我们可以通过手动配置来修改这个超时时长:
ribbon:
  ReadTimeout: 2000 ## 读取超时时长
  ConnectTimeout: 1000 ## 建立链接的超时时长
,因为ribbon内部有重试机制,一旦超时,会自动重新发起请求。如果不希望重试,可以添加配置:
ribbon:
  ReadTimeout: 2000 ## 数据通信超时时长
  ConnectTimeout: 500 ## 连接超时时长
  MaxAutoRetries: 0 ## 当前服务器的重试次数
  MaxAutoRetriesNextServer: 1 ## 重试多少次服务
  OkToRetryOnAllOperations: false ## 是否对所有的请求方式都重试 如果是false代表只对get请求重试
另外,Hystix的超时时间,应该比重试的总时间要大,比如当前案例中,应该配 大于2500*2 = 5000
4.Hystix支持(了解)
Feign默认也有对Hystix的集成:

只不过,默认情况下是关闭的。我们需要通过下面的参数来开启:
feign:
  hystrix:
    enabled: true ## 开启Feign的熔断功能
但是,Feign中的Fallback配置不像Hystrix中那样简单了。
1)首先,我们要定义一个类,是在刚才编写的UserFeignClient,作为fallback的处理类
package cn.itcast.client;
import cn.itcast.pojo.User;
/**
* @author: mryhl
* @date: Created in 2020/11/4 17:46
* @description:
*/
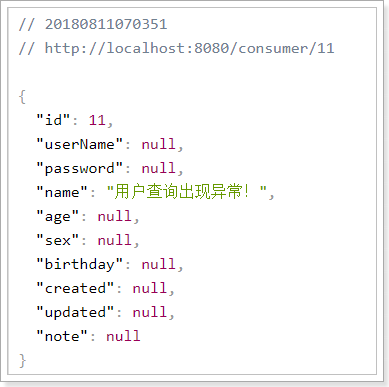
public class UserClientFallback implements UserClient {
@Override
public User findById(Integer id) {
User user = new User();
user.setId(id);
user.setName("用户查询出现异常!");
return user;
}
}
2)然后在UserFeignClient中,指定刚才编写的实现类
@FeignClient(value = "user-service", fallback = UserClientFallback.class)
public interface UserClient {

    @GetMapping("/user/{id}")
    User queryById(@PathVariable("id") Long id);
}
3)重启测试:
我们关闭user-service服务,然后在页面访问:
5.请求压缩(了解)
Spring Cloud Feign 支持对请求和响应进行GZIP压缩,以减少通信过程中的性能损耗。通过下面的参数即可开启请求与响应的压缩功能:
feign:
  compression:
    request:
      enabled: true ## 开启请求压缩
    response:
      enabled: true ## 开启响应压缩
同时,我们也可以对请求的数据类型,以及触发压缩的大小下限进行设置:
feign:
  compression:
    request:
      enabled: true ## 开启请求压缩
      mime-types: text/html,application/xml,application/json ## 设置压缩的数据类型
      min-request-size: 2048 ## 设置触发压缩的大小下限
注:上面的数据类型、压缩大小下限均为默认值。
6.日志级别(了解)
前面讲过,通过logging.level.xx=debug来设置日志级别。然而这个对Fegin客户端而言不会产生效果。因为@FeignClient注解修改的客户端在被代理时,都会创建一个新的Fegin.Logger实例。我们需要额外指定这个日志的级别才可以。
1)设置cn.itcast包下的日志级别都为debug
logging:
  level:
    cn.itcast: debug
2)编写配置类,定义日志级别
@Configuration
public class FeignConfig {
    @Bean
    Logger.Level feignLoggerLevel(){
        return Logger.Level.FULL;
    }
}
这里指定的Level级别是FULL,Feign支持4种级别:
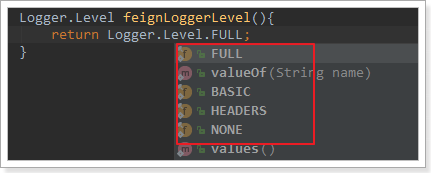
- NONE:不记录任何日志信息,这是默认值。
- BASIC:仅记录请求的方法,URL以及响应状态码和执行时间
- HEADERS:在BASIC的基础上,额外记录了请求和响应的头信息
- FULL:记录所有请求和响应的明细,包括头信息、请求体、元数据。
3)在FeignClient中指定配置类:(可以省略)
@FeignClient(value = "user-service", fallback = UserClientFallback.class, configuration = FeignConfig.class)
public interface UserClient {
    @GetMapping("/user/{id}")
    User queryById(@PathVariable("id") Long id);
}
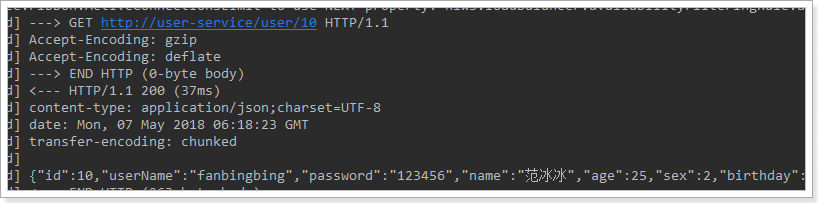
4)重启项目,即可看到每次访问的日志:
第二章 Zuul网关
1.简介
官网:https://github.com/Netflix/zuul

Zuul:维基百科:
电影《捉鬼敢死队》中的怪兽,Zuul,在纽约引发了巨大骚乱。
事实上,在微服务架构中,Zuul就是守门的大Boss!一夫当关,万夫莫开!
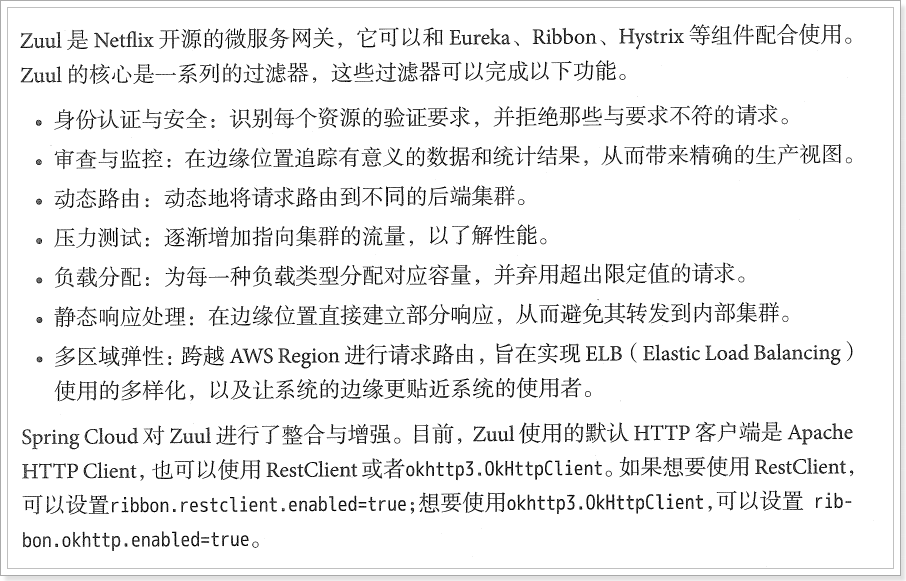
网关的核心功能是:过滤(鉴权)和路由
2.Zuul加入后的架构
- 不管是来自于客户端(PC或移动端)的请求,还是服务内部调用。一切对服务的请求都会经过Zuul这个网关,然后再由网关来实现 鉴权、动态路由等等操作。Zuul就是我们服务的统一入口。
3.快速入门
3.1.新建工程
填写基本信息:

添加Zuul依赖:
<?xml version="1.0" encoding="UTF-8"?>
<project xmlns="http://maven.apache.org/POM/4.0.0"
         xmlns:xsi="http://www.w3.org/2001/XMLSchema-instance"
         xsi:schemaLocation="http://maven.apache.org/POM/4.0.0 http://maven.apache.org/xsd/maven-4.0.0.xsd">
	<parent>
		<artifactId>springcloud-demo</artifactId>
		<groupId>cn.itcast</groupId>
		<version>1.0-SNAPSHOT</version>
	</parent>
	<modelVersion>4.0.0</modelVersion>

	<artifactId>zuul-demo</artifactId>

	<dependencies>
		<dependency>
			<groupId>org.springframework.cloud</groupId>
			<artifactId>spring-cloud-starter-netflix-zuul</artifactId>
		</dependency>
	</dependencies>
</project>
3.2.编写启动类
通过@EnableZuulProxy注解开启Zuul的功能:
package cn.itcast;

import org.springframework.boot.SpringApplication;
import org.springframework.boot.autoconfigure.SpringBootApplication;
import org.springframework.cloud.netflix.zuul.EnableZuulProxy;

/**
 * @author: mryhl
 * @date: Created in 2020/11/4 18:02
 * @description:
 * @EnableZuulProxy // 表示开启网关功能
 */
@SpringBootApplication
@EnableZuulProxy
public class ZuulApplication {
	public static void main(String[] args) {
		SpringApplication.run(ZuulApplication.class,args);
	}
}
3.2.编写配置
server:
  port: 10010
spring:
  application:
    name: zuul-server  ## 微服务名称
3.4.编写路由规则
我们需要用Zuul来代理user-service服务,先看一下控制面板中的服务状态:

- ip为:127.0.0.1
- 端口为:8081
映射规则:
zuul:
  routes:
    user-service: ## 网关动态路由分发路由名称
      path: /user-service/**  ## 映射路径  通过映射路径,关联真实的请求路径
      url: http://localhost:8081  ## 微服务真实路径
我们将符合path 规则的一切请求,都代理到 url参数指定的地址
本例中,我们将 /user-service/**开头的请求,代理到http://127.0.0.1:8081
3.5.启动测试:
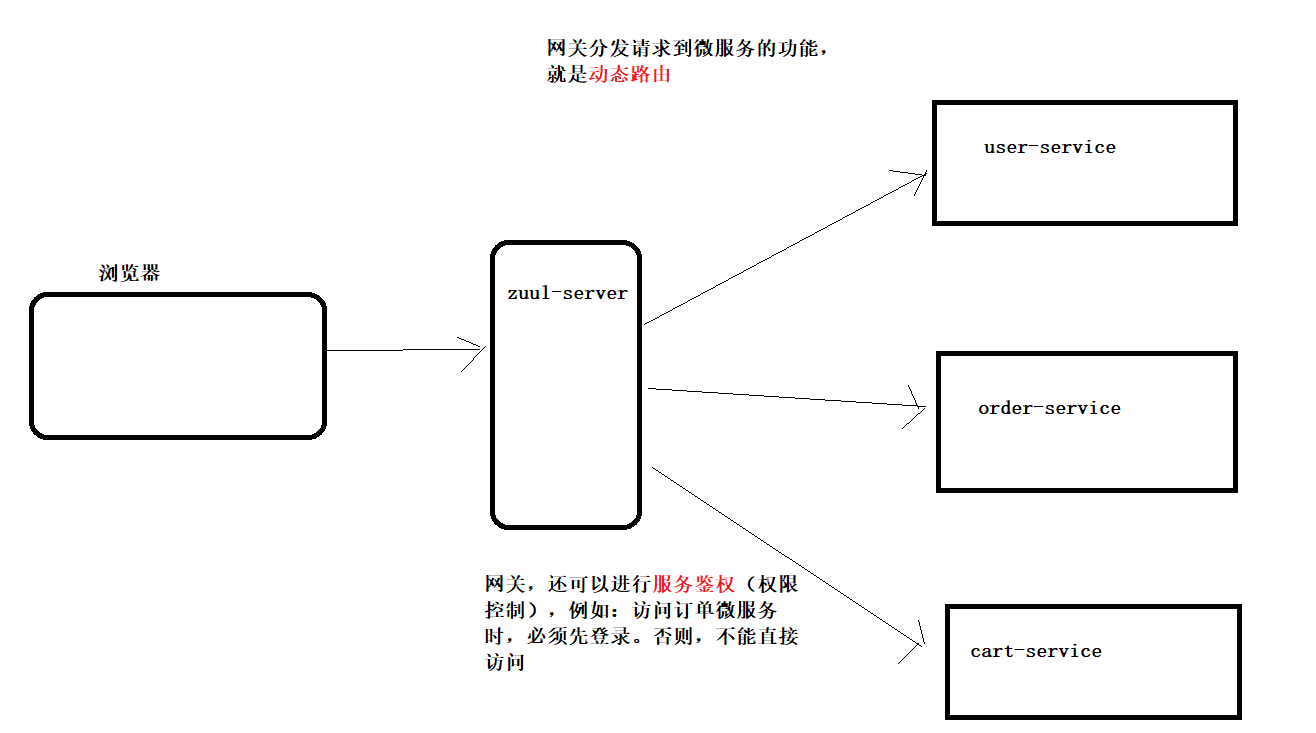
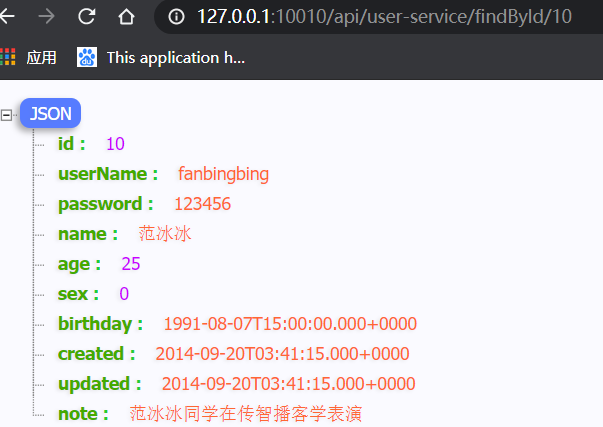
访问的路径中需要加上配置规则的映射路径,我们访问:http://127.0.0.1:10010/user-service/findById/10

4.面向服务的路由
在刚才的路由规则中,我们把路径对应的服务地址写死了!如果同一服务有多个实例的话,这样做显然就不合理了。
我们应该根据服务的名称,去Eureka注册中心查找 服务对应的所有实例列表,然后进行动态路由才对!
4.1.添加Eureka客户端依赖
<dependency>
    <groupId>org.springframework.cloud</groupId>
    <artifactId>spring-cloud-starter-netflix-eureka-client</artifactId>
</dependency>
4.2.开启Eureka客户端发现功能
package cn.itcast;

import org.springframework.boot.SpringApplication;
import org.springframework.boot.autoconfigure.SpringBootApplication;
import org.springframework.cloud.client.discovery.EnableDiscoveryClient;
import org.springframework.cloud.netflix.zuul.EnableZuulProxy;
import org.springframework.cloud.netflix.zuul.EnableZuulServer;

@SpringBootApplication
@EnableDiscoveryClient //开启eureka客户端功能
@EnableZuulProxy //开启网关功能
public class ZuulApplication {
    public static void main(String[] args) {
        SpringApplication.run(ZuulApplication.class,args);
    }
}
4.3.添加Eureka配置,获取服务信息
eureka:
  client:
    service-url:
      defaultZone: http://localhost:10086/eureka  #eureka服务端连接地址
4.4.修改映射配置,通过服务名称获取
因为已经有了Eureka客户端,我们可以从Eureka获取服务的地址信息,因此映射时无需指定IP地址,而是通过服务名称来访问,而且Zuul已经集成了Ribbon的负载均衡功能。
zuul:
  routes:
    user-service: ## 网关动态路由分发的微服务名称
      path: /user-service/**  ## 映射路径  通过映射路径,关联真实的请求路径
      serviceId: user-service ## eureka注册中心,服务id
      ## url: http://localhost:8081  ## 微服务真实路径
4.5.启动测试
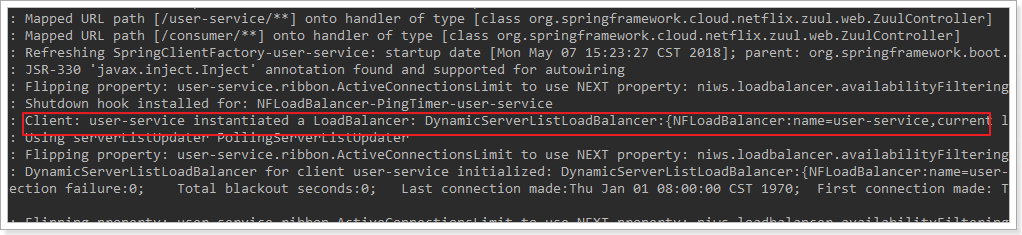
再次启动,这次Zuul进行代理时,会利用Ribbon进行负载均衡访问:
日志中可以看到使用了负载均衡器:
5.简化的路由配置
在刚才的配置中,我们的规则是这样的:
zuul.routes.<route>.path=/xxx/**: 来指定映射路径。<route>是自定义的路由名zuul.routes.<route>.serviceId=/user-service:来指定服务名。
而大多数情况下,我们的<route>路由名称往往和 服务名会写成一样的。因此Zuul就提供了一种简化的配置语法:zuul.routes.<serviceId>=<path>
比方说上面我们关于user-service的配置可以简化为一条:
zuul:
  routes:
    user-service: /user-service/**  ## 路由分发规则简化配置
省去了对服务名称的配置。
6.默认的路由规则
在使用Zuul的过程中,上面讲述的规则已经大大的简化了配置项。但是当服务较多时,配置也是比较繁琐的。因此Zuul就指定了默认的路由规则:
- 默认情况下,一切服务的映射路径就是服务名本身。
- 例如服务名为:
user-service,则默认的映射路径就是:/user-service/**
- 例如服务名为:
也就是说,刚才的映射规则我们完全不配置也是OK的,不信就试试看。
如果想要禁用某个路由规则,可以这样:
zuul:
  ignored-services:
    - eureka-server
7.路由前缀
配置示例:
zuul:
  routes:
    user-service: /user-service/**  ## 路由分发规则简化配置
      #user-service: ## 网关动态路由分发的微服务名称
      #path: /user-service/**  ## 映射路径  通过映射路径,关联真实的请求路径
      #serviceId: user-service ## eureka注册中心,服务id
      ## url: http://localhost:8081  ## 微服务真实路径
  ignored-services:
    - eureka-server
  prefix: /api  ## 路由前缀
我们通过zuul.prefix=/api来指定了路由的前缀,这样在发起请求时,路径就要以/api开头。
路径/api/user-service/user/1将会被代理到/user-service/user/1
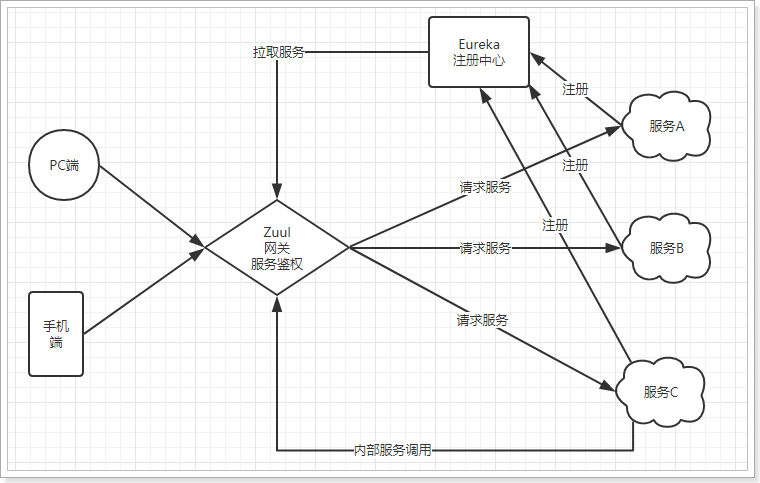
8.过滤器
Zuul作为网关的其中一个重要功能,就是实现请求的鉴权。而这个动作我们往往是通过Zuul提供的过滤器来实现的。
8.1.ZuulFilter
ZuulFilter是过滤器的顶级父类。在这里我们看一下其中定义的4个最重要的方法:
public abstract ZuulFilter implements IZuulFilter{

    abstract public String filterType();

    abstract public int filterOrder();

    boolean shouldFilter();// 来自IZuulFilter

    Object run() throws ZuulException;// IZuulFilter
}
-
filterType:返回字符串,代表过滤器的类型。包含以下4种:pre:请求在被路由之前执行route:在路由请求时调用post:在routing和errror过滤器之后调用error:处理请求时发生错误调用 -
filterOrder:通过返回的int值来定义过滤器的执行顺序,数字越小优先级越高。 -
shouldFilter:返回一个Boolean值,判断该过滤器是否需要执行。返回true执行,返回false不执行。 -
run:过滤器的具体业务逻辑。
8.2.过滤器执行生命周期:
这张是Zuul官网提供的请求生命周期图,清晰的表现了一次请求在各个过滤器的执行顺序。
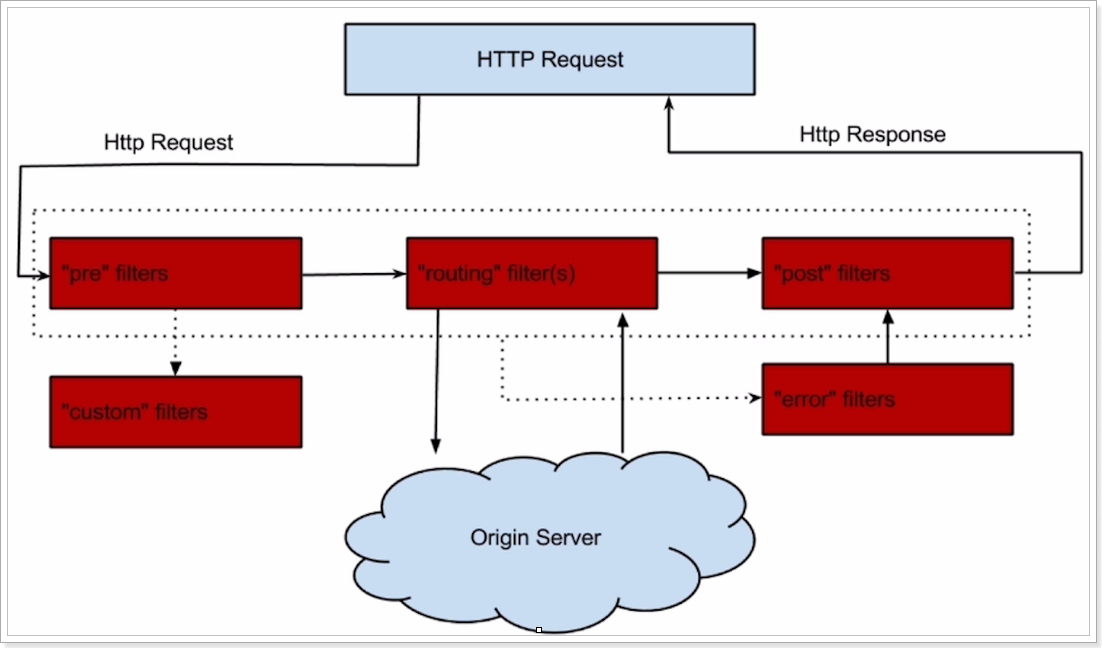
- 正常流程:
- 请求到达首先会经过pre类型过滤器,而后到达routing类型,进行路由,请求就到达真正的服务提供者,执行请求,返回结果后,会到达post过滤器。而后返回响应。
- 异常流程:
- 整个过程中,pre或者routing过滤器出现异常,都会直接进入error过滤器,再error处理完毕后,会将请求交给POST过滤器,最后返回给用户。
- 如果是error过滤器自己出现异常,最终也会进入POST过滤器,而后返回。
- 如果是POST过滤器出现异常,会跳转到error过滤器,但是与pre和routing不同的时,请求不会再到达POST过滤器了。
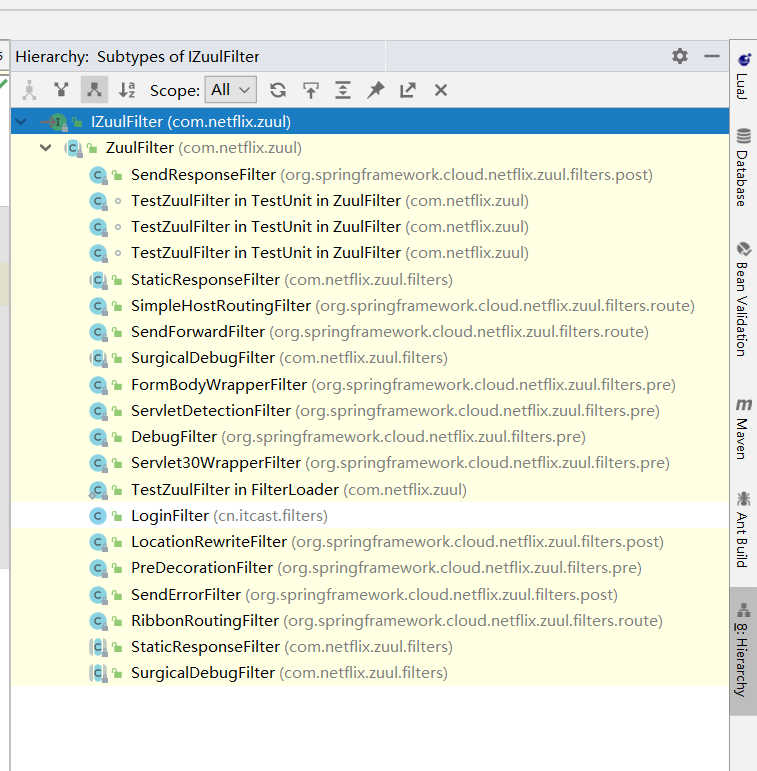
所有内置过滤器列表:
8.3.使用场景
场景非常多:
- 请求鉴权:一般放在pre类型,如果发现没有访问权限,直接就拦截了
- 异常处理:一般会在error类型和post类型过滤器中结合来处理。
- 服务调用时长统计:pre和post结合使用。
9.自定义过滤器
接下来我们来自定义一个过滤器,模拟一个登录的校验。基本逻辑:如果请求中有access-token参数,则认为请求有效,放行。
9.1.定义过滤器类
package cn.itcast.filters;

import com.netflix.zuul.ZuulFilter;
import com.netflix.zuul.context.RequestContext;
import com.netflix.zuul.exception.ZuulException;
import org.apache.commons.lang.StringUtils;
import org.springframework.http.HttpStatus;
import org.springframework.stereotype.Component;

import javax.servlet.http.HttpServletRequest;

import static org.springframework.cloud.netflix.zuul.filters.support.FilterConstants.FORM_BODY_WRAPPER_FILTER_ORDER;
import static org.springframework.cloud.netflix.zuul.filters.support.FilterConstants.PRE_TYPE;

@Component
public class LoginFilter extends ZuulFilter {
    @Override
    public String filterType() {
        return PRE_TYPE;
    }

    @Override
    public int filterOrder() {
        return FORM_BODY_WRAPPER_FILTER_ORDER+1;
    }

    @Override
    public boolean shouldFilter() {
        return true;
    }

    @Override
    public Object run() throws ZuulException {
        //如果请求中有access-token参数,则认为请求有效,放行。
        //1、获取请求对象 参考 FormBodyWrapperFilter获取请求对象
        RequestContext ctx = RequestContext.getCurrentContext();
        HttpServletRequest request = ctx.getRequest();
        //2获取请求参数
        String token = request.getParameter("access-token");
        if(StringUtils.isBlank(token)){
            //未登录,拦截请求
            ctx.setSendZuulResponse(false);
            //返回权限不足状态码
            ctx.setResponseStatusCode(HttpStatus.UNAUTHORIZED.value());
        }

        return null;  //登录了,放行请求
    }
}
9.2.测试
没有token参数时,访问失败:

添加token参数后:

10.负载均衡和熔断
Zuul中默认就已经集成了Ribbon负载均衡和Hystix熔断机制。但是所有的超时策略都是走的默认值,比如熔断超时时间只有1S,很容易就触发了。因此建议我们手动进行配置:
hystrix:
  command:
    default:
      execution:
        isolation:
          thread:
            timeoutInMilliseconds: 6000
ribbon:
  ConnectTimeout: 1000
  ReadTimeout: 2000
  MaxAutoRetries: 0
  MaxAutoRetriesNextServer: 1
11.Zuul的高可用
启动多个Zuul服务,自动注册到Eureka,形成集群。如果是服务内部访问,你访问Zuul,自动负载均衡,没问题。
但是,Zuul更多是外部访问,PC端、移动端等。他们无法通过Eureka进行负载均衡,那么该怎么办?
此时,我们会使用其它的服务网关,来对Zuul进行代理。比如:Nginx
第三章 了解知识:
1.bootstrap.yml 和 application.yml
bootstrap.yml(bootstrap.properties)用来程序引导时执行,应用于更加早期配置信息读取,如可以使用来配置application.yml中使用到参数等
application.yml(application.properties) 应用程序特有配置信息,可以用来配置后续各个模块中需使用的公共参数等。
bootstrap.yml 先于 application.yml 加载
技术上,bootstrap.yml 是被一个父级的 Spring ApplicationContext 加载的。
这个父级的 Spring ApplicationContext是先加载的,在加载application.yml 的 ApplicationContext之前。
可以通过设置spring.cloud.bootstrap.enabled=false来禁用bootstrap。
2.Spring Boot多环境配置切换
一般在一个项目中,总是会有好多个环境。
比如:开发环境 -> 测试环境 -> 预发布环境 -> 生产环境。
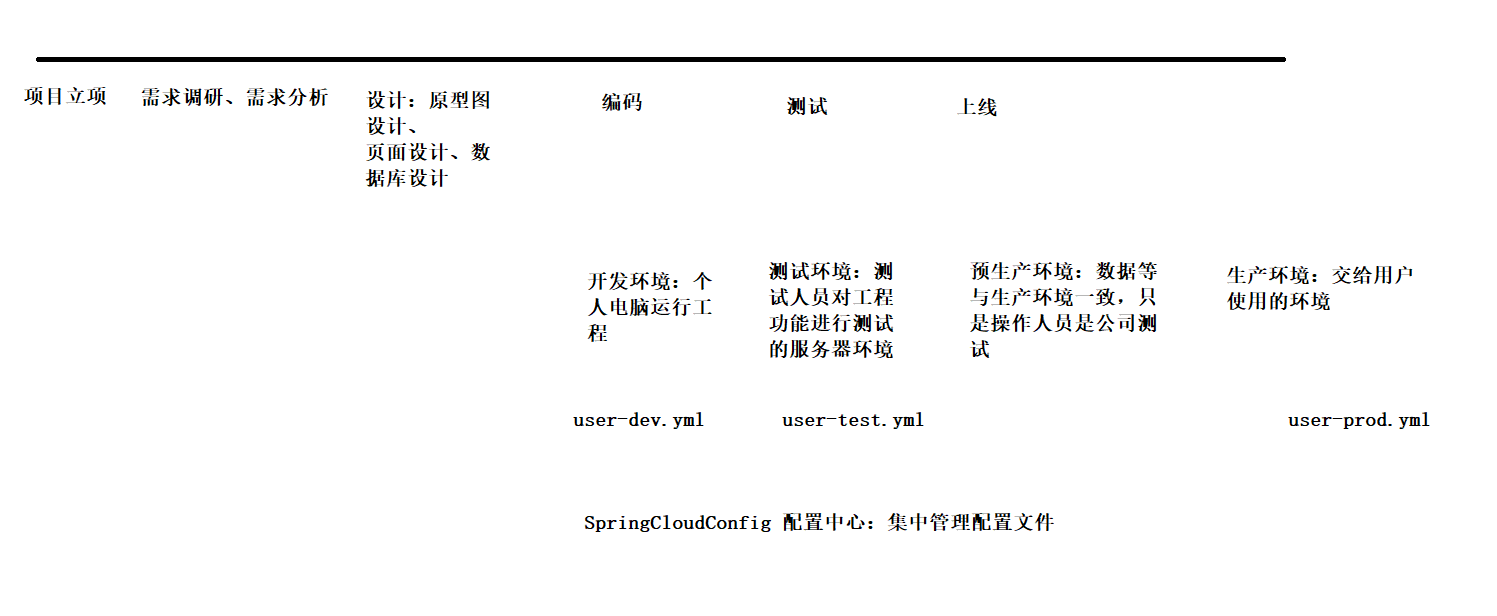
每个环境上的配置文件总是不一样的,甚至开发环境中每个开发者的环境可能也会有一点不同,配置读取可是一个让人有点伤脑筋的问题。
Spring Boot提供了一种优先级配置读取的机制来帮助我们从这种困境中走出来。
常规情况下,我们都知道Spring Boot的配置会从application.yml或.properties中读取
根据Spring Boot的文档,配置使用的优先级从高到低的顺序,具体如下所示:
1. 命令行参数。
2. 通过 System.getProperties() 获取的 Java 系统参数。
3. 操作系统环境变量。
4. 从 java:comp/env 得到的 JNDI 属性。
5. 通过 RandomValuePropertySource 生成的“random.*”属性。
6. 应用 Jar 文件之外的属性文件(application.properties/yml)。
7. 应用 Jar 文件内部的属性文件(application.properties/yml)。
8. 在应用配置 Java 类(包含“@Configuration”注解的 Java 类)中通过“@PropertySource”注解声明的属性文件。
9. 通过“SpringApplication.setDefaultProperties”声明的默认属性。
这意味着,如果Spring Boot在优先级更高的位置找到了配置,那么它就会无视低级的配置。
方法一、不在配置文件写上配置节定义,而是通过执行时定位不同配置文件来区分。如:
java -jar demo.jar --spring.config.location=/path/test_evn.properties
方法二、在配置文件写上配置节定义,在执行时传递配置节需激活定义名称来区分。
一般情况下我们这样定义环境:dev :开发,test:测试环境,prod:生产环境
在yml 文件中配置的话,写法如下:
spring:
  profiles:
    active: prod #生产环境
  datasource:
    driver-class-name: com.mysql.jdbc.Driver
    url: jdbc:mysql://127.0.0.1:3306/test
    username: root
    password: root
启动Jar包的时候:Java -jar xxxxxx.jar spring.profiles.active=prod 也可以这样启动设置配置文件,但是这只是用于开发和测试
第四章 集中配置组件SpringCloudConfig (了解)
1 Spring Cloud Config简介
在分布式系统中,由于服务数量巨多,为了方便服务配置文件统一管理,实时更新,所以需要分布式配置中心组件。在Spring Cloud中,有分布式配置中心组件spring cloud config ,它支持配置服务放在配置服务的内存中(即本地),也支持放在远程Git仓库中。在spring cloud config 组件中,分两个角色,一是config server,二是config client。
Config Server是一个可横向扩展、集中式的配置服务器,它用于集中管理应用程序各个环境下的配置,默认使用Git存储配置文件内容,也可以使用SVN存储,或者是本地文件存储。
Config Client是Config Server的客户端,用于操作存储在Config Server中的配置内容。微服务在启动时会请求Config Server获取配置文件的内容,请求到后再启动容器。
详细内容看在线文档: https://springcloud.cc/spring-cloud-config.html
2 配置服务端
2.1 将配置文件提交到码云
使用GitHub时,国内的用户经常遇到的问题是访问速度太慢,有时候还会出现无法连接的情况。如果我们希望体验Git飞一般的速度,可以使用国内的Git托管服务——码云(gitee.com)。
和GitHub相比,码云也提供免费的Git仓库。此外,还集成了代码质量检测、项目演示等功能。对于团队协作开发,码云还提供了项目管理、代码托管、文档管理的服务。
步骤:
(1)浏览器打开gitee.com,注册用户 ,注册后登陆码云管理控制台

(2)创建仓库 javaee4 (点击右上角的加号 ,下拉菜单选择创建项目)

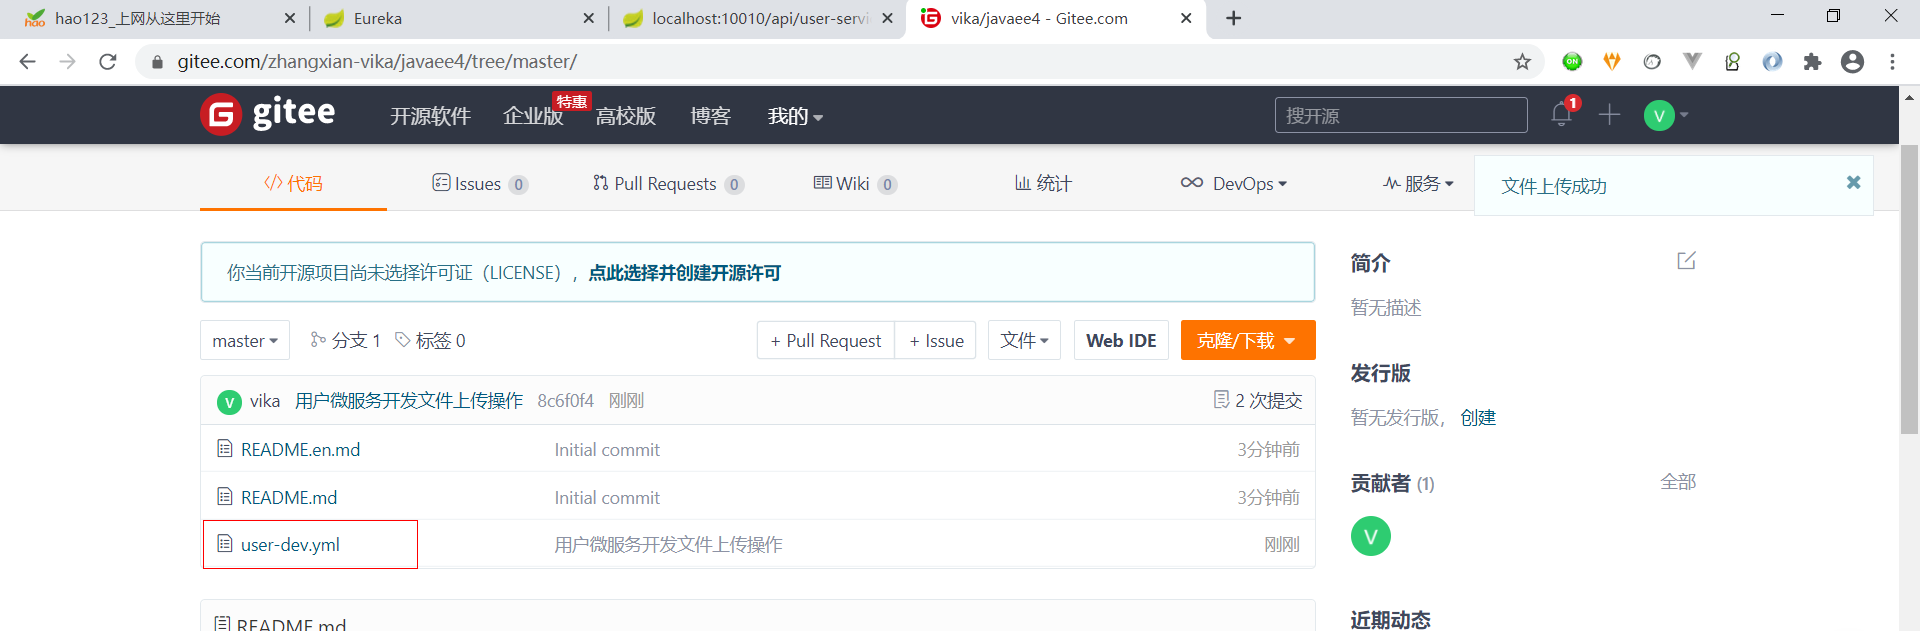
(3)上传配置文件,将user-service工程的application.yml改名为user-dev.yml后上传
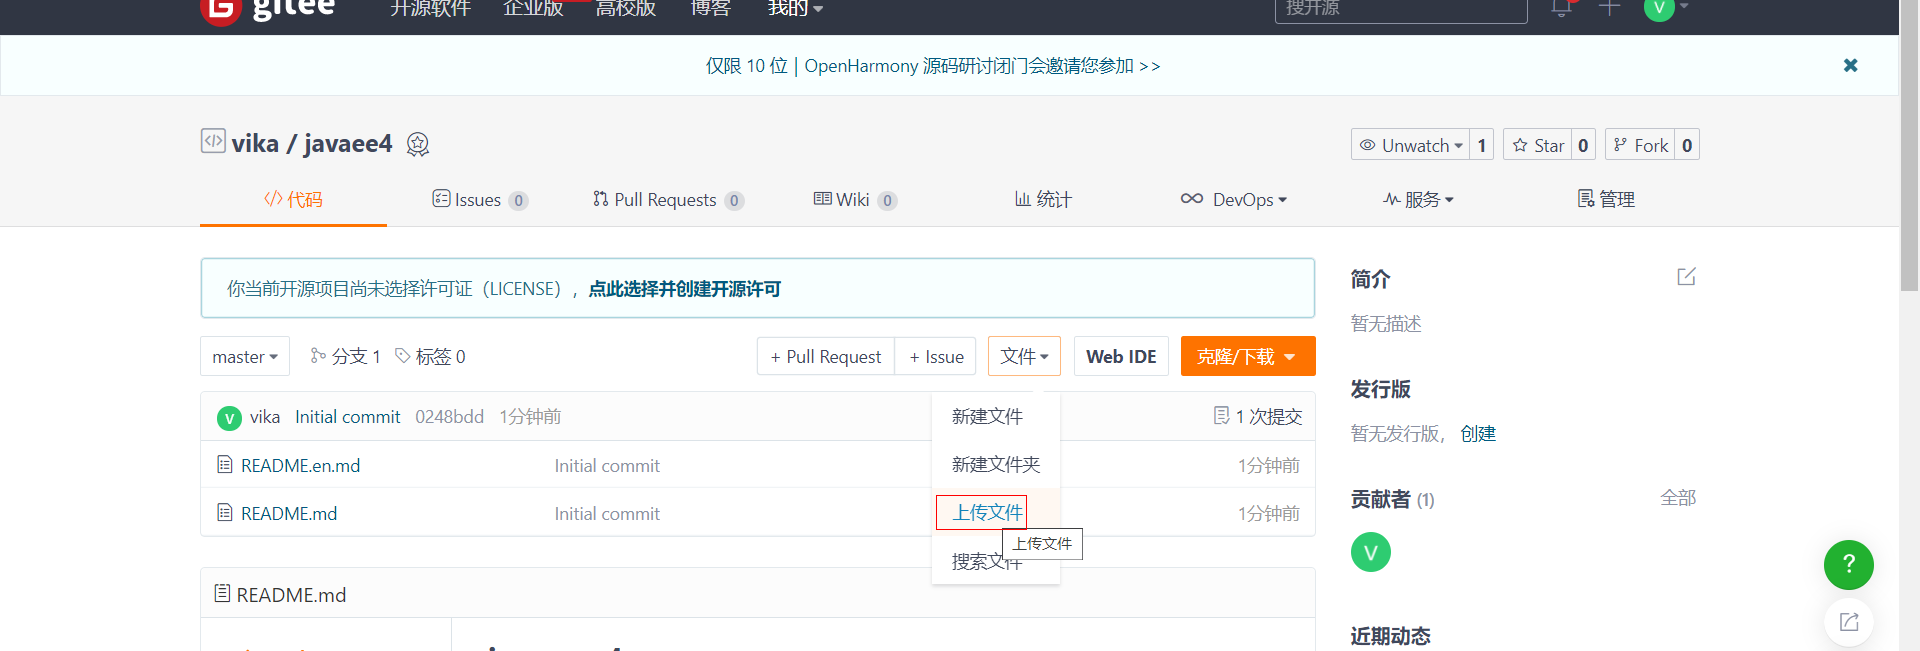
可以通过拖拽的方式将文件上传上去

上传成功后列表可见
可以再次编辑此文件
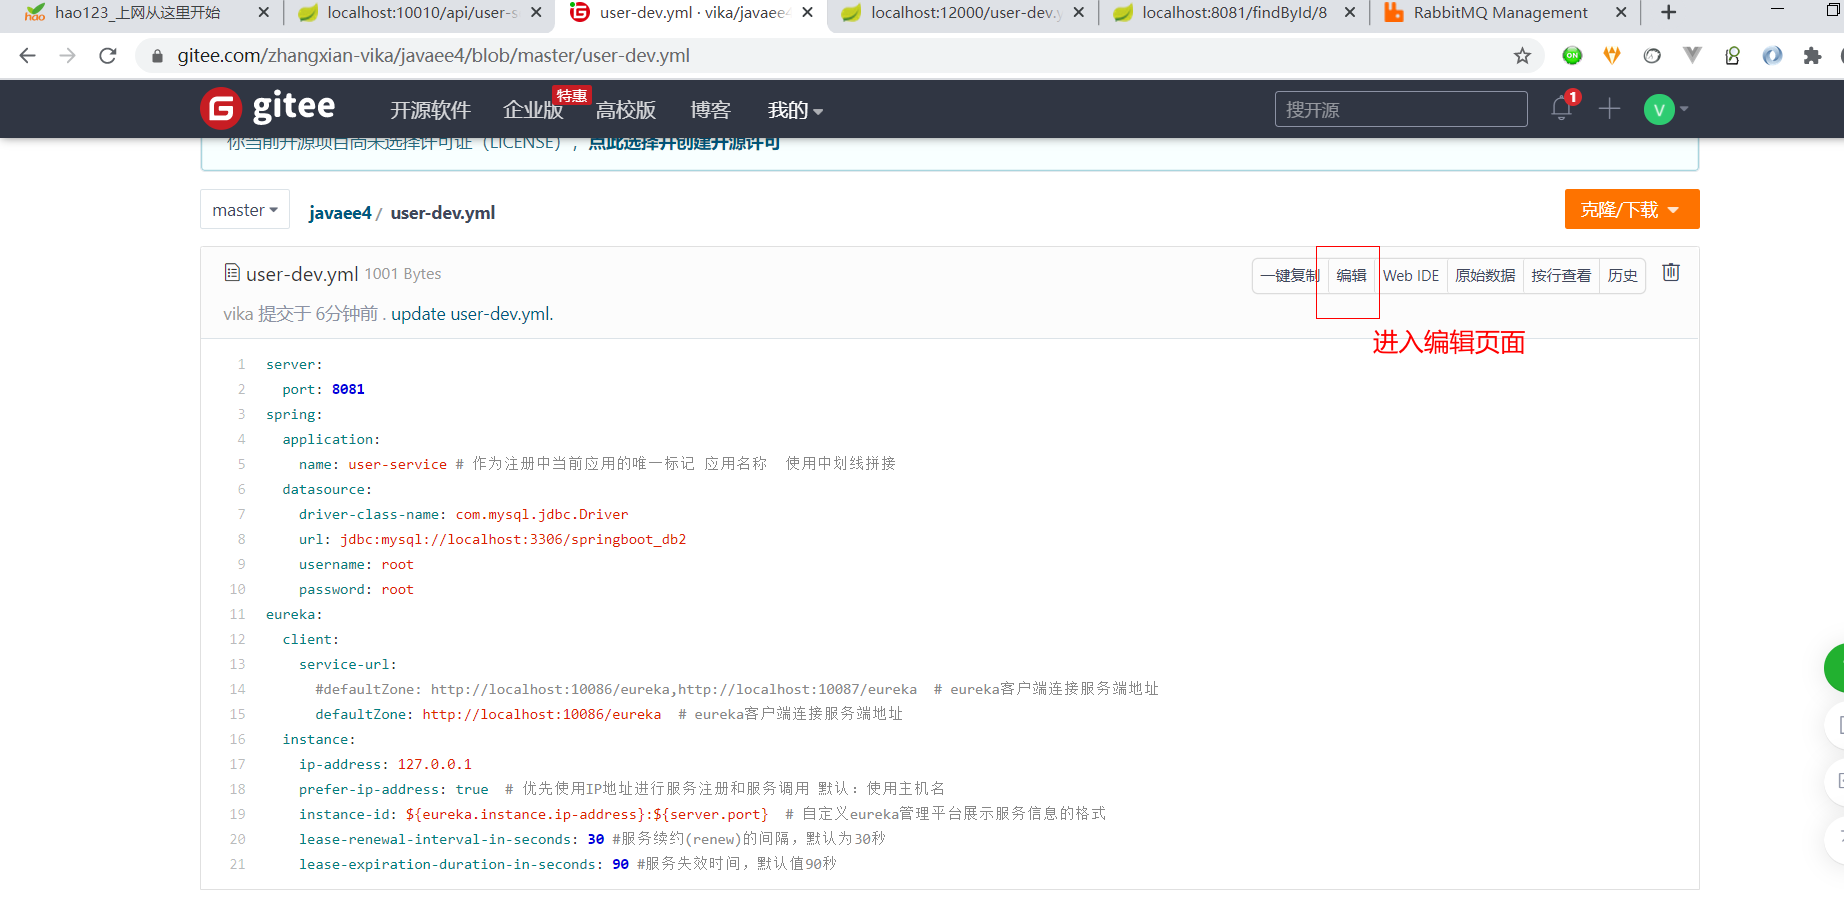
文件命名规则:
{application}-{profile}.yml或{application}-{profile}.properties
application为应用名称 profile指的开发环境(用于区分开发环境,测试环境、生产环境等)
(4)复制git地址 ,备用

地址为:https://gitee.com/zhangxian-vika/javaee4.git
2.2 配置中心微服务
(1)创建工程模块 配置中心微服务 config-server

pom.xml引入依赖
<dependencies>
    <dependency>
        <groupId>org.springframework.cloud</groupId>
        <artifactId>spring-cloud-config-server</artifactId>
    </dependency>
    <dependency>
        <groupId>org.springframework.boot</groupId>
        <artifactId>spring-boot-starter-actuator</artifactId>
    </dependency>
</dependencies>
(2)创建启动类ConfigServerApplication
package cn.itcast;

import org.springframework.boot.SpringApplication;
import org.springframework.boot.autoconfigure.SpringBootApplication;
import org.springframework.cloud.config.server.EnableConfigServer;

@SpringBootApplication
@EnableConfigServer //开启配置中心服务端应用
public class ConfigServerApplication {
    public static void main(String[] args) {
        SpringApplication.run(ConfigServerApplication.class,args);
    }
}
(3)编写配置文件application.yml
server:
  port: 12000
spring:
  application:
    name: config-server
  cloud:
    config:
      server:
        git:
          uri: https://gitee.com/zhangxian-vika/javaee4.git
          skip-ssl-validation: true  ## 跳过SSL安全认证
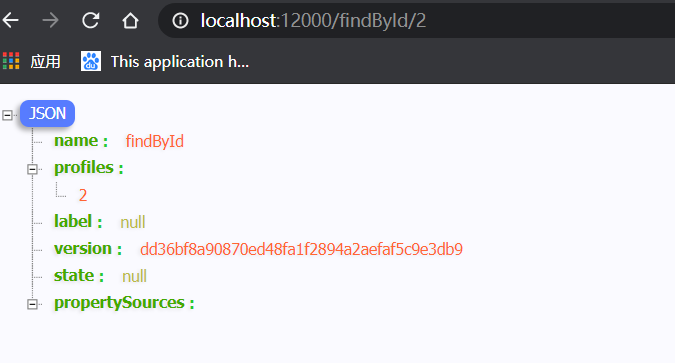
(4)浏览器测试:http://localhost:12000/user-dev.yml 可以看到配置内容
3 配置客户端
(1)在user-service工程添加依赖
<dependency>
    <groupId>org.springframework.cloud</groupId>
    <artifactId>spring-cloud-starter-config</artifactId>
</dependency>
<dependency>
    <groupId>org.springframework.cloud</groupId>
    <artifactId>spring-cloud-config-client</artifactId>
</dependency>
(2)在user-service工程中添加bootstrap.yml ,删除application.yml
spring:
  cloud:
    config:
      name: user
      profile: dev
      label: master
      uri: http://127.0.0.1:12000
第五章 消息总线组件SpringCloudBus(了解)
1 SpringCloudBus简介
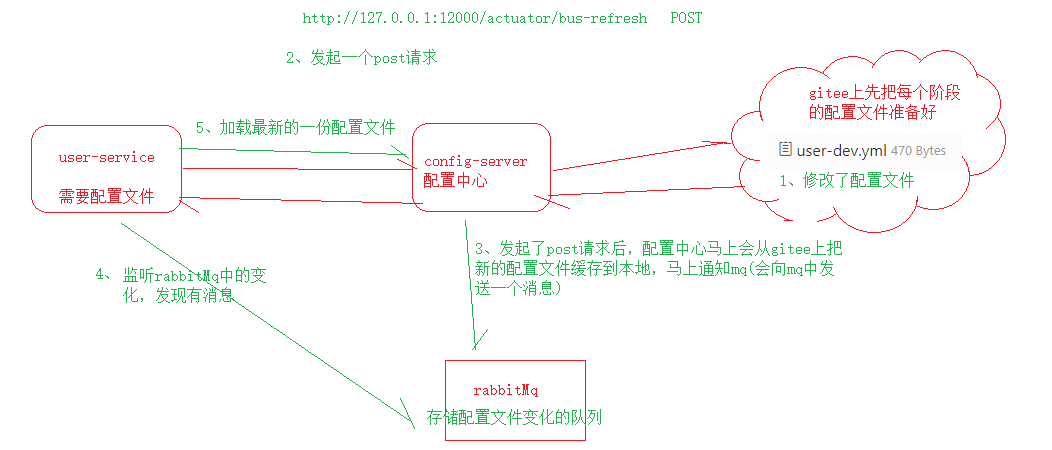
如果我们更新码云中的配置文件,那客户端工程是否可以及时接受新的配置信息呢?我们现在来做有一个测试,修改一下码云中的配置文件中mysql的端口 或者连接不同mysql服务器 ,然后测试数据依然可以查询出来,证明修改服务器中的配置并没有更新立刻到工程,只有重新启动程序才会读取配置。 那我们如果想在不重启微服务的情况下更新配置如何来实现呢? 我们使用SpringCloudBus来实现配置的自动更新。
工作流程图:
2 代码实现
2.1 配置服务端 config-server
(1)修改config-sever工程的pom.xml,引用依赖
<dependency>
    <groupId>org.springframework.cloud</groupId>
    <artifactId>spring-cloud-starter-bus-amqp</artifactId>
</dependency>
(2)修改application.yml ,添加配置
spring:
  rabbitmq:
    host: 127.0.0.1
    port: 5672
    virtual-host: /leyou
    username: leyou
    password: leyou
management: #暴露触发消息总线的地址
  endpoints:
    web:
      exposure:
        include: bus-refresh
2.2 配置客户端 user-service
我们还是以用户微服务模块为例,加入消息总线,确保RabbitMQ正常
(1)修改user_service工程 ,引入依赖
<dependency>
    <groupId>org.springframework.cloud</groupId>
    <artifactId>spring-cloud-starter-bus-amqp</artifactId>
</dependency>
(2)在user-service的bootstrap.yml添加rabbitMQ的配置文件

server:
  port: 8081
spring:
  application:
    name: user-service ## 作为注册中当前应用的唯一标记 应用名称  使用中划线拼接
  datasource:
    driver-class-name: com.mysql.jdbc.Driver
    url: jdbc:mysql://localhost:3306/tb_user2
    username: root
    password: root
  rabbitmq:
    host: 127.0.0.1
    port: 5672
    virtual-host: /leyou
    username: leyou
    password: leyou
eureka:
  client:
    service-url:
      #defaultZone: http://localhost:10086/eureka,http://localhost:10087/eureka  ## eureka客户端连接服务端地址
      defaultZone: http://localhost:10086/eureka  ## eureka客户端连接服务端地址
  instance:
    ip-address: 127.0.0.1
    prefer-ip-address: true  ## 优先使用IP地址进行服务注册和服务调用 默认:使用主机名
    instance-id: ${eureka.instance.ip-address}:${server.port}  ## 自定义eureka管理平台展示服务信息的格式
    lease-renewal-interval-in-seconds: 30 #服务续约(renew)的间隔,默认为30秒
    lease-expiration-duration-in-seconds: 90 #服务失效时间,默认值90秒
(3)启动 注册中心、配置中心、user-service项目看是否正常运行
(4)修改码云上的配置文件 ,将数据库改成另一个数据库tb_user2
准备tb_user2数据库和相关数据


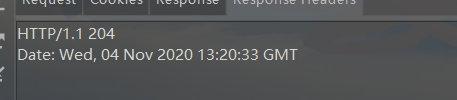
(5)测试 Url: http://127.0.0.1:12000/actuator/bus-refresh Method: post


(6)再次观察输出的数据是否是读取了tb_user中的数据。

经常出的错误:415,405等问题


 1164
1164


 被折叠的 条评论
为什么被折叠?
被折叠的 条评论
为什么被折叠?
 到【灌水乐园】发言


