


1.环境和版本
操作系统:win10
显卡:3060
cpu:i5 6500
2.前置准备
安装anaconda,版本:conda 23.3.1(略)
安装pycharm 2023.1.2(略)
3.版本对应关系
python 3.9
cuda:11.2
cudnn:cudnn-8.2.1-cuda11.3_0
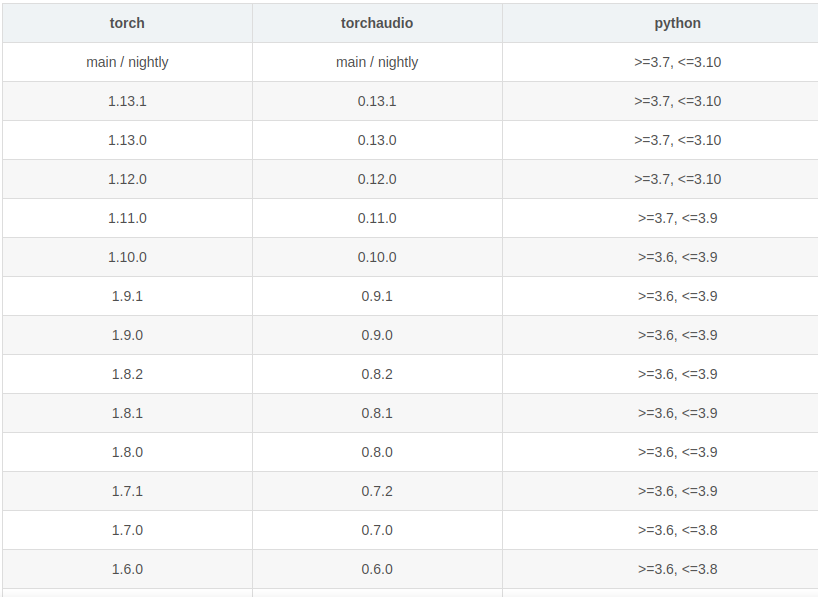
pytorch1.12.1 torchvision0.13.1 torchaudio==0.12.1 cudatoolkit=11.3
3.步骤
3.1创建conda虚拟环境
conda create -n tongyi python=3.9
3.2激活conda虚拟环境
conda activate tongyi
3.3安装pytorch相关依赖包(pytorch版本不低于1.12)
conda install pytorch==1.12.1 torchvision==0.13.1 torchaudio==0.12.1 cudatoolkit=11.3 -c pytorch
3.4安装通义千问所需依赖包
pip install modelscope
pip install transformers_stream_generator
3.5推荐安装(非必须)
推荐安装flash-attention库,以实现更高的效率和更低的显存占用。
In addition, it is recommended to install the flash-attention library for higher efficiency and lower memory usage.
git clone -b v1.0.8 https://github.com/Dao-AILab/flash-attention
cd flash-attention && pip install .
pip install csrc/layer_norm
pip install csrc/rotary
3.7根据代码报错需要安装的依赖包
pip install transformers
pip install tiktoken
pip install accelerate
3.6示例代码
from modelscope import AutoModelForCausalLM, AutoTokenizer
from modelscope import GenerationConfig

tokenizer = AutoTokenizer.from_pretrained("qwen/Qwen-7B-Chat", revision = 'v1.0.1',trust_remote_code=True)
model = AutoModelForCausalLM.from_pretrained("qwen/Qwen-7B-Chat", revision = 'v1.0.1',device_map="auto", trust_remote_code=True).eval()
model.generation_config = GenerationConfig.from_pretrained("Qwen/Qwen-7B-Chat",revision = 'v1.0.1', trust_remote_code=True) # 可指定不同的生成长度、top_p等相关超参

response, history = model.chat(tokenizer, "你好", history=None)
print(response)
response, history = model.chat(tokenizer, "浙江的省会在哪里?", history=history)
print(response)
response, history = model.chat(tokenizer, "它有什么好玩的景点", history=history)
print(response)
代码运行后会下载大模型包(14GB),使用联通的200MB宽带,总计下载时间不到10分钟,平均下载速度30MB/s上下。
3.7成功截图

4.参考
通义千问:https://modelscope.cn/models/qwen/Qwen-7B-Chat/quickstart
pytorch对应关系:https://pytorch.org/get-started/previous-versions/
python与pytorch对应关系:
参考win11+3060的安装记录:
https://zhuanlan.zhihu.com/p/648368704


 1613
1613


 被折叠的 条评论
为什么被折叠?
被折叠的 条评论
为什么被折叠?
 到【灌水乐园】发言


