


一、nginx安装
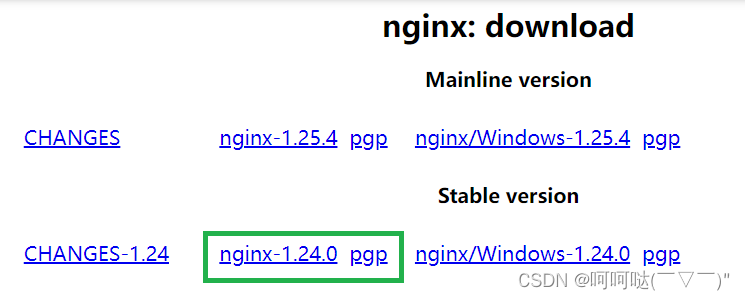
nginx: download 下载nginx安装包
heheda@linux:~/package$ tar -zvxf nginx-1.24.0.tar.gz
nginx-1.24.0/
nginx-1.24.0/auto/
nginx-1.24.0/conf/
nginx-1.24.0/contrib/
nginx-1.24.0/src/
nginx-1.24.0/configure
nginx-1.24.0/LICENSE
nginx-1.24.0/README
nginx-1.24.0/html/
nginx-1.24.0/man/
nginx-1.24.0/CHANGES.ru
nginx-1.24.0/CHANGES
nginx-1.24.0/man/nginx.8
nginx-1.24.0/html/50x.html
...
...
...
heheda@linux:~/package$ ls
boost_1_84_0         build                             muduo-master      nginx-1.24.0
boost_1_84_0.tar.gz  cmake-3.28.2-linux-x86_64.tar.gz  muduo-master.zip  nginx-1.24.0.tar.gz
heheda@linux:~/package$ cd nginx-1.24.0
heheda@linux:~/package/nginx-1.24.0$ ls
auto  CHANGES  CHANGES.ru  conf  configure  contrib  html  LICENSE  man  README  src
heheda@linux:~/package/nginx-1.24.0$ ./configure --with-stream
checking for OS
 + Linux 4.15.0-213-generic x86_64
checking for C compiler ... found
 + using GNU C compiler
 + gcc version: 7.5.0 (Ubuntu 7.5.0-3ubuntu1~18.04)
checking for gcc -pipe switch ... found
checking for -Wl,-E switch ... found
checking for gcc builtin atomic operations ... found
checking for C99 variadic macros ... found
checking for gcc variadic macros ... found
checking for gcc builtin 64 bit byteswap ... found
checking for unistd.h ... found
...
...
...
heheda@linux:~/package/nginx-1.24.0$ make
...
...
...
objs/ngx_modules.o \
-ldl -lpthread -lcrypt -lpcre -lz \
-Wl,-E
sed -e "s|%%PREFIX%%|/usr/local/nginx|" \
        -e "s|%%PID_PATH%%|/usr/local/nginx/logs/nginx.pid|" \
        -e "s|%%CONF_PATH%%|/usr/local/nginx/conf/nginx.conf|" \
        -e "s|%%ERROR_LOG_PATH%%|/usr/local/nginx/logs/error.log|" \
        < man/nginx.8 > objs/nginx.8
make[1]: 离开目录“/home/heheda/package/nginx-1.24.0”

heheda@linux:~/package/nginx-1.24.0$ sudo make install
make -f objs/Makefile install
make[1]: 进入目录“/home/heheda/package/nginx-1.24.0”
test -d '/usr/local/nginx' || mkdir -p '/usr/local/nginx'
test -d '/usr/local/nginx/sbin' \
        || mkdir -p '/usr/local/nginx/sbin'
test ! -f '/usr/local/nginx/sbin/nginx' \
        || mv '/usr/local/nginx/sbin/nginx' \
                '/usr/local/nginx/sbin/nginx.old'
cp objs/nginx '/usr/local/nginx/sbin/nginx'
test -d '/usr/local/nginx/conf' \
        || mkdir -p '/usr/local/nginx/conf'
cp conf/koi-win '/usr/local/nginx/conf'
cp conf/koi-utf '/usr/local/nginx/conf'
cp conf/win-utf '/usr/local/nginx/conf'
test -f '/usr/local/nginx/conf/mime.types' \
        || cp conf/mime.types '/usr/local/nginx/conf'
cp conf/mime.types '/usr/local/nginx/conf/mime.types.default'
test -f '/usr/local/nginx/conf/fastcgi_params' \
        || cp conf/fastcgi_params '/usr/local/nginx/conf'
cp conf/fastcgi_params \
        '/usr/local/nginx/conf/fastcgi_params.default'
test -f '/usr/local/nginx/conf/fastcgi.conf' \
        || cp conf/fastcgi.conf '/usr/local/nginx/conf'
cp conf/fastcgi.conf '/usr/local/nginx/conf/fastcgi.conf.default'
test -f '/usr/local/nginx/conf/uwsgi_params' \
        || cp conf/uwsgi_params '/usr/local/nginx/conf'
cp conf/uwsgi_params \
        '/usr/local/nginx/conf/uwsgi_params.default'
test -f '/usr/local/nginx/conf/scgi_params' \
        || cp conf/scgi_params '/usr/local/nginx/conf'
cp conf/scgi_params \
        '/usr/local/nginx/conf/scgi_params.default'
test -f '/usr/local/nginx/conf/nginx.conf' \
        || cp conf/nginx.conf '/usr/local/nginx/conf/nginx.conf'
cp conf/nginx.conf '/usr/local/nginx/conf/nginx.conf.default'
test -d '/usr/local/nginx/logs' \
        || mkdir -p '/usr/local/nginx/logs'
test -d '/usr/local/nginx/logs' \
        || mkdir -p '/usr/local/nginx/logs'
test -d '/usr/local/nginx/html' \
        || cp -R html '/usr/local/nginx'
test -d '/usr/local/nginx/logs' \
        || mkdir -p '/usr/local/nginx/logs'
make[1]: 离开目录“/home/heheda/package/nginx-1.24.0”
heheda@linux:~/package/nginx-1.24.0$
heheda@linux:~$ cd /etc/nginx
heheda@linux:/etc/nginx$ ls
conf.d        fastcgi_params  koi-win     modules-available  nginx.conf    scgi_params      sites-enabled  uwsgi_params
fastcgi.conf  koi-utf         mime.types  modules-enabled    proxy_params  sites-available  snippets       win-utf
heheda@linux:/etc/nginx$ vim nginx.conf 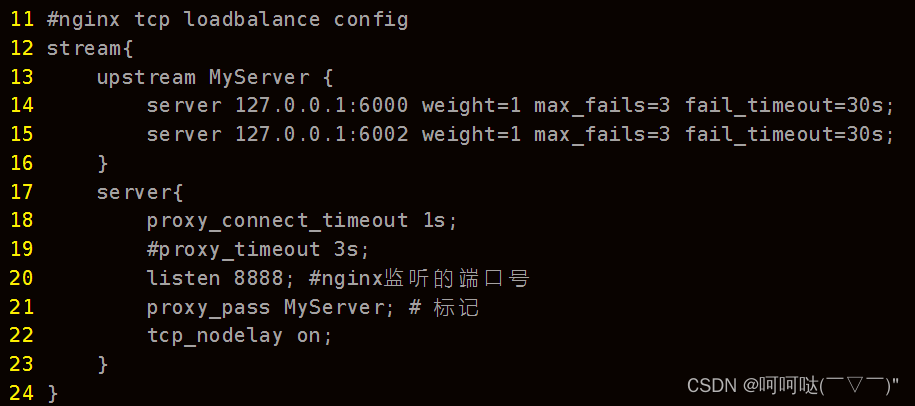
heheda@linux:/usr/local/nginx/sbin$ sudo nginx -s reloadheheda@linux:/usr/local/nginx/sbin$ netstat -tnap
(并非所有进程都能被检测到,所有非本用户的进程信息将不会显示,如果想看到所有信息,则必须切换到 root 用户)
激活Internet连接 (服务器和已建立连接的)
Proto Recv-Q Send-Q Local Address Foreign Address State PID/Program name
tcp 0 0 0.0.0.0:80 0.0.0.0:* LISTEN -
tcp 0 0 127.0.0.53:53 0.0.0.0:* LISTEN -
tcp 0 0 0.0.0.0:22 0.0.0.0:* LISTEN -
tcp 0 0 127.0.0.1:631 0.0.0.0:* LISTEN -
tcp 0 0 0.0.0.0:8888 0.0.0.0:* LISTEN -
tcp 0 0 0.0.0.0:3306 0.0.0.0:* LISTEN -
tcp 0 0 192.168.159.135:22 192.168.159.1:4586 ESTABLISHED -
tcp 0 0 192.168.159.135:22 192.168.159.1:4585 ESTABLISHED -
tcp 0 0 192.168.159.135:22 192.168.159.1:3018 ESTABLISHED -
tcp 0 36 192.168.159.135:22 192.168.159.1:3017 ESTABLISHED -
tcp6 0 0 :::80 :::* LISTEN -
tcp6 0 0 :::22 :::* LISTEN -
tcp6 0 0 ::1:631 :::* LISTEN - 二、redis安装
Install Redis on Linux | Redis
sudo apt install lsb-release curl gpg
curl -fsSL https://packages.redis.io/gpg | sudo gpg --dearmor -o /usr/share/keyrings/redis-archive-keyring.gpg

echo "deb [signed-by=/usr/share/keyrings/redis-archive-keyring.gpg] https://packages.redis.io/deb $(lsb_release -cs) main" | sudo tee /etc/apt/sources.list.d/redis.list

sudo apt-get update
sudo apt-get install redis
heheda@linux:~$ cd /etc/redis
heheda@linux:/etc/redis$ ls
redis.conf
heheda@linux:/etc/redis$ sudo redis-server redis.conf heheda@linux:~$ netstat -tnap
(并非所有进程都能被检测到,所有非本用户的进程信息将不会显示,如果想看到所有信息,则必须切换到 root 用户)
激活Internet连接 (服务器和已建立连接的)
Proto Recv-Q Send-Q Local Address Foreign Address State PID/Program name
tcp 0 0 0.0.0.0:80 0.0.0.0:* LISTEN -
tcp 0 0 127.0.0.53:53 0.0.0.0:* LISTEN -
tcp 0 0 0.0.0.0:22 0.0.0.0:* LISTEN -
tcp 0 0 127.0.0.1:631 0.0.0.0:* LISTEN -
tcp 0 0 0.0.0.0:8888 0.0.0.0:* LISTEN -
tcp 0 0 0.0.0.0:3306 0.0.0.0:* LISTEN -
tcp 0 0 127.0.0.1:6379 0.0.0.0:* LISTEN -
tcp 0 0 192.168.159.135:22 192.168.159.1:4586 ESTABLISHED -
tcp 0 52 192.168.159.135:22 192.168.159.1:4585 ESTABLISHED -
tcp 0 0 192.168.159.135:22 192.168.159.1:3018 ESTABLISHED -
tcp 0 0 192.168.159.135:22 192.168.159.1:3017 ESTABLISHED -
tcp6 0 0 :::80 :::* LISTEN -
tcp6 0 0 :::22 :::* LISTEN -
tcp6 0 0 ::1:631 :::* LISTEN -
tcp6 0 0 ::1:6379 :::* LISTEN -
heheda@linux:~$
集群聊天服务器推荐和参考文章,下文部分文字来自这篇文章:
redis封装业务主要功能:
redis连接后生成publish_context、subscribe_context
publish_context id message: 向id通道发送message消息
subscribe_context id: 订阅id通道
unsubscribe_context id:取消订阅通信
订阅通道与取消订阅通道是阻塞的,专门开启线程thread以循环阻塞方式读取通道上的消息,一旦有消息到来会通过回调函数将发生消息的通道号、数据上报给业务层
- redis.hpp
#ifndef REDIS_H
#define REDIS_H

#include <hiredis/hiredis.h>
#include <thread>
#include <functional>
using namespace std;

class Redis {
public:
    Redis();
    ~Redis();
    // 连接redis服务器
    bool connect();
    // 向redis指定的通道channel发布消息
    bool publish(int channel,string message);
    // 向redis指定的通道subscribe订阅消息
    bool subscribe(int channel);
    // 向redis指定的通道unsubscribe取消订阅消息
    bool unsubscribe(int channel);
    // 在独立线程中接收订阅通道中的消息
    void observer_channel_message();
    // 初始化向业务层上报通道消息的回调对象
    void init_notify_handler(function<void(int,string)> fn);
private:
    // hiredis同步上下文对象,负责publish消息:相当于我们客户端一个redis-cli跟连接相关的所有信息,需要两个上下文处理
    redisContext* m_publish_context;
    // hiredis同步上下文对象,负责subscribe消息
    redisContext* m_subscribe_context;
    // 回调操作,收到订阅的消息,给service层上报:主要上报通道号、数据
    function<void(int,string)>m_notify_message_handler;
};
#endif- redis.cpp
#include <iostream>
using namespace std;
#include "redis.hpp"
//构造函数:初始化两个上下文指针
Redis::Redis()
    : m_publish_context(nullptr)
    , m_subscribe_context(nullptr)
{
}

//析构函数:释放两个上下文指针占用资源
Redis::~Redis() {
    if (m_publish_context != nullptr) {
        redisFree(m_publish_context);
        // m_publish_context = nullptr;
    }

    if (m_subscribe_context != nullptr) {
        redisFree(m_subscribe_context);
        // m_subscribe_context = nullptr;
    }
}

//连接redis服务器
bool Redis::connect() {
    //负责publish发布消息的上下文连接
    m_publish_context = redisConnect("127.0.0.1", 6379);
    if (nullptr == m_publish_context) {
        cerr << "connect redis failed!" << endl;
        return false;
    }

    //负责subscribe订阅消息的上下文连接
    m_subscribe_context = redisConnect("127.0.0.1", 6379);
    if (nullptr == m_subscribe_context) {
        cerr << "connect redis failes!" << endl;
        return false;
    }

    //在单独的线程中监听通道上的事件,有消息给业务层上报 让线程阻塞去监听
    thread t([&](){
        observer_channel_message();
    });
    t.detach();

    cout << "connect redis-server success!" << endl;

    return true;
}

//向redis指定的通道channel publish发布消息:调用redisCommand发送命令即可
bool Redis::publish(int channel, string message) {
    redisReply *reply = (redisReply *)redisCommand(m_publish_context, "PUBLISH %d %s", channel, message.c_str()); //相当于给channel通道发送消息
    if (nullptr == reply) {
        cerr << "publish command failed!" << endl;
        return false;
    }
    freeReplyObject(reply);
    return true;
}

/* 为什么发布消息使用redisCommand函数即可,而订阅消息却不使用?
redisCommand本身会先调用redisAppendCommand将要发送的命令缓存到本地,再调用redisBufferWrite将命令发送到redis服务器上,再调用redisReply以阻塞的方式等待命令的执行。
subscribe会以阻塞的方式等待发送消息,线程是有限,每次订阅一个线程会导致线程阻塞住,这肯定是不行的。
publish一执行马上会回复,不会阻塞当前线程,因此调用redisCommand函数。
*/

//向redis指定的通道subscribe订阅消息:
bool Redis::subscribe(int channel) {
    // SUBSCRIBE命令本身会造成线程阻塞等待通道里面发生消息,这里只做订阅通道,不接收通道消息
    // 通道消息的接收专门在observer_channel_message函数中的独立线程中进行
    // 只负责发送命令,不阻塞接收redis server响应消息,否则和notifyMsg线程抢占响应资源
    if (REDIS_ERR == redisAppendCommand(this->m_subscribe_context, "SUBSCRIBE %d", channel)) { //组装命令写入本地缓存
        cerr << "subscribe command failed!" << endl;
        return false;
    }

    // redisBufferWrite可以循环发送缓冲区,直到缓冲区数据发送完毕(done被置为1)
    int done = 0;
    while (!done) {
        if (REDIS_ERR == redisBufferWrite(this->m_subscribe_context, &done)) { //将本地缓存发送到redis服务器上
            cerr << "subscribe command failed!" << endl;
            return false;
        }
    }
    // redisGetReply

    return true;
}

//向redis指定的通道unsubscribe取消订阅消息,与subscrible一样
bool Redis::unsubscribe(int channel) {
    if (REDIS_ERR == redisAppendCommand(this->m_subscribe_context, "UNSUBSCRIBE %d", channel)) {
        cerr << "unsubscribe command failed!" << endl;
        return false;
    }
    // redisBufferWrite可以循环发送缓冲区,直到缓冲区数据发送完毕(done被置为1)
    int done = 0;
    while (!done) {
        if (REDIS_ERR == redisBufferWrite(this->m_subscribe_context, &done)) {
            cerr << "unsubscribe command failed!" << endl;
            return false;
        }
    }
    return true;
}

//在独立线程中接收订阅通道中的消息:以循环阻塞的方式等待响应通道上发生消息
void Redis::observer_channel_message() {
    redisReply *reply = nullptr;
    while (REDIS_OK == redisGetReply(this->m_subscribe_context, (void**)&reply)) {
        //订阅收到的消息是一个带三元素的数,通道上发送消息会返回三个数据,数据下标为2
        if (reply != nullptr && reply->element[2] != nullptr && reply->element[2]->str != nullptr) {
            //给业务层上报通道上发送的消息:通道号、数据
            m_notify_message_handler(atoi(reply->element[1]->str), reply->element[2]->str);
        }
        freeReplyObject(reply);
    }
}

//初始化向业务层上报通道消息的回调对象
void Redis::init_notify_handler(function<void(int, string)> fn) {
    this->m_notify_message_handler = fn;
}
三、服务器支持跨服务器通信功能
redis主要业务流程:
1、用户登录成功后相应的服务器需要向redis上依据用户id订阅相应通道的消息
2、当服务器上用户之间跨服务器发送消息时,需要向通道上发送消息
3、redis接收到消息通知相应服务器进行处理
1、先在服务器业务类中添加redis操作对象
Redis m_redis; // redis操作对象2、在服务器业务类的构造函数中事先注册回调函数,让redis帮我们监听上报通道上的消息
// 构造函数:注册消息以及对应的Handler回调操作 实现网络模块与业务模块解耦的核心
// 将群组业务的消息id分别与对应的事件处理器提前在聊天服务器业务类的构造函数里绑定好
ChatService::ChatService() {
    m_msgHandlerMap.insert({LOGIN_MSG,std::bind(&ChatService::login, this, _1, _2, _3)});
    m_msgHandlerMap.insert({REG_MSG,std::bind(&ChatService::reg, this, _1, _2, _3)});
    ...
    ...
    ...
    // 连接redis服务器
    if(m_redis.connect()) {
        // 设置上报消息的回调
        m_redis.init_notify_handler(std::bind(&ChatService::handleRedisSubscribeMessage, this, _1, _2));
    }
}

// 从redis消息队列中获取订阅的消息:通道号 + 消息
void ChatService::handleRedisSubscribeMessage(int userid, string msg) {
    lock_guard<mutex> lock(m_connMutex);
    auto it = m_userConnMap.find(userid);
    if (it != m_userConnMap.end()) {
        it->second->send(msg);
        return;
    }
    // 存储该用户的离线消息:在从通道取消息时,用户下线则发送离线消息
    m_offlineMsgModel.insert(userid, msg);
}
3、用户登录成功后,依据用户id向redis订阅相应通道的消息
// 处理登录业务  user表:id password字段
void ChatService::login(const TcpConnectionPtr &conn, json &js, Timestamp time) {
    // 1.获取ids,password字段
    int id = js["id"].get<int>();
    string pwd = js["password"];

    // 传入用户id,返回相应数据
    ConnPool* connPool = this->getConnPool();
    User user = m_userModel.query(connPool,id);
    if(user.getId() == id && user.getPwd() == pwd) { // 登录成功
        if(user.getState() == "online") {
            //该用户已经登录,不允许重复登录
            json response;
            response["msgid"] = LOGIN_MSG_ACK;
            response["errno"] = 2; // 重复登录
            // response["errmsg"] = "该账号已经登录,请重新输入新账号";
            response["errmsg"] = "this account has logined, please input a new account";
            conn->send(response.dump());
        }
        else{ // 用户未登录,此时登录成功
            // 登录成功,记录用户连接信息
            /*
            在用户登录成功时便将用户id与连接信息记录在一个map映射表里,方便后续查找与使用
            线程安全问题:上述我们虽然建立了用户id与连接的映射,但是在多线程环境下,不同的用户
            可能会在不同的工作线程中调用同一个业务,可能同时有多个用户上线,下线操作,因此要
            保证map表的线程安全
            */
            {
                lock_guard<mutex> lock(m_connMutex);
                m_userConnMap.insert({id, conn}); // 登录成功记录用户连接信息
            }
            // id用户登录成功后,向redis订阅channel(id)通道的事件
            m_redis.subscribe(id);

            // 登录成功,更新用户状态信息 state: offline => online
            user.setState("online");
            m_userModel.updateState(connPool,user); // 更新用户状态信息

            ...
            ...
            ...
            conn->send(response.dump());
        }
    }
    else {
        // 该用户不存在/用户存在但是密码错误,登录失败
        ...
        ...
        ...
    }
}
用户注销下线后或异常退出时,依据用户id向redis取消相应通道的消息
//处理注销业务
void ChatService::loginOut(const TcpConnectionPtr &conn, json &js, Timestamp time)
{
    //1、获取要注销用户的id,删除对应连接
    int userid = js["id"].get<int>();
    // std::cout<<"获取要注销用户的id,删除对应连接: userid: "<<userid<<std::endl;
    {
        lock_guard<mutex> lock(m_connMutex);
        auto it = m_userConnMap.find(userid);
        if (it != m_userConnMap.end())
        {
            m_userConnMap.erase(it);
        }
    }

    // 用户注销,相当于就是下线,在redis中取消订阅通道
    m_redis.unsubscribe(userid);

    //2、更新用户状态信息
    ...
    ...
    ...
}
4、一对一聊天部分也需要同步修改:A向B说话,在map表中未找到B,B可能不在本台服务器上但通过数据库查找在线,要发送的消息直接发送以B用户为id的通道上;也可能是离线状态,发送离线消息
// 处理一对一聊天业务
void ChatService::oneChat(const TcpConnectionPtr &conn, json &js, Timestamp time) {
    // 1.先获取目的id
    int toid = js["toid"].get<int>();
    {
        lock_guard<mutex> lock(m_connMutex);
        auto it = m_userConnMap.find(toid);
        // 2.目的id在线 进行消息转发,服务器将源id发送的消息中转给目的id
        if(it != m_userConnMap.end()) {
            // toid在线,转发消息  服务器主动推送消息给toid用户
            it->second->send(js.dump());
            return;
        }
    }

    // 查询toid是否在线
    /*
     * A向B说话,在map表中未找到B,B可能不在本台服务器上但通过
     * 数据库查找在线,要发送的消息直接发送以B用户为id的通道上;
     * 也可能是离线状态,发送离线消息
     */

    cout<<"发送消息 :" <<js.dump()<<endl;

    User user = m_userModel.query(toid);
    if(user.getState() == "online") {
        m_redis.publish(toid, js.dump());
        return;
    }

    // 目的id不在线,将消息存储到离线消息里
    m_offlineMsgModel.insert(toid, js.dump());
}
5.群组聊天也需要修改:A向B说话,在map表中未找到B,B可能不在本台服务器上但通过数据库查找在线,要发送的消息直接发送以B用户为id的通道上;也可能是离线状态,发送离线消息。
// 群组聊天业务
void ChatService::groupChat(const TcpConnectionPtr &conn, json &js, Timestamp time) {
    // 1.获取要发送消息的用户id,要发送的群组id
    int userid = js["id"].get<int>();
    int groupid = js["groupid"].get<int>();

    // 2.查询该群组其他的用户id
    vector<int> useridVec = m_groupModel.queryGroupUsers(userid, groupid);

    // 3.进行用户查找
    /*
     * A向B说话,在map表中未找到B,B可能不在本台服务器上但通过数据库查找
     * 在线,要发送的消息直接发送以B用户为id的通道上;也可能是离线状态,
     * 发送离线消息
     */
    lock_guard<mutex> lock(m_connMutex);
    for(int id : useridVec) {
        auto it = m_userConnMap.find(id);
        // 用户在线,转发群消息
        if(it != m_userConnMap.end()) {
            // 转发群消息
            it->second->send(js.dump());
        }
        else {  // 用户不在线,存储离线消息 或 在其它服务器上登录的
            // 查询toid是否在线
            User user = m_userModel.query(id);
            if(user.getState() == "online") { // 在其他服务器上登录的
                m_redis.publish(id,js.dump());
            }else{
                // 存储离线群消息
                m_offlineMsgModel.insert(id, js.dump());
            }
        }
    }
}
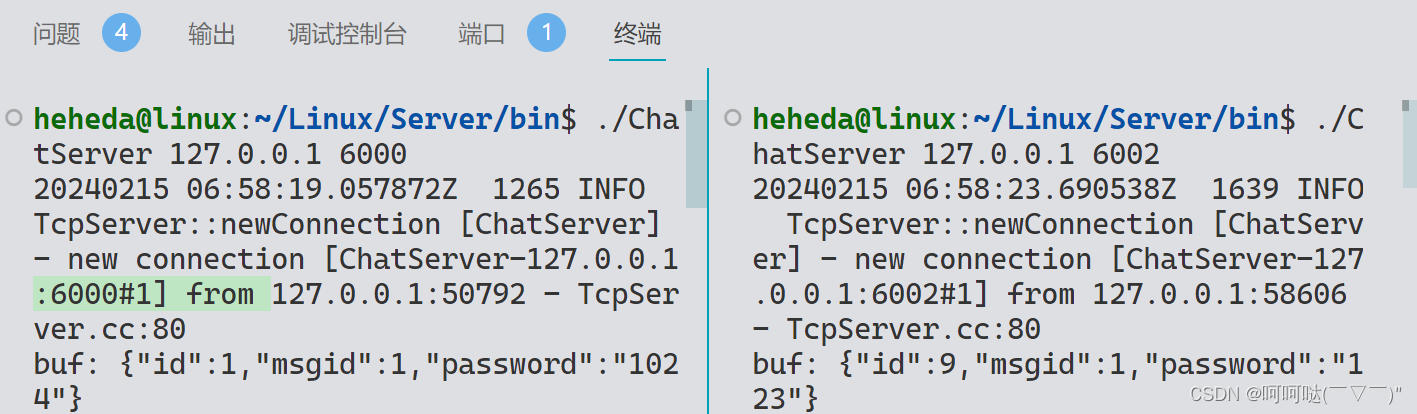
测试一下:启动两台服务器分别为6000、6002端口,客户端通过8888端口登录,通过负载均衡器均衡的分配到两台服务器上。
打开多个客户端看效果,都可以正常通信,
heheda@linux:~/Linux/Chat/bin$ ./ChatClient 127.0.0.1 8888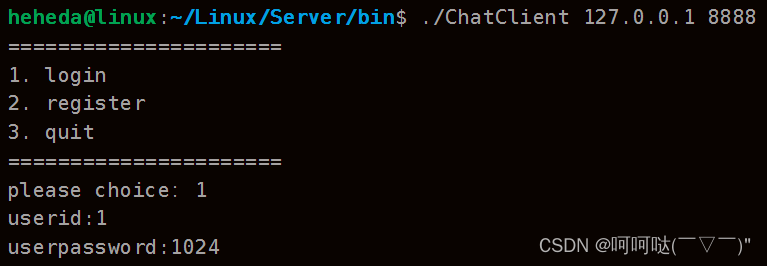

完整项目:
推荐和参考文章:
完美解决方案 redis Could not connect to Redis at 127.0.0.1:6379: Connection refused-CSDN博客![]() https://blog.csdn.net/weixin_42499566/article/details/125403623Ubuntu系统Nginx 下载安装、配置、卸载,实现反向代理_ubuntu下载nginx-CSDN博客
https://blog.csdn.net/weixin_42499566/article/details/125403623Ubuntu系统Nginx 下载安装、配置、卸载,实现反向代理_ubuntu下载nginx-CSDN博客![]() https://blog.csdn.net/weixin_42973884/article/details/126251718Nginx之代理配置以及负载均衡_ubuntu nginx 负载均衡配置 8888为监听端口-CSDN博客
https://blog.csdn.net/weixin_42973884/article/details/126251718Nginx之代理配置以及负载均衡_ubuntu nginx 负载均衡配置 8888为监听端口-CSDN博客![]() https://blog.csdn.net/uq_jin/article/details/51426681
https://blog.csdn.net/uq_jin/article/details/51426681
参考文章:
集群聊天服务器:一、服务器代码实现_chat_server-CSDN博客![]() https://blog.csdn.net/qq_42441693/article/details/129013429?spm=1001.2014.3001.5502集群聊天服务器:二、客户端代码实现_chat" command handler void chat(int clientfd,strin-CSDN博客
https://blog.csdn.net/qq_42441693/article/details/129013429?spm=1001.2014.3001.5502集群聊天服务器:二、客户端代码实现_chat" command handler void chat(int clientfd,strin-CSDN博客![]() https://blog.csdn.net/qq_42441693/article/details/129121615?spm=1001.2014.3001.5502集群聊天服务器:三、集群代码实现_网络编程多服务端集群怎么实现-CSDN博客
https://blog.csdn.net/qq_42441693/article/details/129121615?spm=1001.2014.3001.5502集群聊天服务器:三、集群代码实现_网络编程多服务端集群怎么实现-CSDN博客![]() https://blog.csdn.net/qq_42441693/article/details/129167974?spm=1001.2014.3001.5502
https://blog.csdn.net/qq_42441693/article/details/129167974?spm=1001.2014.3001.5502


 2481
2481


 被折叠的 条评论
为什么被折叠?
被折叠的 条评论
为什么被折叠?
 到【灌水乐园】发言


