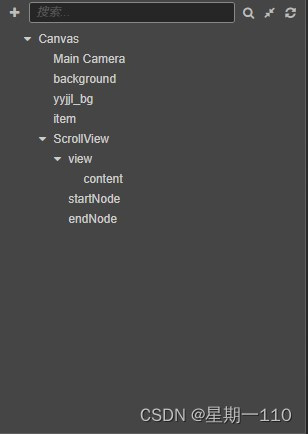
前言: 使用ScrollView组件实现简单的曲线拖拽。
版本:cocosCreator2.4.5。
一、远程路径
https://gitee.com/songhuiyuan/ScrollViewControl.git
由于文件加密, 稍后同步gitee。
二、效果展示(两种方案)
第一种实现原理:
1、角度区间内,根据半径和圆心点计算,排列好Mask遮罩内可显示的节点个数的位置。
2、update中遍历设置遮罩内节点的位置, 为避免顿挫用插值看起来更顺滑一些。
3、对应实现脚本名字:Control_Test1。
缺点: 滑动较快的情况下会有些小延迟,思路可参考, 不建议使用。

第二种实现原理:
1、两点之间找出一条曲线,并且通过两点确定中心点。
2、通过调整两点和半径实现曲线弯曲度的变化。
3、利用圆形或椭圆形公式,实现已知y值,可获得x值公式,实时对节点设置位置。
4、> 对应实现脚本名字:Control_Test2。

三、抛出项目结构和第二种方案的代码,抛砖引玉
1、项目节点数,脚本挂在Canvas下。
2、项目代码
3、代码可优化,比如没有必要每帧都在执行,可加入一下判断条件。自行优化吧。

const {ccclass, property} = cc._decorator;

@ccclass
export default class Control_Test2 extends cc.Component {
    //节点数据
    private scrollView: cc.ScrollView;
    private layOut: cc.Layout;
    private item: cc.Node;
    private startNode: cc.Node;  //开始点
    private endNode: cc.Node;    //结束点 2点之间形成一条曲线

    private contentChilde: cc.Node[];
    private centerPoint: cc.Vec3;            // 中间位置
    //圆形参数
    private radius: number = 400             // 圆形参数: 代表半径
    //椭圆形参数
    private radius_a: number = 35;           // 椭圆型参数:代表X轴半径
    private radius_b: number = 100;          // 椭圆型参数:代表Y轴半径

    onLoad () {
        this.scrollView = cc.find('ScrollView', this.node).getComponent(cc.ScrollView);
        this.layOut = cc.find('ScrollView/view/content', this.node).getComponent(cc.Layout);
        this.item = cc.find("item", this.node);

        this.startNode = cc.find("ScrollView/startNode", this.node);
        this.endNode = cc.find("ScrollView/endNode", this.node);
    }

    start () {
        this.contentChilde = this.scrollView.content.children;
        let centerPoint = new cc.Vec3();
        cc.Vec3.lerp(centerPoint, this.startNode.position, this.endNode.position, 0.5);
        this.centerPoint = this.scrollView.node.convertToWorldSpaceAR(centerPoint);

        for (let i = 0; i < 30; i++) {
            // 创建节点并设置位置
            const newNode = cc.instantiate(this.item); // 假设我们使用一个精灵节点作为示例
            this.scrollView.content.addChild(newNode); // 将节点添加到当前节点的子节点中
            newNode.x = 0;
        }


        //初始化节点位置
        this.layOut.updateLayout();
        //this.setItemPoint();
    }

    protected update(dt: number): void {
        //if (this.scrollView.isScrolling() == true || this.scrollView.isAutoScrolling() == true) {
            this.setItemPoint();
        //}
    }


    private setItemPoint() {
        for (let i = 0; i < this.contentChilde.length; i++) {
            let item =  this.contentChilde[i];
            let w_point = this.scrollView.content.convertToWorldSpaceAR(item.position);

            //let w_point_x = this.calculateXForY_Circle(w_point.y);
            let w_point_x = this.calculateXForY_Ellipse(w_point.y);
            w_point.x = w_point_x;

            let n_point = this.scrollView.content.convertToNodeSpaceAR(w_point);
            item.x = n_point.x;
        }
    }

    //圆型计算公式:
    calculateXForY_Circle(w_point_y: number) {
        let x = Math.sqrt(this.radius * this.radius + (w_point_y - this.centerPoint.y) * (w_point_y - this.centerPoint.y)) + this.centerPoint.x;
        return x;
    }

    //椭圆计算公式
    calculateXForY_Ellipse(w_point_y: number) {
        let xRelativeToCenter = w_point_y - this.centerPoint.y;
        // 使用椭圆方程计算y值
        let x = Math.sqrt(this.radius_a * this.radius_a * (1 + (xRelativeToCenter * xRelativeToCenter) / (this.radius_b * this.radius_b))) + this.centerPoint.x;
        return x;
    }

}


 739
739


 被折叠的 条评论
为什么被折叠?


