


前言:2D和3D开发中必然涉及坐标的转换,对于2D坐标无非就本地和世界坐标进行转换,但对于3D来讲多了几个概念。
1、UI坐标系
2、屏幕坐标系
3、3D世界坐标系
我们要探究的就是这三种内部各自和之间的坐标是如何转换的。
纯干货!一文搞懂 Cocos Creator 3.0 坐标转换原理:
https://mp.weixin.qq.com/s/mV5EY4NMrpgCP9XFocrcGA
这篇文章非常的干货,读完后我整理验证了一下关于坐标的转换;研究解决了一个疑惑问题(UI坐标和屏幕坐标计算为何不同)。
一、对应的坐标转换验证
场景结构和验证代码如下:

    //两种相机
    private cameraUI: Camera | null = null;
    private camera3D: Camera | null = null;

    //UI节点和3D节点
    private btnNode: Node | null = null;
    private cube: Node | null = null;

    //用于测试3D之间坐标转换
    private cubeA: Node | null = null;
    private cubeB: Node | null = null;

    //用于测试UI节点下的坐标系转换
    private Test1: Node | null = null;
    private label: Node | null = null;
    private Test2: Node | null = null;

    onLoad() {
        this.cameraUI = find('Camera', this.node).getComponent(Camera) as Camera;
        this.camera3D = find('Main Camera', this.node.parent).getComponent(Camera) as Camera;

        this.btnNode = find('Button', this.node);
        this.cube = find('Cube', this.node.parent);

        this.cubeA = find('Transformation/CubeA', this.node.parent);
        this.cubeB = find('Transformation/CubeB', this.node.parent);

        this.Test1 = find('Test1', this.node);
        this.label = find('Test1/Label', this.node);
        this.Test2 = find('Test2', this.node);
    }

    start() {
        input.on(Input.EventType.TOUCH_START, this.onTouchStart, this);
    }

    onTouchStart(event: EventTouch) {
        // ==屏幕坐标获取==     2D当中代表UI坐标(自动转换成UI坐标的)3D中代表屏幕坐标
        let sceenPos: Vec2 = event.getLocation();
        // ==UI坐标获取==
        let uiPos: Vec2 = event.getUILocation();
        console.error('sceenPos', sceenPos.x, sceenPos.y)
        console.error('uiPos', uiPos.x, uiPos.y)

        //一、<屏幕 => UI>: 点击屏幕让UI上的btnNode节点设置到点击位置上,两种方式
        /**
         * 1、屏幕 - UI坐标转换
         *  let uiPoint = this.cameraUI.screenToWorld(new Vec3(sceenPos.x, sceenPos.y ,0));
         *  this.btnNode.setWorldPosition(uiPoint);
         * 2、直接使用UI坐标
         * this.btnNode.setWorldPosition(new Vec3(uiPos.x, uiPos.y, 0));
         */

        //二、<UI => 屏幕>比如当从摄像机道某个UI位置打一条射线,需要UI到屏幕的坐标转换。
        /**
         * let sceenPoint = this.cameraUI.worldToScreen(new Vec3(uiPos.x, uiPos.y ,0));
         * 转换后的屏幕坐标验证近似相等
         * console.error(sceenPoint.x, sceenPos.x)
         * console.error(sceenPoint.y, sceenPos.y)
         */

        //三、<屏幕 => 3D世界>点击屏幕的位置,设置3D物体世界坐标的位置。
        /**
         * let c_z = this.camera3D.node.worldPosition.z / 1000;
         * let worldPoint = this.camera3D.screenToWorld(new Vec3(sceenPos.x, sceenPos.y ,c_z));
         * this.cube.setWorldPosition(worldPoint);
         */

        //四、<3D世界 -> 屏幕 -> UI>修改一下cube的位置,运行时候自动将UI上的btnNode节点设置在cube上
        /**
         * let sceenPoint = this.camera3D.worldToScreen(this.cube.worldPosition);
         * let uiPoint = this.cameraUI.screenToWorld(sceenPoint);
         * this.btnNode.setWorldPosition(uiPoint);
         */

        //五、<3D世界 -> UI>(上面已经提到,我们可以世界-屏幕-UI, 也可以直接转到UI上)
        /**
         * let out = new Vec3();
         * this.camera3D.convertToUINode(this.cube.worldPosition, this.node, out); //这里的this.node是Canvas
         * this.btnNode.parent = this.node;
         * this.btnNode.position = out;
         */

        //六、<UI坐标系的内部转换>UI不同节点之间的转换 比如:将label节点转换到Test2下面。
        /**
         * let pos = new Vec3();
         * let test2UITrans = this.Test2.getComponent(UITransform)!;
         * test2UITrans.convertToNodeSpaceAR(this.label.worldPosition, pos);
         * this.label.parent = this.Test2;
         * this.label.position = pos;
         * console.error('*****************', pos)
         */

        //七、<3D世界坐标系内部转换> 比如:3D节点cubeB本地坐标转换到 3D节点cubeA本地坐标系下
        /**
         * let tempPos = new Vec3();
         * let tempMat4 = new Mat4();
         * Mat4.invert(tempMat4, this.cubeA.getWorldMatrix());
         * Vec3.transformMat4(tempPos, this.cubeB.worldPosition, tempMat4);
         * console.error("__-----", tempPos)
         */
    }
二、UI坐标和屏幕坐标计算为何不同
如下图,使用的是iPhone 6s进行的截图,参数如下所示:
屏幕分辨率:1334 * 750;
设计分辨率:1280 * 720 ;
适配方式:按照高度适配。

如上图进行适配后结果:ABEF = 1334 * 750也就是设备的屏幕分辨率
1、通过点击事件获取的分辨率来自如下区域:
CDEF区域 = 1206 * 750。适配后可通过view.getCanvasSize()获取。
2、UI分辨率:
CDEF区域 = 1280* 796.0199004975125。适配后可通过view.getVisibleSize()。
同一片区域的分辨率尺寸是不同的,所以UI和屏幕坐标的的值肯定不同
如果以上结果看的不是很明白的话:建议浏览一下我之前分享适配原文:https://blog.csdn.net/weixin_41997753/article/details/118120557
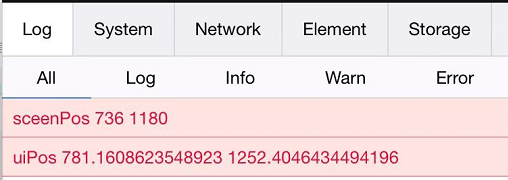
手指点击一下截图的右上角输出的结果进行验证如下:
另外:3D场景很多情况我们在搞透视摄像机和模型的旋转。可以了看一下这边文章希望对你有所启发:
https://forum.cocos.org/t/topic/133354


 133
133

 被折叠的 条评论
为什么被折叠?
被折叠的 条评论
为什么被折叠?
 到【灌水乐园】发言


