


Yolov5之Pytorch部署
前言
yolov5官方代码功能太多太杂,新手小白同学往往不能很好的使用,我们部署的时候只需要选择其中我们需要的部分整理并增加一定的灵活性即可。本文代码在yolov5 5.0基础上封装,经测试,适用于3.0-5.0,s,m,l,x各版本。本文代码以上传至github yolo部署
代码介绍
代码目录如下:

YoloV5Detector为封装的yolov5检测类,models为yolov5官方的模型定义文件和utils为yolov5官方的辅助文件,samples为测试用的图片以及视频。demo.py为实际使用的示例代码。
使用方式
我们这里主要讲解demo的使用方式,大家可以参照demo来仿写或改造自己的部署代码。
下载github代码库:
git clone https://github.com/xgyyao/YoloDeploy.git
1.导入库
import cv2
import time
import os
import sys
import importlib
import time
import shutil
from tqdm import tqdm
BASE_PATH = os.path.dirname(os.path.dirname(os.path.abspath(__file__)))
print(BASE_PATH)
sys.path.append(BASE_PATH)
importlib.reload(sys)
from YoloV5Detector.V5Detector import Detector
2.定义推理单张图片函数
def inference_single_image(weights_path, thresh, src_img, dst_img, cls, colors=None, gpu_id='0'):
	#实例化V5检测类,可指定检测阈值,输入图片,输出图片,需要检测类别,画框颜色,以及使用的gpuid
    det = Detector(weights_path, gpu_id=gpu_id, colors=colors)
    for i in range(100):
        t1 = time.time()
        img = cv2.imread(src_img)
        #模型推理
        img_res, det_res = det.detect(img, cls, thresh)
        t2 = (time.time() - t1) * 1000
        print("inference time:{} ms".format(t2))
        #绘制模型检测到的框
        img_res = det.draw_box(img, det_res)
        #打印模型检测到的框信息
        det.print_result(det_res)
    #保存图片
    cv2.imwrite(dst_img, img_res)
这里重复推理100次是保证推理时间更精确。
3.实际测试推理单张图片
if __name__ == '__main__':
	#设置模型路径
    weights_path = "weights/5.0/yolov5s.pt"
    #设置模型阈值
    thresh = 0.3
    #设置待检测图片
    src_img = "samples/images/zidane.jpg"
    #设置检测结果图片
    dst_img = "samples/images/zidane_res.jpg"
    #设置待检测类别名称,不在此列内的物体不会被检测
    cls = ['person', 'bus', 'horse', 'dog']
    #设置待检测类别id对应的BGR颜色,若不设置则随机
    colors = {0: (0, 0, 255), 5: (0, 255, 0)}
    #设置使用第几块cpu序号,可设为'cpu'来使用cpu推理,若不设置,默认使用0号gpu
    gpu_id = '0'
    inference_single_image(weights_path, thresh, src_img, dst_img, cls, colors, gpu_id)
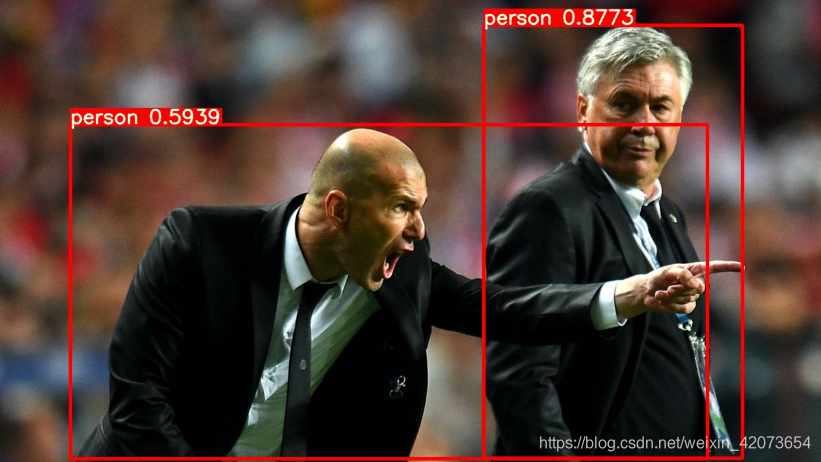
图片检测结果:
打印结果信息:

4.定义推理图片文件夹函数
#从文件夹读入图片路径并返回成list
def get_images_from_dir(imgPath):
    imagelist = os.listdir(imgPath)
    image_dic = []
    for imgname in imagelist:
        if (imgname.endswith(".jpg")):
            imgp = imgPath + imgname
            image_dic.append(imgp)
    return image_dic
#推理图片文件夹
def inference_images(weights_path, thresh, src_dir, dst_dir, cls, colors=None, gpu_id='0'):
    det = Detector(weights_path, gpu_id=gpu_id, colors=colors)
    images_dic = get_images_from_dir(src_dir)
    if os.path.exists(dst_dir):
        shutil.rmtree(dst_dir)
    os.mkdir(dst_dir)
    for img_dic in images_dic:
        t1 = time.time()
        img = cv2.imread(img_dic)
        img_res, det_res = det.detect(img, cls, thresh)
        t2 = (time.time() - t1) * 1000
        print("{} inference time:{} ms".format(img_dic.split('/')[-1], t2))
        img_res = det.draw_box(img, det_res)
        det.print_result(det_res)
        dst_img = dst_dir + img_dic.split('/')[-1]
        cv2.imwrite(dst_img, img_res)
5.实际推理图片文件夹
if __name__ == '__main__':
    weights_path = "weights/5.0/yolov5s.pt"
    thresh = 0.3
    cls = ['person', 'bus', 'horse', 'dog']
    colors = {0: (0, 0, 255), 5: (0, 255, 0)}
    gpu_id = '0'
    src_dir = "samples/images/"
    dst_dir = "samples/images/res/"
    inference_images(weights_path, thresh, src_dir, dst_dir, cls, colors, gpu_id)
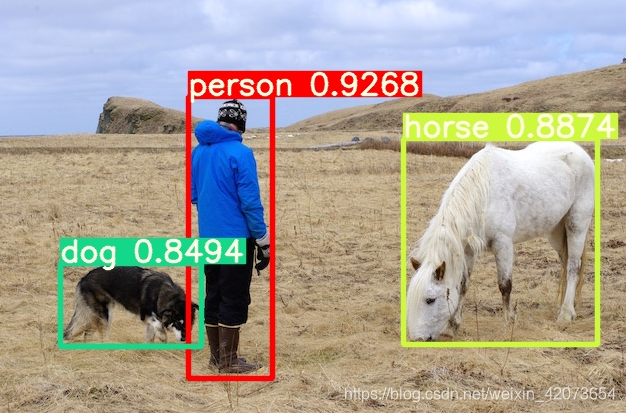
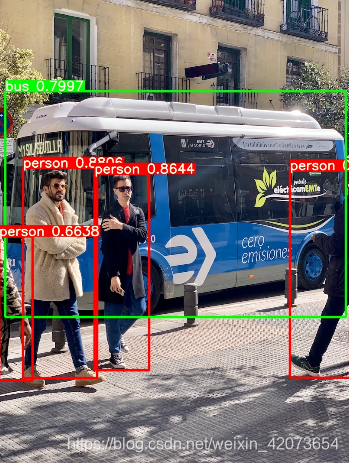
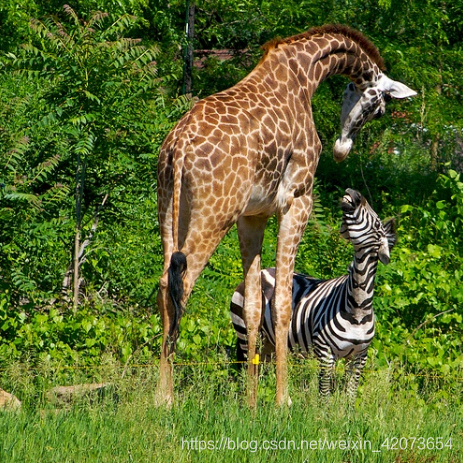
图片检测结果:
打印结果信息:

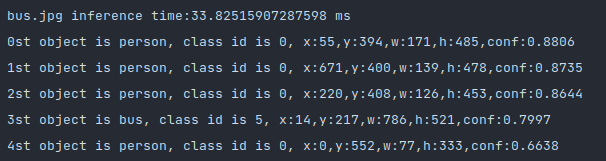

可以看到的是,其中①人和公交车框的颜色为我们设定的红色和绿色,其他的框则为随机颜色。
②未在我们设置检测类别里的长颈鹿没有被检测出来。
6.定义推理视频函数
def inference_videos(weights_path, thresh, src_video, dst_video, cls, colors=None, gpu_id='0'):
    det = Detector(weights_path, gpu_id=gpu_id, colors=colors)
    cap = cv2.VideoCapture(src_video)

    fps = int(cap.get(cv2.CAP_PROP_FPS))
    size = (int(cap.get(cv2.CAP_PROP_FRAME_WIDTH)), int(cap.get(cv2.CAP_PROP_FRAME_HEIGHT)))
    total_frame = int(cap.get(cv2.CAP_PROP_FRAME_COUNT))
    print("fps: {}\nsize: {}\ntotal_frame:{}".format(fps, size, total_frame))

    fourcc = cv2.VideoWriter_fourcc(*'MP4V')
    out = cv2.VideoWriter(dst_video, fourcc, fps, size)

    for i in tqdm(range(total_frame)):
        success, frame = cap.read()
        if not success:
            print("this video is over!")
            break
        img_res, det_res = det.detect(frame, cls, thresh)
        img_res = det.draw_box(img_res, det_res)
        out.write(img_res)
7.实际推理视频
if __name__ == '__main__':
    weights_path = "weights/5.0/yolov5s.pt"
    thresh = 0.3
    cls = ['person', 'bus', 'horse', 'dog']
    colors = {0: (0, 0, 255), 5: (0, 255, 0)}
    gpu_id = '0'
    src_video = "samples/videos/person.mp4"
    dst_video = "samples/videos/person_res.mp4"
    inference_videos(weights_path, thresh, src_video, dst_video, cls, colors, gpu_id)
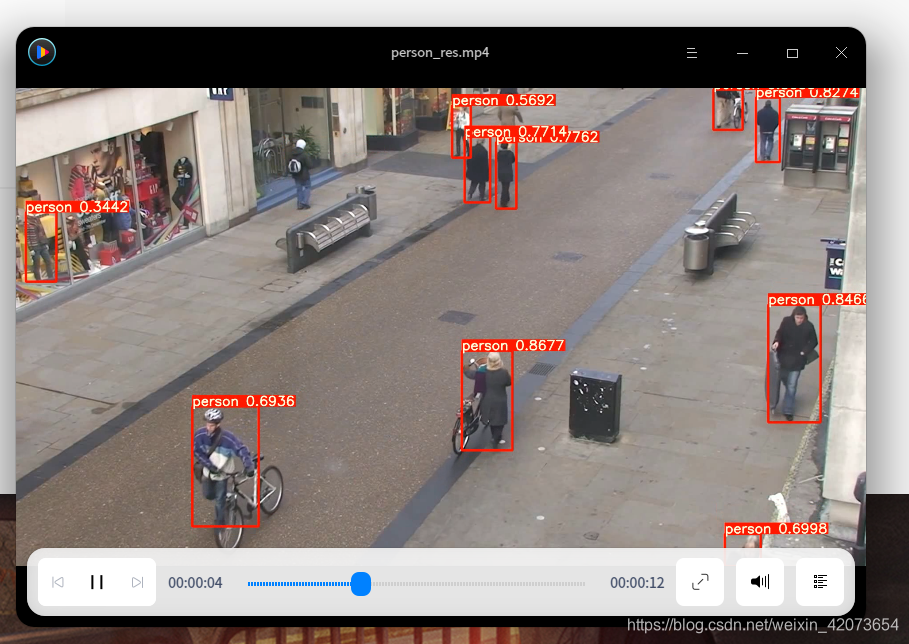
视频检测进度:

视频检测结果:
模型库
考虑到yolov5各个版本的模型较多,且github官方模型由于网速原因不好下载,这里给出yolov5 3.0-5.0 各模型的下载链接百度云,方便大家测试。
百度云链接:yolov5模型 密码:n7vq


 1万+
1万+

 被折叠的 条评论
为什么被折叠?
被折叠的 条评论
为什么被折叠?
 到【灌水乐园】发言


