


文章目录
为什么要使用布局管理器?
根据屏幕大小,管理容器内的控件,自动适配组件在手机屏幕中的位置
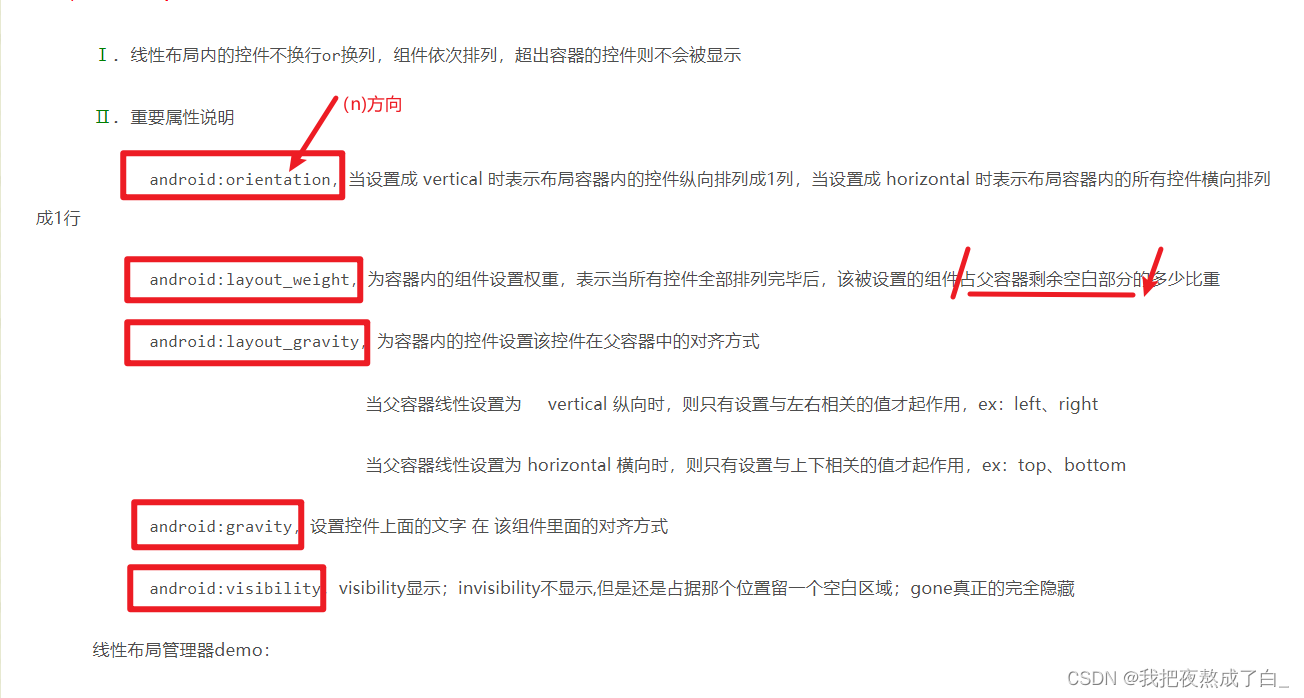
6大布局管理器详解
1. LinearLayout 线性布局管理器
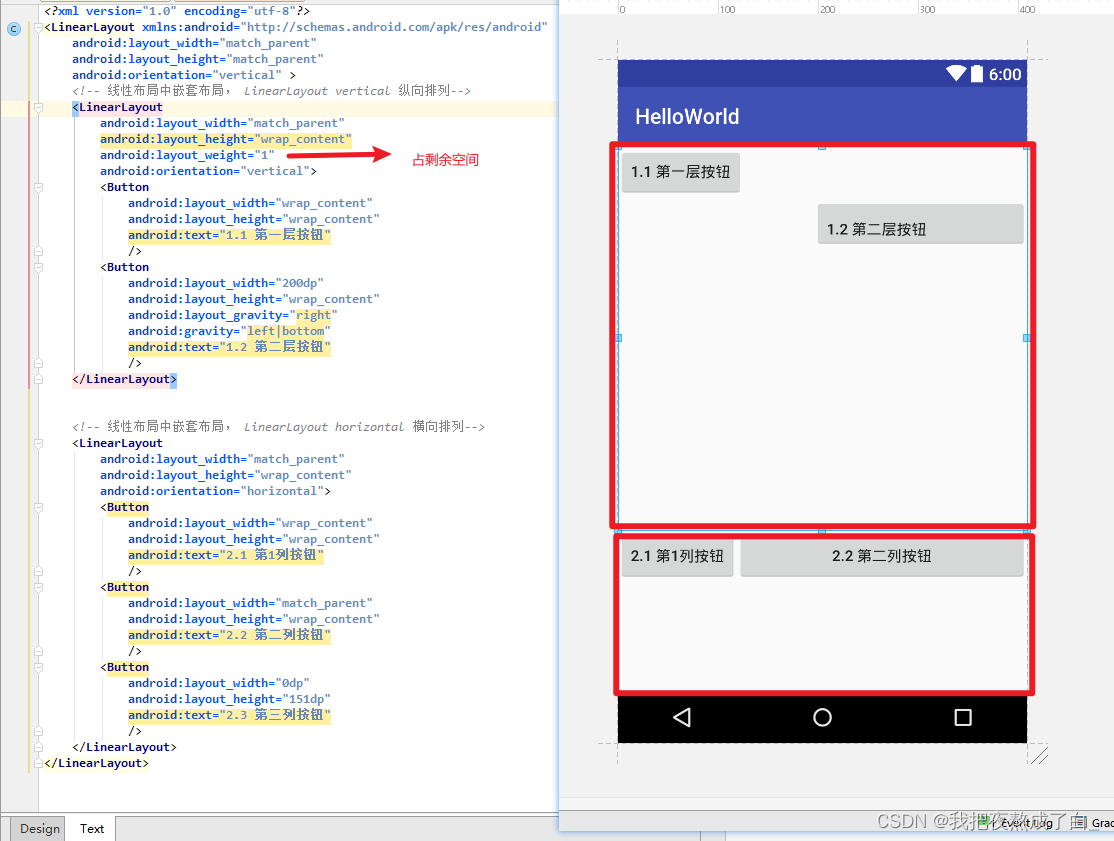
demo效果:
可以看到xml布局文件中的
"2.3 第三列按钮"因为超出容器,所以不显示;
"1.2 第二层按钮"在容器中右对齐,按钮自身文字靠左靠下
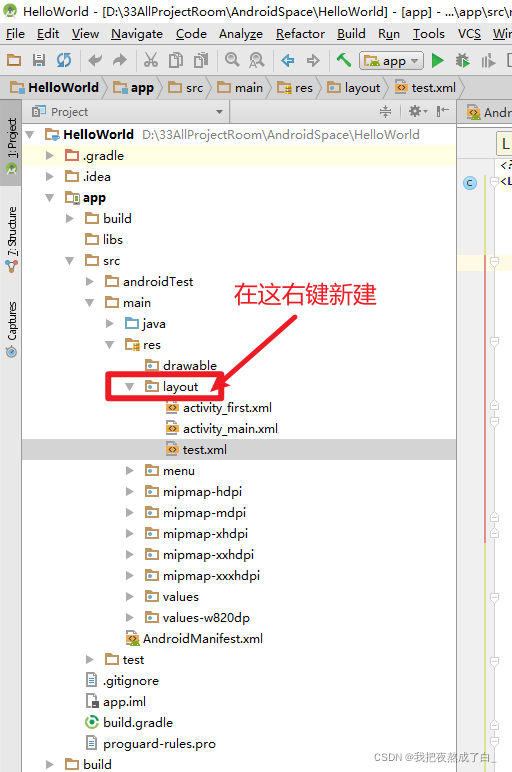
代码的位置:
<?xml version="1.0" encoding="utf-8"?>
<LinearLayout xmlns:android="http://schemas.android.com/apk/res/android"
    android:layout_width="match_parent"
    android:layout_height="match_parent"
    android:orientation="vertical" >
    <!-- 线性布局中嵌套布局, LinearLayout vertical 纵向排列-->
    <LinearLayout
        android:layout_width="match_parent"
    	android:layout_height="wrap_content"
    	android:layout_weight="1"
    	android:orientation="vertical">
    		<Button
	    		android:layout_width="wrap_content"
	    		android:layout_height="wrap_content"
	    		android:text="1.1 第一层按钮"
	    	/>
			<Button
	    		android:layout_width="200dp"
	    		android:layout_height="wrap_content"
	    		android:layout_gravity="right"
	    		android:gravity="left|bottom"
	    		android:text="1.2 第二层按钮"
	    	/>
    </LinearLayout>
    <!-- 线性布局中嵌套布局, LinearLayout horizontal 横向排列-->
    <LinearLayout
        android:layout_width="match_parent"
    	android:layout_height="wrap_content"
    	android:orientation="horizontal">
    		<Button
	    		android:layout_width="wrap_content"
	    		android:layout_height="wrap_content"
	    		android:text="2.1 第1列按钮"
	    	/>
			<Button
	    		android:layout_width="match_parent"
	    		android:layout_height="wrap_content"
	    		android:text="2.2 第二列按钮"
	    	/>
			<Button
	    		android:layout_width="wrap_content"
	    		android:layout_height="wrap_content"
	    		android:text="2.3 第三列按钮"
	    	/>
    </LinearLayout>
</LinearLayout>
2. TableLayout 表格布局管理器
Ⅰ. 表格布局继承自LinearLayout线性布局
Ⅱ. 表格布局用行、列方式来管理容器内的控件
Ⅲ. 表格布局不需要制定多少行列,布局内每添加一行TableRow表示添加一行,然后再在TableRow添加子控件,容器的列数由包含列数最多的行决定
Ⅳ. 重要属性说明
android:stretchColumns,为TableLayout容器里面设置属性,表示 被设置的这些列 可拉伸 (注意:TableLayout中列的索引从0开始)
android:shrinkColumns, 为TableLayout容器里面设置属性,表示 被设置的这些列 可收缩
android:layout_column, 在容器里面的控件设置属性,指定该控件在TableRow中的指定列
android:layout_span, 合并
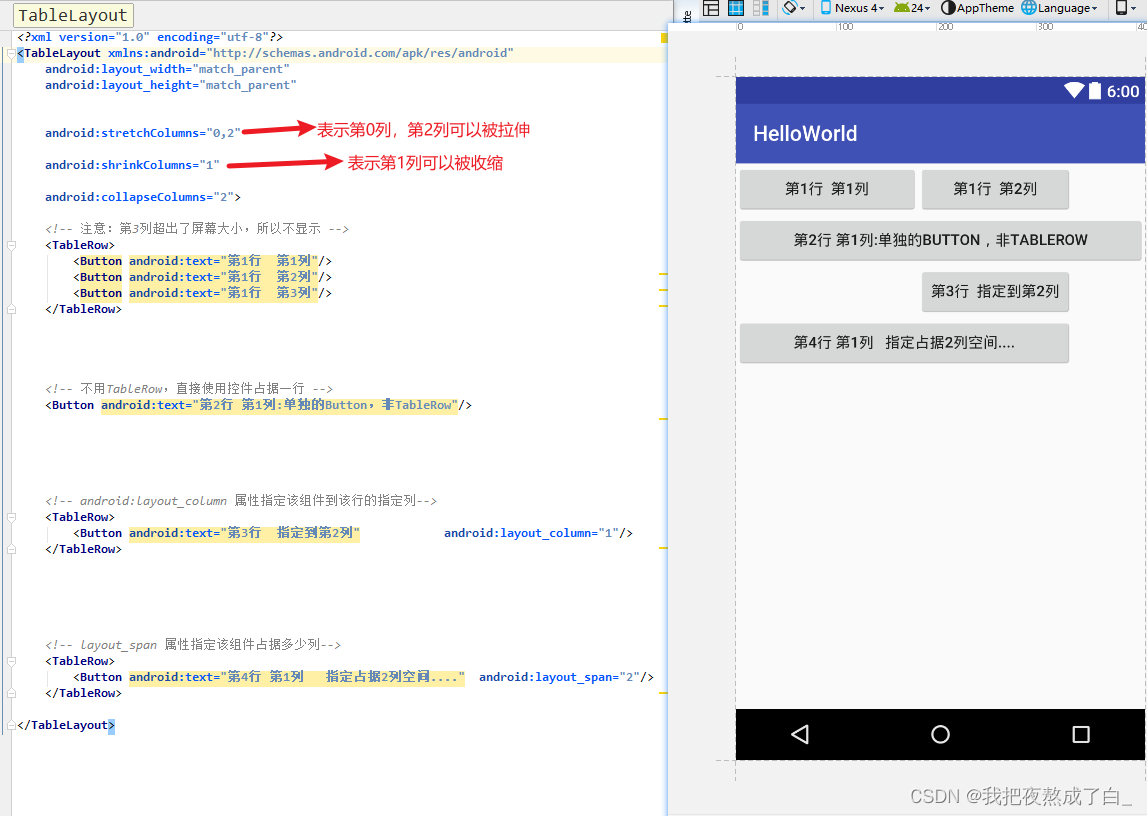
<?xml version="1.0" encoding="utf-8"?>
<TableLayout xmlns:android="http://schemas.android.com/apk/res/android"
    android:layout_width="match_parent"
    android:layout_height="match_parent"


    android:stretchColumns="0,2"

    android:shrinkColumns="1"

    android:collapseColumns="2">

    <!-- 注意:第3列超出了屏幕大小,所以不显示 -->
    <TableRow>
        <Button android:text="第1行  第1列"/>
        <Button android:text="第1行  第2列"/>
        <Button android:text="第1行  第3列"/>
    </TableRow>


    <!-- 不用TableRow,直接使用控件占据一行 -->
    <Button android:text="第2行 第1列:单独的Button,非TableRow"/>


    <!-- android:layout_column 属性指定该组件到该行的指定列-->
    <TableRow>
        <Button android:text="第3行  指定到第2列"            android:layout_column="1"/>
    </TableRow>


    <!-- layout_span 属性指定该组件占据多少列-->
    <TableRow>
        <Button android:text="第4行 第1列   指定占据2列空间...."  android:layout_span="2"/>
    </TableRow>

</TableLayout>
3. GridLayout 网格布局管理器
就是将布局划分为类似Excel一样有一定行数和列数并且排列整齐的单元格(单元格指代控件),然后通过跨行和跨列设置单个单元格大小
相关属性:
布局行数和列数
rowCount:行数
columnCount:列数
单元格操作
layout_row:子控件在布局的行数
layout_column:子控件在布局的列数
layout_rowSpan:跨行数
layout_columnSpan:跨列数
实现效果:

这个没什么说的直接上代码
<?xml version="1.0" encoding="utf-8"?>
<LinearLayout xmlns:android="http://schemas.android.com/apk/res/android"
    xmlns:tools="http://schemas.android.com/tools"
    android:padding="10dp"
    android:layout_width="match_parent"
    android:layout_height="match_parent"
    tools:context=".MainActivity">

    <GridLayout
        android:layout_width="wrap_content"
        android:layout_height="wrap_content"
        android:layout_marginTop="10dp"
        android:columnCount="5"
        android:rowCount="7">

        <Button
            android:layout_width="65dp"
            android:layout_row="1"
            android:layout_column="0"
            android:text="MC" />

        <Button
            android:layout_width="65dp"
            android:layout_row="1"
            android:layout_column="1"
            android:text="MR" />

        <Button
            android:layout_width="65dp"
            android:layout_row="1"
            android:layout_column="2"
            android:text="MS" />

        <Button
            android:layout_width="65dp"
            android:layout_row="1"
            android:layout_column="3"
            android:text="M+" />

        <Button
            android:layout_width="65dp"
            android:layout_row="1"
            android:layout_column="4"
            android:text="M-" />

        <Button
            android:layout_width="65dp"
            android:layout_row="2"
            android:layout_column="0"
            android:text="←" />

        <Button
            android:layout_width="65dp"
            android:layout_row="2"
            android:layout_column="1"
            android:text="CE" />

        <Button
            android:layout_width="65dp"
            android:layout_row="2"
            android:layout_column="2"
            android:text="C" />

        <Button
            android:layout_width="65dp"
            android:layout_row="2"
            android:layout_column="3"
            android:text="±" />

        <Button
            android:layout_width="65dp"
            android:layout_row="2"
            android:layout_column="4"
            android:text="√" />

        <Button
            android:layout_width="65dp"
            android:layout_row="3"
            android:layout_column="0"
            android:text="7" />

        <Button
            android:layout_width="65dp"
            android:layout_row="3"
            android:layout_column="1"
            android:text="8" />

        <Button
            android:layout_width="65dp"
            android:layout_row="3"
            android:layout_column="2"
            android:text="9" />

        <Button
            android:layout_width="65dp"
            android:layout_row="3"
            android:layout_column="3"
            android:text="/" />

        <Button
            android:layout_width="65dp"
            android:layout_row="3"
            android:layout_column="4"
            android:text="%" />


        <Button
            android:layout_width="65dp"
            android:layout_row="4"
            android:layout_column="0"
            android:text="4" />

        <Button
            android:layout_width="65dp"
            android:layout_row="4"
            android:layout_column="1"
            android:text="5" />

        <Button
            android:layout_width="65dp"
            android:layout_row="4"
            android:layout_column="2"
            android:text="6" />

        <Button
            android:layout_width="65dp"
            android:layout_row="4"
            android:layout_column="3"
            android:text="*" />

        <Button
            android:layout_width="65dp"
            android:layout_row="4"
            android:layout_column="4"
            android:text="1/x" />

        <Button
            android:layout_width="65dp"
            android:layout_row="5"
            android:layout_column="0"
            android:text="1" />

        <Button
            android:layout_width="65dp"
            android:layout_row="5"
            android:layout_column="1"
            android:text="2" />

        <Button
            android:layout_width="65dp"
            android:layout_row="5"
            android:layout_column="2"
            android:text="3" />

        <Button
            android:layout_width="65dp"
            android:layout_row="5"
            android:layout_column="3"
            android:text="-" />

        <Button
            android:layout_width="65dp"
            android:layout_height="95dp"
            android:layout_row="5"
            android:layout_rowSpan="2"
            android:layout_column="4"
            android:text="=" />

        <Button
            android:layout_width="130dp"
            android:layout_row="6"
            android:layout_column="0"
            android:layout_columnSpan="2"
            android:text="0" />

        <Button
            android:layout_width="65dp"
            android:layout_row="6"
            android:layout_column="2"
            android:text="." />

        <Button
            android:layout_width="65dp"
            android:layout_row="6"
            android:layout_column="3"
            android:text="+" />
    </GridLayout>

</LinearLayout>
~~~~~~~~~~~~~~~~~~~~~~~~~~~~~~~~~~
4. AbsoulteLayout 绝对布局管理器
容器管理容器内控件的位置大小,开发人员通过指定X、Y坐标指定组件的位置
android:layout_x,指定控件在容器中的 x 坐标值
android:layout_y,指定控件在容器中的 y 坐标值
实际应用中一般不适用AbsoulteLayout,因为应用该APP的手机屏幕大小,分辨率肯定会不同
实现效果:

<?xml version="1.0" encoding="utf-8"?>
<AbsoluteLayout xmlns:android="http://schemas.android.com/apk/res/android"
    android:layout_width="match_parent"
    android:layout_height="match_parent" >

    <TextView
        android:id="@+id/tv1"
        android:layout_width="wrap_content"
        android:layout_height="wrap_content"
        android:height="200dp"
        android:width="200dp"
        android:layout_x="100dp"
        android:layout_y="80dp"
        android:textSize="50sp"
        android:textColor="#ffffff"
        android:background="#680000"/>
    <TextView
        android:layout_width="wrap_content"
        android:layout_height="wrap_content"
        android:height="200dp"
        android:width="200dp"
        android:layout_x="10dp"
        android:layout_y="250dp"
        android:textSize="50sp"
        android:textColor="#680000"
        android:background="#00cc88"
        android:text="绝对布局我在这"/>
</AbsoluteLayout>
5. RelativeLayout 相对布局管理器
参考博客:安卓学习:相对布局
~~~~~~~~~~~~~~~~~~~~~~~~~~~~~~~~~~
6. FrameLayout帧式布局
上述代码:

<?xml version="1.0" encoding="utf-8"?>
<LinearLayout xmlns:android="http://schemas.android.com/apk/res/android"
    android:layout_width="match_parent"
    android:layout_height="match_parent"
    android:gravity="center"
    android:orientation="vertical">

    <FrameLayout
        android:layout_width="wrap_content"
        android:layout_height="wrap_content">

        <TextView
            android:id="@+id/tvBottom"
            android:layout_width="300dp"
            android:layout_height="300dp"
            android:layout_gravity="center"
            android:background="#ff0000"
            android:text="最底层"
            />

        <TextView
            android:id="@+id/tvMiddle"
            android:layout_width="200dp"
            android:layout_height="200dp"
            android:layout_gravity="center"
            android:background="#0000ff"
            android:text="中间层"
            />

        <TextView
            android:id="@+id/tvTop"
            android:layout_width="100dp"
            android:layout_height="100dp"
            android:layout_gravity="center"
            android:background="#00ff00"
            android:text="顶层"
             />
    </FrameLayout>
</LinearLayout>


 193
193


 被折叠的 条评论
为什么被折叠?
被折叠的 条评论
为什么被折叠?
 到【灌水乐园】发言


