


一、安装
rabbitMq是erlang语言开发的,所以安装rabbitmq之前必须安装erlang。
https://www.rabbitmq.com/which-erlang.html,选择想要下载的rabbitmq版本和与之对应的erlang版本。

我下载的3.8.1版本的rabbitmq,erlang版本是22.1
Erlang安装:
1、下载。进入http://erlang.org/download/,如下图下载。

2、安装:右键已管理员身份运行。
3、配置环境变量

并在path中配置%ERLANG_HOME%\bin
rabbitmq安装:
1、下载:点击rabbitMQ version,进入如下图下载:

2、安装:右键以管理员身份运行。
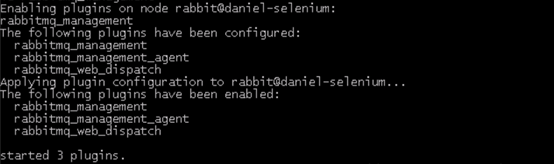
启用控制台插件
1、执行命令。以管理员身份打开dos命令窗口,进入C:\Program Files\RabbitMQ Server\rabbitmq_server-3.8.1\sbin,执行命令:rabbitmq-plugins.bat enable rabbitmq_management。
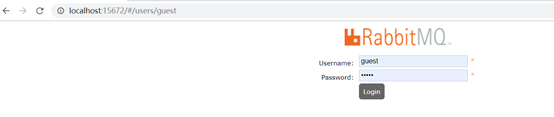
2、验证。http://localhost:15672, 默认的用户名/密码:guest/guest

二、入门程序hello test-单个生产者消费者
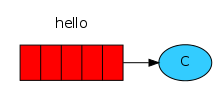
RabbitMQ是一个消息代理:它接受和转发消息。你可以把它想象成一个邮局:当你把你想要投寄的邮件放进邮箱时,你可以确定邮差先生或女士最终会把邮件送到你的收件人那里。在这个类比中,RabbitMQ是一个邮筒,一个邮局和一个邮递员。
RabbitMQ和邮局之间的主要区别是它不处理纸张,而是接受、存储和转发二进制的数据消息块。
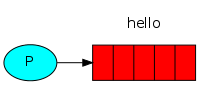
生产者要发送消息:

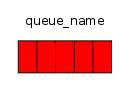
生产者将要发送的消息发送到队列,消费者监听队列,队列代表着一个消息缓存区:
消费者等待接收消息:

生产者、消费者可以不在同一台机器上,但是一个服务器既可以是生产者也可以是消费者。

Sending
大致步骤:
(1) 创建连接工厂
(2) 创建连接
(3) 创建通道
(4) 声明队列
(5) 消息发布
代码实现:
import java.io.IOException;
import java.util.concurrent.TimeoutException;

import com.rabbitmq.client.Channel;
import com.rabbitmq.client.Connection;
import com.rabbitmq.client.ConnectionFactory;

/**
 * @ClassName:  Producer01
 * @Description:生产者
 * @author:
 * @date:
 * @Copyright:
 */
public class Producer01 {

	private static final String QUEUE = "producer001";

	public static void main(String[] args) throws IOException, TimeoutException {
		Connection newConnection = null;
		Channel channel = null;
		try {
			//连接工厂
			ConnectionFactory connectionFactory = new ConnectionFactory();
			connectionFactory.setHost("localhost");
			connectionFactory.setPort(5672);
			connectionFactory.setUsername("guest");
			connectionFactory.setPassword("guest");
			connectionFactory.setVirtualHost("/");//rabbitmq默认虚拟机名称是/,虚拟机相当于一个独立的mq的服务。
			newConnection = connectionFactory.newConnection();//创建与rabbitmq服务的TCP连接
			channel = newConnection.createChannel();//创建与exchange的通道,每个连接可以创建多个通道,每个通道代表一个会话任务
			/**
			 * 声明队列,如果rabbit没有此队列则自动创建。
			 * queue:队列名称
			 * durable:是否持久化
			 * exclusive:队列是否独占此连接
			 * autoDelete:队列不再使用时是否自动删除此队列
			 * arguments:队列参数
			 */
			channel.queueDeclare(QUEUE,true,false,false,null);
			String message = "hello test 第一次"+System.currentTimeMillis();
			/**
			 * 消息发布方法
			 * exchange
			 * routingKey
			 * props
			 * body
			 */
			channel.basicPublish("", QUEUE, null, message.getBytes());
		}catch (Exception e) {
			e.printStackTrace();
		}finally {
			if(channel != null) {
				channel.close();
			}
			if(newConnection != null) {
				newConnection.close();
			}
		}

	}

}
Receiving
(1) 创建连接工厂
(2) 创建连接
(3) 创建通道
(4) 声明队列
(5) 监听并执行消息
代码实现:
import java.io.IOException;
import java.util.concurrent.TimeoutException;

import com.rabbitmq.client.AMQP;
import com.rabbitmq.client.Channel;
import com.rabbitmq.client.Connection;
import com.rabbitmq.client.ConnectionFactory;
import com.rabbitmq.client.DefaultConsumer;
import com.rabbitmq.client.Envelope;

/**
 * @ClassName:  Consumer01
 * @Description: 消费者
 * @author:
 * @date:
 * @Copyright:
 */
public class Consumer01 {

	private static final String QUEUE = "producer001";

	/**
	 * @Title: main
	 * @Description:
	 * @param args
	 * @throws TimeoutException
	 * @throws IOException
	 */
	public static void main(String[] args) throws IOException, TimeoutException {
		Connection newConnection = null;
		Channel channel = null;
			ConnectionFactory connectionFactory = new ConnectionFactory();
			connectionFactory.setHost("localhost");
			connectionFactory.setPort(5672);
			newConnection = connectionFactory.newConnection();//
			channel = newConnection.createChannel();//
			/**
			   *  声明队列
			 * queue:
			 * durable:
			 * exclusive:
			 * autoDelete:
			 * arguments:
			 */
			channel.queueDeclare(QUEUE,true,false,false,null);
			//定义消费方法
			DefaultConsumer consumer = new DefaultConsumer(channel) {
				@Override
	            public void handleDelivery(String consumerTag,
	                                       Envelope envelope,
	                                       AMQP.BasicProperties properties,
	                                       byte[] body)
	                    throws IOException {
					String exchange = envelope.getExchange();//
					String routingKey = envelope.getRoutingKey();//
					long deliveryTag = envelope.getDeliveryTag();//
	                String msg = new String(body,"utf-8");
	                System.out.println("receive message.."+msg);
	            }
			};

			/**
			 *
			 * exchange
			 * routingKey
			 * props
			 * body
			 */
			channel.basicConsume(QUEUE, true,consumer);
	}

}
三、工作模式
1、 work queue
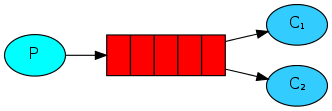
这种工作模式和入门程序一样,只是它有多个消费者,并且多个消费者轮询接收消息。
其他的工作模式大致步骤:
生产者:
(1) 创建连接工厂
(2) 创建连接
(3) 声明通道
(4) 声明交换机
(5) 声明队列
(6) 队列绑定交换机(生产者中指定routingkey的地方无需绑定)
(7) 发送消息
消费者:
(1) 创建连接工厂
(2) 创建连接
(3) 声明通道
(4) 声明交换机
(5) 声明队列
(6) 队列绑定交换机
(7) 监听并处理消息
2、 publish/subscribe(交换机类型-fanout)
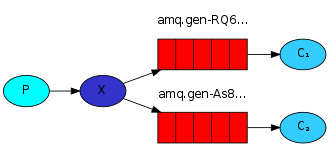
这种模式下较work queue模式增加了交换机,区别是每一个消费者都会收到生产者的消息。
生产者:
(1)这种模式下的交换类型是fanout,声明交换机处指定:
channel.exchangeDeclare(EXCHANGE_FANOUT_INFORM, BuiltinExchangeType.FANOUT);
(2)多个通道,需声明多个通道:
/**
			 * 声明队列,如果rabbit没有此队列则自动创建。
			 * queue:队列名称
			 * durable:是否持久化
			 * exclusive:队列是否独占此连接
			 * autoDelete:队列不再使用时是否自动删除此队列
			 * arguments:队列参数
			 */
			channel.queueDeclare(QUEUE_INFORM_EMAIL,true,false,false,null);
			channel.queueDeclare(QUEUE_INFORM_SMS,true,false,false,null);
(3)多个队列绑定交换机
/**
			   *  交换机与队列绑定
			 * queue 队列名称
			 * exchange 交换机名称
			 * routingKey 路由key
			 */
			channel.queueBind(QUEUE_INFORM_EMAIL, EXCHANGE_FANOUT_INFORM, "");
			channel.queueBind(QUEUE_INFORM_SMS, EXCHANGE_FANOUT_INFORM, "");
消费者(创建多个消费者):
声明交换机:
channel.exchangeDeclare(EXCHANGE_FANOUT_INFORM, BuiltinExchangeType.FANOUT);
队列绑定交换机:
channel.queueBind(QUEUE_INFORM_EMAIL, EXCHANGE_FANOUT_INFORM, "");
多个消费者定义多个。。。
3、 routing(交换机类型-direct)
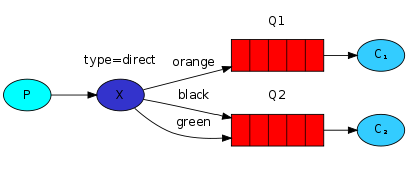
它同publish/ subscribe不同在于,它可以指定routingkey,每个通道可以绑定多个routingkey,根据routingkey来接收生产者的消息,只有生产者和消费者声明的routingkey一致才能收到消息。
生产者:
(1)这种模式下,交换机声明类型是direct
/**
			   *  声明交换机
			 * exchange
			 * BuiltinExchangeType type:
			 */
channel.exchangeDeclare(EXCHANGE_DIRECT_INFORM, BuiltinExchangeType.DIRECT);
(2)发送消息指定routingkey
/**
				 * 向交换机发送消息
				 * exchange
				 * routingKey
				 * props
				 * body
				 */
				channel.basicPublish(EXCHANGE_DIRECT_INFORM, QUEUE_INFORM_EMAIL, null, message.getBytes());
消费者(多个消费者声明多个消费者类):
声明交换机、队列和交换机绑定同生产者。
这种模式下可以实现publish/subscribe模式,即将所有的通道上都指定相同的routingkey。
4、 topic(交换机类型-topic)
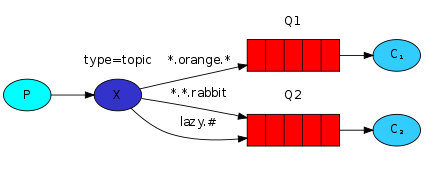
Topic模式是通过通配符匹配,*代表一个单词,#代表零个或多个单词,.表示分隔符。Routingkey最多255个字节。
生产者:
声明交换机的模式是topic:
/**
			 *  声明交换机
			 * exchange
			 * BuiltinExchangeType type:
			 */
channel.exchangeDeclare(EXCHANGE_TOPIC_INFORM, BuiltinExchangeType.TOPIC);
/**
				 * 向交换机发送消息
				 * exchange
				 * routingKey
				 * props
				 * body
				 */
channel.basicPublish(EXCHANGE_TOPIC_INFORM, "inform.sms", null, message.getBytes());
channel.basicPublish(EXCHANGE_TOPIC_INFORM, "inform.email", null, message.getBytes());
channel.basicPublish(EXCHANGE_TOPIC_INFORM, "inform.sms.email",null, message.getBytes());
消费者:
交换机与队列绑定
channel.queueBind(QUEUE_INFORM_EMAIL, EXCHANGE_TOPIC_INFORM, "inform.#.email.#");
这种模式下可以通过routing模式实现。
5、 headers(交换机类型-headers)
这种模式下是通过队列和map键值对来匹配的。无需指定routingkey
生产者:
/**
			   *  声明交换机
			 * exchange
			 * BuiltinExchangeType type:
			 */
channel.exchangeDeclare(EXCHANGE_HEADERS_INFORM, BuiltinExchangeType.HEADERS);
/**
			 * 交换机与队列绑定
			 * queue
			 * exchange
			 * routingKey
			 * Map<String, Object> arguments
			 */
			Map<String,Object> headers_email = new Hashtable<>();
			headers_email.put("inform_type", "email");
			Map<String,Object> headers_sms = new Hashtable<>();
			headers_sms.put("inform_type", "sms");
channel.queueBind(QUEUE_INFORM_EMAIL, EXCHANGE_HEADERS_INFORM, "",headers_email);
channel.queueBind(QUEUE_INFORM_SMS, EXCHANGE_HEADERS_INFORM, "", headers_sms);
/**
				 * 向交换机发送消息
				 * exchange
				 * routingKey
				 * AMQP.BasicProperties props
				 * body
				 */
				Map<String,Object> headers = new Hashtable<>();
				headers.put("inform_type", "email");
				AMQP.BasicProperties.Builder props = new AMQP.BasicProperties.Builder();
				props.headers(headers);
				channel.basicPublish(EXCHANGE_HEADERS_INFORM, "", props.build(), message.getBytes());
消费者:
队列和交换机绑定:
		Map<String,Object> headers_email = new Hashtable<>();
		headers_email.put("inform_type", "email");
		channel.queueBind(QUEUE_INFORM_EMAIL, EXCHANGE_TOPIC_INFORM, "",headers_email);
6、RPC
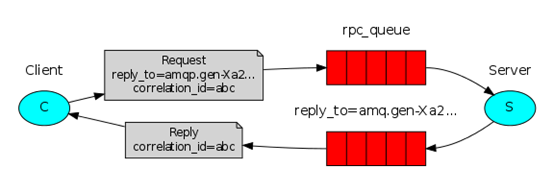
如果需要远程调用一个方法并等待返回结果,这种模式成为远程过程调用模式。这种模式下服务端即是生产者又是消费者。适用于需要返回结果的异步请求。
四、Springboot+rabbitmq
一、环境创建
生产者和消费者的项目pom引入依赖:
<dependency>
  		<groupId>org.springframework.boot</groupId>
  		<artifactId>spring-boot-starter-amqp</artifactId>
  	</dependency>
  	<dependency>
      <groupId>org.springframework.boot</groupId>
      <artifactId>spring-boot-starter-test</artifactId>
</dependency>
application.yml中:
server:
   port: 41007
spring:
   application:
      name: test-rabbitmq-consumer
   rabbitmq:
      host: 127.0.0.1
      port: 5672
      username: guest
      password: guest
      virtualHost: /
应用启动类:
@SpringBootApplication
public class RabbitmqApp {
	public static void main(String[] args) {
		SpringApplication.run(RabbitmqApp.class, args);
	}
}
二、生产、消费配置类
/**
 * All rights Reserved, Designed By www.tydic.com
 * @Title:  RabbitmqConfig.java
 * @Package com.songder.rabbitmq.config
 * @Description:    描述
 * @author: Ys
 * @date:   2019年11月27日 上午9:18:07
 * @version V1.0
 * @Copyright:
 */
package com.songder.rabbitmq.config;

import org.springframework.amqp.core.Binding;
import org.springframework.amqp.core.BindingBuilder;
import org.springframework.amqp.core.Exchange;
import org.springframework.amqp.core.ExchangeBuilder;
import org.springframework.amqp.core.Queue;
import org.springframework.beans.factory.annotation.Qualifier;
import org.springframework.context.annotation.Bean;
import org.springframework.context.annotation.Configuration;

/**
 * @ClassName:  RabbitmqConfig
 * @Description: rabbitmq消费者配置类
 * @author: Ys
 * @date:   2019年11月27日 上午9:18:07
 * @Copyright:
 */
@Configuration
public class RabbitmqConfig {

	public static final String QUEUE_INFORM_EMAIL = "queue_inform_email";
	public static final String QUEUE_INFORM_SMS = "queue_inform_sms";
	public static final String EXCHANGE_TOPIC_SPRINGBOOT_INFORM = "exchange_topic_springboot_inform";
	public static final String ROUTING_EMAIL ="inform.#.email.#";
	public static final String ROUTING_SMS ="inform.#.sms.#";

	/**
	 *
	 * @Title: EXCHANGE_TOPIC_SPRINGBOOT_INFORM
	 * @Description: 定义交换机
	 * @return
	 * @author Ys
	 * @date 2019-11-27 09:31:40
	 */
	@Bean(EXCHANGE_TOPIC_SPRINGBOOT_INFORM)
	public Exchange EXCHANGE_TOPIC_SPRINGBOOT_INFORM() {
		//durable(true)持久化,mq启动后交换机持久化
		return ExchangeBuilder.topicExchange(EXCHANGE_TOPIC_SPRINGBOOT_INFORM).durable(true).build();
	}
	/**
	 *
	 * @Title: QUEUE_INFORM_EMAIL
	 * @Description: 声明队列1
	 * @return
	 * @author Ys
	 * @date 2019-11-27 09:34:57
	 */
	@Bean(QUEUE_INFORM_EMAIL)
	public Queue QUEUE_INFORM_EMAIL() {
		Queue queue = new Queue(QUEUE_INFORM_EMAIL);
		return queue;
	}
	/**
	 *
	 * @Title: QUEUE_INFORM_SMS
	 * @Description: 声明队列2
	 * @return
	 * @author Ys
	 * @date 2019-11-27 09:35:23
	 */
	@Bean(QUEUE_INFORM_SMS)
	public Queue QUEUE_INFORM_SMS() {
		Queue queue = new Queue(QUEUE_INFORM_SMS);
		return queue;
	}

	/**
	 *
	 * @Title: BIND_QUEUE_INFORM_EMAIL
	 * @Description: email绑定交换机
	 * @param queue
	 * @param exchange
	 * @return
	 * @author Ys
	 * @date 2019-11-27 09:45:34
	 */
	@Bean
	public Binding BINDING_ROUTING_EMAIL(@Qualifier(QUEUE_INFORM_EMAIL)Queue queue,
			@Qualifier(EXCHANGE_TOPIC_SPRINGBOOT_INFORM)Exchange exchange) {
		return BindingBuilder.bind(queue).to(exchange).with(ROUTING_EMAIL).noargs();
	}
	/**
	 *
	 * @Title: BIND_QUEUE_INFORM_EMAIL
	 * @Description:sms绑定交换机
	 * @param queue
	 * @param exchange
	 * @return
	 * @author Ys
	 * @date 2019-11-27 09:45:34
	 */
	@Bean
	public Binding BINDING_ROUTING_SMS(@Qualifier(QUEUE_INFORM_SMS)Queue queue,
			@Qualifier(EXCHANGE_TOPIC_SPRINGBOOT_INFORM)Exchange exchange) {
		return BindingBuilder.bind(queue).to(exchange).with(ROUTING_SMS).noargs();
	}

}
三、生产测试类
import org.junit.Test;
import org.junit.runner.RunWith;
import org.slf4j.Logger;
import org.slf4j.LoggerFactory;
import org.springframework.amqp.rabbit.core.RabbitTemplate;
import org.springframework.beans.factory.annotation.Autowired;
import org.springframework.boot.test.context.SpringBootTest;
import org.springframework.test.context.junit4.SpringRunner;

import com.songder.rabbitmq.config.RabbitmqConfig;

/**
 * @ClassName:  Producer05_topic_springboot
 * @Description:
 * @author: Ys
 * @date:   2019年11月27日 上午10:01:52
 * @Copyright:
 */
@SpringBootTest
@RunWith(SpringRunner.class)
public class Producer05_topic_springboot {

	@Autowired
	RabbitTemplate rabbitTemplate;
	Logger logger = LoggerFactory.getLogger(Producer05_topic_springboot.class);

	@Test
	public void testSendByTopic() {
		for(int i=0;i<5;i++) {
			String message = "inform to user"+i;
			rabbitTemplate.convertAndSend(RabbitmqConfig.EXCHANGE_TOPIC_SPRINGBOOT_INFORM,"inform.sms.email", message);
			logger.info(message+i);
		}
	}


}
四、消费监听类
import org.springframework.amqp.core.Message;
import org.springframework.amqp.rabbit.annotation.RabbitListener;
import org.springframework.stereotype.Component;

import com.rabbitmq.client.Channel;
import com.songder.rabbitmq.config.RabbitmqConfig;

/**
 * @ClassName:  ReceiveHandler
 * @Description: 消费
 * @author: Ys
 * @date:   2019年11月27日 上午10:39:14
 * @Copyright:
 */
@Component
public class ReceiveHandler {

	@RabbitListener(queues= {RabbitmqConfig.QUEUE_INFORM_EMAIL})
	public void receiveEmail(String message) {
		System.out.println(message);
	}

	@RabbitListener(queues= {RabbitmqConfig.QUEUE_INFORM_SMS})
	public void receiveSms(String message,Message msg,Channel channel) {
		System.out.println(message);
	}
}


 3562
3562


 被折叠的 条评论
为什么被折叠?
被折叠的 条评论
为什么被折叠?
 到【灌水乐园】发言


