


 本教程指导如何使用Node.js设备SDK在Windows计算机上创建并预配一个带有TPM模拟器的IoT模拟设备到IoT中心。
快速入门:使用适用于 IoT 中心设备预配服务的 Node.js 设备 SDK 创建和预配模拟的 TPM 设备Quickstart: Create and provision a simulated TPM device using Node.js device SDK for IoT Hub Device Provisioning Service
09/30/2020
本文内容
在本快速入门中,我们在 Windows 计算机上创建一台模拟 IoT 设备。In this quickstart, you create a simulated IoT device on a Windows computer. 此模拟设备包含用作硬件安全模块 (HSM) 的 TPM 模拟器。The simulated device includes a TPM simulator as a Hardware Security Module (HSM). 我们使用设备预配服务 (DPS) 的单个注册,通过设备示例 Node.js 代码将此模拟设备连接到 IoT 中心。You use device sample Node.js code to connect this simulated device with your IoT hub using an individual enrollment with the Device Provisioning Service (DPS).
先决条件Prerequisites
备注
初始的设备孪生状态配置仅在 IoT 中心的标准层中提供。The initial device twin state configuration is available only in the standard tier of IoT Hub. 有关基本和标准 IoT 中心层的详细信息,请参阅如何选择合适的 IoT 中心层。For more information about the basic and standard IoT Hub tiers, see How to choose the right IoT Hub tier.
准备环境Prepare the environment
Make sure you have Node.js v4.0 or above installed on your machine.
确保在计算机上安装 git 并将其添加到可供命令窗口访问的环境变量。Make sure git is installed on your machine and is added to the environment variables accessible to the command window. 请参阅软件自由保护组织提供的 Git 客户端工具,了解要安装的最新版 git 工具,其中包括 Git Bash,这是一个命令行应用,可以用来与本地 Git 存储库交互。See Software Freedom Conservancy's Git client tools for the latest version of git tools to install, which includes the Git Bash, the command-line app that you can use to interact with your local Git repository.
模拟 TPM 设备Simulate a TPM device
打开命令提示符或 Git Bash。Open a command prompt or Git Bash. 克隆 azure-utpm-c GitHub 存储库:Clone the azure-utpm-c GitHub repo:
git clone https://github.com/Azure/azure-utpm-c.git --recursive
导航到 GitHub 根文件夹,运行 TPM 模拟器。Navigate to the GitHub root folder and run the TPM simulator. 该模拟器通过套接字在端口 2321 和 2322 上进行侦听。It listens over a socket on ports 2321 and 2322. 请勿关闭此命令窗口;本快速入门指南自始至终都需让该模拟器保持运行状态:Do not close this command window; you need to keep this simulator running until the end of this quickstart guide:
.\azure-utpm-c\tools\tpm_simulator\Simulator.exe
新建名为 registerdevice 的空文件夹。Create a new empty folder called registerdevice. 在 registerdevice 文件夹的命令提示符处,使用以下命令创建 package.json 文件。In the registerdevice folder, create a package.json file using the following command at your command prompt. 确保回答 npm 提问的所有问题,或者接受默认设置(如果适合):Make sure to answer all questions asked by npm or accept the defaults if they suit you:
npm init
安装以下前提包:Install the following precursor packages:
npm install node-gyp -g
npm install ffi -g
备注
安装上述包时存在一些已知问题。There are some known issues to installing the above packages. 若要解决这些问题,请使用命令提示符在“以管理员身份运行”模式下运行 npm install --global --production windows-build-tools,在将路径替换为已安装版本后运行 SET VCTargetsPath=C:\Program Files (x86)\MSBuild\Microsoft.Cpp\v4.0\V140,然后重新运行上述安装命令。To resolve these issues, run npm install --global --production windows-build-tools using a command prompt in Run as administrator mode, run SET VCTargetsPath=C:\Program Files (x86)\MSBuild\Microsoft.Cpp\v4.0\V140 after replacing the path with your installed version, and then rerun the above installation commands.
安装以下包,其中包含在注册过程中使用过的组件:Install the following packages containing the components used during registration:
适用于 TPM 的安全客户端:azure-iot-security-tpma security client that works with TPM: azure-iot-security-tpm
设备的传输,用于连接到设备预配服务:azure-iot-provisioning-device-http 或 azure-iot-provisioning-device-amqpa transport for the device to connect to the Device Provisioning Service: either azure-iot-provisioning-device-http or azure-iot-provisioning-device-amqp
将要使用传输的客户端和安全客户端:azure-iot-provisioning-devicea client to use the transport and security client: azure-iot-provisioning-device
注册设备以后,即可使用常用的 IoT 中心设备客户端包通过在注册过程中提供的凭据来连接设备。Once the device is registered, you can use the usual IoT Hub Device Client packages to connect the device using the credentials provided during registration. 将需要以下项:You will need:
设备客户端:azure-iot-devicethe device client: azure-iot-device
一个传输:azure-iot-device-amqp、azure-iot-device-mqtt、azure-iot-device-http 中的任一项a transport: any of azure-iot-device-amqp, azure-iot-device-mqtt, or azure-iot-device-http
已安装的安全客户端:azure-iot-security-tpmthe security client that you already installed: azure-iot-security-tpm
备注
下面的示例使用 azure-iot-provisioning-device-http 和 azure-iot-device-mqtt 传输。The samples below use the azure-iot-provisioning-device-http and azure-iot-device-mqtt transports.
可以在 registerdevice 文件夹中的命令提示符处运行以下命令,一次性安装所有这些包:You can install all of these packages at once by running the following command at your command prompt in the registerdevice folder:
npm install --save azure-iot-device azure-iot-device-mqtt azure-iot-security-tpm azure-iot-provisioning-device-http azure-iot-provisioning-device
在 registerdevice 文件夹中,使用文本编辑器创建新的 ExtractDevice.js 文件。Using a text editor, create a new ExtractDevice.js file in the registerdevice folder.
在 ExtractDevice.js 文件的开头添加以下 require 语句:Add the following require statements at the start of the ExtractDevice.js file:
'use strict';
var tpmSecurity = require('azure-iot-security-tpm');
var tssJs = require("tss.js");
var myTpm = new tpmSecurity.TpmSecurityClient(undefined, new tssJs.Tpm(true));
添加以下函数以实现该方法:Add the following function to implement the method:
myTpm.getEndorsementKey(function(err, endorsementKey) {
if (err) {
console.log('The error returned from get key is: ' + err);
} else {
console.log('the endorsement key is: ' + endorsementKey.toString('base64'));
myTpm.getRegistrationId((getRegistrationIdError, registrationId) => {
if (getRegistrationIdError) {
console.log('The error returned from get registration id is: ' + getRegistrationIdError);
} else {
console.log('The Registration Id is: ' + registrationId);
process.exit();
}
});
}
});
保存并关闭 ExtractDevice.js 文件。Save and close the ExtractDevice.js file. 运行示例:Run the sample:
node ExtractDevice.js
输出窗口会显示进行设备注册所需的“认可密钥”和“注册 ID” 。The output window displays the Endorsement key and the Registration ID needed for device enrollment. 记下这些值。Note down these values.
创建设备条目Create a device entry
Azure IoT 设备预配服务支持两类注册:The Azure IoT Device Provisioning Service supports two types of enrollments:
注册组:用于注册多个相关设备。Enrollment groups: Used to enroll multiple related devices.
单个注册:用于注册单个设备。Individual enrollments: Used to enroll a single device.
本文演示单个注册。This article demonstrates individual enrollments.
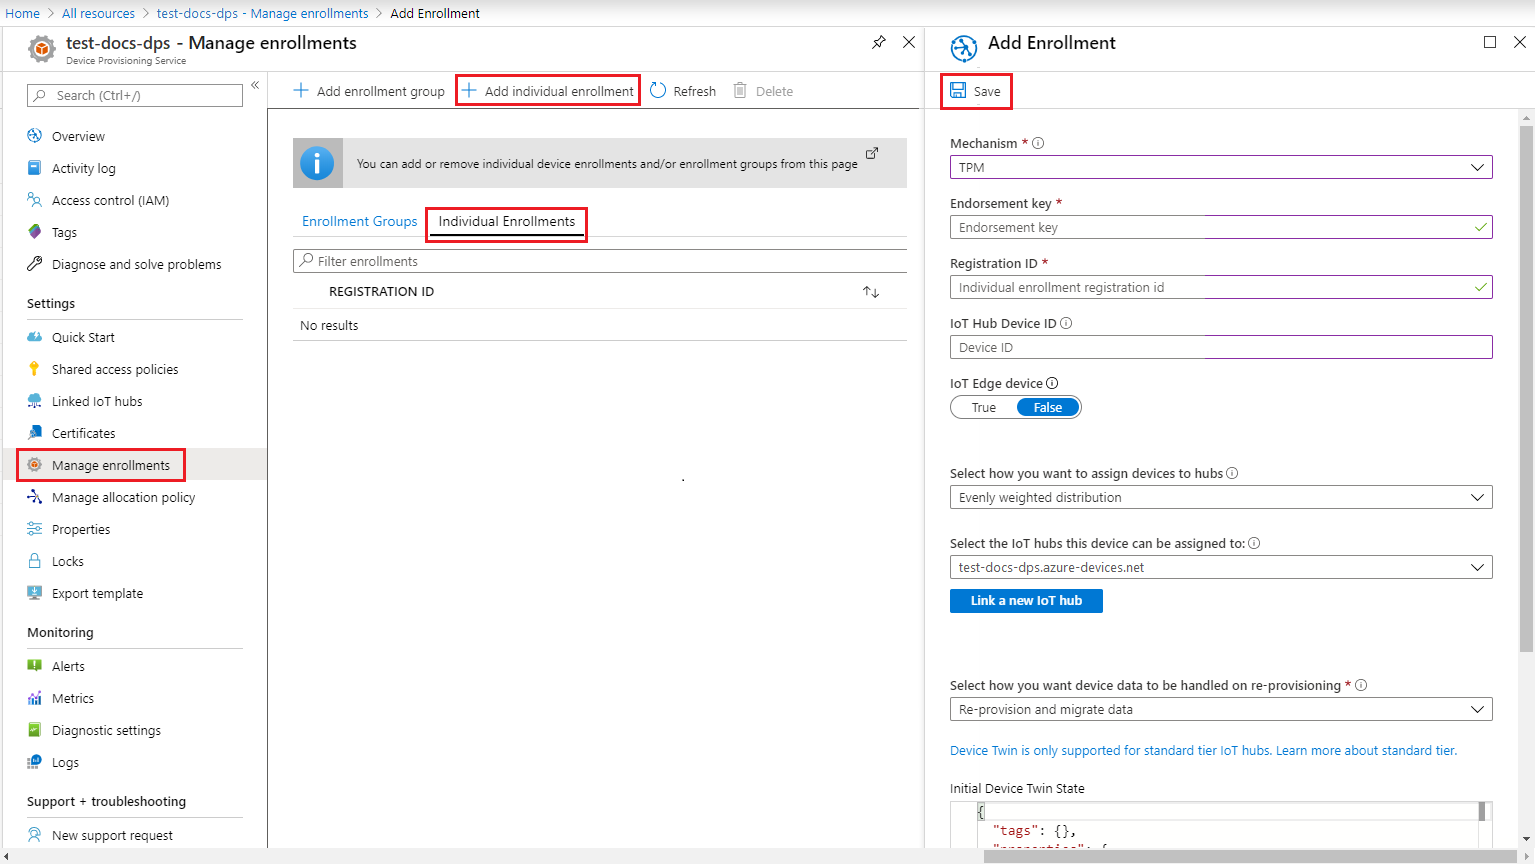
登录到 Azure 门户,选择左侧菜单上的“所有资源”按钮,打开设备预配服务。Sign in to the Azure portal, select the All resources button on the left-hand menu and open your Device Provisioning service.
在“设备预配服务”菜单中,选择“管理注册”。From the Device Provisioning Service menu, select Manage enrollments. 选择“个人注册”选项卡,然后选择顶部的“添加个人注册”按钮 。Select Individual Enrollments tab and select the Add individual enrollment button at the top.
在“添加注册”面板中,输入以下信息:In the Add Enrollment panel, enter the following information:
选择“TPM”作为标识证明 机制。Select TPM as the identity attestation Mechanism.
使用你之前记下的值输入 TPM 设备的“注册 ID”和“认可密钥” 。Enter the Registration ID and Endorsement key for your TPM device from the values you noted previously.
选择与预配服务链接的 IoT 中心。Select an IoT hub linked with your provisioning service.
(可选)可以提供以下信息:Optionally, you may provide the following information:
输入唯一“设备 ID”。Enter a unique Device ID. 为设备命名时,请确保避免使用敏感数据。Make sure to avoid sensitive data while naming your device. 如果选择不提供此项,则系统将改用注册 ID 来标识设备。If you choose not to provide one, the registration ID will be used to identify the device instead.
使用设备所需的初始配置更新“初始设备孪生状态”。Update the Initial device twin state with the desired initial configuration for the device.
完成后,按“保存”按钮。Once complete, press the Save button.
成功注册以后,设备的“注册 ID”显示在“单个注册”选项卡下的列表中。On successful enrollment, the Registration ID of your device appears in the list under the Individual Enrollments tab.
注册设备Register the device
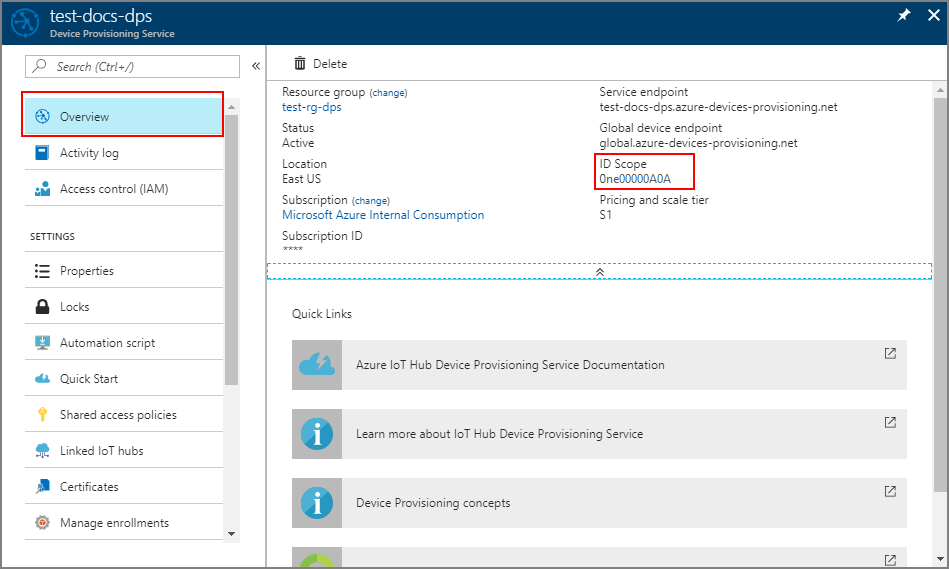
在 Azure 门户中,选择设备预配服务的“概览”边栏选项卡,记下“全局设备终结点”和“ID 范围”的值。In the Azure portal, select the Overview blade for your Device Provisioning service and note the Global Device Endpoint and ID Scope values.
在 registerdevice 文件夹中,使用文本编辑器创建新的 RegisterDevice.js 文件。Using a text editor, create a new RegisterDevice.js file in the registerdevice folder.
在 RegisterDevice.js 文件的开头添加以下 require 语句:Add the following require statements at the start of the RegisterDevice.js file:
'use strict';
var ProvisioningTransport = require('azure-iot-provisioning-device-http').Http;
var iotHubTransport = require('azure-iot-device-mqtt').Mqtt;
var Client = require('azure-iot-device').Client;
var Message = require('azure-iot-device').Message;
var tpmSecurity = require('azure-iot-security-tpm');
var ProvisioningDeviceClient = require('azure-iot-provisioning-device').ProvisioningDeviceClient;
备注
用于 Node.js 的 Azure IoT SDK 支持其他协议,例如 AMQP、AMQP WS、MQTT WS。The Azure IoT SDK for Node.js supports additional protocols like AMQP, AMQP WS, and MQTT WS.
添加 globalDeviceEndpoint 和 idScope 变量,使用它们创建 ProvisioningDeviceClient 实例。Add globalDeviceEndpoint and idScope variables and use them to create a ProvisioningDeviceClient instance. 将 {globalDeviceEndpoint} 和 {idScope} 替换为 步骤 1 中的“全局设备终结点”和“ID 范围”的值:Replace {globalDeviceEndpoint} and {idScope} with the Global Device Endpoint and ID Scope values from Step 1:
var provisioningHost = '{globalDeviceEndpoint}';
var idScope = '{idScope}';
var tssJs = require("tss.js");
var securityClient = new tpmSecurity.TpmSecurityClient('', new tssJs.Tpm(true));
// if using non-simulated device, replace the above line with following:
//var securityClient = new tpmSecurity.TpmSecurityClient();
var provisioningClient = ProvisioningDeviceClient.create(provisioningHost, idScope, new ProvisioningTransport(), securityClient);
添加以下函数,实现设备上的方法:Add the following function to implement the method on the device:
provisioningClient.register(function(err, result) {
if (err) {
console.log("error registering device: " + err);
} else {
console.log('registration succeeded');
console.log('assigned hub=' + result.registrationState.assignedHub);
console.log('deviceId=' + result.registrationState.deviceId);
var tpmAuthenticationProvider = tpmSecurity.TpmAuthenticationProvider.fromTpmSecurityClient(result.registrationState.deviceId, result.registrationState.assignedHub, securityClient);
var hubClient = Client.fromAuthenticationProvider(tpmAuthenticationProvider, iotHubTransport);
var connectCallback = function (err) {
if (err) {
console.error('Could not connect: ' + err.message);
} else {
console.log('Client connected');
var message = new Message('Hello world');
hubClient.sendEvent(message, printResultFor('send'));
}
};
hubClient.open(connectCallback);
function printResultFor(op) {
return function printResult(err, res) {
if (err) console.log(op + ' error: ' + err.toString());
if (res) console.log(op + ' status: ' + res.constructor.name);
process.exit(1);
};
}
}
});
保存并关闭 RegisterDevice.js 文件。Save and close the RegisterDevice.js file. 运行示例:Run the sample:
node RegisterDevice.js
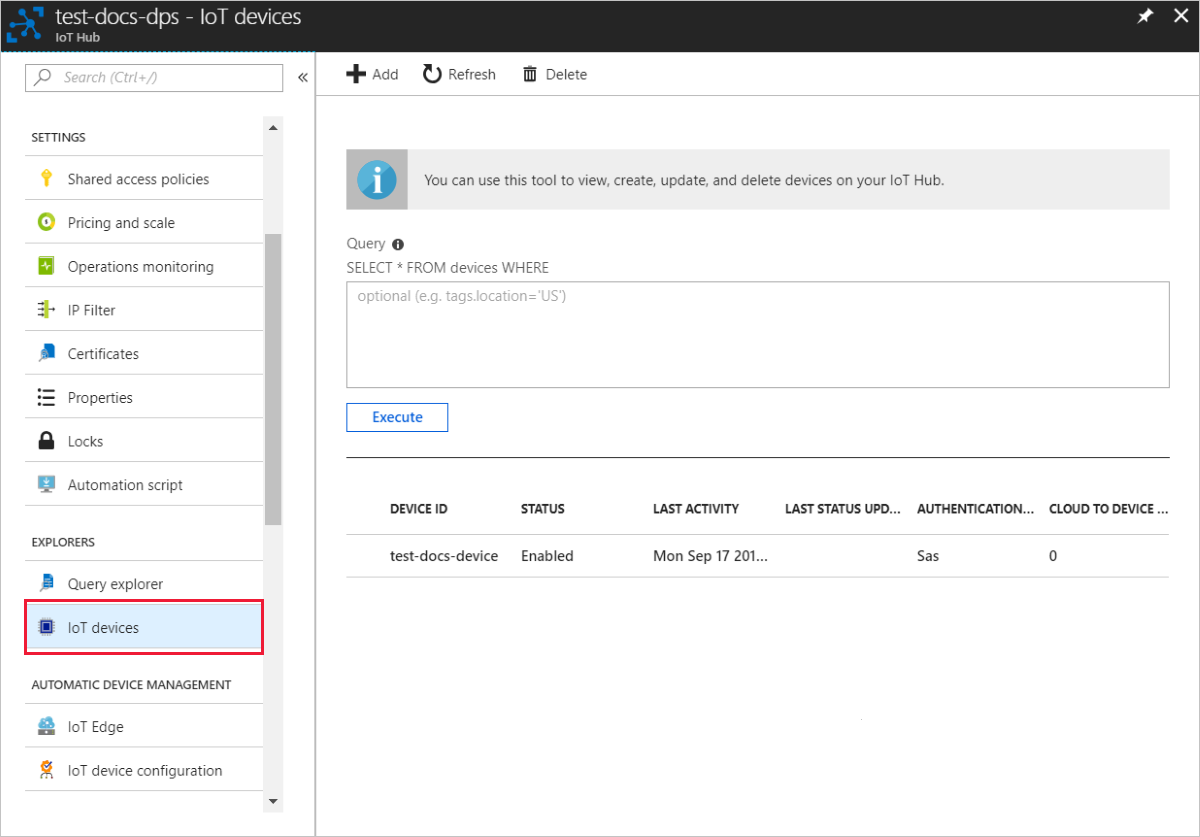
请注意相关消息,这些消息模拟设备启动后连接到设备预配服务以获取 IoT 中心信息的情况。Notice the messages that simulate the device booting and connecting to the Device Provisioning Service to get your IoT hub information. 将模拟设备成功预配到与预配服务链接的 IoT 中心以后,设备 ID 会显示在该中心的“IoT 设备”边栏选项卡上。On successful provisioning of your simulated device to the IoT hub linked with your provisioning service, the device ID appears on the hub's IoT devices blade.
如果从设备的注册项中的默认值更改了“初始设备孪生状态”,则它会从中心拉取所需的孪生状态,并执行相应的操作。If you changed the initial device twin state from the default value in the enrollment entry for your device, it can pull the desired twin state from the hub and act accordingly.
清理资源Clean up resources
如果打算继续使用和探索设备客户端示例,请勿清理在本快速入门中创建的资源。If you plan to continue working on and exploring the device client sample, do not clean up the resources created in this quickstart. 如果不打算继续学习,请按以下步骤删除本快速入门中创建的所有资源。If you do not plan to continue, use the following steps to delete all resources created by this quickstart.
关闭计算机上的设备客户端示例输出窗口。Close the device client sample output window on your machine.
关闭计算机上的 TPM 模拟器窗口。Close the TPM simulator window on your machine.
在 Azure 门户的左侧菜单中选择“所有资源”,然后选择设备预配服务。From the left-hand menu in the Azure portal, select All resources and then select your Device Provisioning service. 打开服务的“管理注册”边栏选项卡,然后选择“单个注册”选项卡 。选中在本快速入门中注册的设备的“注册 ID”旁边的复选框,然后按窗格顶部的“删除”按钮。Open the Manage Enrollments blade for your service, and then select the Individual Enrollments tab. Select the check box next to the REGISTRATION ID of the device you enrolled in this quickstart, and press the Delete button at the top of the pane.
在 Azure 门户的左侧菜单中选择“所有资源”,然后选择 IoT 中心。From the left-hand menu in the Azure portal, select All resources and then select your IoT hub. 打开中心的“IoT 设备”边栏选项卡,选中在本快速入门中注册的设备的“设备 ID”旁边的复选框,然后按窗格顶部的“删除”按钮。Open the IoT devices blade for your hub, select the check box next to the DEVICE ID of the device you registered in this quickstart, and then press the Delete button at the top of the pane.
后续步骤Next steps
在本快速入门中,你已在计算机上创建 TPM 模拟设备,并已使用 IoT 中心设备预配服务将其预配到 IoT 中心。In this quickstart, you've created a TPM simulated device on your machine and provisioned it to your IoT hub using the IoT Hub Device Provisioning Service. 若要了解如何以编程方式注册 TPM 设备,请继续阅读快速入门中关于 TPM 设备的编程注册内容。To learn how to enroll your TPM device programmatically, continue to the quickstart for programmatic enrollment of a TPM device.


 785
785

 被折叠的 条评论
为什么被折叠?
被折叠的 条评论
为什么被折叠?
 到【灌水乐园】发言


