


1、环境准备
两台CentOS-7主机:node1(主):192.168.137.128,node2(从):192.168.137.129
两台主机均已安装MySQL5.7.31 ,且网络互通
2、配置过程
主从原理大致有三个步骤:
在主库上把数据更改记录到二进制日志中(Binary Log)中,这些记录称为二进制日志事件。
从库通过IO线程将主库上的日志复制到自己的中继日志(Relay Log)中。
从库通过SQL线程读取中继日志中的事件,将其重放到自己数据上。
配置文件确定
配置主库:
修改my.cnf 文件,在[mysqld] 段下添加:
# 服务id
server-id = 1
# 开启mysql binlog功能
log-bin = mysql-bin
# binlog模式
binlog_format = MIXED
配置好后重启mysql服务
[root@swarm-node1 mysql]# cd support-files/
[root@swarm-node1 support-files]# ls
magic mysqld_multi.server mysql-log-rotate mysql.server
[root@swarm-node1 support-files]# ./mysql.server restart
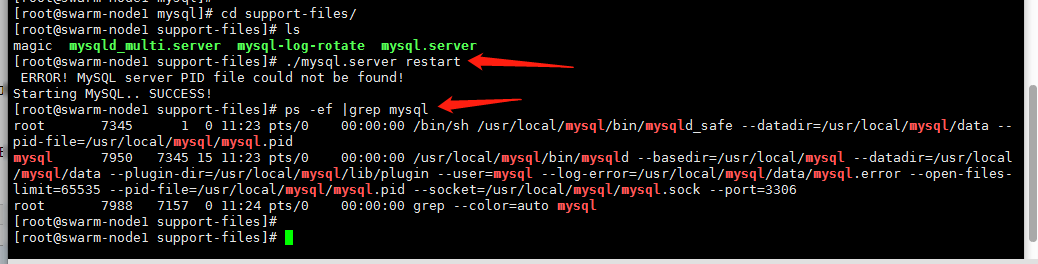
检查data目录是否有binlog日志生成

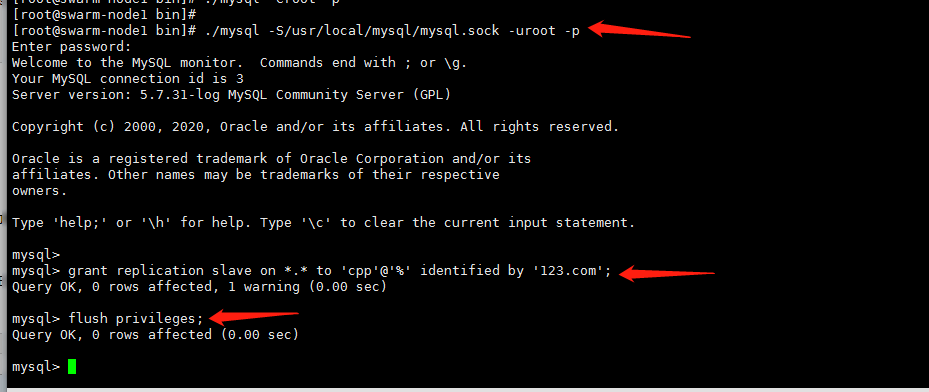
登录主数据库,新建一个复制账号
[root@swarm-node1 bin]# ./mysql -S/usr/local/mysql/mysql.sock -uroot -p
Enter password:
Welcome to the MySQL monitor. Commands end with ; or \g.
Your MySQL connection id is 3
Server version: 5.7.31-log MySQL Community Server (GPL)
Copyright (c) 2000, 2020, Oracle and/or its affiliates. All rights reserved.
Oracle is a registered trademark of Oracle Corporation and/or its
affiliates. Other names may be trademarks of their respective
owners.
Type 'help;' or '\h' for help. Type '\c' to clear the current input statement.
mysql>
mysql> grant replication slave on *.* to 'cpp'@'%' identified by '123.com';
Query OK, 0 rows affected, 1 warning (0.00 sec)
mysql> flush privileges;
Query OK, 0 rows affected (0.00 sec)
mysql>
配置从库:
修改my.cnf 文件,在[mysqld] 段下添加:
# 服务id
server-id = 2
# 开启mysql 启动中继日志
relay-log=relay-log
修改完后重启MySQL
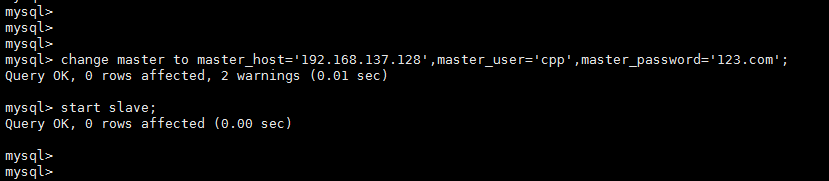
登录从数据库,配置主从
在从库上指定主库地址,以及 同步账号、密码,并启动同步
mysql>
mysql>
mysql> change master to master_host='192.168.137.128',master_user='cpp',master_password='123.com';
Query OK, 0 rows affected, 2 warnings (0.01 sec)
mysql> start slave;
Query OK, 0 rows affected (0.00 sec)
mysql>
mysql>
show slave status\G; 查看从库状态,查看Slave_IO_Running: Yes和 Slave_SQL_Running: Yes 为yes主从配置完成
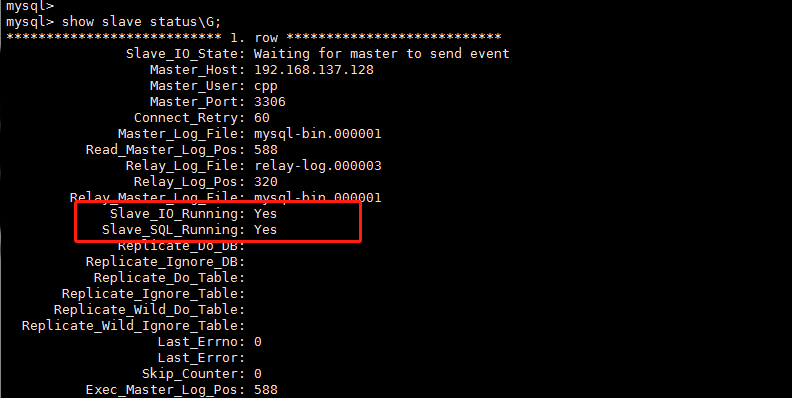
如果启动同步后,第一个为Connecting,第二个为Yes,大部分为连接问题,请检查网络是否通,配置的用户名密码是否正确


 1805
1805


 被折叠的 条评论
为什么被折叠?
被折叠的 条评论
为什么被折叠?
 到【灌水乐园】发言


