


安装MySQL8
安装几个常用的命令。yum -y install wget vim xz lrzsz
安装MySQL依赖包。yum -y install libaio-devel numactl-devel
下载MySQL8并解压wget https://cdn.mysql.com//Downloads/MySQL-8.0/mysql-8.0.13-linux-glibc2.12-x86_64.tar.xz
tar -xvf mysql-8.0.13-linux-glibc2.12-x86_64.tar.xz -C /usr/local/ #需要安装xzcd /usr/local/mv mysql-8.0.13-linux-glibc2.12-x86_64 mysql
创建MySQL数据库以及日志的存放目录:mkdir -p /data/mysql/{data,tmp,binlog,log}touch /data/mysql/log/mysqld-error.log
创建mysql用户并给MySQL目录授权。
MySQL数据库需要以一个普通用户去执行一些操作,因而需要创建一个普通用户,useradd mysql -s /sbin/nologin -M
chown -R mysql.mysql /data/mysql
chown -R mysql.mysql /usr/local/mysql
添加MySQL的环境变量export PATH=$PATH:/usr/local/mysql/bin
echo "export PATH=$PATH:/usr/local/mysql/bin" >> /etc/profile
初始化MySQLmysqld --initialize-insecure --basedir=/usr/local/mysql --datadir=/data/mysql/data --user=mysql

初始化完成。
--initialize 生成随机密码,官方推荐使用
--initialize-insecure 生成空密码,root用户密码默认为空
--basedir MySQL的安装目录,一般放在/usr/local/mysql/
--datadir 数据库的存放路径, 放在比较安全的目录
--user 指定用户去初始化MySQL/data/mysql/error.log | ---29T02::+: [Note] [MY-] [Server] A temporary password is generated root@localhost: wquR3-Kxlg1d
创建MySQL配置文件vim /etc/my.cnf[mysqld]
port=3306
user=mysql
basedir=/usr/local/mysql
datadir=/data/mysql/data
socket=/tmp/mysql.sock
symbolic-links=0
[mysqld_safe]
log-error=/data/mysql/log/mysqld-error.log
pid-file=/data/mysql/mysqld.pid
启动MySQLmysqld_safe --user=mysql &

MySQL启动成功。
通过二进制包安装MySQL8,MySQL启动之后监听了两个端口3306和33060。 这是应为MySQL5.7.12 之后新增了X plugin。
这个插件默认是启用的,可以在配置配置文件/etc/my.cnf 添加mysqlx=0关闭X plugin。
也可以在启动时指定 --mysqlx=0 或 --skip-mysqlx 来禁用X插件。

测试启动成功之后,我们先停止MySQL 。使用MySQL自带的启动脚本来管启动MySQL 并加入到开机自动运行, 方便以后维护。# CentOS
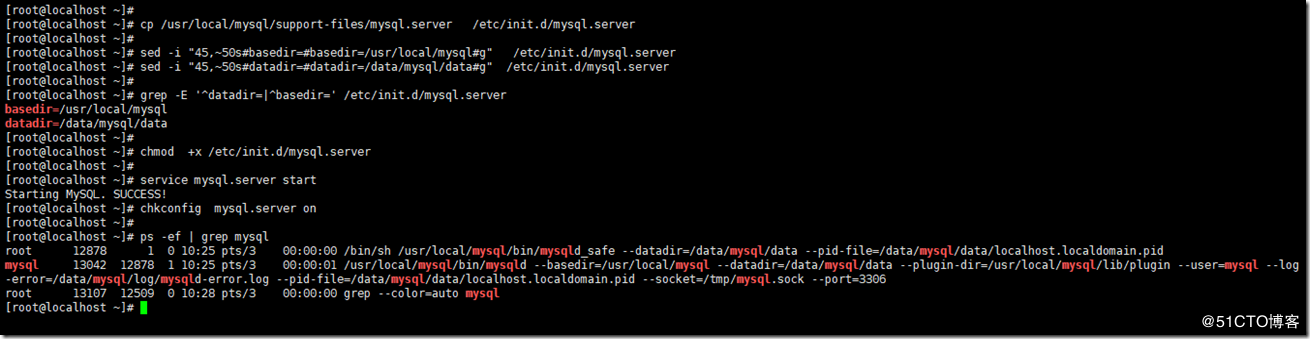
cp /usr/local/mysql/support-files/mysql.server /etc/init.d/mysql.server
sed -i "45,~50s#basedir=#basedir=/usr/local/mysql#g" /etc/init.d/mysql.server
sed -i "45,~50s#datadir=#datadir=/data/mysql/data#g" /etc/init.d/mysql.server
grep -E '^datadir=|^basedir=' /etc/init.d/mysql.server #确认一下我们是否修改成功
chmod +x /etc/init.d/mysql.server
service mysql.server start
chkconfig mysql.server on
#MySQL自带的启动脚本中 basedir和datadir默认都是在/usr/local/mysql/目录下,所以我们要根据自己实际情况去修改。
到这里MySQL就算是安装完成了。
我们简单的对MySQL权限做一下修改。
登录MySQL :
由于我初始化的时候 --initialize-insecure 生成空密码,所以MySQL-client就直接进入到MySQL 。
修改'root'@'localhost' 密码ALTER USER 'root'@'localhost' IDENTIFIED BY 'new_password';
创建'root'@'127.0.0.1'CREATE USER 'root'@'127.0.0.1' IDENTIFIED BY 'root_password';grant all privileges on *.* to 'root'@'127.0.0.1' ;
刷新MySQL权限flush privileges;
[root@localhost ~]# mysql
Welcome to the MySQL monitor. Commands end with ; or \g.
Your MySQL connection id is 8
Server version: 8.0.13 MySQL Community Server - GPL
Copyright (c) 2000, 2018, Oracle and/or its affiliates. All rights reserved.
Oracle is a registered trademark of Oracle Corporation and/or its
affiliates. Other names may be trademarks of their respective
owners.
Type 'help;' or '\h' for help. Type '\c' to clear the current input statement.
mysql> show databases ;
+--------------------+
| Database |
+--------------------+
| information_schema |
| mysql |
| performance_schema |
| sys |
+--------------------+
4 rows in set (0.01 sec)
mysql> ALTER USER 'root'@'localhost' IDENTIFIED BY 'new_password';
Query OK, 0 rows affected (0.11 sec)
mysql> CREATE USER 'root'@'127.0.0.1' IDENTIFIED BY 'root_password';
Query OK, 0 rows affected (0.01 sec)
mysql> grant all privileges on *.* to 'root'@'127.0.0.1' ;
Query OK, 0 rows affected (0.07 sec)
mysql> flush privileges;
Query OK, 0 rows affected (0.01 sec)
mysql> quit
Bye
[root@localhost data]# mysql -uroot -hlocalhost -p
Enter password:
Welcome to the MySQL monitor. Commands end with ; or \g.
Your MySQL connection id is 19Server version: 8.0.13 MySQL Community Server - GPL
Copyright (c) 2000, 2018, Oracle and/or its affiliates. All rights reserved.
Oracle is a registered trademark of Oracle Corporation and/or its
affiliates. Other names may be trademarks of their respective
owners.
Type 'help;' or '\h' for help. Type '\c' to clear the current input statement.
mysql> show databases ;
+--------------------+
| Database |
+--------------------+
| information_schema |
| mysql |
| performance_schema |
| sys |
+--------------------+
4 rows in set (0.01 sec)
mysql> SELECT DISTINCT CONCAT('User: ''',user,'''@''',host,''';') AS query FROM mysql.user;
+---------------------------------------+
| query |
+---------------------------------------+
| User: 'root'@'127.0.0.1'; |
| User: 'mysql.infoschema'@'localhost'; |
| User: 'mysql.session'@'localhost'; |
| User: 'mysql.sys'@'localhost'; |
| User: 'root'@'localhost'; |
+---------------------------------------+
5 rows in set (0.00 sec)
mysql>


 1171
1171


 被折叠的 条评论
为什么被折叠?
被折叠的 条评论
为什么被折叠?
 到【灌水乐园】发言


