


空的气泡控件
Qt5.12.7
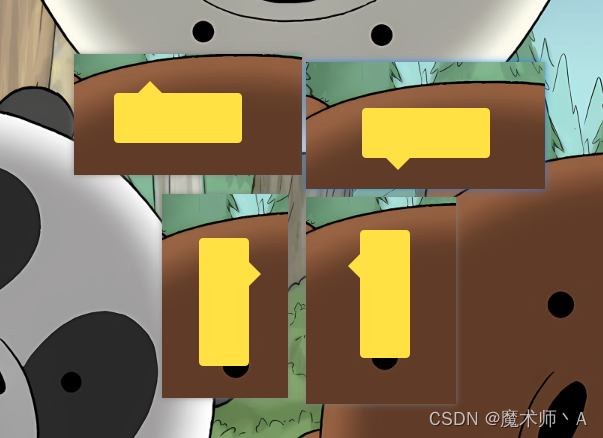
展示
代码
- 头文件
#pragma once
#include <QWidget>
#include <QPaintEvent>
#include <QVBoxLayout>
// A D
// ······················
// | /\ |
// |--------- ---------|
// | |
// | |
// | |
// | |
// | |
// ·--------------------·
// B C
//
// ABCD 组成的大矩形==>气泡Widget;
// 移动时移动A点
// 设置size 也是设置ABCD 整个区域的大小
//
class QWidgetBubble : public QWidget
{
Q_OBJECT
public:
enum Direction {
left,
right,
up,
down,
};
enum IconType
{
complete = 0,
error,
warning,
};
QWidgetBubble(QWidget* parent = nullptr, Direction direct = up, int offset = 24, int triangleWidth = 24, int triangleHeight = 12);
~QWidgetBubble();
// 设置小三角起始位置的偏移;
void setStartOffset(int offset);
// 设置小三角宽和高;
void setTriangleInfo(int width, int height);
// 设置小三角的位置
void setDirection(Direction d);
//设置颜色
void SetColor(const QString & color);
//获取内容Widget,可以在此区域自行添加内容
QWidget* GetContentWidget();
protected:
void paintEvent(QPaintEvent* e) override;
private:
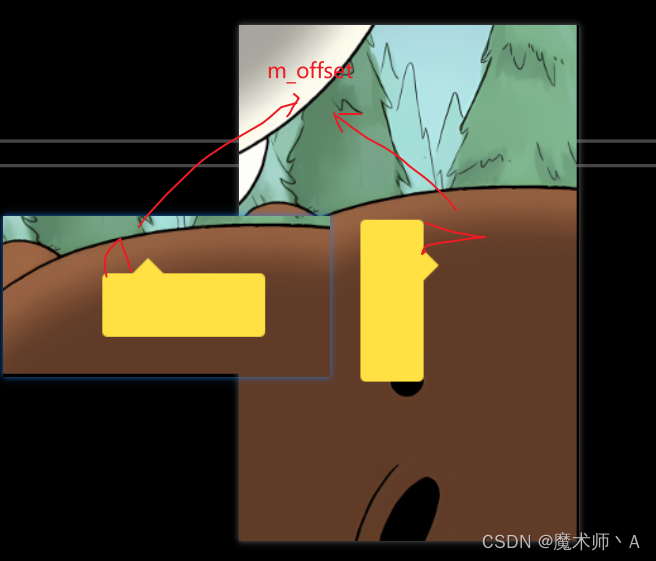
// 小三角的偏移量;
int m_offset;
// 小三角的宽度;
int m_triangleWidth;
// 小三角高度;
int m_triangleHeight;
// 小三角指向方向
Direction m_direct;
//颜色
QString m_color = "#FFE144";
QGridLayout* m_pLayout = nullptr;
QWidget* m_pTriangleWidget = nullptr; //三角
QWidget* m_pContentWidget = nullptr; //内容
};
- 源文件
#include "QWidgetBubble.h"
#include <QWidget>
#include <QPainter>
#include <qcolor.h>


QWidgetBubble::QWidgetBubble(QWidget* parent, Direction direct, int offset, int triangleWidth, int triangleHeight):
QWidget(parent),
m_direct(direct),
m_offset(offset),
m_triangleWidth(triangleWidth),
m_triangleHeight(triangleHeight)
{
	setWindowFlags(Qt::FramelessWindowHint | Qt::WindowStaysOnTopHint);
	setAttribute(Qt::WA_TranslucentBackground);
	setAttribute(Qt::WA_ShowModal);

	m_pLayout = new QGridLayout(this);
	m_pLayout->setContentsMargins(0,0,0,0);
	m_pLayout->setSpacing(0);
	m_pLayout->setHorizontalSpacing(0);
	m_pLayout->setVerticalSpacing(0) ;

	m_pTriangleWidget = new QWidget(this);	 //三角
	m_pContentWidget = new QWidget(this);	 //内容
	m_pContentWidget->setSizePolicy(QSizePolicy::Policy::Preferred, QSizePolicy::Policy::Preferred);
	m_pContentWidget->setMinimumSize(0, 0);
	m_pContentWidget->setMaximumSize(2000, 2000);

	this->setStyleSheet("background: transparent;");
	m_pTriangleWidget->setStyleSheet("background: transparent;");
	m_pContentWidget->setStyleSheet(QString("QWidget{background: %1;border-radius: 4px;}").arg(m_color));


	setDirection(m_direct);
}

QWidgetBubble::~QWidgetBubble()
{

}


void QWidgetBubble::setStartOffset(int offset)
{
	m_offset = offset;
	repaint();
}

void QWidgetBubble::setTriangleInfo(int width, int height)
{
	m_triangleWidth = width;
	m_triangleHeight = height;

	setDirection(m_direct);
}

void QWidgetBubble::setDirection(Direction d)
{
	m_direct = d;

	while (m_pLayout->takeAt(0)) {}

	switch (m_direct)
	{
	case QWidgetBubble::left:
	{
		m_pTriangleWidget->setMinimumSize(m_triangleHeight, 0);
		m_pTriangleWidget->setMaximumSize(m_triangleHeight,2000);
		m_pLayout->addWidget(m_pTriangleWidget, 0, 0);
		m_pLayout->addWidget(m_pContentWidget, 0, 1);
	}
	break;
	case QWidgetBubble::right:
	{
		m_pTriangleWidget->setMinimumSize(m_triangleHeight, 0);
		m_pTriangleWidget->setMaximumSize(m_triangleHeight, 2000);
		m_pLayout->addWidget(m_pContentWidget, 0, 0);
		m_pLayout->addWidget(m_pTriangleWidget, 0, 1);
	}
	break;
	case QWidgetBubble::up:
	{
		m_pTriangleWidget->setMinimumSize(0, m_triangleHeight);
		m_pTriangleWidget->setMaximumSize(2000, m_triangleHeight);
		m_pLayout->addWidget(m_pTriangleWidget, 0, 0);
		m_pLayout->addWidget(m_pContentWidget, 1, 0);
	}
	break;
	case QWidgetBubble::down:
	{
		m_pTriangleWidget->setMinimumSize(0, m_triangleHeight);
		m_pTriangleWidget->setMaximumSize(2000, m_triangleHeight);
		m_pLayout->addWidget(m_pContentWidget, 0, 0);
		m_pLayout->addWidget(m_pTriangleWidget, 1, 0);
	}
	break;
	default:
		break;
	}

	m_pLayout->invalidate();
}

void QWidgetBubble::SetColor(const QString& color)
{
	m_color = color;
	m_pContentWidget->setStyleSheet(QString("QWidget{background: %1;border-radius: 4px;}").arg(m_color));
}

QWidget* QWidgetBubble::GetContentWidget()
{
	return m_pContentWidget;
}

void QWidgetBubble::paintEvent(QPaintEvent *e)
{
	QWidget::paintEvent(e);

	QPainter painter(this);
	painter.setRenderHint(QPainter::Antialiasing, true);
	painter.setPen(Qt::NoPen);
	painter.setBrush(QColor(m_color));

	int p0[2]{ 0 };
	int p1[2]{ 0 };
	int p2[2]{ 0 };

	switch (m_direct)
	{
	case QWidgetBubble::left:
	{
		p0[0] = m_triangleHeight;
		p0[1] = m_offset;

		p1[0] = m_triangleHeight;
		p1[1] = m_offset + m_triangleWidth;

		p2[0] = 0;
		p2[1] = m_offset + (m_triangleWidth / 2);
	}
	break;
	case QWidgetBubble::right:
	{
		QPoint pos = m_pTriangleWidget->pos();

		p0[0] = pos.x();
		p0[1] = m_offset;

		p1[0] = pos.x();
		p1[1] = m_offset + m_triangleWidth;

		p2[0] = pos.x() + m_triangleHeight;
		p2[1] = m_offset + (m_triangleWidth / 2);
	}
	break;
	case QWidgetBubble::up:
	{
		p0[0] = m_offset;
		p0[1] = m_triangleHeight;

		p1[0] = m_offset + m_triangleWidth;
		p1[1] = m_triangleHeight;

		p2[0] = m_offset + (m_triangleWidth / 2);
		p2[1] = 0;
	}
	break;
	case QWidgetBubble::down:
	{
		QPoint pos = m_pTriangleWidget->pos();

		p0[0] = m_offset;
		p0[1] = pos.y();

		p1[0] = m_offset + m_triangleWidth;
		p1[1] = pos.y();

		p2[0] = m_offset + (m_triangleWidth / 2);
		p2[1] = pos.y() + m_triangleHeight;
	}
	break;
	default:
	{
		return ;
	}
	break;
	}

	QPolygon triangle;
	triangle.setPoints(3, p0[0], p0[1], p1[0], p1[1], p2[0], p2[1]);//三点坐标
	painter.drawPolygon(triangle);
}
一种使用方法
	auto pBubble = new QWidgetBubble(nullptr, QWidgetBubble::right);
	pBubble->setGeometry(point.x(), point.y(), 62, 128);

	QWidget* pWidget =  pBubble->GetContentWidget();
	//使用pWidget 实现气泡内的逻辑

	pBubble->show();


 1081
1081


 被折叠的 条评论
为什么被折叠?
被折叠的 条评论
为什么被折叠?
 到【灌水乐园】发言


